JavaWeb学习——事务管理&AOP&原理篇
目录
1.事务管理
1.1事务回顾--spring事务管理
1.2事务进阶--rollbackFor属性
1.3事务进阶--propagation属性
2.AOP(面向切面编程)
2.1AOP基础--快速入门
2.2AOP基础--核心概念
2.3AOP进阶--通知类型
2.4AOP进阶--通知顺序
2.5AOP进阶--切入点表达式--execution
2.6AOP进阶--切入点表达式--@annotation
2.7AOP进阶--连接点
2.8AOP案例--记录操作日志
3.SpringBoot--配置优先级
4.bean的管理
4.1bean的获取
4.2bean的作用域
4.3第三方bean
5.SpringBoot原理
5.1起步依赖
5.2自动配置--概述
5.3自动配置--方案
5.4自动配置--原理分析--源码追踪
5.5自动配置--原理分析--@Conditional
5.6自动配置--原理分析--案例(自定义starter分析)
5.6自动配置--原理分析--案例(自定义starter实现)
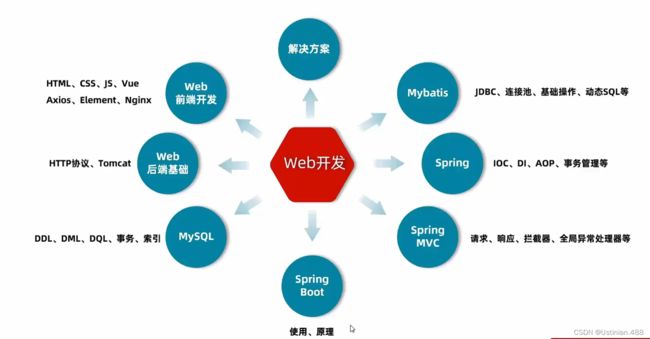
6.Web后端开发--总结
7.maven高级
7.1分模块设计与开发
7.2继承与聚合--继承关系实现
7.3继承与聚合--版本实现
7.4继承与聚合--聚合实现
7.5私服
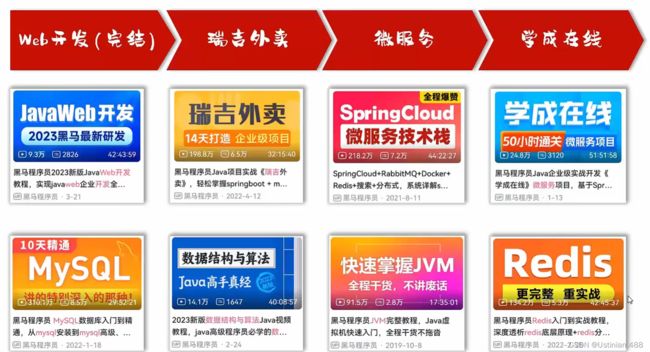
8.Web开发完结
1.事务管理
1.1事务回顾--spring事务管理

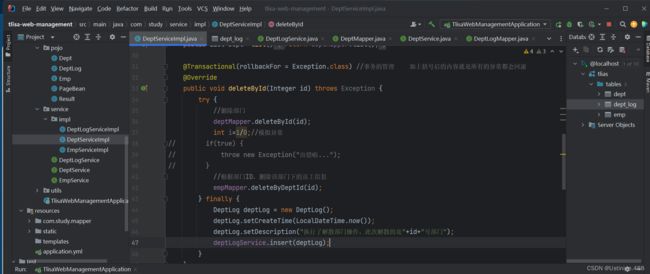
在解散部门时,删除部门,同时要删除该部门下的员工。但是如果在两个操作之间出现异常情况导致两个操作不能同时进行就需要将两步变成一个事务来解决。可以在该方法上加上@Transactional注解。

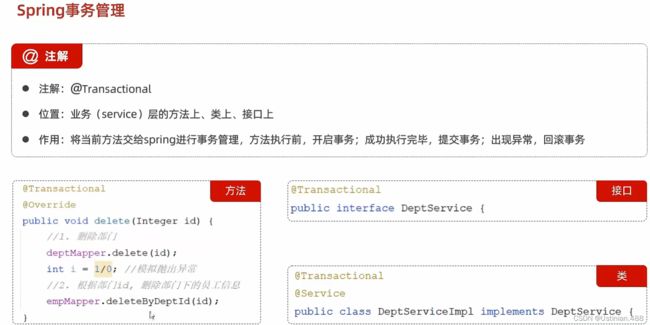

在yml配置文件当中加上配置信息记录事务。
#spring事务管理日志
logging:
  level:
    org.springframework.jdbc.support.JdbcTransactionManager: debug
1.2事务进阶--rollbackFor属性
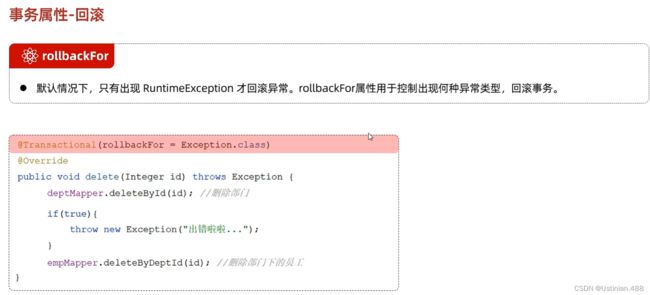
1.3事务进阶--propagation属性
Propagation属性也就是指定几个事务之间的关系,常见的主要是新的事务加入到已有的事务当中(REQUIRED)或者新事物自己重新再开一个属于自己的事务(REQUIRED_NEW)。


由于传播行为默认是REQIURED,新的事务在执行插入操作的时候加入到已有的事务当中,因为已有的事务在执行过程当中出现了异常,所以事务发生回滚导致第二个事务也发生回滚,所以插入日志数据没有写入表中。解决方法就是让第二个事务的传播方式也就是Propagation属性的值为REQUIRED_NEW。


2.AOP(面向切面编程)
2.1AOP基础--快速入门
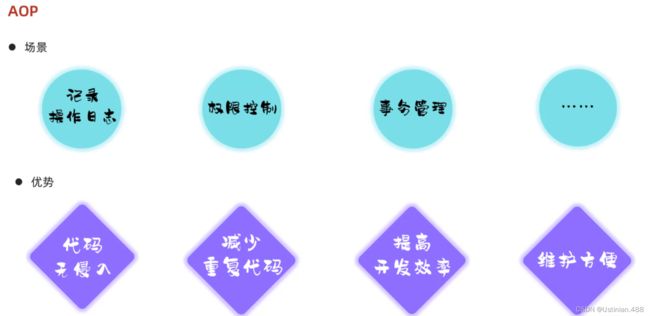
AOP: Aspect Oriented Programming(面向切面编程、面向方面编程),其实就是面向特定方法编程。


2.2AOP基础--核心概念

SpringAOP底层基于动态代理技术实现,程序运行的时候自动基于动态代理技术为目标对象生成对应的代理对象。在代理对象当中就会对目标对象的原始方法进行功能增强,增强的逻辑就是定义的通知。比如首先在方法运行开始之前记录方法运行的开始时间,再来调用原始方法的执行(list方法),接下来在代理对象当中就会实行原始list方法的逻辑,运行完毕之后就会记录方法运行的结束时间,最后统计方法的运行时长。可以看到在代理对象当中就已经对原始方法进行了增强,最终在程序运行的时候往Controller注入的是代理对象,调用的方法也是代理对象的list方法。

 对于AOP执行流程需要注意一点:一旦进行了AOP程序的开发,最终运行的不是原始的目标对象,而是基于目标对象生成的代理对象。
2.3AOP进阶--通知类型


import lombok.extern.slf4j.Slf4j;
import org.aspectj.lang.ProceedingJoinPoint;
import org.aspectj.lang.annotation.*;
import org.springframework.stereotype.Component;

@Slf4j
@Component
@Aspect
public class MyAspect1 {

    @Pointcut("execution(* com.itheima.service.impl.DeptServiceImpl.*(..))")
    public void pt(){};

    @Before("pt()")
    public void before() {
        log.info("before...");
    }

    @Around("pt()")
    public Object around(ProceedingJoinPoint joinPoint) throws Throwable {
        log.info("around before...");

        Object proceed = joinPoint.proceed();

        log.info("around after");
        return proceed;
    }

    @After("pt()")
    public void after() {
        log.info("after...");
    }

    @AfterReturning("pt()")
    public void afterReturning() {
        log.info("afterReturning...");
    }

    @AfterThrowing("pt()")
    public void afterThrowing() {
        log.info("afterThrowing...");
    }
} 
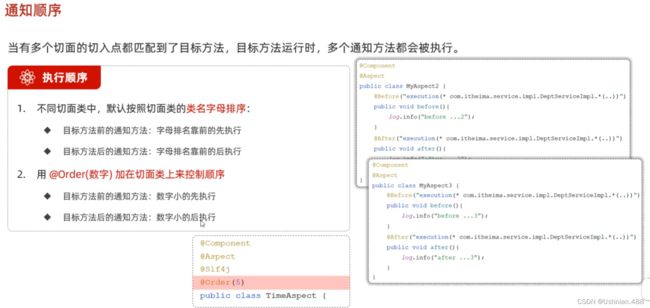
2.4AOP进阶--通知顺序
2.5AOP进阶--切入点表达式--execution


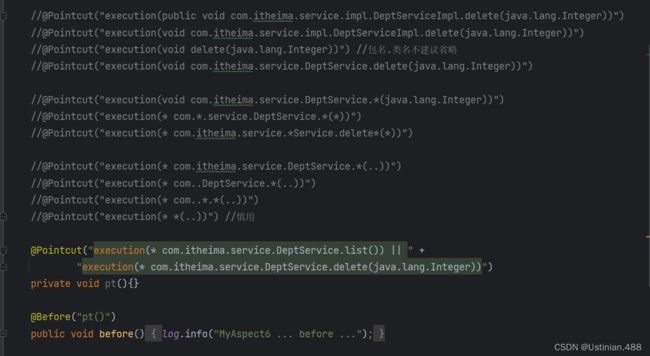
2.6AOP进阶--切入点表达式--@annotation
当需要匹配多个不规则的方法时,使用切入点表达式不方便,需要将两个切入点表达式组合在一起完成,较为繁琐,此时可以使用@annotation切入点表达式描述。

execution切入点表达式根据指定的方法的描述信息来匹配切入点方法,@annotation基于注解的方式匹配切入点方法,较为灵活。

2.7AOP进阶--连接点

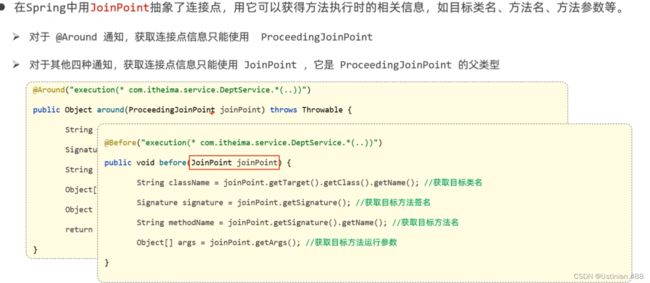
import lombok.extern.slf4j.Slf4j;
import org.aspectj.lang.ProceedingJoinPoint;
import org.aspectj.lang.annotation.Around;
import org.aspectj.lang.annotation.Aspect;
import org.aspectj.lang.annotation.Before;
import org.aspectj.lang.annotation.Pointcut;
import org.springframework.stereotype.Component;

import java.util.Arrays;

@Slf4j
@Component
@Aspect
public class MyAspect8 {

    @Pointcut("execution(* com.itheima.service.DeptService.*(..))")
    private void pt(){}

    @Before("pt()")
    public void before() {
        log.info("before...");
    }

    @Around("pt()")
    public Object around(ProceedingJoinPoint joinPoint) throws Throwable {
        log.info("around before...");

        //1.获取目标对象的类名
        String className = joinPoint.getTarget().getClass().getName();
        log.info("目标对象的类名:{}",className);

        //2.获取目标方法的方法名
        String methodName = joinPoint.getSignature().getName();
        log.info("目标方法的方法名:{}",methodName);

        //3.获取目标方法运行时传入的参数
        Object[] args = joinPoint.getArgs();
        log.info("目标方法的传入的参数:{}", Arrays.toString(args));

        //4.放行目标方法的执行
        Object proceed = joinPoint.proceed();

        //5.目标方法运行的返回值
        log.info("目标方法的返回值:{}",proceed);

        log.info("around after...");
        return proceed;
    }
}
2.8AOP案例--记录操作日志


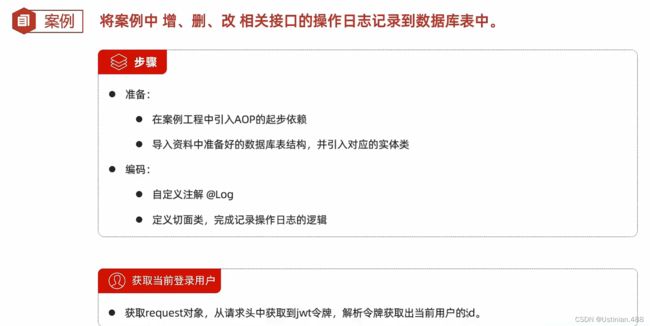
-- 操作日志表
create table operate_log(
                            id int unsigned primary key auto_increment comment 'ID',
                            operate_user int unsigned comment '操作人ID',
                            operate_time datetime comment '操作时间',
                            class_name varchar(100) comment '操作的类名',
                            method_name varchar(100) comment '操作的方法名',
                            method_params varchar(1000) comment '方法参数',
                            return_value varchar(2000) comment '返回值',
                            cost_time bigint comment '方法执行耗时, 单位:ms'
) comment '操作日志表';
在anno包下自定义注解@Log,最后在要记录日志的操作方法上加上注解@Log,切面类如下:
import com.alibaba.fastjson.JSONObject;
import com.study.mapper.OperateLogMapper;
import com.study.pojo.OperateLog;
import com.study.utils.JwtUtils;
import io.jsonwebtoken.Claims;
import lombok.extern.slf4j.Slf4j;
import org.aspectj.lang.ProceedingJoinPoint;
import org.aspectj.lang.annotation.Around;
import org.aspectj.lang.annotation.Aspect;
import org.springframework.beans.factory.annotation.Autowired;
import org.springframework.stereotype.Component;
import javax.servlet.http.HttpServletRequest;
import java.time.LocalDateTime;
import java.util.Arrays;
@Slf4j
@Component
@Aspect
public class LogAspect {
@Autowired
private HttpServletRequest request;
@Autowired
private OperateLogMapper operateLogMapper;
@Around("@annotation(com.study.anno.Log)")
public Object recordLog(ProceedingJoinPoint joinPoint) throws Throwable {
//操作人ID--当前登录员工ID 登录成功之后服务端生成JWT令牌包含ID
//获取请求头当中的令牌,解析令牌
String jwt = request.getHeader("token");
Claims claims = JwtUtils.parseJWT(jwt);
Integer operateUser = (Integer) claims.get("id");
//操作时间
LocalDateTime operateTime = LocalDateTime.now();
//操作类名
String className = joinPoint.getTarget().getClass().getName();
//操作方法名
String methodName = joinPoint.getSignature().getName();
//操作方法参数
Object[] args = joinPoint.getArgs();
String methodParams = Arrays.toString(args);
long begin = System.currentTimeMillis();
//执行原始方法
Object result = joinPoint.proceed();
long end = System.currentTimeMillis();
//方法返回值
String returnValue = JSONObject.toJSONString(result);
//操作耗时
long costTime = end - begin;
//记录操作日志
OperateLog operateLog = new OperateLog(null,operateUser,operateTime,className,methodName,methodParams,returnValue,costTime);
operateLogMapper.insert(operateLog);
log.info("AOP记录操作日志:{}",operateLog);
return result;
}
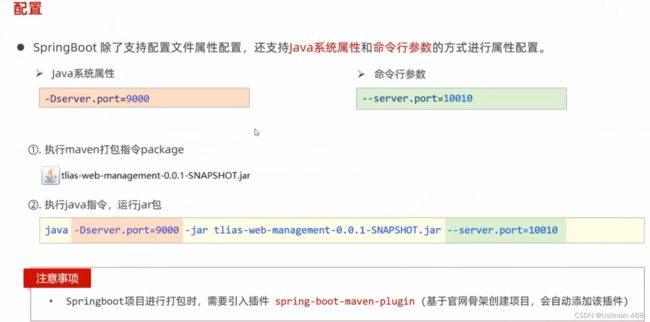
}3.SpringBoot--配置优先级
三种配置文件当中优先级:properties>yml>yaml

属性配置中命令行参数优先级大于Java系统属性。

项目打包之后在运行时指定Java系统属性以及命令行参数:

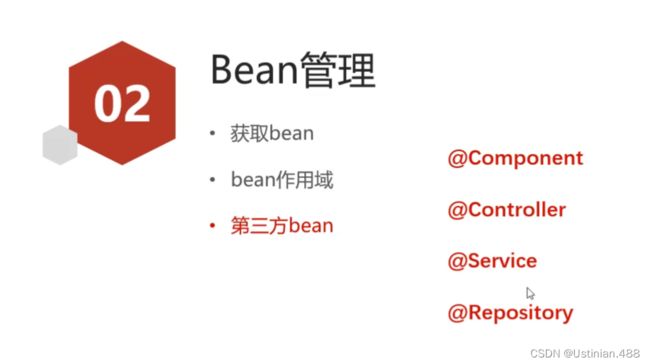
4.bean的管理
4.1bean的获取
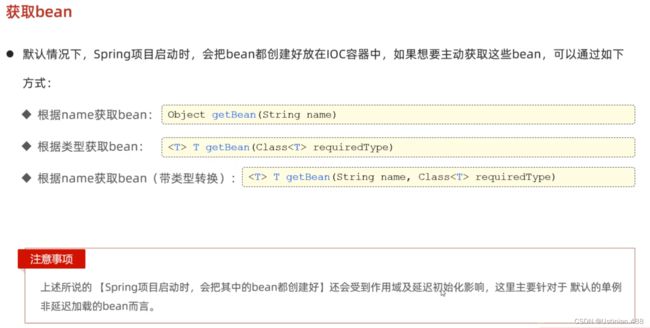
@SpringBootTest
class SpringbootWebConfig2ApplicationTests {
@Autowired
private ApplicationContext applicationContext;//IOC容器对象
//获取bean对象
@Test
public void testGetBean(){
//根据bean的名称获取
DeptController bean1 = (DeptController) applicationContext.getBean("deptController");
System.out.println(bean1);
//根据bean的类型获取
DeptController bean2 = applicationContext.getBean(DeptController.class);
System.out.println(bean2);
//根据bean的名称 及 类型获取
DeptController bean3 = applicationContext.getBean("deptController", DeptController.class);
System.out.println(bean3);
}
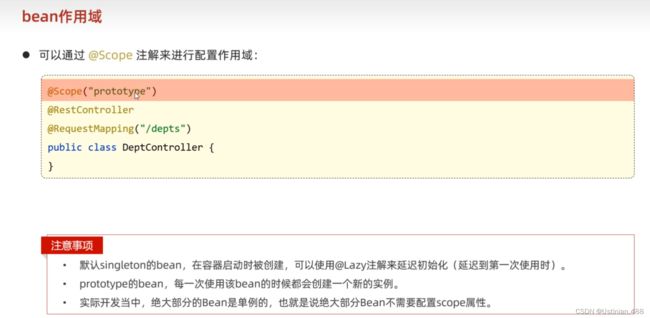
}4.2bean的作用域

4.3第三方bean
自己定义的类声明bean对象就可以使用@Component以及衍生类,但是当这个类不是自己定义的,是引入的第三方依赖定义的,就需要使用第三方bean了。
比如在pom文件中引入的Dom4j依赖,用来解析XML文件。当需要解析XML文件时,需要new SAXReader();对象来用里面的方法读取文件并解析。每次都需要new对象,比较耗费资源。
    org.dom4j
    dom4j
    2.1.3
//第三方bean的管理
@Test
public void testThirdBean() throws Exception {
    SAXReader saxReader = new SAXReader();

    Document document = saxReader.read(this.getClass().getClassLoader().getResource("1.xml"));
    Element rootElement = document.getRootElement();
    String name = rootElement.element("name").getText();
    String age = rootElement.element("age").getText();

    System.out.println(name + " : " + age);
}
由于不是自己定义的类,需要使用@Bean注解。

package com.itheima.config;

import com.itheima.service.DeptService;
import org.dom4j.io.SAXReader;
import org.springframework.context.annotation.Bean;
import org.springframework.context.annotation.Configuration;

@Configuration //配置类
public class CommonConfig {

    //声明第三方bean
    @Bean//将当前方法的返回值对象交给Ioc容器管理,成为工oc容器bean
    //通过@Bean注解的name/value属性指定bean名称,如果未指定,默认是方法名
    public SAXReader saxReader(DeptService deptService) {
        System.out.println(deptService);
        return new SAXReader();
    }
}
@Autowired
private SAXReader saxReader;
//第三方bean的管理
@Test
public void testThirdBean() throws Exception {
//SAXReader saxReader = new SAXReader();
Document document = saxReader.read(this.getClass().getClassLoader().getResource("1.xml"));
Element rootElement = document.getRootElement();
String name = rootElement.element("name").getText();
String age = rootElement.element("age").getText();
System.out.println(name + " : " + age);
}
@Test
public void testBean2() {
Object bean = applicationContext.getBean("saxReader");
System.out.println(bean);
}
5.SpringBoot原理
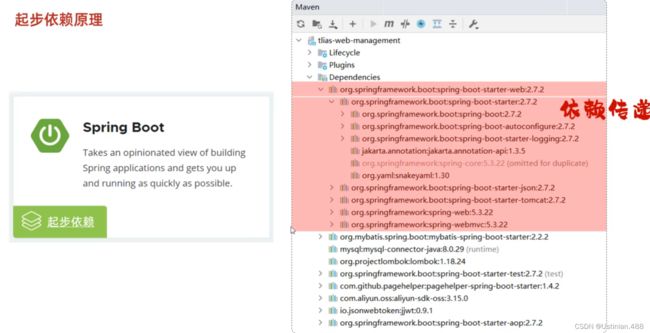
5.1起步依赖


SpringBoot相对于比较简单、快捷,是由于底层提供了起步依赖以及自动配置。

使用了SpringBoot就只需要一个依赖starter-web, Web开发所需要的依赖就有了,是因为Maven的依赖传递。
5.2自动配置--概述

5.3自动配置--方案

直接将itheima-utils引入到依赖当中,无法获取到bean对象,因为springboot只能扫描当前包及其子包,所以要使用@ComponentScan指定扫描包的范围。

但是当要扫描的包较多时就比较繁琐,此时可以使用@Import注解。

5.4自动配置--原理分析--源码追踪

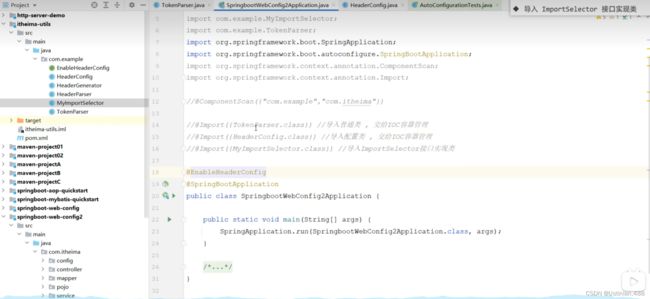
追踪SpringBoot启动类注解@SpringBootApplication,里面有三个关键的注解@SpringBootConfiguration、@ComponentScan和@EnableAutoConfiguration。
@SpringBootConfiguratio里面封装了一个@Configuration注解,说明@SpringBootConfiguratio用来声明当前类也是配置类。
@ComponentScan说明启动类也有包扫描的功能。
@EnableAutoConfiguration自动配置的核心注解。底层封装有@Import注解,通过@Import导入指定的bean或者配置类。可以看到导入了一个ImportSelector接口的实现类;实现了ImportSelector接口的String[] selectImports(AnnotationMetadata importingClassMetadata)方法,这个方法封装了了需要导入到IOC容器当中的类的全类名。在这个方法当中加载了两个文件spring.factoriesy以及org.springframework.boot.autoconfigure.AutoConfiguration.imports,3.以上的版本导入的配置类的全类名定义在imports文件中。在该配置类当中就可以通过@Bean注解声明Bean对象,最终可以在SpringBoot项目启动的时候就可以加载这个配置文件当中的配置类,然后将这些配置类的信息封装到String[] selectImports方法的数组当中,最终通过@Import注解将这些配置类全部加载到Spring的IOC容器当中进行管理。


但是不是配置文所有的bean对象都注册到IOC容器当中,通过@ConditionalOnMissingBean按条件装配。
5.5自动配置--原理分析--@Conditional


5.6自动配置--原理分析--案例(自定义starter分析)
在实际的开发当中需要引入很多第三方技术,官方没有对应的起步依赖,在多个项目当中都需要很多步骤,使用起来就比较繁琐,就可以自定义起步依赖。
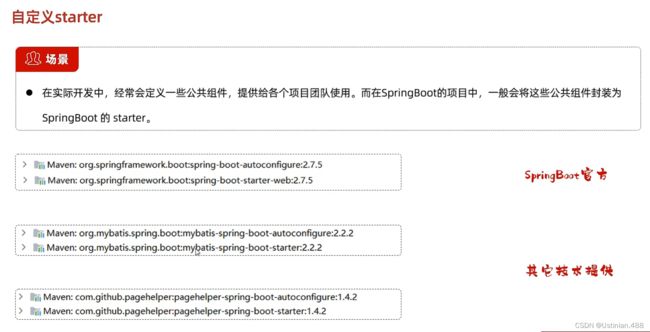
需要定义两个模块:starter模块:进行依赖管理,将当前程序开发所需要的依赖放到starter起步依赖当中,在starter当中还引入了一个包autoconfigure。autoconfigure模块:进行自动配置操作。
最终在starter当中需要将autoconfigure引入进来,在项目进行功能开发的时候只需要引入起步依赖就行了。
5.6自动配置--原理分析--案例(自定义starter实现)

创建好两个模块之后,在starter模块的pom文件中引入autoconfigure依赖
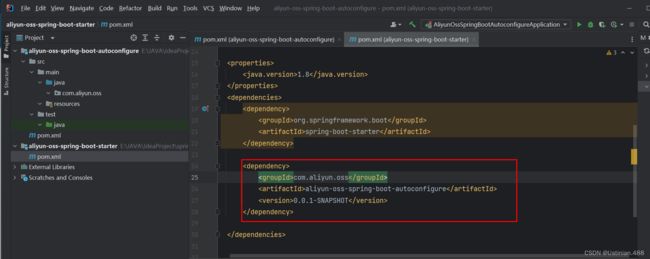
在autoconfigure的pom文件中引入aliyun依赖:
    com.aliyun.oss
    aliyun-sdk-oss
    3.15.1
再将AliOSSProperties以及AliOSSUtils两个类导入到autoconfigure包里面,根据错误提示进行更改。因为引入这个依赖的话,不会再扫描这个包,将两个类上的@Component注解删除,但是要想注入AliyunosSutils直接使用即可的话,就需要定义自动配置类。
自动配置类如下:
import org.springframework.boot.context.properties.EnableConfigurationProperties;
import org.springframework.context.annotation.Bean;
import org.springframework.context.annotation.Configuration;

@EnableConfigurationProperties(AliOSSProperties.class)
@Configuration
public class AliOSSAutoConfiguration {

    @Bean
    public AliOSSUtils aliOSSUtils(AliOSSProperties aliOSSProperties) {
        AliOSSUtils aliOSSUtils = new AliOSSUtils();
        aliOSSUtils.setAliOSSProperties(aliOSSProperties);
        return aliOSSUtils;
    }
}
还要定义自动配置文件META-INF/spring/xxxx.imports,如下:

6.Web后端开发--总结


7.maven高级
7.1分模块设计与开发
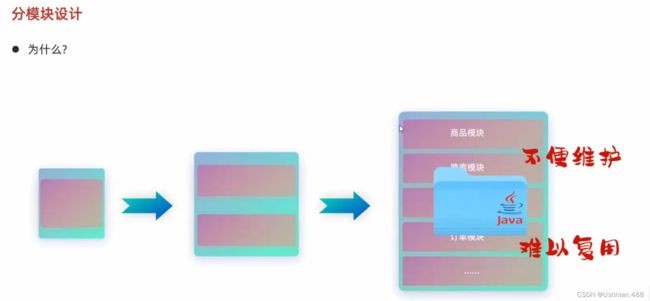
Maven用来构建以及管理Java项目,分模块设计以及开发就是将Java项目拆分为多个模块进行设计。


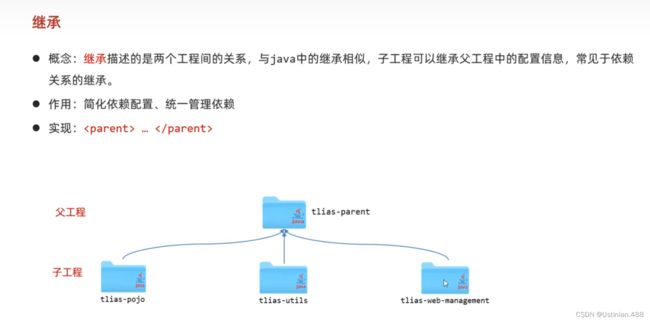
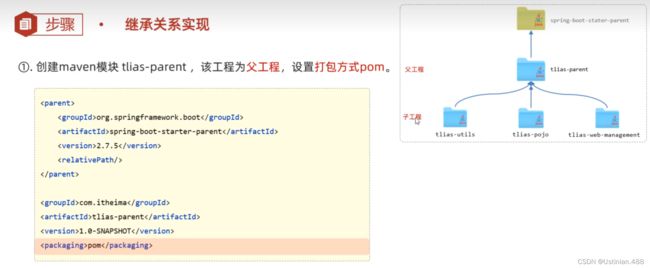
7.2继承与聚合--继承关系实现


7.3继承与聚合--版本实现


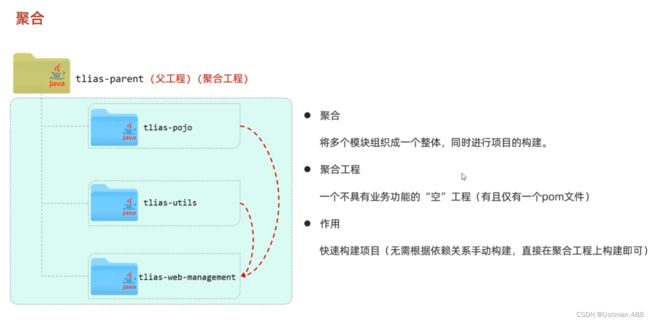
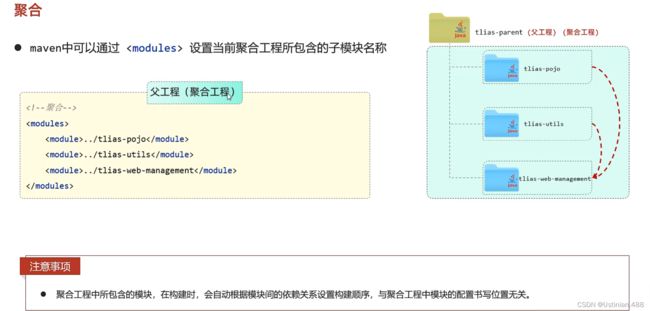
7.4继承与聚合--聚合实现
分模块开发的项目打包上线需要将启动模块引入的模块都进行install操作,安装到Maven仓库,再进行打包才能成功。

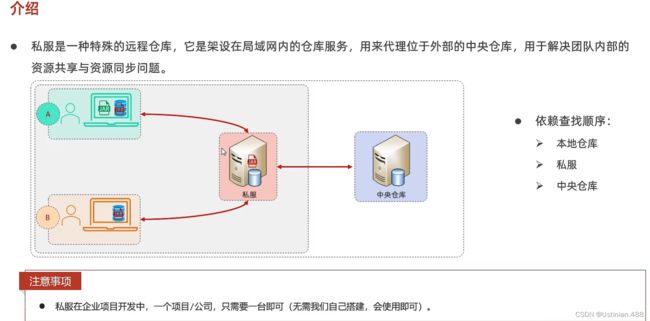
7.5私服
私服就是用于资源共享的仓库。


私服配置说明
访问私服:http://192.168.150.101:8081
访问密码:admin/admin
使用私服,需要在maven的settings.xml配置文件中,做如下配置:
-
需要在 servers 标签中,配置访问私服的个人凭证(访问的用户名和密码)
maven-releases admin admin maven-snapshots admin admin -
在 mirrors 中只配置我们自己私服的连接地址(如果之前配置过阿里云,需要直接替换掉)
maven-public * http://192.168.150.101:8081/repository/maven-public/ -
需要在 profiles 中,增加如下配置,来指定snapshot快照版本的依赖,依然允许使用
allow-snapshots true maven-public http://192.168.150.101:8081/repository/maven-public/ true true -
如果需要上传自己的项目到私服上,需要在项目的pom.xml文件中,增加如下配置,来配置项目发布的地址(也就是私服的地址)
maven-releases http://192.168.150.101:8081/repository/maven-releases/ maven-snapshots http://192.168.150.101:8081/repository/maven-snapshots/ -
发布项目,直接运行 deploy 生命周期即可 (发布时,建议跳过单元测试)
启动本地私服
-
解压: apache-maven-nexus.zip
-
进入目录: apache-maven-nexus\nexus-3.39.0-01\bin
-
启动服务:双击 start.bat
-
访问服务:localhost:8081
-
私服配置说明:将上述配置私服信息的 192.168.150.101 改为 localhost
8.Web开发完结