Python爬虫:github自动登录,ctfhub自动签到(带验证码)
目录
- 0x00 写在前面
- 0x01 GitHub的登录
- 0x02 CTFHub的登录
- 0x03 CTFHub自动登录,签到的完整代码
0x00 写在前面
这次是记录学习过程中关于自动登录的案例,在这几天的学习中发现,很多情况下,我们都只有在登录的情况下才能看到我们想要的数据,所以自动登录是爬虫必不可少的一环
0x01 GitHub的登录
github登录网址:https://github.com/login
github的登录不需要验证码验证,也就不需要定位,直接post就行了,相对简单,就试了试不使用selenium,先用123测试一下发送数据的格式
在session下找到了post的数据
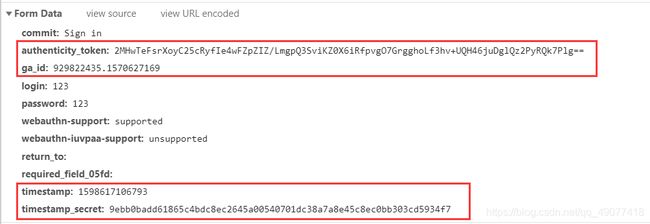
其中,用红框框起来的几条数据,看起来像是动态生成的,去网页源码里搜索一下

找到了位置,从而我们就得到了data里的所有数据。值得注意的是,这里是用了cookie在储存数据
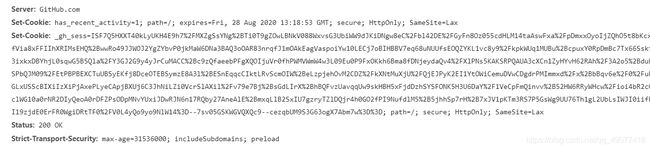
而如果我们的request不带有cookie,登录的时候就会出现…

不能正常登录,所以我们要使用
session=requests.session()
来为网站创建一个会话对象,这样就能自动生成,储存cookie,从而正常登录,完整代码如下:
from lxml import etree
import requests
url='https://github.com/login'
headers={
     "User-Agent": "Mozilla/5.0 (Windows NT 10.0; Win64; x64; rv:77.0) Gecko/20100101 Firefox/77.0"}
session=requests.session()#创建会话对象,后面的所有请求都由此对象发出
response=session.get(url=url,headers=headers)
response.encoding='utf-8'
tree=etree.HTML(response.text)
token=tree.xpath('//*[@name="authenticity_token"]/@value')[0]
#gaid=tree.xpath('//*[@class="js-octo-ga-id-input"]/@value')[0]
timestamp=tree.xpath('//*[@name="timestamp"]/@value')[0]
timestampsec=tree.xpath('//*[@name="timestamp_secret"]')[0]
data = {

    'commit': 'Sign in',
    'authenticity_token': token,
    'ga_id':'929822435.1570627169',#可以看到本来我写了获取这个值的代码,但是我又发现这个值好像没变过,就直接写在这了
    'login': 'github帐号',
    'password': 'github密码',
    'webauthn-support': 'supported',
    'webauthn-iuvpaa-support':'unsupported',
    'return_to:':'',
    'required_field_05fd':'',#这里的05fd好像每次请求都不一样,但是好像是不影响登录,如果发现无法登录,可以试试post后查看对应参数并修改
    'timestamp':timestamp,
    'timestamp_secret':timestampsec
}
login=session.post(url='https://github.com/session',data=data,headers=headers)
f=open('login.html','w',encoding='utf-8')
f.write(login.text)#将登录后的界面写入login.html,如果显示的页面不是错误页面则说明登录成功
0x02 CTFHub的登录
ctfhub的登录使用了selenium,因为又要弄验证码,而且这码还不简单
网站:https://www.ctfhub.com/#/user/login
先看看网页元素,我们要先定位帐号,密码,验证码的输入框和验证码图案的位置

![]()
![]()
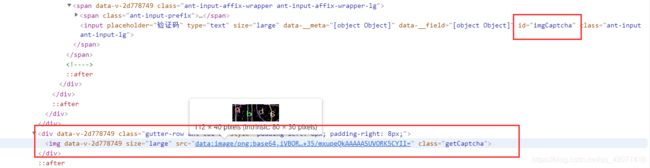
我们可以看到,他们的id或者class都是独一无二的,我们就可以通过id或class来定位,验证码图片的加密字符串只需要再经过正则匹配即可,代码如下
options = webdriver.ChromeOptions()
options.add_experimental_option('excludeSwitches', ['enable-automation'])
driver = Chrome(options=options)#这个设置是用来消除[浏览器正在受到自测软件控制]的影响
driver.get('https://www.ctfhub.com/#/user/login')
driver.find_element_by_id('account').clear()
driver.find_element_by_id('password').clear()
driver.find_element_by_id('account').send_keys('帐号')
driver.find_element_by_id('password').send_keys('密码')
img = driver.find_element_by_class_name('getCaptcha').get_attribute('src')#验证码图片的src内容
b64 = re.findall(r'data:image/png;base64,(.*)', img)[0]#正则匹配加密字符串
...................................................................
这里是api解析验证码图片的代码,先不写出来哈
...................................................................
driver.find_element_by_id('imgCaptcha').send_keys('验证码')#获取验证码输入框的位置并输入得到的验证码字符串
接着我就发现了问题,应该是我自己的原因,我定位‘确定’键的时候,没那么好定位,后来我意识到,我直接在验证码输入完之后,多send一个enter不就好了嘛
driver.find_element_by_id('imgCaptcha').send_keys(Keys.ENTER)#这里要import一个新库,代码为:from selenium.webdriver.common.keys import Keys
下一个问题就是如何判断登陆成功,我的方法是如果driver的url没变,那就说明没登录成功,url改变,就是完成了登录跳转,当然,别忘了写一个while循环来循环写入验证码并尝试登陆,只要url变了直接break循环即可.
    if (driver.current_url == 'https://www.ctfhub.com/#/user/login'):
        print('验证码错误,正在重试')
        driver.find_element_by_xpath('//*[@id="formLogin"]/div[1]/div[3]/div/div[4]/div[2]').click()#这句话是通过点击更新验证码,按理说不写也行,但是不写的时候超级鹰总是说系统错误
    else:
        break
登录ctfhub之后的第一件事当然是签到了,但是,当你登录的时候,会出现一个弹出框

刚好挡住了我们要定位的元素,这里sleep是个方法,但是我是直接refresh网页,这样就没有弹出框了,而这里的签到隐藏在二级菜单中,我们需要鼠标的悬停操作来唤出二级菜单
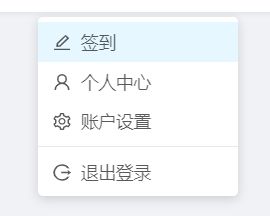
这里的元素定位就不细说,直接上代码了
try:
    driver.refresh()
    print('test pass: refresh successful')
except Exception as e:
    print("Exception found", format(e))#刷新页面
sleep(3)
move = driver.find_element_by_xpath('//*[@id="app"]/div/div/div[1]/div/div/div[2]/span[2]')
ActionChains(driver).move_to_element(move).perform()#将鼠标悬停在个人名称上,唤出二级菜单
driver.find_element_by_xpath('/html/body/div[2]/div/div/ul/li[1]').click()#点击二级菜单中的签到
这样我们就能够自动登录ctfhub并签到了,当然,爬取一些数据肯定也是可以的
0x03 CTFHub自动登录,签到的完整代码
from selenium import webdriver
from selenium.webdriver import Chrome, ActionChains
from selenium.webdriver.common.keys import Keys
from chaojiying import Chaojiying_Client#这里是导入了超级鹰的api
from time import sleep
import re

options = webdriver.ChromeOptions()
options.add_experimental_option('excludeSwitches', ['enable-automation'])
driver = Chrome(options=options)#这个设置是用来消除[浏览器正在受到自测软件控制]的影响
driver.get('https://www.ctfhub.com/#/user/login')
driver.find_element_by_id('account').clear()
driver.find_element_by_id('password').clear()
driver.find_element_by_id('account').send_keys('ctfhub帐号')
driver.find_element_by_id('password').send_keys('ctfhub密码')
sleep(1)
cjy = Chaojiying_Client('超级鹰帐号', '超级鹰密码', '软件号')
while True:
    sleep(3)#这个sleep是我当时想先看看输入的验证码对不对而写的
    img = driver.find_element_by_class_name('getCaptcha').get_attribute('src')
    #print(img)
    b64 = re.findall(r'data:image/png;base64,(.*)', img)[0]
    #print(b64)
    dic = cjy.PostBase64(b64, 1902)#这里的b64是加密字符串,1902是超级鹰的验证码类型参数,dic是返回的带有解析出来的验证码的字典
    #print(dic)
    driver.find_element_by_id('imgCaptcha').send_keys(dic['pic_str'])#写入得到的验证码
    sleep(1)
    driver.find_element_by_id('imgCaptcha').send_keys(Keys.ENTER)#写入enter,代替了  点击[确定]键 的行为
    sleep(3)
    print(driver.current_url)
    if (driver.current_url == 'https://www.ctfhub.com/#/user/login'):
        print('验证码错误,正在重试')
        cjy.ReportError(dic['pic_id'])
        driver.find_element_by_xpath('//*[@id="formLogin"]/div[1]/div[3]/div/div[4]/div[2]').click()#url不变,则登录失败
    else:
        break#改变则登录成功,跳出循环
try:
    driver.refresh()
    print('test pass: refresh successful')#登录成功后先刷新,消除掉弹窗
except Exception as e:
    print("Exception found", format(e))
sleep(3)
move = driver.find_element_by_xpath('//*[@id="app"]/div/div/div[1]/div/div/div[2]/span[2]')
ActionChains(driver).move_to_element(move).perform()#将鼠标悬停在个人名称上,唤出二级菜单
driver.find_element_by_xpath('/html/body/div[2]/div/div/ul/li[1]').click()#点击签到
里面关于base64数据获取的详见上一篇博客…