Python代码实现“消息轰炸机”
1前言
今天,小编给大家带来一个好玩的东西,它可以自动的给你的QQ好友发送消息,并且如题目所述达到一个“轰炸”的效果,实际上就是刷屏,所以也可以叫它“刷屏神器”,代码很简单,也是通过python编程实现,只要会一点python都能学会。
2准备
首先看此程序需要的核心模块有:tkinter、pywin32、pillow。其中tkinter为python3版本自带的,所以不需要安装,pywin32和pillow是第三方库,需要自己安装,可以通过命令行运行以下代码安装。
pip install pywin32

pip install pillow
3详细步骤
这个程序可以分为两个部分,小编将通过以下几个步骤给大家来实现这个程序。
自动发消息
导入模块
找到窗口
编写消息
发送消息
编写gui界面
编写主窗口
添加组件
响应按钮
错误提示
4.自动发消息
4.1导入模块
为了整个程序的运行,在这一步将所有需要用到的模块导入进来。具体见代码。
import time

from tkinter import *

from PIL import Image,ImageTk

import win32gui

import win32con

import win32clipboard
4.2找到窗口
首先要了解该如何找到窗口。在pywin32中的类win32gui有一个函数:
FindWindow(ClassName,WindowName)函数,它的作用是查找指定的类名和窗口名,如果找到了就会返回该窗口的句柄,否则返回0,其中参数ClassName是类名,一般填写None代表会返回任何与Windowname相匹配的窗口,Windowname就是窗口的名字,就比如你打开与某QQ联系人的聊天框时,顶部出现的备注名。SetForegroundWindow()则是建立窗口,里面的参数就为窗口句柄。详见代码:
def set_message(window_name,message):

    global failed  #将failed申明为全局变量,因为后面会在函数外用到该变量

    win = win32gui.FindWindow(None,window_name) #找到指定联系人窗口的句柄

    if win != 0: #判断是否找到

        win32gui.SetForegroundWindow(win) #找到了就建立该窗口

        failed = False

    else:

        failed = True
4.3编写消息
pywin32发消息的工作原理是,利用剪贴板的复制与粘贴,然后模拟按下Enter,最终达到发送消息的效果。所以程序首先要用到pywin32里关于剪贴板的类,然后需要的方法是OpenClipboard()、EmptyClipboard()、SetClipboardData()、CloseClipboard()。分别代表打开剪贴板、清空剪贴板、设置剪贴板(复制)、关闭剪贴板。具体的用法直接看代码。
 win32clipboard.OpenClipboard()#打开剪贴板

    win32clipboard.EmptyClipboard()#清空剪贴板

    win32clipboard.SetClipboardData(win32con.CF_UNICODETEXT,message)#设置剪贴板

    win32clipboard.CloseClipboard()#关闭剪贴板
其中SetClipboardData()函数需要接两个参数,第一个是消息类型比如(图片、文件、文本等),第二个是消息内容。
消息类型有:
CF_DIB ——DIB图片,它包含一个BITMAPINFO结构,然后是位图位。
CF_DIF ——软件领域的数据交换格式。
CF_PALETTE ——调色板。
CF_PENDATA ——笔扩展的Microsoft笔计算的数据。
CF_RIFF ——表示更复杂的音频数据可以被表示为一个CF_WAVE的标准波形格式。CF_SYLK ——微软符号链接(SYLK)格式。
CF_TEXT ——ANSI文本格式。回车/换行(CR-LF)组合表示换行。必须用NULL结束字符串。使用此格式为ANSI文本。
CF_WAVE ——表示在的标准电波格式之一,例如11 kHz或22kHz的脉冲编码调制(PCM)的音频数据。
CF_TIFF ——TIFF标记图像文件格式。
CF_UNICODETEXT ——Unicode文本格式。回车/换行(CR-LF)组合表示换行。必须用NULL结束字符串。这是Unicode格式的字符串。
4.4发送消息
前面相当于已经写好了消息,只需要按下Enter键就可以发送了,所以就需要显示出窗口,然后获取键盘事件,再执行相应就可以了。用到的类是win32con。
 win32gui.ShowWindow(win,win32con.WM_SHOWWINDOW)#显示窗口

win32gui.SendMessage(win,win32con.WM_PASTE,0,0)#相当于粘贴

win32gui.SendMessage(win,win32con.WM_KEYDOWN,win32con.VK_RETURN,0)#模拟按下Enter键

    win32gui.SendMessage(win,win32con.WM_KEYUP,win32con.VK_RETURN,0)#模拟松开
通过以上程序就已经可以发送消息了,但是没有gui界面,运行起来就不那么美观,所以接下来就是编写gui界面。
5编写gui界面
5.1编写主窗口
tkinter中建立主窗口的方式与turtle类似,设置标题,大小,位置,背景等等。只是具体的函数名不一样。
root = Tk()#应用界面为root

image_name = Image.open('resource/樱花.jpg')#打开准备好的背景图片

root.title('消息轰炸机')#给窗口命名

root.geometry('400x500+50+50')#设置窗口大小及位置

canvas_root = Canvas(root,width = 400,height = 500)#创建画布

im_root = ImageTk.PhotoImage(image_name)#预设打开的图片

canvas_root.create_image(200,250,image = im_root)#嵌入预设的图片

canvas_root.pack()#将画布显示出来

root.mainloop()#让窗口一直显示
注意:图片名前面的是路径,resource与py文件是同一目录下的。还有geometry()函数所接参数的意思是:窗口宽400、高500中间用小写x相连,后面用“+”连接的是窗口右上顶点在电脑屏幕的位置。
运行效果:
图5.1主窗口
5.2添加组件
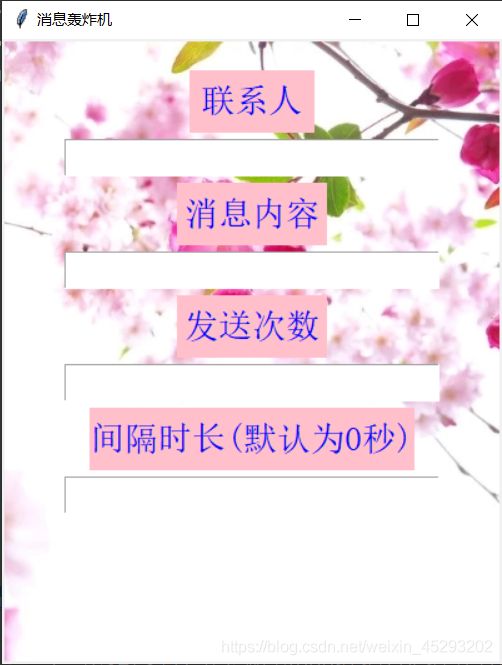
添加的所有组件都需两个步骤,先是设置组件参数(大小,字体,颜色),然后再用tkinter的几种布局方式(grid、place、pack)布局,几种方式的具体区别这里就不多讲了,感兴趣的小伙伴可以去了解一下。小编这里都用place布局方式,里面的参数有(x,y,width,height),x,y表示组件在窗口的坐标,width和height表示宽高。
label1 = Label(root,text = '联系人',font = ('宋体',20),fg = 'blue',bg = 'pink')#设置组件

label2 = Label(root,text = '消息内容',font = ('宋体',20),fg = 'blue',bg = 'pink')

label3 = Label(root,text = '发送次数',font = ('宋体',20),fg = 'blue',bg = 'pink')

label4 = Label(root,text = '间隔时长(默认为0秒)',font = ('宋体',20),fg = 'blue',bg = 'pink')

label5 = Label(root,text = '发送成功',font = ('宋体',20),fg = 'green')

label6 = Label(root,text = '发送失败,请打开与该联系人的聊天框',font = ('宋体',15),fg = 'red')

label7 = Label(root,text = '未完整输入信息',font = ('宋体',20),fg = 'red',bg = 'black')

label1.place(x = 150,y = 25,width = 100,height = 50)

label2.place(x = 140,y = 115,width = 120,height = 50)

label3.place(x = 140,y = 205,width = 120,height = 50)

label4.place(x = 70,y = 295,width = 260,height = 50)

entry1 = Entry(root,font = ('宋体',20))#设置输入框

entry2 = Entry(root,font = ('宋体',20))

entry3 = Entry(root,font = ('宋体',20))

entry4 = Entry(root,font = ('宋体',20))

entry1.place(x = 50,y= 80,width = 300,height = 30)#显示组件

entry2.place(x = 50,y = 170,width = 300,height = 30)

entry3.place(x = 50,y = 260,width = 300,height = 30)

entry4.place(x = 50,y = 350,width = 300,height = 30)
里面的参数都可以根据自己的喜好调整,反正自己喜欢什么样的就改成什么样的就行。
运行看一下:
图5.2组件界面
5.3响应按钮
看上面的运行效果可以发现,只需要一个发送按钮就可以完成整个程序了,所以还需要用到Button()函数,其中的参数与其他组件一样,只是多了一个command,其接一个函数名,然后只要用鼠标点击它,就可以执行该函数。
button = Button(root,text = '发送',font = ('宋体',20),fg = 'black',bg = 'green',command = send)#设置按钮

button.place(x = 170,y = 385,width = 60,height = 50)#显示按钮

def send():#发送消息的函数

    window_name = entry1.get()#获取输入框中的信息

    message = entry2.get()

    times = entry3.get()

    sleep_time = entry4.get()

    if sleep_time == '':#设置默认间隔时长

        sleep_time = 0

    if times and window_name and message != '':#判断是否输入了完整内容

        for i in range(int(times)):

            time.sleep(int(sleep_time))#根据间隔时长来停止程序

            set_message(window_name,message)#运行建立消息函数发送消息
5.4程序基本完成
考虑程序给他人用时,并不知道该怎么用,所以就需要设置几个错误提醒。
  if times and window_name and message != '':#判断是否输入了完整内容

        for i in range(int(times)):

            time.sleep(int(sleep_time))#根据间隔时长来停止程序

            set_message(window_name,message)#运行建立消息函数发送消息

        if failed:#判断是否找到了窗口句柄

            label7.place_forget()#隐藏其他该位置的组件

            label5.place_forget()

            label6.place(x = 30,y = 445,width = 340,height = 20)#显示当前需要显示的组件

        else:

            label7.place_forget()

            label6.place_forget()

            label5.place(x = 140,y = 445,width = 120,height = 50)

    else:

        label7.place(x = 100,y = 440,width = 200,height = 30)
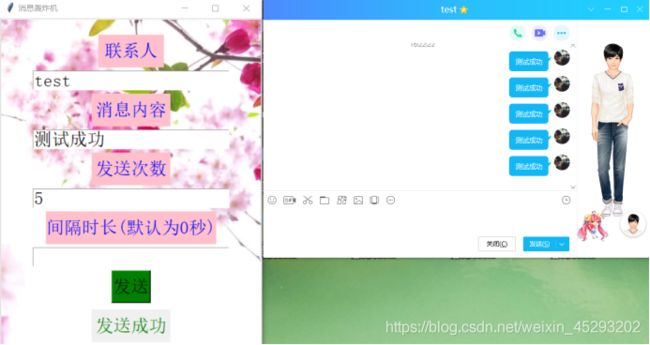
经过不懈努力,最终程序完成,一起来看一下最终运行效果,感受一下成功喜悦吧!
6完整代码及运行效果
import time

from tkinter import *

from PIL import Image,ImageTk

import win32gui

import win32con

import win32clipboard

def set_message(window_name,message):

    global failed  #将failed申明为全局变量,因为后面会在函数外用到该变量

    win = win32gui.FindWindow(None,window_name) #找到指定联系人窗口的句柄

    if win != 0: #判断是否找到

        win32gui.SetForegroundWindow(win) #找到了就建立该窗口

        failed = False

    else:

        failed = True

    win32clipboard.OpenClipboard()#打开剪贴板

    win32clipboard.EmptyClipboard()#清空剪贴板

    win32clipboard.SetClipboardData(win32con.CF_UNICODETEXT,message)#设置剪贴板

    win32clipboard.CloseClipboard()#关闭剪贴板

    win32gui.ShowWindow(win,win32con.WM_SHOWWINDOW)#显示窗口

    win32gui.SendMessage(win,win32con.WM_PASTE,0,0)#相当于粘贴

    win32gui.SendMessage(win,win32con.WM_KEYDOWN,win32con.VK_RETURN,0)#模拟按下Enter键

    win32gui.SendMessage(win,win32con.WM_KEYUP,win32con.VK_RETURN,0)#模拟松开

def send():#发送消息的函数

    window_name = entry1.get()#获取输入框中的信息

    message = entry2.get()

    times = entry3.get()

    sleep_time = entry4.get()

    if sleep_time == '':#设置默认间隔时长

        sleep_time = 0

    if times and window_name and message != '':#判断是否输入了完整内容

        for i in range(int(times)):

            time.sleep(int(sleep_time))#根据间隔时长来停止程序

            set_message(window_name,message)#运行建立消息函数发送消息

        if failed:#判断是否找到了窗口句柄

            label7.place_forget()#隐藏其他该位置的组件

            label5.place_forget()

            label6.place(x = 30,y = 445,width = 340,height = 20)#显示当前需要显示的组件

        else:

            label7.place_forget()

            label6.place_forget()

            label5.place(x = 140,y = 445,width = 120,height = 50)

    else:

        label7.place(x = 100,y = 440,width = 200,height = 30)

root = Tk()#应用界面为root

image_name = Image.open('resource/樱花.jpg')#打开准备好的背景图片

root.title('消息轰炸机')#给窗口命名

root.geometry('400x500+50+50')#设置窗口大小及位置

canvas_root = Canvas(root,width = 400,height = 500)#创建画布

im_root = ImageTk.PhotoImage(image_name)#预设打开的图片

canvas_root.create_image(200,250,image = im_root)#嵌入预设的图片

canvas_root.pack()#将画布显示出来

label1 = Label(root,text = '联系人',font = ('宋体',20),fg = 'blue',bg = 'pink')#设置组件

label2 = Label(root,text = '消息内容',font = ('宋体',20),fg = 'blue',bg = 'pink')

label3 = Label(root,text = '发送次数',font = ('宋体',20),fg = 'blue',bg = 'pink')

label4 = Label(root,text = '间隔时长(默认为0秒)',font = ('宋体',20),fg = 'blue',bg = 'pink')

label5 = Label(root,text = '发送成功',font = ('宋体',20),fg = 'green')

label6 = Label(root,text = '发送失败,请打开与该联系人的聊天框',font = ('宋体',15),fg = 'red')

label7 = Label(root,text = '未完整输入信息',font = ('宋体',20),fg = 'red',bg = 'black')

label1.place(x = 150,y = 25,width = 100,height = 50)

label2.place(x = 140,y = 115,width = 120,height = 50)

label3.place(x = 140,y = 205,width = 120,height = 50)

label4.place(x = 70,y = 295,width = 260,height = 50)

entry1 = Entry(root,font = ('宋体',20))#设置输入框

entry2 = Entry(root,font = ('宋体',20))

entry3 = Entry(root,font = ('宋体',20))

entry4 = Entry(root,font = ('宋体',20))

entry1.place(x = 50,y= 80,width = 300,height = 30)#显示组件

entry2.place(x = 50,y = 170,width = 300,height = 30)

entry3.place(x = 50,y = 260,width = 300,height = 30)

entry4.place(x = 50,y = 350,width = 300,height = 30)

button = Button(root,text = '发送',font = ('宋体',20),fg = 'black',bg = 'green',command = send)#设置按钮

button.place(x = 170,y = 385,width = 60,height = 50)#显示按钮

root.mainloop()#让窗口一直显示
图6.1未输入完整信息
图6.2发送失败
图6.3发送成功
7总结
经过以上不算复杂的过程,总算是完成了这个消息轰炸机,小编自己在写这个时,花了不少时间,过程也是很煎熬,但是做完后看到效果时,还是比较开心的。所以希望大家在学习编程的时候,过程虽然很累,但是只要不放弃,坚持坚持就能感受到成功带来的喜悦。


