springboot+vue学习
书籍:Spring Boot + Vue全栈开发 作者:王松
第一章:Spring Boot入门
1.1 简介
1.1.1 优势
- 快速构建项目
- 通用性配置
- 内嵌服务器
1.2 第一个spring boot程序
1.2.1 创建maven工程
目前使用IDEA较多,直接使用IDEA创建springboot工程
第二章:Spring Boot配置
2.1 spring-boot-starter-parent
spring-boot-starter-parent是一个特殊的starter,提供了一些Maven的默认配置,主要是便于管理
- Java默认使用版本1.8
- 编码格式utf-8
- 提供Dependency Management进行项目依赖的版本管理
- 默认资源过滤与插件配置
2.2 @SpringBootApplication
启动类的注解,集合三个注解的功能
- @SpringBootConfiguration:配置类,类似与applicationContext.xml
- @EnableAutoConfiguration:自动化配置
- @ComponentScan:包扫描,扫描位于当前类所在包下的所有类, @Service、@Repository、@Component、@Controller、@RestController
注:@Configuration可专门用来配置Bean
2.3 定制banner
在resources创建一个banner.txt文件,启动时就会打印出来
关闭操作:
2.4 Web容器配置
2.4.1 Tomcat配置
1. 常规配置
spring boot内嵌:
- Tomcat
- Jetty
- Undertow
- Netty
spring-boot-starter-web:默认Tomcat,其扩展配置application.properties
server.port=8081
server.error.path=/error
server.servlet.session.timeout=30m
server.servlet.context-path=/chapter02
server.tomcat.uri-encoding=utf-8    // 请求编码
server.tomcat.max-threads=500
server.tomcat.basedir=/home/sang/tmp
2. HTTPS配置
给网站加上HTTPS证书能够在一定程度上保障网站及其数据之间的交互
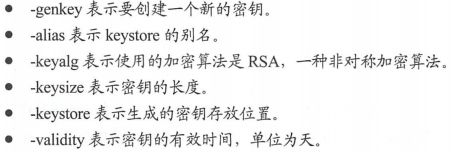
java数字证书管理工具keytool(\jdk\bin),可以生成一个数字证书
keytool -genkey -alias tomcathttps -keyalg RAS -keysize 2048 -keystore sang.p12 -validity 365
执行完毕后生成snag.12的文件,将其复制到根目录下并在application.properties配置如下
server.ssl.key-store=sang.p12
server.ssl.key-alias=tomcathttps
server.ssl.key-store-password=123456
生成自己的证书后,需要将http请求重定向为https请求,需要TomcatConfig类
2.4.2 Jetty配置
将pom文件中的spring-boot-starter-web去掉
添加:spring-boot-starter-jetty
2.5 Properties配置
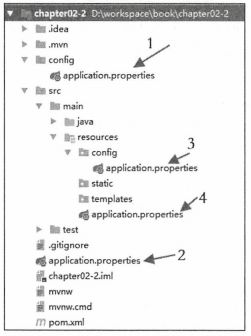
application.properties可出现在四个位置,其加载顺序1到4依次降低
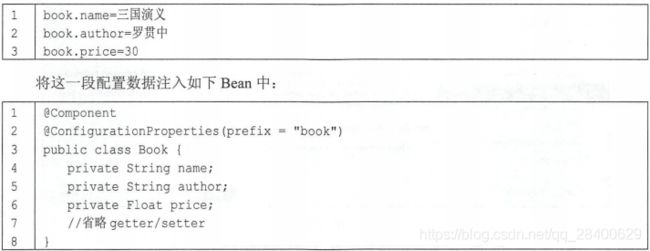
2.6 类型安全配置属性
Properties和Yaml配置---->加载到Spring Environment
Spring提供@Value注解以及EnvironmentAware接口将Spring Environment中的数据注入到属性上
例:
2.7 Yaml配置
2.7.1 常规配置
优点:条理清晰,简洁强大,具有层次感
application.yml
server:
    port:80
    servlet:
        context-path: /chapter02
    tomcat:
        uri-encoding: utf-8
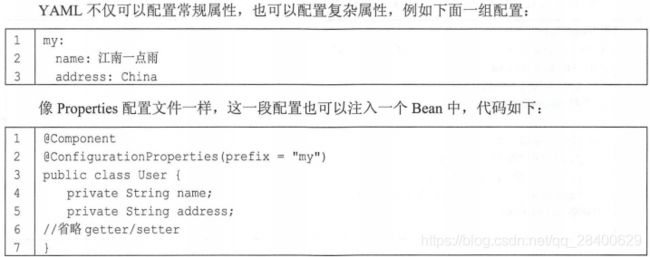
2.7.2 复杂配置
列表配置
对象配置
2.8 Profile
一项工程需要频繁地在各种环境下测试数据,例如开发环境(application-dev.properties)和生产环境(application-prod.properties)
在applicaiton.properties指定环境可节省时间:
spring.profile.active=dev // profile占位符--application-profile.properties
第三章:Spring Boot整合视图层技术
模板引擎:
- Thymeleaf
- FreeMarker
3.1 整合Thymeleaf
使用IDEA创建springBoot工程的时候选择Thymeleaf,则在pom文件中有spring-boot-starter-thymeleaf
由thymeleaf源码可知,Thymeleaf的配置写在templates下
常见配置如下:(配置写在application.properties中)
# 是否开启缓存
spring.thymeleaf.cache = true
# 检查模板是否存在
spring.thymeleaf.check-template = true
# 检查模板位置是否存在
spring.thymeleaf.check-template-location = true
# content-type配置
spring.thymeleaf.servlet.content-type = text/html
# 模板文件编码方式
spring.thymeleaf.encoding = UTF-8 #模板编码。
# 模板文件位置
spring.thymeleaf.prefix = classpath:/templates/
# 模板文件后缀
spring.thymeleaf.suffix = .html
使用:
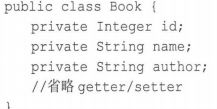
1) 实体类
public class Book{

    private Integer id;
    private String name;
    private String author;

    // getter setter方法

    // toString

}
2) 控制类
@Controller
public class BookController{

    @GetMapping("/books")
    public ModelAndView books(){

        List books = new ArrayList<>();

        Book b1 = new Book();
        b1.setId(1);
        b1.setName("罗贯中");
        b1.setAuthor("三国演义");

        Book b2 = new Book();
        b2.setId(2);
        b2.setName("曹雪芹");
        b1.setAuthor("红楼梦");

        books.add(b1);
        books.add(b2);

        ModelAndView mv = new ModelAndView();
        mv.addObject("books",book);
        mv.setViewName("books");

        return mv;

    }

}
3) 创建视图
</head>
<body>
    <table border=” 1” >
        <tr>
            <td>图书编号< ltd>
            <td>图书名称</ td>
            <td>图书作者</ td>
        </tr>
        <tr th:each="book:${books }">
            <td th:text="${book.id)"></ td>
            <td th:text="${book.name}"></ td>
            <td th:text="${book.author}"></ td>
        </tr>
    </table>
</body>
</html></code></pre>
  <p>3.2 整合FreeMarker</p>
  <p>pom:spring-boot-starter-freemarker</p>
  <p>其位置也在template下,文件后缀.ftl</p>
  <p>同样在application.properties对默认配置进行修改</p>
  <pre class="has"><code class="language-java">#HttpServletRequest的属性是否可以覆盖 controller中model的同名项
spring.freemarker.allow-request-override=false
#HttpSession的属性是否可以覆盖controller中model的同名项
spring.freemarker.allow-session-override=false
#是否开启缓存
spring.freemarker.cache=false
#模板文件编码
spring.freemarker.charset=UTF-8
#是否检查模板位置
spring.freemarker.check-template-location=true
#Content-Type的值
spring.freemarker.content-type=text/html
#是否将HttpServletRequest中的属性添加到Model中
spring.freemarker.expose-request-attributes=false
#是否将HttpSession中的属性添加到Model中
spring.freemarker.expose-session-attributes=false
#模板文件后缀
spring.freemarker.suffix= .ftl
#模板文件位置
spring.freemarker.template-loader-path=classpath:/templates/</code></pre>
  <h3>第四章:整合web开发</h3>
  <p>4.1 返回json数据格式</p>
  <p>目前前后端分离,都是将后端数据以json的形式发送到前端,所以需要在后端将数据封装为json格式</p>
  <p>4.1.1 默认实现</p>
  <p>spring-boot-starter-web中提供jackson-databind作为json处理器,使其返回的数据为json格式</p>
  <p>注:@RestController组合了@ResponseBody和@Controller</p>
  <p>4.1.2 自定义转换器</p>
  <p>1. Gson   谷歌开源JSON解释框架,需除去jackson-databind</p>
  <pre class="has"><code><dependency>
    <groupId>org.springframework.boot</groupId>
    <artifactId>spring-boot-starter-web</artifactId>
    <exclusions>
        <exclusion>
            <groupId>com.fasterxml.jackson,core</groupId>
            <artifactId>jackson-databind</artifactId>
        </exclusion>
    </exclusions>
</dependency>
<dependency>
    <groupId>com.google.code.gson</groupId>
    <artifactId>gson</artifactId>
</dependency></code></pre>
  <p>当加入Gson依赖后,springboot默认提供Gson封装数据</p>
  <p>但是当对日期数据进行格式化时,需要开发者自己定义HttpMessageConverter</p>
  <pre class="has"><code class="language-java">@Configuration
public class GsonConfig {
    @Bean
    GsonHttpMessageConverter gsonHttpMessageConverter() {
        GsonHttpMessageConverter converter= new GsonHttpMessageConverter() ;
        GsonBuilder builder= new GsonBuilder( );
        builder.setDateFormat("yyyy-MM-dd");
        builder.excludeFieldsWithModifiers(Modifier.PROTECTED) ;
        Gson gson = builder.create();
        converter.setGson(gson) ;
        return converter;
    }
}</code></pre>
  <p>2. fastjson 阿里巴巴自己开发的Json解析框架</p>
  <p>添加依赖</p>
  <pre class="has"><code class="language-java"><dependency>
    <groupId>org.springframework.boot</groupId>
    <artifactId>spring-boot-starter-web</artifactId>
    <exclusions>
        <exclusion>
            <groupId>com.fasterxml.jackson,core</groupId>
            <artifactId>jackson-databind</artifactId>
        </exclusion>
    </exclusions>
</dependency>
<dependency>
    <groupId>com.alibaba</groupId>
    <artifactId>fastjson</artifactId>
    <version>1.1.41</version>
</dependency></code></pre>
  <p>开发者自己配置HttpMessageConverter</p>
  <pre class="has"><code class="language-java">package com.github.afkbrb.lightblogback.configurer;

import com.alibaba.fastjson.serializer.SerializerFeature;
import com.alibaba.fastjson.support.config.FastJsonConfig;
import com.alibaba.fastjson.support.spring.FastJsonHttpMessageConverter;
import org.springframework.context.annotation.Bean;
import org.springframework.context.annotation.Configuration;

import java.nio.charset.Charset;


@Configuration
public class MyFastJsonConfig {
    @Bean
    FastJsonHttpMessageConverter fastJsonHttpMessageConverter(){
        FastJsonHttpMessageConverter converter = new FastJsonHttpMessageConverter();
        FastJsonConfig config = new FastJsonConfig();

        // 日期格式
        config.setDateFormat("yyyy-MM-dd");
        // 数据编码
        config.setCharset(Charset.forName("UTF-8"));
        config.setSerializerFeatures(
                // 是否在生成的json中输出类名
                SerializerFeature.WriteClassName,
                // 是否输出value为null的数据
                SerializerFeature.WriteMapNullValue,
                // 生成的json格式化
                SerializerFeature.PrettyFormat,
                // 空集合输出[]而非null
                SerializerFeature.WriteNullListAsEmpty,
                // 空字符串输出""而非null
                SerializerFeature.WriteNullStringAsEmpty
        );
        converter.setFastJsonConfig(config);
        return converter;
    }
}
</code></pre>
  <p>当还出现中文乱码的时候,在application.properties中添加如下配置:</p>
  <blockquote>
   <p>spring.http.encoding.force-response=true</p>
  </blockquote>
  <p>4.2 静态资源访问</p>
  <p>4.2.1 默认策略</p>
  <p>springboot默认会过滤掉所有的静态资源,静态资源的位置有5个,最后一个为   /</p>
  <p><a href="http://img.e-com-net.com/image/info8/57e65da8d2554aa7bf9200c2b26b2a58.jpg" target="_blank"><img alt="springboot+vue学习_第6张图片" class="has" height="362" src="http://img.e-com-net.com/image/info8/57e65da8d2554aa7bf9200c2b26b2a58.jpg" width="309" style="border:1px solid black;"></a></p>
  <p>使用IDEA创建springboot工程,默认生成static文件夹</p>
  <p>4.2.2 自定义策略</p>
  <p>1. 在application.properties中配置过滤规则和静态资源位置</p>
  <blockquote>
   <p>spring.mvc.static-path-pattern=/static/**                        // 过滤规则</p>
   <p>spring.resources.static-locations=classpath:/static/      // 静态资源位置</p>
  </blockquote>
  <p>2. java编码定义</p>
  <p>4.3 文件上传</p>
  <p>springboot中提供文件上传自动化配置类MultipartAutoConfiguration,默认也是采用StandardServletMultipartResolver</p>
  <p>4.3.1 单文件上传</p>
  <p>upload.html</p>
  <pre class="has"><code class="language-html"><!DOCTYPE html>
<html lang="en">
<head>
    <meta charset="UTF-8">
    <title>Title
controller
package com.github.afkbrb.lightblogback.web;

import org.springframework.web.multipart.MultipartFile;

import javax.servlet.http.HttpServletRequest;
import javax.servlet.http.HttpServletResponse;
import java.io.File;
import java.io.IOException;
import java.text.SimpleDateFormat;
import java.util.Date;
import java.util.UUID;

public class FileUploadController {
    SimpleDateFormat sdf = new SimpleDateFormat("yyyy-MM-dd");

    public String upload(MultipartFile uploadFile, HttpServletRequest request){

        String realPath = request.getSession().getServletContext().getRealPath("/uploadFile/");
        String format = sdf.format(new Date());
        File folder = new File(realPath + format);
        if (!folder.isDirectory()){
            folder.mkdirs();
        }

        String oldName = uploadFile.getOriginalFilename();
        String newName = UUID.randomUUID().toString() + oldName.substring(oldName.lastIndexOf("."),oldName.length());
        try{
            uploadFile.transferTo(new File(folder,newName));
            String filePath = request.getScheme() + "://" + request.getServerName() + ":" + request.getServerPort() + "uploadFile" +
                    format + newName;
        }catch (IOException e){
            e.printStackTrace();
        }

        return "上传失败";
    }
}
当需要对图片经行细节配置的时候,可以application.properties中添加配置
spring.servlet.multipart.enabled=true
spring.servlet.multipart.file-size-threshold=0
spring.servlet.multipart.location=E:\\temp
spring.servlet.multipart.max-file-size=lMB
spring.servlet.multipart.max-request-size=lOMB
spring.servlet.multipart.resolve-lazily=false
4.2.3 多文件上传
需要对文件经行遍历上传
MultipartFile[] uploadFiles, HttpServletRequest request
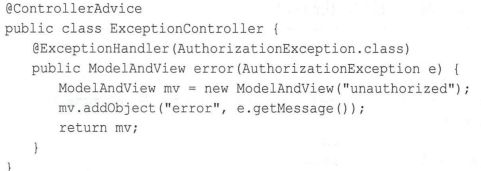
4.4 @ControllerAdvice
是@Controller的增强版,主要全局异常处理
4.4.1 全局异常处理
当用户上传的文件大小超过了限制,可使用@ControllerAdvice
无参情况:
package com.github.afkbrb.lightblogback.configurer;

import org.springframework.web.bind.annotation.ControllerAdvice;
import org.springframework.web.multipart.MaxUploadSizeExceededException;

import javax.servlet.http.HttpServletResponse;
import java.io.IOException;
import java.io.PrintWriter;

@ControllerAdvice
public class CustomExceptionHandler {
    @ExceptionHandler(MaxUploadSizeExceededException.class)
    public void uploadException(MaxUploadSizeExceededException e, HttpServletResponse response) throws IOException {
        response.setContentType("text/html;charset=utf-8");
        PrintWriter out = response.getWriter();
        out.write("上传文件大小超出限制");
        out.flush();
        out.close();
    }
}
返回参数为ModelAndView,且使用Thymleaf模板
package com.github.afkbrb.lightblogback.configurer;

import org.springframework.web.bind.annotation.ControllerAdvice;
import org.springframework.web.bind.annotation.ExceptionHandler;
import org.springframework.web.multipart.MaxUploadSizeExceededException;
import org.springframework.web.servlet.ModelAndView;

import javax.servlet.http.HttpServletResponse;
import java.io.IOException;

@ControllerAdvice
public class CustomExceptionHandler {
    @ExceptionHandler(MaxUploadSizeExceededException.class)
    public ModelAndView uploadException(MaxUploadSizeExceededException e, HttpServletResponse response) throws IOException {
        ModelAndView mv = new ModelAndView();
        mv.addObject("msg","上传大小超出限制")
        mv.setViewName("error");
        return mv;
    }
}
Title
4.4.2 添加全局数据
package com.github.afkbrb.lightblogback.configurer;

import org.springframework.web.bind.annotation.ControllerAdvice;
import org.springframework.web.bind.annotation.ModelAttribute;

import java.util.HashMap;
import java.util.Map;

@ControllerAdvice
public class GlobalConfig {
    @ModelAttribute(value = "info")
    public Map userInfo(){
        HashMap map = new HashMap<>();
        map.put("username","罗贯中");
        map.put("gender","男");
        return map;
    }
}
数据存放在model中,可通过
Map
map = model.asMap();
4.5 自定义错误
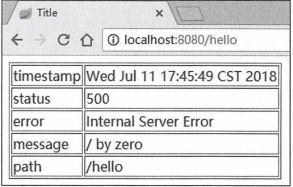
springboot中返回的错误信息有五条
- timestamp
- status
- error
- message
- path
springboot中默认的错误页404
500
![]()
默认错误有BasicErrorController类处理
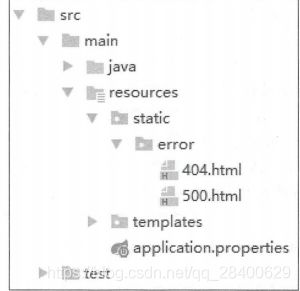
4.5.1 简单配置 只定义HTML页面
当使用thymeleaf模板,则在template下error下写入错误页面
4.5.2 处理JSON
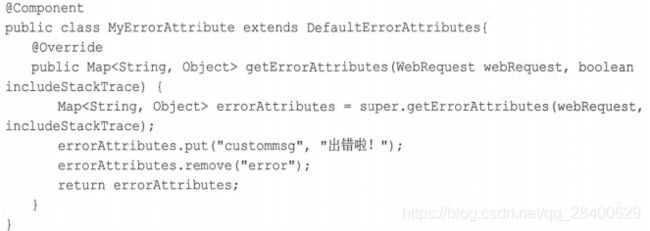
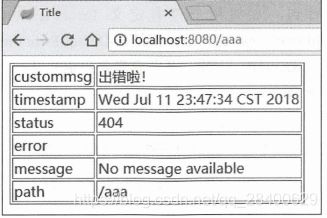
1. 自定义Error数据
当系统没有提供ErrorAttributes时才会采用DefaultErrorAttributes,因此自定义自己的ErrorAttributes(继承DefaultErrorAttributes)
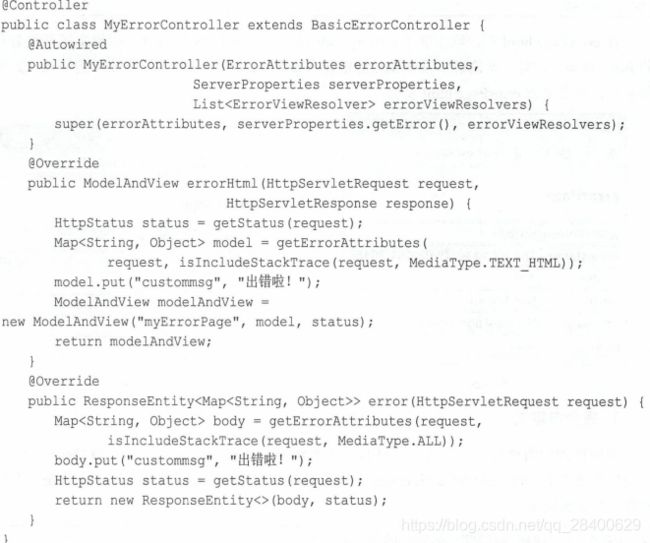
Postman工具
2. 自定义Error视图
3. 完全自定义
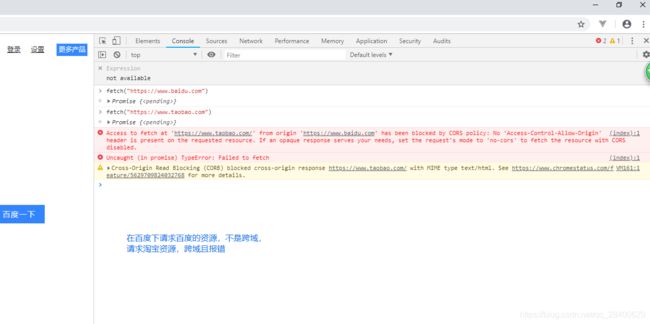
4.6 Cors支持 cross-origin resource sharing 跨域请求
最常见的前端跨域请求时JSONP(只支持get请求)
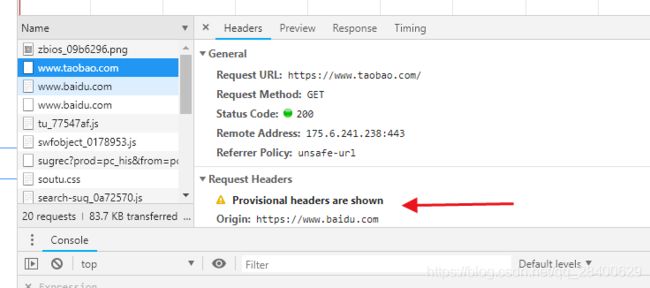
// 当浏览器发起请求时,请求头携带如下信息
Host: localhost:8080
Origin: http://localhost:8081
Referer: http://localhost:8081/index.html

// cors支持 服务器给出的响应信息
Access-Control-Allow-Origin: http://localhost:8081
Content-Length: 20
Content-Type: text/plain;charest=UTF-8
Date: Thu, 12 Jul 2018 12:51:14 GMT
跨域请求流程
配置跨域的方式有两种:
方式一
@RestController
@RequestMapping("/book")
public class BookController {

    @PostMapping("/")
    @CrossOrigin(value = "http://localhost:8081",maxAge = 1800,allowedHeaders = "*" )
    public String addBook(String name){
        return "receive" + name;
    }
}
方式二:全局配置
@Configuration
public class MyWebMvcConfig implements WebMvcConfigurer {
    public void addCrossMappings(CorsRegistry registy){
        registy.addMapping("/book/**")
                .allowedHeaders("*")
                .allowedMethods("*")
                .maxAge(1800)
                .allowedOrigins("http://localhost:8081");
    }
}
4.7 配置类与XML配置
4.8 注册拦截器
依赖接口:HandlerInterceptor
且执行的顺序为:preHandle-->Controller-->postHandle-->afterCompletion 当preHandle返回true,后面的方法才执行
创建拦截器
package com.github.afkbrb.lightblogback.Handle;

import org.springframework.web.servlet.HandlerInterceptor;
import org.springframework.web.servlet.ModelAndView;

import javax.servlet.http.HttpServletRequest;
import javax.servlet.http.HttpServletResponse;

public class MyInterceptor implements HandlerInterceptor {

    @Override
    public boolean preHandle(HttpServletRequest request, HttpServletResponse response, Object handler) throws Exception {
        return true;
    }

    @Override
    public void postHandle(HttpServletRequest request, HttpServletResponse response, Object handler, ModelAndView modelAndView) throws Exception {

    }

    @Override
    public void afterCompletion(HttpServletRequest request, HttpServletResponse response, Object handler, Exception ex) throws Exception {

    }
}
配置拦截器
4.10 整合Servlet、Filter和Listener
@WebServlet、@WebFilter、@WebListener
并且@ServletComponentScan实现对以上包的扫描
4.11 路径映射
    // 配置如下可以直接通过http://localhost:8080/login直接访问了
    @Override
    public void addViewControllers(ViewControllerRegistry registry) {
            registry.addViewController("/login").setViewName("login");
            registry.addViewController("/index").setViewName("index");
    }
4.12 配置AOP
- Joinpoint 类里面可以被增强的方法即为连接点。例如,想修改哪个方法的功能,那么该方法就是一个连接点。
- PointCut 对 Joinpoint 进行拦截的定义即为切入点,例如,拦截所有以 insert 开始的方法,这个定义即为切入点。
- Advice 拦截到 Joinpoint 之后所要做的事情就是通知。例如, 上文说到的打印日志监控通知分为前直通知、后直通知、异常通知、最终通知和环绕通知。
- Aspect Pointcut Advice 的结合。
- Target 要增强的类称为 Target
springboot中使用
添加依赖:spring-boot-starter-aop
创建service类
package com.github.afkbrb.lightblogback.service;

import org.springframework.stereotype.Service;

@Service
public class UserService {

    public String getUserId(Integer id){
        System.out.println("get ...");
        return "user";
    }

    public void deleteUserById(Integer id){
        System.out.println("delete ...");
    }
}
切面
package com.github.afkbrb.lightblogback.Aspect;

import org.aspectj.lang.JoinPoint;
import org.aspectj.lang.ProceedingJoinPoint;
import org.aspectj.lang.annotation.*;
import org.springframework.stereotype.Component;

@Component
@Aspect
public class LogAspect {

    @Pointcut("execution(* com.github.afkbrb.lightblogback.service.*.*(..))")
    public void pc1(){

    }

    @Before(value = "pc1()")
    public void before(JoinPoint jp){
        String name = jp.getSignature().getName();
        System.out.println(name+"方法开始执行");
    }

    @After(value = "pc1()")
    public void after(JoinPoint jp){
        String name = jp.getSignature().getName();
        System.out.println(name+"方法执行结束");
    }

    @AfterReturning(value = "pc1()",returning = "result")
    public void afterReturning(JoinPoint jp,Object result){
        String name = jp.getSignature().getName();
        System.out.println(name + "方法返回值:" + result);
    }

    @AfterThrowing(value = "pc1()",throwing = "e")
    public void afterThrowing(JoinPoint jp, Exception e){
        String name = jp.getSignature().getName();
        System.out.println(name + "方法抛出异常,为:" + e.getMessage());
    }

    @Around("pc1()")
    public Object around(ProceedingJoinPoint pjp) throws Throwable{
        return pjp.proceed();
    }
}
4.13 其他
- favicon.ico 浏览器选项卡上的图标 位置在static下
第五章:Springboot整合持久层技术
5.1 整合JDBCTemplate
自动化配置JdbcTemplateAutoConfiguration
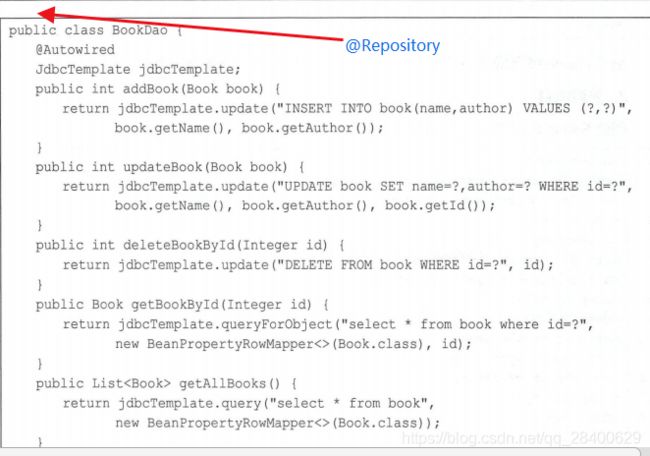
使用:
1. 创建数据库
2. 依赖:spring-boot-starter-jdbc mysql-connector-java、连接池druid
2. 数据库配置
3. 实体类
4. dao层
4. service层
5. controller层
5.2 整合Mybatis
使用方式:
1. 数据库配置信息
2. 数据库、实体类
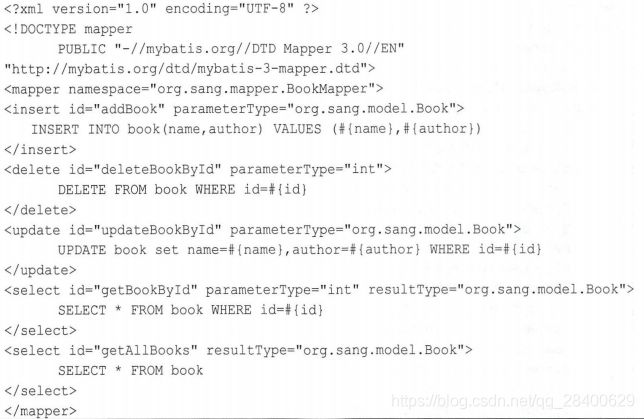
3. 数据库访问层
mapper
4. Mapper.xml
5. service、controller
6. pom.xml
除了依赖,需要指明资源文件位置
            org.springframework.boot
            spring-boot-maven-plugin

                com.github.afkbrb.lightblogback.Application


            src/main/java

                **/*.xml


            src/main/resources
5.3 整合Spring data jpa
JPA:java persistence api
JPA制定了ORM规范,Hibernate实现了这些规范
使用:
1. 添加依赖:spring-boot-starter-data-jpa
2. 数据配置
注:transient注解表示生成数据库中表时,该属性被忽略
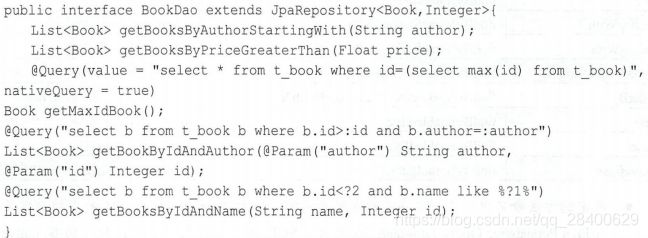
3. dao接口
5.4 多数据源
配置多个数据库连接信息(对于持久层都如此),但不同持久层使用方式不同
5.4.1 JDBCTemplate
1. 配置数据源
2. 配置JdbcTemplate
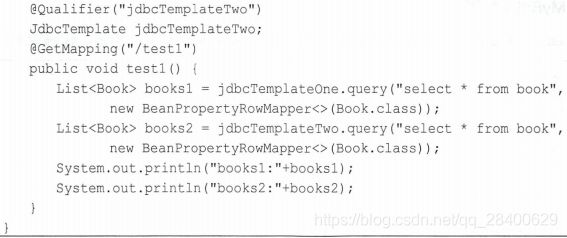
3. controller实现(没有实现service层,直接将JdbcTemplate注入)
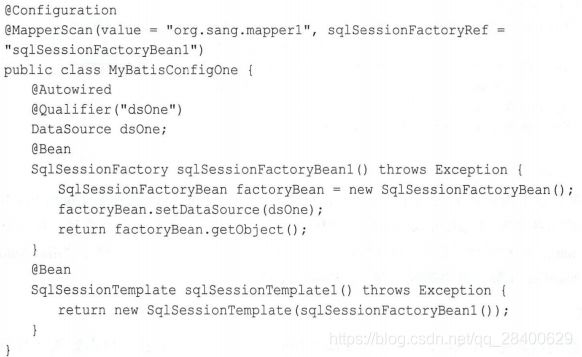
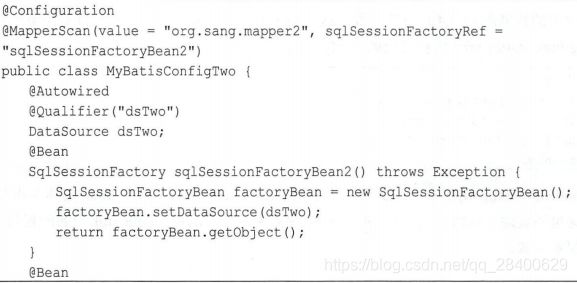
5.4.2 Mybatis多数据源
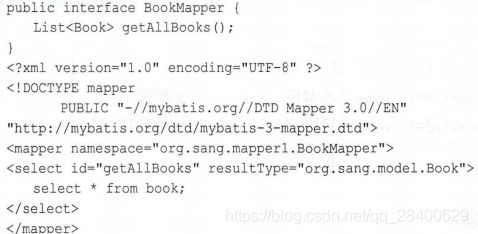
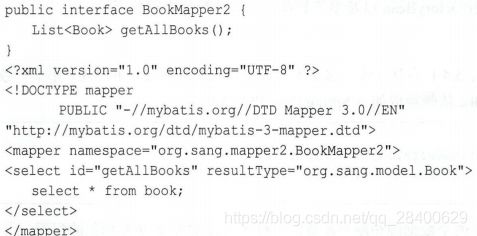
1. 配置mybatis,提供sqlsessionFactory实例和sqlSessionTemplate实例
2. mapper
5.4.3 JPA多数据源
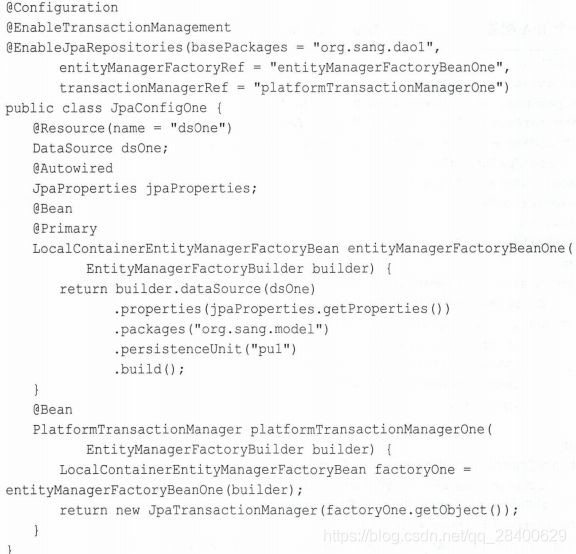
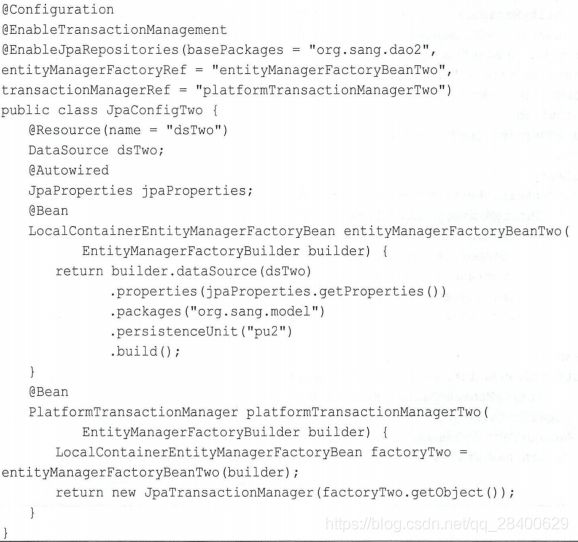
添加额外的配置
第六章:springboot整合NoSql
非关系型数据库:
- Key/Value存储:Redis
- 列存储数据库
- 文档型数据库:MongoDB
- 图形数据库
6.1 Redis
redis的java客户端:
- Jedis
- JRedis
- Spring Data Redis
6.1.1 单个Redis使用
1. 添加依赖:spring-boot-starter-data-redis,引入Jedis
    org.springframework.boot
    spring-boot-starter-data-redis


            io.lettuce
            lettuce-core


    redis.clients
    jedis
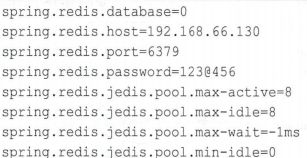
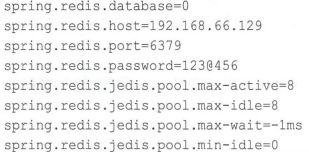
2. 配置Redis
// redis库的编号,redis中提供了16个database:0-15
spring.redis.database=O
// redis实例地址
spring.redis.host=l92.168.248.144
// 端口号
spring.redis.port=6379
// 密码
spring.redis.password=l23@456
// 最大连接数
spring.redis.jedis.pool.max-actve=8
// 最大空闲数
spring.redis.jedis.pool.max-idle=8
// 最大阻塞等待时间  -1表示没有限制
spring.redis.jedis.pool.max-wait=-lms
// 最小空闲数
spring.redis.jedis.pool.min-idle=O
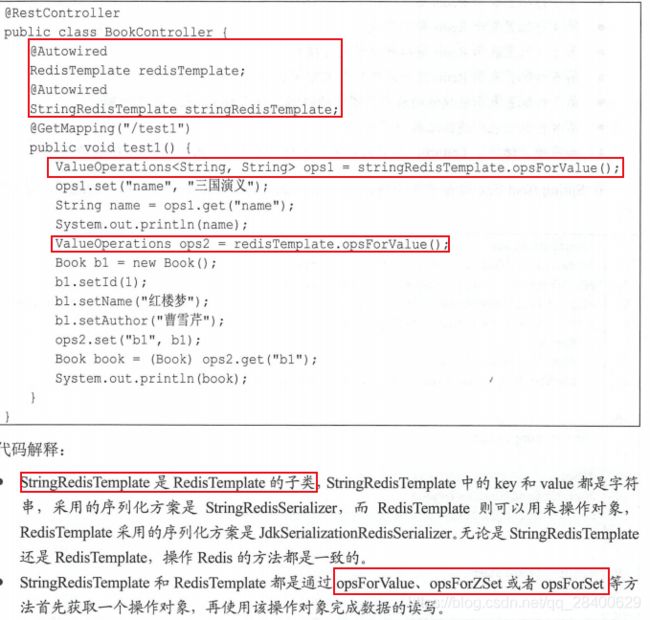
3. controller使用
6.1.2 Redis集群
1. redis介绍
Redis集群管理工具redis-trib.rb 依赖环境Ruby
windows环境下可使用RedisDesktopManger
win10创建集群:https://blog.csdn.net/tianshuhao521/article/details/98849203 作者:tianshuhao521
2. springboot整合redis集群
1) 创建springboot项目
2) 配置集群信息 结构清晰,使用yml格式的配置文件
spring:
  redis:
    cluster:
      ports:
        - 8001
        - 8002
        - 8003
        - 8004
        - 8005
        - 8006
      host: 192.168.248.144
      poolConfig:
        max-total: 8
        max-idle: 8
        max-wait-millis: -1
        min-idle: 0
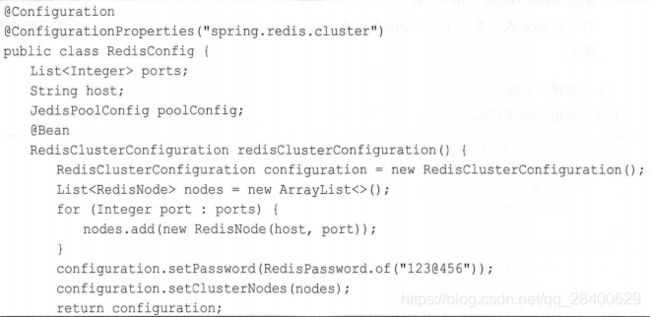
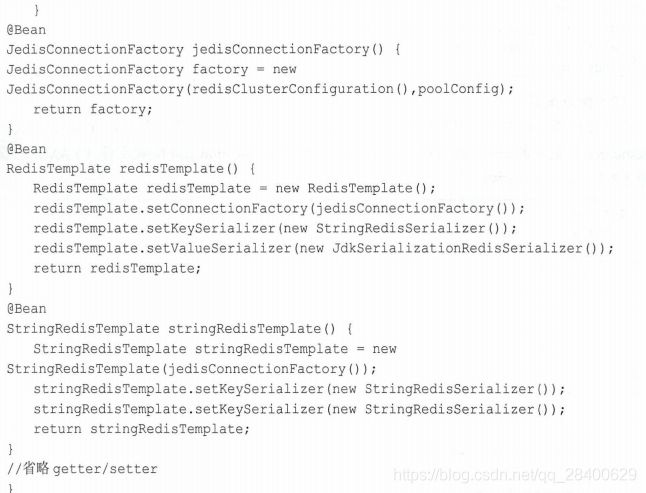
3) 配置redis
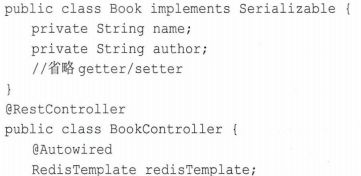
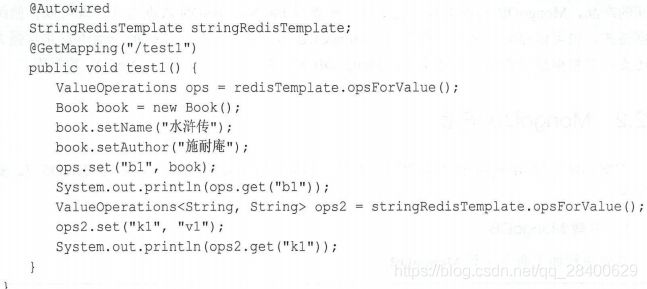
4) controller
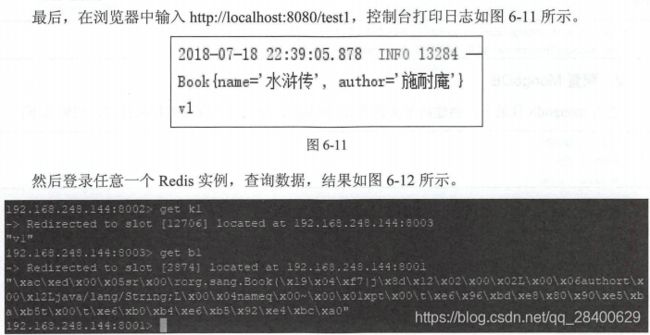
5) 结果
6.3 Session共享
独立的Session服务器 Session与Redis组合使用
6.3.1 session共享配置
1. 添加依赖 spring session可以做到透明化替换应用的Session容器
    org.springframework.session
    spring-session-data-redis
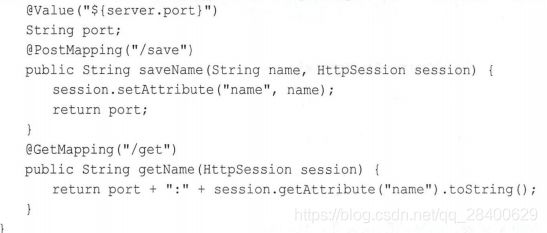
2. controller
save接口用来向session中存储数据,get接口从session中获取数据
server.port项目启动的端口号(区分哪个服务器提供服务)
session此时存储在redis服务器上
6.3.2 负载均衡nginx
第七章:RESTful服务
representational state transfer:是一种风格
第八章:开发者工具与单元测试
8.1 devtools
热部署
依赖:spring-boot-devtools true
8.2 devtools实战
自动重启技术涉及两个类加载器:
- baseclassloader 用来加载不会变化的类,例如引入第三方jar
- restartclassloader 加载自己写的变化的类
自定义监控资源:springboot默认在以下的资源不会触发自动重启
- /META-INF/maven
- /META-INF/resources
- /static
- /public
- /templates
需添加:默认不触发的目录中剔除static
spring.devtools.restart.exclude=static/**
8.3 单元测试
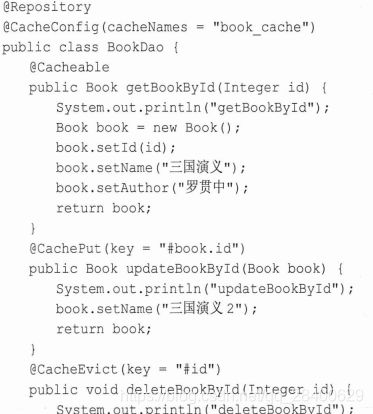
第九章:Spring Boot缓存
第一次调用该方法时,正常走完方法保存数据,再次调用时,直接调用数据即可
9.1 Ehcache 2.x缓存
1. 创建项目,添加依赖
    org.springframework.boot
    spring-boot-starter-cache


    net.sf.ehcache
    ehcache
2. 缓存配置文件 resources目录下
- maxElementsInMemory 最大缓存个数
- eternal 缓存对象是否永久有效 当为true时,timeout将不起作用
- timeToIdleSeconds 表示缓存对象在失效前允许闲置的时间 当eternal为false时才生效
- timeToLiveSeconds 在失效前允许存活的时间 当eternal为false时才生效
-
overflowToDisk 内存数量达到maxElementsInMemory时,Ehcache是否将对象写到磁盘中
-
diskExpiryThreadlntervalSeconds 磁盘失效线程运行时间间隔
spring.cache.ehcache.config=classpath:config/another-config.xml
3. 开启缓存
@EnableCaching
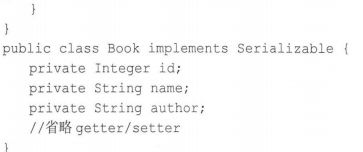
4. 实体类
9.2 Redis缓存(NoSql章节下)
第十章:Spring Boot 安全管理
10.1 spring security基本配置
添加依赖:spring-boot-starter-security
10.1.2 配置用户和密码 启动项目默认生成的用户名和密码
spring.security.user.name=sang
spring.security.user.password=123
spring.security.user.role=admin
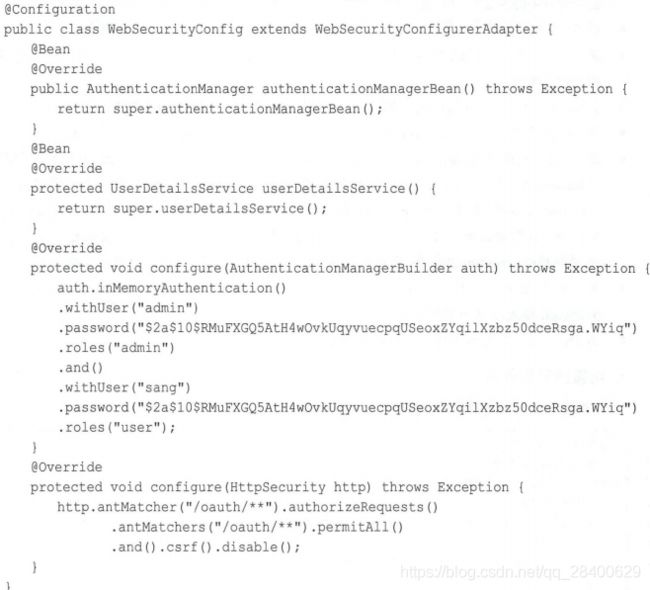
10.1.3 基于内存认证
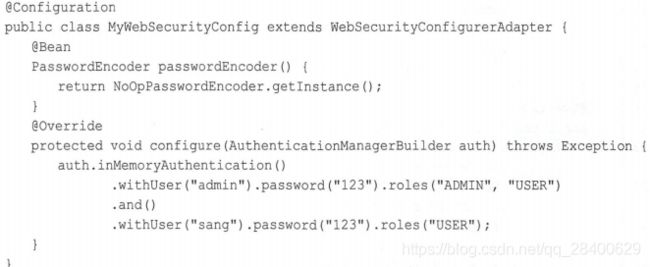
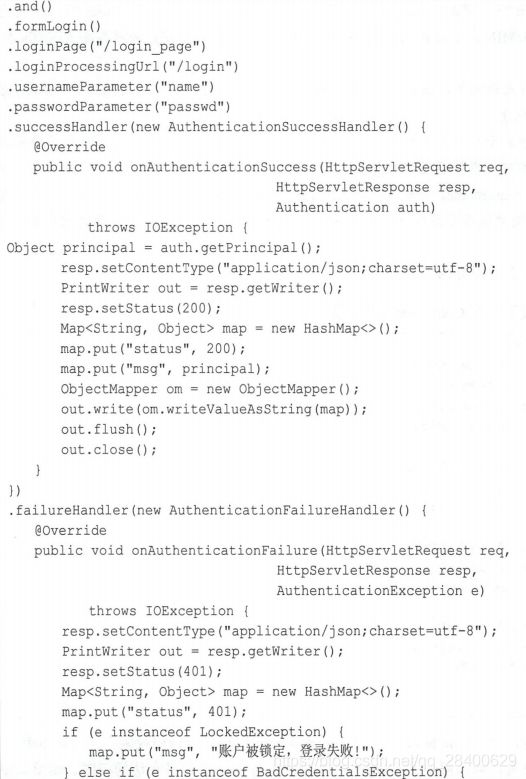
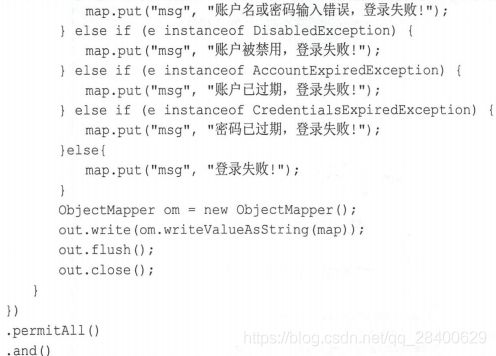
10.1.4 HttpSecurity
package com.github.afkbrb.lightblogback.configurer;
import org.springframework.context.annotation.Bean;
import org.springframework.context.annotation.Configuration;
import org.springframework.security.config.annotation.authentication.builders.AuthenticationManagerBuilder;
import org.springframework.security.config.annotation.web.builders.HttpSecurity;
import org.springframework.security.config.annotation.web.configuration.WebSecurityConfigurerAdapter;
import org.springframework.security.crypto.password.NoOpPasswordEncoder;
import org.springframework.security.crypto.password.PasswordEncoder;

@Configuration
public class MyWebSecurityConfig extends WebSecurityConfigurerAdapter {

    @Bean
    PasswordEncoder passwordEncoder() {
        return NoOpPasswordEncoder.getInstance();
    }
    // 配置三个用户
    // root具备  ADMIN和DBA角色
    // ...
    @Override
    protected void configure(AuthenticationManagerBuilder auth) throws Exception {
        auth.inMemoryAuthentication()
                .withUser("root").password("123").roles("ADMIN","DBA")
                .and()
                .withUser("admin").password("123").roles("ADMIN","USER")
                .and()
                .withUser("sang").password("123").roles("USER");
    }

    // 访问 /admin/** 必须具备ADMIN的角色
    @Override
    protected void configure(HttpSecurity http) throws Exception {
        http.authorizeRequests()
                .antMatchers("/admin/**")
                .hasRole("ADMIN")
                .antMatchers("/user/**")
                .access("hasAnyRole('ADMIN','USER')")
                .antMatchers("/db/**")
                .access("hasRole('ADNIN') and hasRole('DBA')")
                .anyRequest()
                .authenticated()
                .and()
                .formLogin()
                .loginProcessingUrl("/login")
                .permitAll()
                .and()
                .csrf()
                .disable();
    }
}
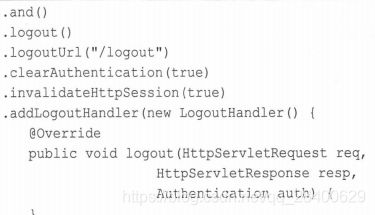
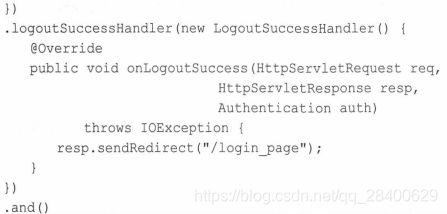
// 注销
10.1.8 密码加密
- 散列算法
- 哈希函数
- 加盐
BCryptPasswordEncoder使用BCrypt强哈希函数
10.2 基于数据库的认证
1. 创建数据库
2. 创建项目
3. 配置数据库 application.properties
4. 创建实体类
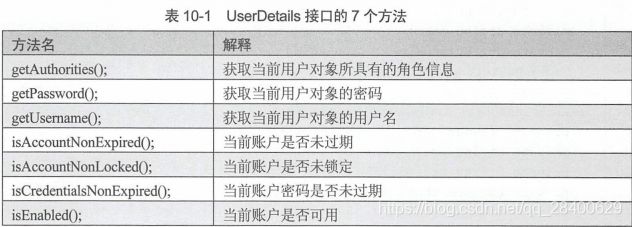
User
package com.github.afkbrb.lightblogback.model;

import org.springframework.security.core.GrantedAuthority;
import org.springframework.security.core.authority.SimpleGrantedAuthority;
import org.springframework.security.core.userdetails.UserDetails;

import java.util.ArrayList;
import java.util.Collection;
import java.util.List;

public class User implements UserDetails {

    private Integer id;
    private String username;
    private String password;
    private Boolean enabled;
    private Boolean locked;
    private List roles;

    @Override
    public Collection getAuthorities() {
        List authorities = new ArrayList<>();
        for (Role role:roles) {
            authorities.add(new SimpleGrantedAuthority(role.getName()));
        }
        return authorities;
    }

    @Override
    public String getPassword() {
        return password;
    }

    @Override
    public String getUsername() {
        return username;
    }

    @Override
    public boolean isAccountNonExpired() {
        return true;
    }

    @Override
    public boolean isAccountNonLocked() {
        return !locked;
    }

    @Override
    public boolean isCredentialsNonExpired() {
        return true;
    }

    @Override
    public boolean isEnabled() {
        return enabled;
    }

    public Integer getId() {
        return id;
    }

    public void setId(Integer id) {
        this.id = id;
    }

    public void setUsername(String username) {
        this.username = username;
    }

    public void setPassword(String password) {
        this.password = password;
    }

    public Boolean getEnabled() {
        return enabled;
    }

    public void setEnabled(Boolean enabled) {
        this.enabled = enabled;
    }

    public Boolean getLocked() {
        return locked;
    }

    public void setLocked(Boolean locked) {
        this.locked = locked;
    }

    public List getRoles() {
        return roles;
    }

    public void setRoles(List roles) {
        this.roles = roles;
    }

    @Override
    public String toString() {
        return "User{" +
                "id=" + id +
                ", username='" + username + '\'' +
                ", password='" + password + '\'' +
                ", enabled=" + enabled +
                ", locked=" + locked +
                ", roles=" + roles +
                '}';
    }
}
10.3 高级配置
1. 角色继承 一个用户具有多个角色
spring security中RoleHiberarchy
ROLE_dba > ROLE_admin > ROLE_user:
2. 动态配置权限
1) 数据库设计
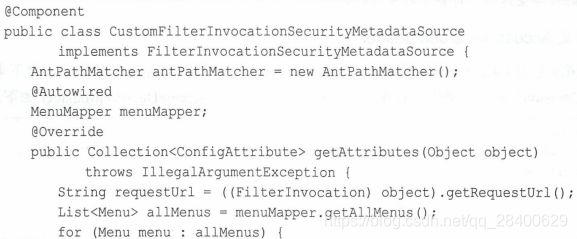
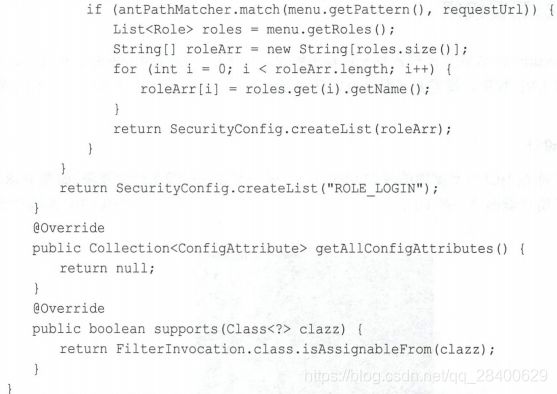
2) 自定义FilterInvocationSecurityMetadataSource
spring security通过FilterInvocationSecurityMetadataSource接口中的getAttributes确定需要哪些角色
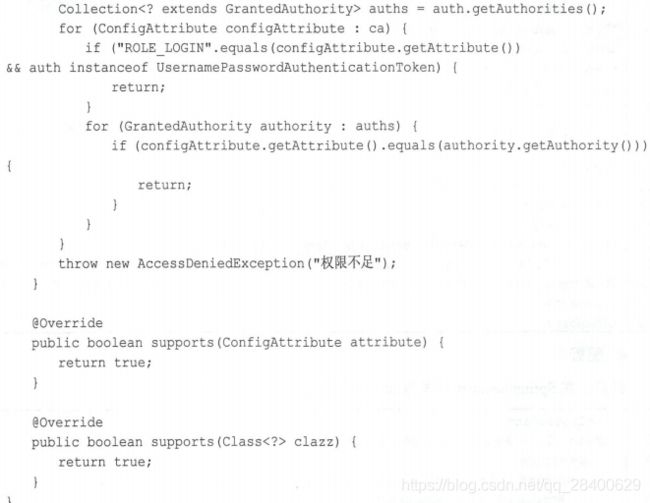
3) 自定义AccessDecisionManager
10.4 OAuth 2
开放标准,该标准允许用户让第三方应用访问该用户在某一网站存储的私密资源(图像、照片、视频)
例子:qq登录知乎,qq授权给知乎,但也可以将授权收回
OAuth 2角色
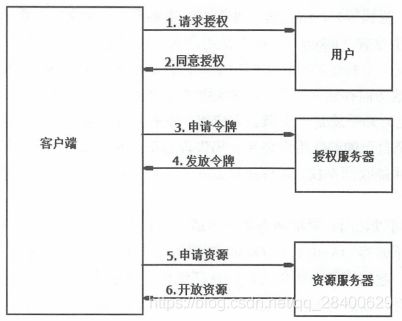
授权流程:
授权模式:
- 授权码
- 简化模式
- 密码模式
- 客户端模式
实践:
1) 添加依赖:
    org.springframework.security.oauth
    spring-boot-starter-web
application.properties
2) 授权服务器
package com.github.afkbrb.lightblogback.configurer;

import org.springframework.beans.factory.annotation.Autowired;
import org.springframework.context.annotation.Configuration;
import org.springframework.data.redis.connection.RedisConnectionFactory;
import org.springframework.security.authentication.AuthenticationManager;
import org.springframework.security.core.userdetails.UserDetailsService;
import org.springframework.security.crypto.bcrypt.BCryptPasswordEncoder;
import org.springframework.security.crypto.password.PasswordEncoder;
import org.springframework.security.oauth2.config.annotation.configurers.ClientDetailsServiceConfigurer;
import org.springframework.security.oauth2.config.annotation.web.configuration.AuthorizationServerConfigurer;
import org.springframework.security.oauth2.config.annotation.web.configuration.AuthorizationServerConfigurerAdapter;
import org.springframework.security.oauth2.config.annotation.web.configuration.EnableAuthorizationServer;
import org.springframework.security.oauth2.config.annotation.web.configurers.AuthorizationServerEndpointsConfigurer;
import org.springframework.security.oauth2.config.annotation.web.configurers.AuthorizationServerSecurityConfigurer;
import org.springframework.security.oauth2.provider.token.store.redis.RedisTokenStore;

@Configuration
@EnableAuthorizationServer
// 自定义类继承AuthorizationServerConfigurerAdapter  完成对授权器的配置,
// 通过@EnableAuthorizationServer开启授权服务器
public class AuthorizationServerConfig extends AuthorizationServerConfigurerAdapter {

    // 注入AuthenticationManager   支持password模式
    @Autowired
    AuthenticationManager authenticationManager;

    // 注入RedisConnectionFactory   完成Redis缓存,将令牌信息存储到Redis中
    @Autowired
    RedisConnectionFactory redisConnectionFactory;

    // 注入UserDetailsService   该对象为刷新token提供支持
    @Autowired
    UserDetailsService userDetailsService;

    // 为密码加密
    PasswordEncoder passwordEncoder() {
        return new BCryptPasswordEncoder();
    }
    // 支持client_id和client_secret做登录认证
    @Override
    public void configure(AuthorizationServerSecurityConfigurer security) throws Exception {
        security.allowFormAuthenticationForClients();
    }

    // 配置password授权模式
    // accessTokenValiditySeconds 有效时间
    // resourceIds  资源id
    // secret 配置加密后的密码  明文123
    @Override
    public void configure(ClientDetailsServiceConfigurer client) throws Exception {
        client.inMemory()
                .withClient("password")
                .authorizedGrantTypes("password","refresh_token")
                .accessTokenValiditySeconds(1800)
                .resourceIds("rid")
                .scopes("all")
                .secret("$2a$10$RMuFXGQ5AtH4wOvkUqyvuecpqUSeoxZYqilXzbz50dceRsga.WYiq");
    }
    // authenticationManager  userDetailsService支持password刷新
    @Override
    public void configure(AuthorizationServerEndpointsConfigurer endpoints) throws Exception {
        endpoints.tokenStore(new RedisTokenStore(redisConnectionFactory))
                .authenticationManager(authenticationManager)
                .userDetailsService(userDetailsService);
    }
}
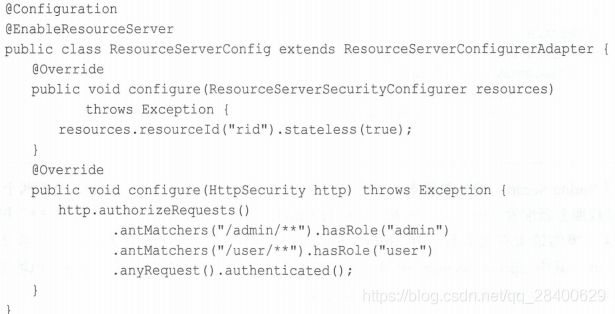
3) 配置资源服务器
4) 配置Security
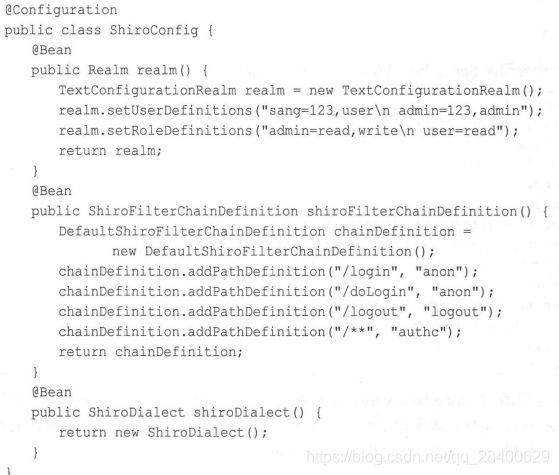
10.5 整合shiro
shiro:提供身份验证、授权、密码管理以及会话管理功能
1. 创建项目
添加依赖:
2. Shiro基本配置
![]()
第十一章:Spring boot 整合WebSocket
Http协议中,所有的请求都是由客户端发起,由服务端进行响应,服务端无法向客户端推送消息,但有时需要一些即时通信的业务(天气预报)
此时解决方案如下:
- 轮询:定时向服务端请求数据 缺点:请求太过频繁,容易高并发
- 长轮询:也是定时向服务端请求数据,但只有存在新数据时才会发送给客户端 缺点:长轮询并不能一直维持
- Applet和Flash:明日黄花了
websocket是一种单个tcp连接上进行双工通信的协议,允许服务端主动向客户端推送数据
在WebSocket协议中,浏览器和服务器只需完成一次协议,两者之间就可以直接创建持久性连接,并进行双向传输
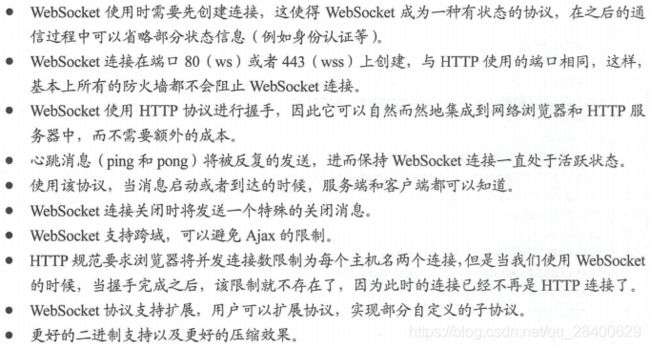
特点:
应用:
整合:
1. 消息群发
1) 创建项目 添加依赖
    org.springframework.boot
    spring-boot-starter-websocket


    org.webjars
    webjars-locator-core


    org.webjars
    sockjs-client
    1.1.2


    org.webjars
    stomp-websocket
    2.3.3


    org.webjars
    jquery
    3.3.1
2) 配置WebSocket
stomp是一个简单的可互操作的协议,用于通过中间服务器在客户端之间进行异步消息传递
package com.github.afkbrb.lightblogback.configurer;

import org.springframework.context.annotation.Configuration;
import org.springframework.messaging.simp.config.MessageBrokerRegistry;
import org.springframework.web.socket.config.annotation.EnableWebSocketMessageBroker;
import org.springframework.web.socket.config.annotation.StompEndpointRegistry;
import org.springframework.web.socket.config.annotation.WebSocketMessageBrokerConfigurer;

@Configuration
// 开启WebSocket消息代理
@EnableWebSocketMessageBroker
public class WebSocketConfig implements WebSocketMessageBrokerConfigurer {
    @Override
    public void configureMessageBroker(MessageBrokerRegistry config) {
        // 消息代理前缀,如果消息的前缀是/topic,就会将消息转发消息代理(broker)
        // 再由消息代理将消息广播给当前连接的客户端
        config.enableSimpleBroker("/topic");
        // 表示配置一个或多个前缀,通过这些前缀过滤出需要被注解方法处理的消息
        // 前缀/app的destination可以通过@MessageMapping注解的方法处理
        config.setApplicationDestinationPrefixes("/app");
    }

    @Override
    public void registerStompEndpoints(StompEndpointRegistry registry) {
        // 定义一个前缀/chat的endPoint,并开启sockjs(解决浏览器对WebSocket的兼容性问题)
        registry.addEndpoint("/chat").withSockJS();
    }
}
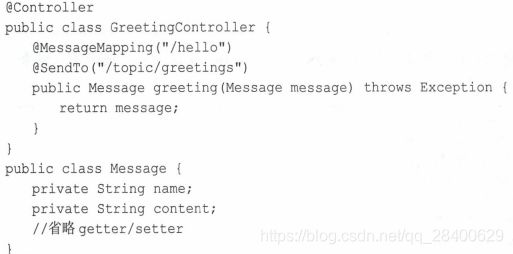
3) 定义Controller
@MessageMapping("/hello")用来接受/app/hello路径发送来的消息,再注解的方法对消息进行处理后,
再将消息转发到@SendTo定义的路径上
4) 聊天页面
chat.html
群聊

