[TOC]
https://github.com/geektime-g...
用Logstash和Beats构建数据管道
Logstash 入门及架构介绍
架构
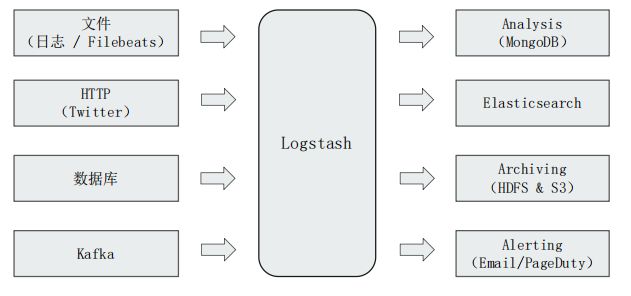
Logstash 是 ETL 工具/数据搜集处理引擎, 支持200多个插件.
概念
Pipeline
- 包含了 input -> filter -> output 三个阶段的处理流程
- 插件生命周期管理
- 队列管理
多 Pipelines 实例
- pipeline.id: my-pipeline_1
  path.config: "/etc/path/to/p1.config"
  pipeline.workers: 3
- pipeline.id: my-other-pipeline
  path.config: "/etc/different/path/p2.cfg"
queue.type: persistedpipeline.workers: Pipeline 线程数, 默认是 cpu 核心数pipeline.batch.size: Batcher 一次批量获取等待处理的文档树, 默认 125. 需结合 jvm.options 调节pipeline.batch.delay: Batcher 等待时间
Logstash Event
- 数据在内部流转时的具体表现形式。数据在 input 阶段被转换为 Event,在 output 被转化成目标格式数据
- Event 其实是一个 Java Object, 在配置文件中, 对 Event 的属性进行增删改查.
Queue
Logstash 的 Queue 有两种
- In Memory Queue
机器 Crash, 机器宕机, 都会引起数据的丢失
- Persistent Queue
queue.type.persisted默认是 memoryqueue.max_bytes: 4gb机器宕机数据也不会丢失, 数据保证会被消费, 可以替代 Kafka 等消息队列缓冲区的作用.
插件
Input Plugins
一个 Pipeline 可以有多个 input 插件. 完整 Plugins 列表
- Stdin / File
- Beats / Log4J / Elasticsearch / JDBC / Kafka / Rabbitmq / Redis
- JMX / HTTP / Websocket / UDP / TCP
- Google Cloud Storage / S3
- Github / Twitter
stdin
示例
stdin {}file
支持从文件中读取数据, 如日志文件
- 读取到文件新内容, 发现新文件
- 只读取一次, 重启后从上次读取的位置继续(通过 sincedb 实现)
- 文件发生归档操作(文档位置发生变化, 日志 rotation), 不影响当前内容读取.
参数
pathstart_positionsincedb_path
示例
file {
    path => "/Users/yiruan/dev/elk7/logstash-7.0.1/bin/movies.csv"
    start_position => "beginning"
    sincedb_path => "/dev/null"
}
jdbc
Codec Plugins
Codec 将原始数据 decode 成 Event, 同时负责将 Event encode 成目标数据, 完整 Plugins 列表
- Line / Multiline
- JSON / Avro / Cef (ArcSight Common Event Format)
- Dots / Rubydebug
line 单行
bin/logstash -e "input{stdin{codec=>line}} output{stdout{codec=>rubydebug}}"
bin/logstash -e "input{stdin{codec=>line}} output{stdout{codec=>dots}}"
将输入解析成单行来处理.
multiline 多行
参数
- pattern: 设置行匹配的正则表达式
what: 如果匹配成功, 那么匹配行属于上一个事件还是下一个事件
previousnext
negate: 是否对pattern结果取反
truefalse
multiline-exception.conf
input {
    stdin {
        codec => multiline {
            pattern => "^\s"
            what => "previous"
        }
    }
}
bin/logstash -f multi-exception.conf解析异常日志
json
json codec: 对 JSON 格式的内容进行解码(input)和编码(output), 为 JSON 数组中的每个元素分别创建一个 event.
示例
input {
    file {
        path => "/path/to/myfile.json"
        codec =>"json"
    }
}
rubydebug
以 ruby debug 格式输出
示例
output {
    stdout {
        codec => rubydebug
    }
}
Filter Plugins
Filter 处理 Event. 完整 Plugins 列表
- Metrics – Aggregate metrics
Filter Plugin 可以对 Logstash Event 进行各种处理,例如解析,删除字段,类型转换
- Date:日期解析
- Dissect:分割符解析
- Grok:正则匹配解析
- Mutate:处理字段。重命名,删除,替换
- Ruby:利用 Ruby 代码来动态修改 Event
mutate
mutate filter: 对字段应用变化(mutation), 包括重命名, 移除, 替换, 修改 event 的字段.
参数
split字符串分割remove_field移除字段add_field添加字段convert格式转换strip去除空白
示例
# 将 "HOSTORIP" 字段重命名为 "client_ip"
filter {
  mutate {
    rename => { "HOSTORIP" => "client_ip" }
  }
}


# 移除指定字段的前后空白
filter {
  mutate {
    strip => ["field1", "field2"]
  }
}

filter
mutate {
    split => { "genre" => "|" }
    remove_field => ["path", "host","@timestamp","message"]
}

mutate {
    split => ["content", "("]
    add_field => { "title" => "%{[content][0]}"}
    add_field => { "year" => "%{[content][1]}"}
}

mutate {
    convert => {
        "year" => "integer"
    }
    strip => ["title"]
    remove_field => ["path", "host","@timestamp","message","content"]
}
csv
将逗号分隔的值数据解析为各个字段
参数
seperatorcolumns
示例
filter {
    csv {
        separator => ","
        columns => ["id","content","genre"]
    }
}
date
date: 从字段中解析出日期, 并将其作为 events 中的 Logstash timestamp
示例
# 解析 logdate 字段, 并将其作为 logstash
filter {
  date {
    match => [ "logdate", "MMM dd yyyy HH:mm:ss" ]
  }
}
drop
drop: (可按条件筛选)丢弃 events
参数
percentage默认是100, 按百分比来抛弃
示例
# 丢弃日志级别为 debug 的日志
filter {
    if [loglevel] == "debug" {
        drop { }
    }
}


filter {
    if [loglevel] == "debug" {
        drop {
            percentage => 40
        }
    }
}
fingerprint
fingerprint: 使用一致性哈希来生成 fingerprint 字段
示例
# 使用 ip, @timestamp, message 这几个字段来生成一致性哈希, 并存储在 metadata 字段 "generated_id"
filter {
  fingerprint {
    source => ["IP", "@timestamp", "message"]
    method => "SHA1"
    key => "0123"
    target => "[@metadata][generated_id]"
  }
}
ruby
ruby filter: 执行 Ruby 代码
# 取消 90% 的 event
filter {
  ruby {
    code => "event.cancel if rand <= 0.90"
  }
}
dissect
dissect filter: 使用分隔符将非结构化event数据解析为字段.
- dissect 不使用正则表达式, 因此速度很快.
- 但如果每行的数据格式不一样, 那么使用
grokfilter 更合适
示例
# 用于解析下面这种格式的日志:
# Apr 26 12:20:02 localhost systemd[1]: Starting system activity accounting tool...
filter {
  dissect {
    mapping => { "message" => "%{ts} %{+ts} %{+ts} %{src} %{prog}[%{pid}]: %{msg}" }
  }
}


#  上述的日志会被解析为
{
  "msg"        => "Starting system activity accounting tool...",
  "@timestamp" => 2017-04-26T19:33:39.257Z,
  "src"        => "localhost",
  "@version"   => "1",
  "host"       => "localhost.localdomain",
  "pid"        => "1",
  "message"    => "Apr 26 12:20:02 localhost systemd[1]: Starting system activity accounting tool...",
  "type"       => "stdin",
  "prog"       => "systemd",
  "ts"         => "Apr 26 12:20:02"
}
kv
kv filter: 解析键值对
示例
# 用于解析如下这种格式的日志:
# ip=1.2.3.4 error=REFUSED
filter {
  kv { }
}


# 上述日志会被解析为
{
    "ip" = "1.2.3.4"
    "error" => "REFUSED"
}
grok
grok filter: 解析任意文本, 并将其结构化.
- 该工具非常适合 syslog、apache和其他 web 服务器日志、mysql日志, 以及通常用于供人类而非计算机使用的任何日志格式。
- Grok 工作原理是通过组合文本模式来匹配日志
- 官方提供了 Grok Debugger 来帮助调试 grok patterns, 该特性是由 X-Pack 特性提供的(Basic License), 免费使用.
与
dissect的主要应用区别dissect并不使用正则, 性能更好. 它仅适用于当数据格式基本稳定重复时效果好.grok则适用于每行文本结构不一样的情况可以将
dissect和grok同时混用于特定场景: 每行中的特定部分格式稳定重复, 但其他部分并不稳定时.- 使用
dissect解析稳定重复的部分 - 使用
grok处理剩余的部分
- 使用
在线 Grok 调试
Grok Pattern 语法
- 基本语法:
%{SYNTAX:SEMANTIC}SYNTAX: 匹配类型
SEMANTIC: 字段名
Grok 是基于正则表达式的(语法: Oniguruma), 因此除了 Grok 模式外, 也可以直接使用/混用正则语法.
- **Grok 所支持的正则语法请参见: the Oniguruma site**
Logstash 中默认提供的 Grok 模式请参见: logstash-patterns-core
上述Grok模式的部分中文解释: grok语法定义
简单示例
# 下面示例用于解析如下这种格式的日志:
# 55.3.244.1 GET /index.html 15824 0.043
input {
    file {
        path => "/var/log/http.log"
    }
}
filter {
    grok {
        match => { "message" => "%{IP:client} %{WORD:method} %{URIPATHPARAM:request} %{NUMBER:bytes} %{NUMBER:duration}" }
    }
}


#  上述日志解析结果为
{
    "client": "55.3.244.1"
    "method": "GET"
    "request": "/index.html"
    "bytes": 15824
    "duration": 0.043
}
Oniguruma 语法示例
#   Jan  1 06:25:43 mailserver14 postfix/cleanup[21403]: BEF25A72965: message-id=<[email protected]>
 filter {
      grok {
        patterns_dir => ["./patterns"]
        match => { "message" => "%{SYSLOGBASE} %{POSTFIX_QUEUEID:queue_id}: %{GREEDYDATA:syslog_message}" }
      }
    }


# contents of ./patterns/postfix:
# POSTFIX_QUEUEID [0-9A-F]{10,11}


# 匹配结果
timestamp: Jan  1 06:25:43
logsource: mailserver14
program: postfix/cleanup
pid: 21403
queue_id: BEF25A72965
syslog_message: message-id=<[email protected]>
dns
dns filter plugin: 执行标准或反向DNS
示例
# 执行反向域名解析(将ip解析到对应的域名)
filter {
  dns {
    reverse => [ "source_host" ]
    action => "replace"
  }
}
elasticsearch
elasticsearch filter: 从 es 中获取数据来填充字段
常用于从es中查找当前 event 对应的开始 event, 从而计算总的时间消耗等.
示例
# 从 logstash 收到 "end" event 时, 它使用 elasticsearch filter 来查找匹配的 "start" event(基于相同的操作id).
# 然后它从 "start" event 中获取 @timstamp 并赋值给 started
# 再使用 date 和 ruby filter 来计算出两个 event 的时间间隔
if [type] == "end" {
    elasticsearch {
        hosts => ["es-server"]
        query => "type:start AND operation:%{[opid]}"
        fields => { "@timestamp" => "started" }
    }
    date {
        match => ["[started]", "ISO8601"]
        target => "[started]"
    }
    ruby {
        code => 'event.set("duration_hrs", (event.get("@timestamp") - event.get("started")) / 3600) rescue nil'
    }
}
geoip
geoip filter: 添加 ip 对应的地理信息
示例
filter {
  geoip {
    source => "clientip"
  }
}
http
http filter: 集成外部 web 服务/REST APIs, 并允许通过任何 HTTP 服务或终端来充实 event.
jdbc_static
jdbc_static filter: 通过使用远程数据库预加载的数据来充实 event
示例
# 从远程数据库获取数据, 并在本地数据库缓存, 并使用这些缓存来充实当前 event
filter {
  jdbc_static {
    loaders => [
      {
        id => "remote-servers"
        query => "select ip, descr from ref.local_ips order by ip"
        local_table => "servers"
      },
      {
        id => "remote-users"
        query => "select firstname, lastname, userid from ref.local_users order by userid"
        local_table => "users"
      }
    ]
    local_db_objects => [
      {
        name => "servers"
        index_columns => ["ip"]
        columns => [
          ["ip", "varchar(15)"],
          ["descr", "varchar(255)"]
        ]
      },
      {
        name => "users"
        index_columns => ["userid"]
        columns => [
          ["firstname", "varchar(255)"],
          ["lastname", "varchar(255)"],
          ["userid", "int"]
        ]
      }
    ]
    local_lookups => [
      {
        id => "local-servers"
        query => "select descr as description from servers WHERE ip = :ip"
        parameters => {ip => "[from_ip]"}
        target => "server"
      },
      {
        id => "local-users"
        query => "select firstname, lastname from users WHERE userid = :id"
        parameters => {id => "[loggedin_userid]"}
        target => "user"
      }
    ]
    # using add_field here to add & rename values to the event root
    add_field => { server_name => "%{[server][0][description]}" }
    add_field => { user_firstname => "%{[user][0][firstname]}" }
    add_field => { user_lastname => "%{[user][0][lastname]}" }
    remove_field => ["server", "user"]
    jdbc_user => "logstash"
    jdbc_password => "example"
    jdbc_driver_class => "org.postgresql.Driver"
    jdbc_driver_library => "/tmp/logstash/vendor/postgresql-42.1.4.jar"
    jdbc_connection_string => "jdbc:postgresql://remotedb:5432/ls_test_2"
  }
}
jdbc_streaming
jdbc_streaming filter: 使用数据库数据来充实 event
示例
# The following example executes a SQL query and stores the result set in a field called `country_details`:
filter {
  jdbc_streaming {
    jdbc_driver_library => "/path/to/mysql-connector-java-5.1.34-bin.jar"
    jdbc_driver_class => "com.mysql.jdbc.Driver"
    jdbc_connection_string => "jdbc:mysql://localhost:3306/mydatabase"
    jdbc_user => "me"
    jdbc_password => "secret"
    statement => "select * from WORLD.COUNTRY WHERE Code = :code"
    parameters => { "code" => "country_code"}
    target => "country_details"
  }
}
memcached
memcached filter: 使用 memcach, 支持 GET 和 SET 操作.
translate
translate filter: 替换字段内容, 支持 hash 结构(字典) 或 文件的形式.
当前支持的文件格式:
- YAML
- JSON
- CSV
示例
# The following example takes the value of the response_code field, translates it to a description based on the values specified in the dictionary, and then removes the response_code field from the event
filter {
  translate {
    field => "response_code"
    destination => "http_response"
    dictionary => {
      "200" => "OK"
      "403" => "Forbidden"
      "404" => "Not Found"
      "408" => "Request Timeout"
    }
    remove_field => "response_code"
  }
}
useragent
useragent filter: 解析 user agent 字符串
示例
# The following example takes the user agent string in the agent field, parses it into user agent fields, and adds the user agent fields to a new field called user_agent. It also removes the original agent field:
filter {
  useragent {
    source => "agent"
    target => "user_agent"
    remove_field => "agent"
  }
}


# 解析结果
"user_agent": {
    "os": "Mac OS X 10.12",
    "major": "50",
    "minor": "0",
    "os_minor": "12",
    "os_major": "10",
    "name": "Firefox",
    "os_name": "Mac OS X",
    "device": "Other"
    }
Output Plugins
Output 是 pipeline 的最后一个阶段, 是将处理完的 Event 发送到特定的目的地. 完整 Plugins 列表
- Elasticsearch
- Email / Pageduty
- Influxdb / Kafka / Mongodb / Opentsdb / Zabbix
- Http / TCP / Websocket
- rubydebug
- dots 输出一个
., 常用于展示处理进度
elasticsearch
参数
hostsindexdocument_id
示例
elasticsearch {
    hosts => "http://localhost:9200"
    index => "movies"
    document_id => "%{id}"
}
stdout
示例
stdout {}

stdout { codec => rubydebug }
示例
简单示例
Logstash配置文件示例
input { stdin {} }

filter {
    grok {
        match => { "message" => "%{COMBINEDAPACHELOG}" }
    }
    date {
        match => { "timestamp", "dd/MMM/yyyy:HH:mm:ss Z" ]
    }
}

output {
    elasticsearch { hosts => ["localhost:9200"] }
    stdout { codec => rubydebug }
}- 使用:
bin/logstash -f demo.conf - 上面这个 pipeline 包含了: input / filter / output 这3个过程
导入 movies 示例
input {
  file {
    path => "/Users/yiruan/dev/elk7/logstash-7.0.1/bin/movies.csv"
    start_position => "beginning"
    sincedb_path => "/dev/null"
  }
}
filter {
  csv {
    separator => ","
    columns => ["id","content","genre"]
  }

  mutate {
    split => { "genre" => "|" }
    remove_field => ["path", "host","@timestamp","message"]
  }

  mutate {

    split => ["content", "("]
    add_field => { "title" => "%{[content][0]}"}
    add_field => { "year" => "%{[content][1]}"}
  }

  mutate {
    convert => {
      "year" => "integer"
    }
    strip => ["title"]
    remove_field => ["path", "host","@timestamp","message","content"]
  }

}
output {
   elasticsearch {
     hosts => "http://localhost:9200"
     index => "movies"
     document_id => "%{id}"
   }
  stdout {}
}
movies.csv 数据文件格式如下
利用JDBC 插件导入数据到Elasticsearch
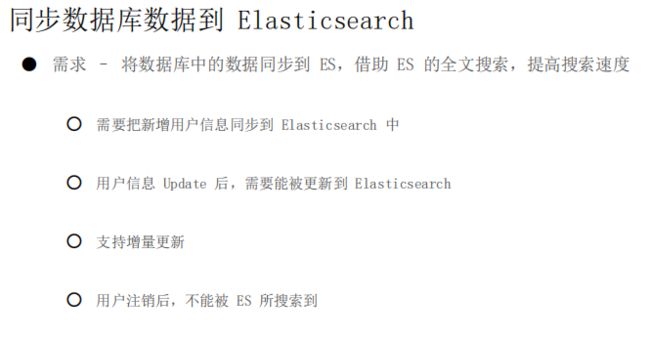
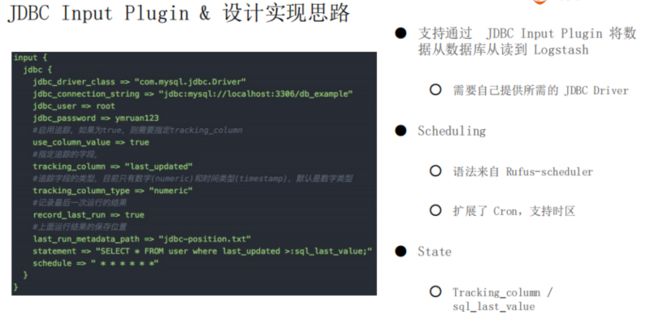
Demo
- https://spring.io/guides/gs/a...
- 支持 新增 / 更新 / 删除 三种 API
- User 字段包含了一个 last update 的字段
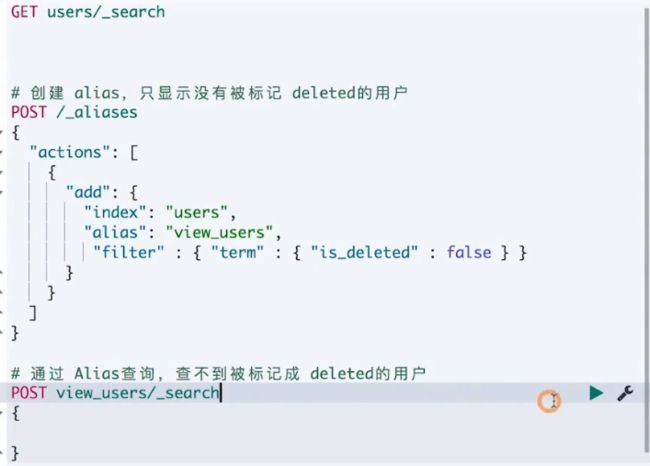
- User 表包含了一个 is deleted 字段
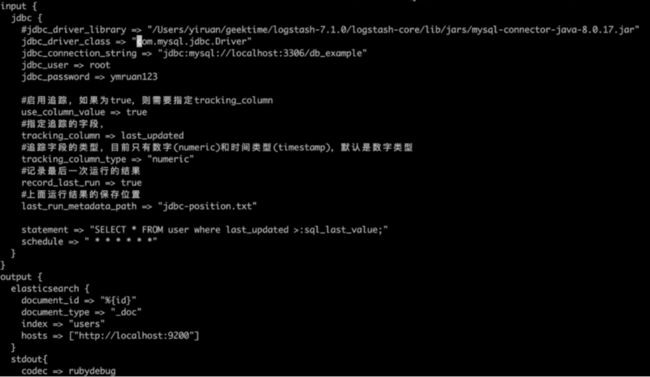
- 将
mysql-connector-java-8.0.17.jar拷贝到 logstash 的 logstash-core/lib/jars/ 地下 - 在 input 阶段加入 jdbc 相应配置
Beats介绍
Beats 是轻量级数据采集器(light weight data shippers)
- 以搜集数据为主
- 支持与 Logstash 或 ES 集成
- 特点: 全品类, 轻量级, 开箱即用(golang开发), 可插拔, 可扩展, 可视化
Metricbeat
Metricbeat 的组成
Module
- 搜集的指标对象, 例如不同的操作系统, 不同的数据库, 不同的应用系统
Metricset
一个 Module 可以有多个 metricset
以 System Module 为例, 其 metricset 有:
- core
- cpu
- disk io
- filesystem
- load
- memory
具体的指标集合. 以减少调用次数为原则进行划分
- 不同的 metricset 可以设置不同的抓取时长
Metricbeat 提供了大量的开箱即用的 Module
- https://www.elastic.co/guide/...
- 通过执行
metricbeat modules list查看 通过执行
metricbeat moudles enable启用指定 module需自行修改相关 module 的配置, 比如 mysql module 的配置文件在 modules.d/mysql.yml
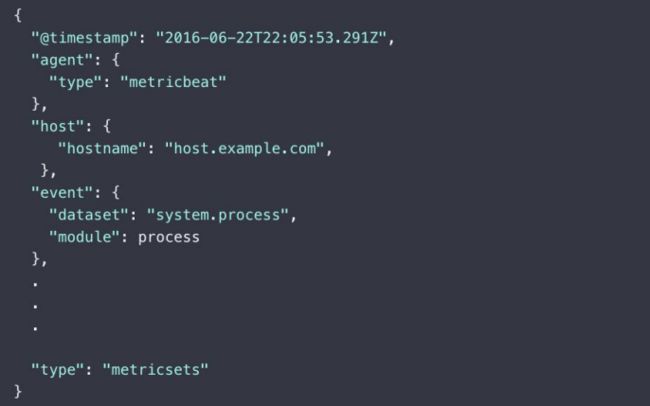
Metricbeat Event
安装
- 安装 Metricbeat
配置连接到 Elastic Stack: metricbeat.yml
metricbeat.config.modules:
  # Glob pattern for configuration loading
  path: ${path.config}/modules.d/*.yml

  # Set to true to enable config reloading
  # 将该值设为 true, 那么后续修改 modules.d 目录下的 yml 配置会自动重新 reload, 无需重启 metricbeat
  reload.enabled: true

  # Period on which files under path should be checked for changes
  reload.period: 10s


setup.template.settings:
  index.number_of_shards: 1
  index.codec: best_compression
  #_source.enabled: false
  # 由于这里部署的是单节点集群, 因此将副本分片数设为 0
  index.number_of_replicas: 0


# 设置 es 的url和账号密码
output.elasticsearch:
    hosts: ["myEShost:9200"]
    #username: "metricbeat_internal"
    #password: "YOUR_PASSWORD"


# 配置 Kibana 连接信息(仅在需要初始化 Kibana Dashboard 时使用), 若 Metricbeat 和 Kibana 在同一台服务器上则无需处理
setup.kibana:
    host: "mykibanahost:5601"
    username: "my_kibana_user"
    password: "{pwd}"


# ================================== General ===================================

# The name of the shipper that publishes the network data. It can be used to group
# all the transactions sent by a single shipper in the web interface.
# 这里建议为每台主机设置一个 name, 后续可在 event 的 "agent.name" 和 "host.name" 获取到该值
# 这里若未配置, 则会默认使用 host.hostname 来填充该值
# 不然就只能后续通过 "agent.hostname", "host.hostname" 来读取主机名(hostname)了
# 更推荐在这里设置 name
#name: "...."

# The tags of the shipper are included in their own field with each
# transaction published.
# 这里可以添加 tag, 方便后续在 kibana 中根据 tag 筛选要展示的一组服务器的数据
#tags: ["webserver", "p3"]

# Optional fields that you can specify to add additional information to the
# output.
#fields:
#  env: staging
查看可用的 modules
metricbeat modules list启用需要的 module
metricbeat modules enable- 修改各 module 的配置文件: modules/*.yml
验证 metricbeat 配置文件是否正确
metricbeat test config -e初始化 Kibana Dashboard
metricbeat setup -e启动 metricbeat
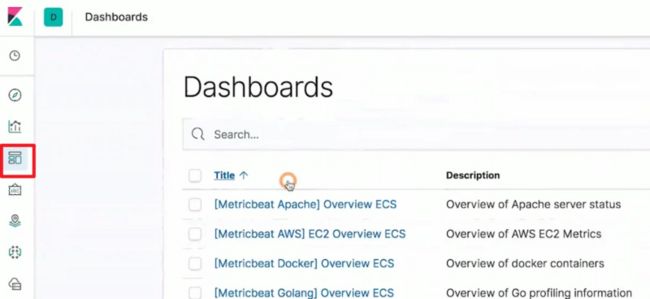
systemctl start metricbeat- 在 Kibana 的 Discover/Dashboard 中能看到 Metricbeat 数据
其他配置: https://www.elastic.co/guide/...
配置 Kibana Dashboard
metricbeat modules enable kibana
metricbeat modules enable elasticsearch
# 配置 kibana 可视化 dashboards 相关数据, 并写入 es
# 需确保 es 和 kibana 正在运行
metricbeat setup -e
#metricbeat setup --dashboards
Packetbeat
实时网络数据分析
Packetbeat - 实时网络数据分析,监控应用服务器之间的网络流量
- 常见抓包工具 - Tcpdump /wireshark
- 常见抓包配置 - Pcap 基于 libpcap,跨平台 / Af_packet 仅支持 Linux,基于内存映射嗅探,高性能
Packetbeat 支持的协议
- ICMP / DHCP / DNS / HTTP / Cassandra / Mysql / PostgresSQL / Redis / MongoDB / Memcache / TLS
- Network flows:抓取记录网络流量数据,不涉及协议解析
配置 Kibana Dashboard
https://www.elastic.co/guide/...
先修改 packetbeat.yml, 配置需要监听的端口等
# 配置 kibana dashboard
packetbeat setup --dashboards
Filebeat
简介
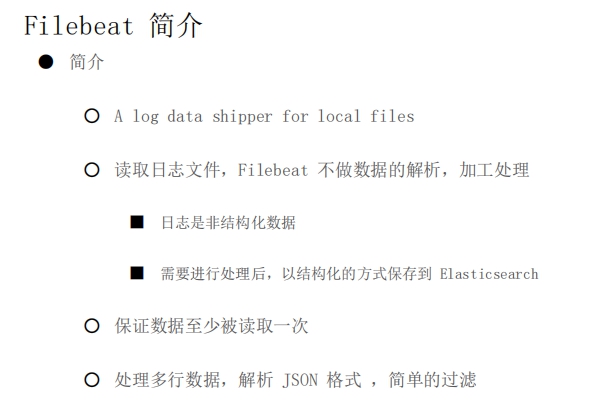
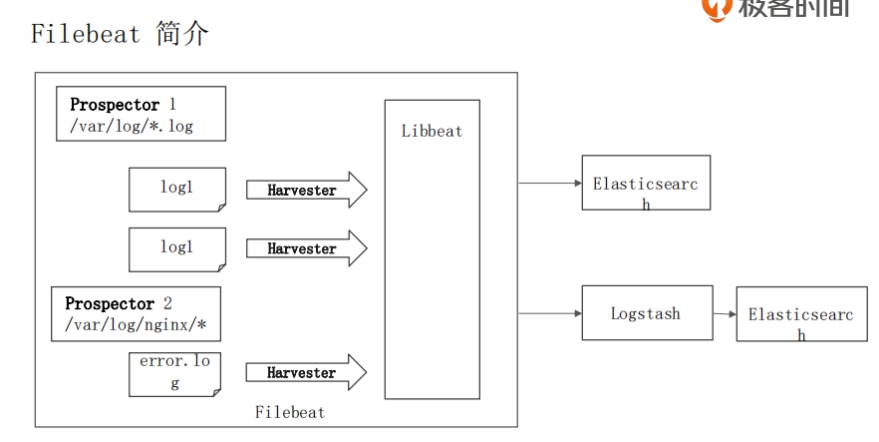
Filebeat 是用于采集本地日志文件的工具.
读取日志文件, Filebeat 不做数据的解析, 加工处理
- 日志是非结构化数据
- 需要进行处理后, 以结构化的方式保存到 ES
- 保证数据至少被读取一次
- 处理多行数据, 解析 JSON 格式, 简单的过滤
关于 FileBeat 的正则表达式支持可以查看: https://www.elastic.co/guide/...
组成
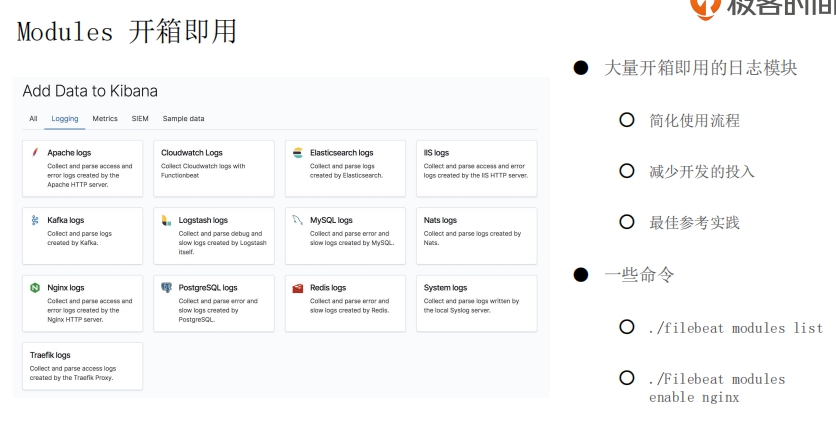
类似 Logstash, 它也有很多开箱即用的日志 Modules
- 简化使用流程
- 减少开发的投入
- 最佳参考实践
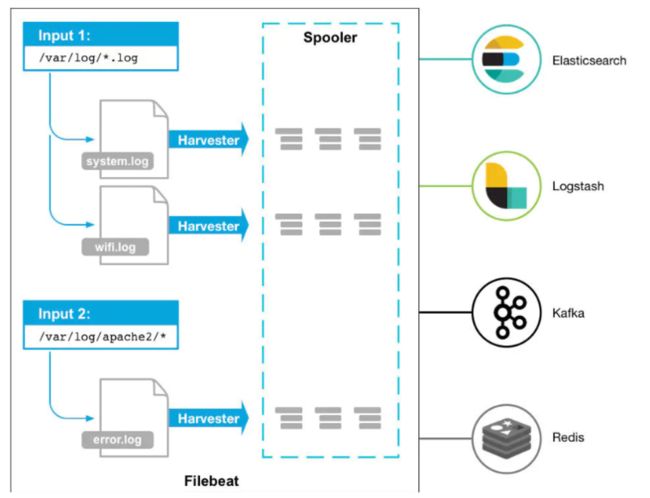
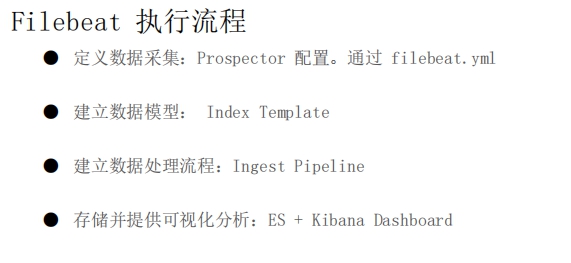
Filebeat 的执行流程
- 定义数据采集: Prospector 配置. 通过 filebeat.yml
- 建立数据模型: Index Template
- 建立数据处理流程: Ingest Pipeline
- 存储并提供可视化分析
与 Logstash 的对比
对比
- Logstash 是基于 Java 编写, 插件则是 JRuby 编写, 功能强大, 不仅仅是一个日志采集工具,它也是可以作为一个日志搜集工具,有丰富的input|filter|output插件可以使用。.但是对机器的资源消耗很高.
- Filebeat 则是采用 go 开发, 是 beats 的一个文件采集工具, 性能好, 部署简单.
推荐的架构
一些命令
# 查看所有可用的日志模块
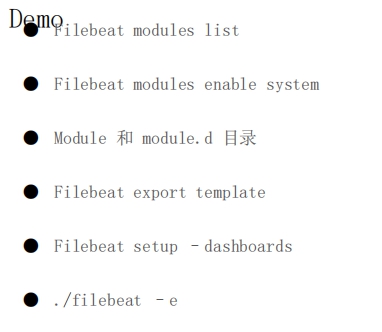
./filebeat modules list

# 启用系统日志模块
./filebeat modules enable system

# 启用 nginx 日志模块
./filebeat modules enable nginx

./filebeat export template

./filebeat setup -e

# 启动 filebeat
./filebeat -e
导出配置 export
导出到标准输出

filebeat export

- 参数: command
    config                # 导出当前的配置
     dashboard            # 导出已定义的 kibana dashboard
    ilm-policy            # 导出 ILM policy
    index-pattern        # 导出 kibana index patterm
    template            # 导出 index template
安装
预先创建 geo 的 ingest pipeline
PUT _ingest/pipeline/geoip-info
{
  "description": "Add geoip info",
  "processors": [
    {
      "geoip": {
        "field": "client.ip",
        "target_field": "client.geo",
        "ignore_missing": true
      }
    },
    {
      "geoip": {
        "field": "source.ip",
        "target_field": "source.geo",
        "ignore_missing": true
      }
    },
    {
      "geoip": {
        "field": "destination.ip",
        "target_field": "destination.geo",
        "ignore_missing": true
      }
    },
    {
      "geoip": {
        "field": "server.ip",
        "target_field": "server.geo",
        "ignore_missing": true
      }
    },
    {
      "geoip": {
        "field": "host.ip",
        "target_field": "host.geo",
        "ignore_missing": true
      }
    }
  ]
}
这里处理的字段目前是针对 nginx 日志
- 安装 Filebeat
配置连接到 Elastic Stack: filebeat.yml
# ============================== Filebeat modules ==============================

filebeat.config.modules:
  # Glob pattern for configuration loading
  path: ${path.config}/modules.d/*.yml

  # Set to true to enable config reloading
  reload.enabled: true

  # Period on which files under path should be checked for changes
  reload.period: 10s

# ======================= Elasticsearch template setting =======================

setup.template.settings:
  index.number_of_shards: 1
  index.number_of_replicas: 0
  #index.codec: best_compression
  #_source.enabled: false


# ========================== Filebeat global options ===========================
# How long filebeat waits on shutdown for the publisher to finish.
# Default is 0, not waiting.
# 在关闭 filebeat 时等待多久(默认是0, 这可能关闭时部分未 ack 的 event 在下一次启动 filebeat 时重复发送)
# 在未达到该值时, 但所有 event 已 ack, 那么 filebeat 也会关闭.
# 该值的设定很大程度取决于 filebeat 所在主机的运行环境以及当前output的状态
#filebeat.shutdown_timeout: 0
filebeat.shutdown_timeout: 1s


# ================================== General ===================================

# The name of the shipper that publishes the network data. It can be used to group
# all the transactions sent by a single shipper in the web interface.
# 这里建议为每台主机设置一个 name, 后续可在 event 的 "agent.name" 和 "host.name" 获取到该值
# 这里若未配置, 则会默认使用 host.hostname 来填充该值
# 不然就只能后续通过 "agent.hostname", "host.hostname" 来读取主机名(hostname)了
# 更推荐在这里设置 name
name: "...."

# The tags of the shipper are included in their own field with each
# transaction published.
# 这里可以添加 tag, 方便后续在 kibana 中根据 tag 筛选要展示的一组服务器的数据
#tags: ["webserver", "p3"]

# Optional fields that you can specify to add additional information to the
# output.
#fields:
#  env: staging


# 设置 es 的url和账号密码
output.elasticsearch:
    hosts: ["myEShost:9200"]
    #username: "metricbeat_internal"
    #password: "YOUR_PASSWORD"
    # 这里使用上面创建的 geoip-info 这个 ingest pipeline, 以添加 geo 信息
    pipeline: geoip-info
查看可用的 modules
filebeat modules list启用需要的 module
filebeat modules enable- 修改各 module 的配置文件: modules/*.yml
验证 filebeat配置文件是否正确
filebeat test config -e初始化 Kibana Dashboard 等
# 可查看官方文档, 可以只载入需要的 module 相关的配置, 而不是默认的一股脑全塞进去
filebeat setup -e
启动 filebeat
systemctl start filebeat- 在 Kibana 的 Discover/Dashboard 中能看到 filebeat数据
其他配置: https://www.elastic.co/guide/...
使用 RPM 方式安装的文件目录结构
| Type | Description | Location |
|---|---|---|
| home | Home of the Filebeat installation. | /usr/share/filebeat |
| bin | The location for the binary files. | /usr/share/filebeat/bin |
| config | The location for configuration files. | /etc/filebeat |
| data | The location for persistent data files. | /var/lib/filebeat |
| logs | The location for the logs created by Filebeat. | /var/log/filebeat |
配置选项
https://www.elastic.co/guide/...
在 filebeat.yml 中可以配置全局选项(global options)和通用选项(general options)
- 全局选项: 控制 publisher 的一些行为, 以及文件的存放路径.
- 通用选项: 所有 Elastic Beats 都支持的选项.
Filebeat 全局配置选项
filebeat.registry.pathfilebeat.registry.file_permissionsfilebeat.registry.flushfilebeat.registry.migrate_filefilebeat.shutdown_timeout默认禁用状态, 意味着当关闭 filebeat 并在下次启动时有可能导致部分 event 被重复发送.
Filebeat 在关闭之前最长的等待时间.
该项配置需要根据实际的运行环境及 output 的当前状态来决定
示例
filebeat.shutdown_timeout: 5s
Beats 通用配置选项
https://www.elastic.co/guide/...
nameBeat 的 name, 位于 event 的
agent.name字段中.若该项配置为空则会使用
hostname的值.可以使用该项配置来分组不同的 Beat
name: "my-shipper"tags位于 event 的
tags字段, 同样可以使用它来分组不同的服务器.tags: ["my-service", "hardware", "test"]fileds添加自定义属性.
默认位于 event 的
fields字段中fields: { xxxxx1: "myproject", xxxxx2: "574734885120952459" }fields_under_rootfields_under_root: true fields: instance_id: i-10a64379 region: us-east-1processorsmax_procs默认是系统的逻辑cpu数量.
设置可同时使用的最大CPU数
ILM 策略
从 Filebeat 7.0 开始, Filebeat 对于其所创建的索引(若启用了 output.elasticsearch)会自动应用默认的生命周期管理(ILM)策略.
关于 ILM, 具体可以参考这里: https://www.elastic.co/guide/...
更多关于Filebeat 的 ILM 设置请参见: https://www.elastic.co/guide/...
可用参数配置模板
# ====================== Index Lifecycle Management (ILM) ======================

# Configure index lifecycle management (ILM). These settings create a write
# alias and add additional settings to the index template. When ILM is enabled,
# output.elasticsearch.index is ignored, and the write alias is used to set the
# index name.

# Enable ILM support. Valid values are true, false, and auto. When set to auto
# (the default), the Beat uses index lifecycle management when it connects to a
# cluster that supports ILM; otherwise, it creates daily indices.
#setup.ilm.enabled: auto

# Set the prefix used in the index lifecycle write alias name. The default alias
# name is 'filebeat-%{[agent.version]}'.
#setup.ilm.rollover_alias: 'filebeat'

# Set the rollover index pattern. The default is "%{now/d}-000001".
#setup.ilm.pattern: "{now/d}-000001"

# Set the lifecycle policy name. The default policy name is
# 'beatname'.
#setup.ilm.policy_name: "mypolicy"

# The path to a JSON file that contains a lifecycle policy configuration. Used
# to load your own lifecycle policy.
#setup.ilm.policy_file:

# Disable the check for an existing lifecycle policy. The default is true. If
# you disable this check, set setup.ilm.overwrite: true so the lifecycle policy
# can be installed.
#setup.ilm.check_exists: true

# Overwrite the lifecycle policy at startup. The default is false.
#setup.ilm.overwrite: false
Process
Process 主要是用于增删字段, 解码, 过滤 event 等, 当定义多个 processes 时, event 会依次处理并输出.
若是仅仅需要在某个 input 中根据条件匹配过滤 event 的话, 可以在具体的 input 中使用include_lines,exclude_lines,exclude_files来配置.但这种方式需要每个 input 中都配置.
而 Process 中则可以全局生效.
https://www.elastic.co/guide/...
可以在哪些地方使用 Process
- 在顶级的配置中(指 filebeat.yml), 此处配置的 process 会应用到全局.
- 在特定的 input 中, 此时仅对该 input 搜集到的 event 生效.
对于 modules, 可以在模块配置中的
input部分定义.Similarly, for Filebeat modules, you can define processors under the
inputsection of the module definition.
when 与 if-then-else
使用 When 的条件判断
processors:
  - :
      when:


  - :
      when:


... condition: 若配置了该项, 则需满足条件才会处理, 否则每次都会处理.parameter: 是传给给 process 的参数
使用 If-Then-Else 的条件判断
processors:
  - if:

    then:
      - :

      - :

      ...
    else:
      - :

      - :

... then必须配置一个或多个 process 来处理else是可选的, 同样可以一个或多个 process
支持的 Processes
列表
add_cloud_metadataadd_cloudfoundry_metadataadd_docker_metadataadd_fieldsadd_host_metadataadd_idadd_kubernetes_metadataadd_labelsadd_localeadd_observer_metadataadd_process_metadataadd_tagscommunity_idconvertcopy_fieldsdecode_base64_fielddecode_cefdecode_csv_fieldsdecode_json_fieldsdecompress_gzip_fielddissectdnsdrop_eventdrop_fieldsextract_arrayfingerprintinclude_fieldsregistered_domainrenamescripttimestamptranslate_sidtruncate_fieldsurldecode
add_id
生成一个唯一值, 保存在 @metadata._id 字段, ES 在收到该 event 时会将该值作为文档 id 来使用.
这可以避免在 ES 中保存重复的 event (因为 Filebeat 只能保证 event 至少被交付一次, 但不能确保最多一次)
适用于无法从 event 中生成唯一值作为文档的 id 情况下使用.若可以从多个字段中生成唯一值, 那么可使用
fingerprint这个 process
fingerprint
根据给定的多个字段, 生成一个唯一值, 保存在 @metadata._id 字段.
processors:
  - fingerprint:
      fields: ["field1", "field2"]
      target_field: "@metadata._id"
drop_event
示例: 丢弃所有 DEBUG 级别的日志
processors:
  - drop_event:
      when:
        regexp:
          message: "^DBG:"
示例: 丢弃从特定日志文件搜集的 event
processors:
  - drop_event:
      when:
        contains:
          source: "test"
decode_json_fields
示例: 解析 json 字符串
{ "outer": "value", "inner": "{\"data\": \"value\"}" }上述 json 数据中, inner 字段下是个 json 字符串.使用 decode_json_fields process 将上述 inner 字段的值解析为对象
filebeat.inputs:
- type: log
  paths:
    - input.json
  json.keys_under_root: true

processors:
  - decode_json_fields:
      fields: ["inner"]

output.console.pretty: true
解析结果为:
{
  "@timestamp": "2016-12-06T17:38:11.541Z",
  "beat": {
    "hostname": "host.example.com",
    "name": "host.example.com",
    "version": "7.9.3"
  },
  "inner": {
    "data": "value"
  },
  "input": {
    "type": "log",
  },
  "offset": 55,
  "outer": "value",
  "source": "input.json",
  "type": "log"
}
add_fields
支持的 Conditions
equals
仅支持比较数字或字符串.
示例: http 状态码 = 200
equals:
  http.response.code: 200
contains
字符串匹配
contains:
  status: "Specific error"
regexp
正则匹配判断
regexp:
  system.process.name: "^foo.*"
range
范围匹配, 仅接受整数或浮点数.
range:
  http.response.code:
    gte: 400
上面这种方式可以简写为:
range:
  http.response.code.gte: 400
示例: cpu 使用率在 [0.5~0.8) 范围
range:
  system.cpu.user.pct.gte: 0.5
  system.cpu.user.pct.lt: 0.8
network
匹配网络, 支持多种网络地址格式.
示例: private adress
network:
  source.ip: private
示例: 192.168.1.0 ~ 192.168.1.255
network:
  destination.ip: '192.168.1.0/24'
示例: 在多个网段范围
network:
  destination.ip: ['192.168.1.0/24', '10.0.0.0/8', loopback]
has_fields
判断是否包含指定的所有字段
has_fields: ['http.response.code']or
可以组合多个 condition
or:
  -
  -
  -
  ...
示例: 组合2个 equals
or:
  - equals:
      http.response.code: 304
  - equals:
      http.response.code: 404
and
类似 or
not
对指定的 condition 判断结果取反.
not:
示例: 匹配 status 不是 OK 的 event
not:
  equals:
    status: OK
Inputs
通用
若不使用 module, 而是手动配置的话, 则应在 filebeat.inputs 一节配置(指 filebeat.yml 文件)
可以每一个将 input 配置独立成一个小配置文件, 但是必须在 filebeat.yml 中的 filebeat.config.inputs 中指定路径
filebeat.config.inputs:
    enabled: true
    path: inputs.d/*.yml
    #reload.enabled: true
    #reload.period: 10s
这里的 reload 配置仅对外部文件有效, 对于
filebeat.yml 本身是无效的.
具体的外部配置文件可以如下所示(以 log input 为例)
- type: log
  paths:
    - /var/log/mysql.log
  scan_frequency: 10s

- type: log
  paths:
    - /var/log/apache.log
  scan_frequency: 5s
以下这些选项是所有 Input 都适用的
enabled是否启用该 input默认为 true.
tags这里设置的 tags 会追加到 filebeat 的通用设置中的 tags 中
fields额外增加的字段可以是标量值(scalar values), 数组, 字典或任何嵌套组合.
默认情况下, 这里增加的字段会被放置在
fields这个字段下(作为其子字段), 若要将其作为顶级字段, 则应设置fields_under_root选项为 true.若是在 filebeat 中的设置了同名的 fields, 那么会被这里的配置覆盖.
fields_under_root将fields中的字段作为顶级字段存储在 event 中processors设置要应用在输入数据的 processpipeline指定写入 ES 时要应用的 ingest pipeline若是在 input 和 output 都定义了 pipeline id, 那么最后会使用的是 input 中设置的.
keep_null若是 fields 的值是 null, 那么仍会被写入 event 中默认是 false
index设置该 event 写入的索引(若 output 是 elasticsearch)或设置raw_index字段的值(若 output 非 elasticsearch)这里的索引名只能使用 agent name, version, event timestamp 这3个动态数据.
若想使用动态字段, 那么应在
output.elasticsearch.index中设置或是在 process 中设置.示例
"%{[agent.name]}-myindex-%{+yyyy.MM.dd}"实际对应的是"filebeat-myindex-2019.11.01"索引publisher_pipeline.disable_host禁用自动设置 host.name 的行为默认是 false
Multiline Message
通过设置 filebeat.yml 中的 multiline 选项可以设置哪些行要作为同一个 event 的组成部分(即视为一条日志消息)
比如程序输出调用栈(多行), 那么此时就需要将这个调用栈信息合并成同一条消息, 而不是被 filebeat 默认行为视为多条消息.!!!! 如果 filebeat 是将搜集到的 event 发送给 logstash, 那么应该在 filebeat 中先处理好多行数据, 而不是在 logstash 中处理.
若是交由 logstash 处理多行数据的话, 可能导致流的混乱和数据损坏.
关于 filebeat 的 正则表达式支持 , 注意与 logstash 对正则的支持是不完全一样的.
官方提供了一个在线测试正则匹配 multiline: https://play.golang.org/p/uAd...
选项
以下选项可以在 filebeat.inputs 部分配置(指在 filebeat.yml 配置文件中), 从而控制 filebeat 如何处理跨多行的消息.
multiline.type默认是 "pattern"
设置要使用哪个聚合方法.
pattern这是默认的方式
count适用于聚合常量数量的行(意思应该是指定连续多少行作为同一个消息)
multiline.pattern注意 filebeat 对正则的支持与 logstash 不完全一样.
指定要使用哪个正则表达式来匹配, 根据其他选项来决定是将匹配行作为上一行的延续, 还是作为新的 event 的第一行.
multiline.negate默认是 false
定义是否否定上述匹配的正则表达式(应该是取反的意思)
multiline.match指定 filebeat 如何将匹配的行合并到一个 event 中.
afterbefore
这两个选项的行为受到 multiline.negate 的影响.
| Setting for negate | Setting for match | Result | Example pattern: ^b |
| -------------------- | ------------------- | ------------------------------------------------------------ | ------------------------------------------------------------ |
| false | after | Consecutive lines that match the pattern are appended to the previous line that doesn’t match.
所有匹配 pattern 的行, 都归属到前一行 |  |
|
这里按照 logstash 的方式来, 就非常容易理解.
after等同于 logstash 中的previousbefore等同于 logstash 的next
multiline.flush_pattern指定一个正则表达式, 若匹配到则会将当前的 multiline 消息从内存中 flush, 并结束当前的多行消息.
假定
multiline.pattern匹配 event 的开始, 则multiline.flush_pattern就适合匹配 event 结束所在的那一行.multiline.max_lines默认是 500
指定最多多少行可以被合并成一个 event, 若超过该行数限制, 则超出的部分会被抛弃.
multiline.timout默认是 5s
注意, 该值若设置得太小可能会导致数据丢失.
指定在超时多久后(这里指的应该是针对每个多行消息匹配到第一行的那个时间点开始), 强制将当前的多行消息(缓存中)直接作为一条 event 发送出去.
multiline.count_lines指定每多少行的内容被合并成一个 event
multiline.skip_newline若设置该值, 那么多行消息之间的换行符会被移除.
示例
示例: 匹配每条消息都是以 [ 开头
multiline.type: pattern
multiline.pattern: '^\['
multiline.negate: true
multiline.match: after


# 示例匹配的多行消息
[beat-logstash-some-name-832-2015.11.28] IndexNotFoundException[no such index]
    at org.elasticsearch.cluster.metadata.IndexNameExpressionResolver$WildcardExpressionResolver.resolve(IndexNameExpressionResolver.java:566)
    at org.elasticsearch.cluster.metadata.IndexNameExpressionResolver.concreteIndices(IndexNameExpressionResolver.java:133)
    at org.elasticsearch.cluster.metadata.IndexNameExpressionResolver.concreteIndices(IndexNameExpressionResolver.java:77)
    at org.elasticsearch.action.admin.indices.delete.TransportDeleteIndexAction.checkBlock(TransportDeleteIndexAction.java:75)
将不以
[ 开头的行都归属到上一行.
示例: 每条消息以日期为开头的
multiline.type: pattern
multiline.pattern: '^\[[0-9]{4}-[0-9]{2}-[0-9]{2}'
multiline.negate: true
multiline.match: after


# 匹配示例
[2015-08-24 11:49:14,389][INFO ][env                      ] [Letha] using [1] data paths, mounts [[/
(/dev/disk1)]], net usable_space [34.5gb], net total_space [118.9gb], types [hfs]
示例: 应用程序事件
multiline.type: pattern
multiline.pattern: 'Start new event'
multiline.negate: true
multiline.match: after
multiline.flush_pattern: 'End event'


# 匹配示例
[2015-08-24 11:49:14,389] Start new event
[2015-08-24 11:49:14,395] Content of processing something
[2015-08-24 11:49:14,399] End event
Log
完整的配置项: https://www.elastic.co/guide/...
Log Input 导出的 event 字段: https://www.elastic.co/guide/...
选项
paths支持 Go Glob 通配符
示例
目录结构:
a
|- a1.log
|- a2.log
|- b
    |- b1.log
    |- b2.log
|- c
    |- c1.log
    |- c2.log
    |- d
        |- d1.log
        |- d2.log


/a/*.log            匹配目录 a 中的 *.log
/a/*/*.log            匹配目录 b 和目录 c 中的 *.log (不会匹配目录 a 中的 *.log)
/a/*/*/*.log        (这个应该是可以, 没试过)匹配目录 d 中的 *.log (不会匹配目录 a,b,c 中的 *.log)

/a/**                匹配 a/*, a/b/*, a/c/*, a/c/d/*, 最深可以递归8个层级
glob 特殊字符
*匹配任意个非路径分隔符?匹配1个非路径分隔符[]匹配1个字符组[abc][0-9][^]不匹配1个字符组
recursive_glob.enabled是否将 paths 中的**自动扩展为最深8级的递归匹配默认是 true
encoding指定待读取的文件编码plain: plain ASCII encodingplain 这个 encoding 是特殊的, 应为它不校验也不转换数据
utf-8orutf8: UTF-8 encodinggbk: simplified Chinese charaters- ...
include_lines指定正则表达式, 此时仅匹配的行才会被导出.默认会导出所有非空的行.
若同时指定了 exclude_lines, 那么会先执行 include_lines, 则执行 exclude_lines.
exclude_lines指定正则表达式, 若匹配到读取的行, 那么该行会被丢弃掉.默认是空.
max_bytes指定单行日志消息的最大长度, 若超过该长度的部分会被丢弃. 特别适用于 multiline 消息.默认是 10MB
json将消息视为一个 json 并解析每行仅限一条 json, 否则会解析出错.
json 的解析是在 filter 和 multiline 之前.
若设置了
json, 那么必须同时设置以下任意一个选项keys_under_root默认解析的 json 字段会被放在一个叫做
json的字段中.overwrite_keys若同时指定了
keys_under_root, 那么会覆盖 filebeat 默认添加的字段(比如 type, source, offset 等)add_error_key若出错 json 解析/设置出错, 那么会添加
error.message字段及error.type:json字段message_key指定 json 数据中要用哪个字段来作为 filtering 和 multiline 的作用目标, 这个字段必须在 json 中作为顶级字段, 且只能是字符串.
document_id指定 json 中的某个字段作为 document id, 若配置该项, 则会从原始 json 中移除该字段, 并存储在@metadata._idignore_decoding_error是否忽略 json 解析失败的 event默认是 false
json.keys_under_root: true
json.add_error_key: true
json.message_key: log
multiline.*控制 filebeat 如何处理跨多行的日志消息.exclude_files设置要忽略的文件(正则表达式)filebeat.inputs: - type: log ... exclude_files: ['\.gz$']ignore_older忽略在某个时间段(modified time)前的文件这对于已经生成一部分日志, 但此时启动 filebeat 时只想处理某个时间段后的日志时特别有用.
默认是 0, 表示忽略该配置.
可以设置为
2h(2小时),5m(5分钟) 之类的.该选项是依赖于文件的 modification time, 因此在 windows 上可能存在异常情况(比如修改了文件内容, 但文件的 modification time 没变时)
ignore_older的值必须大于close_inactive该选项会影响到的文件分类两类
- 从没有被 harvested 的文件
此时该文件的 offset state 会被设置为文件尾.
- 文件已经被 harvested, 但超过
ignore_older时长没有更新过此时该文件的 offset state 不会被改变, 后续若该文件又被修改, 那么也会被继续正常处理.
若要从 registry 文件中移除之前被 harvested 的文件状态, 则应使用
clean_inactive选项文件必须被关闭后(指 filebeat 不能持有该文件的句柄)才能被 filebeat 忽略掉(ignore). 为了确保被忽略的文件不再处于 harvested 状态, 必须设置
ignore_older的值比close_inactive大.若当前正在被 harvested 的文件受到
ignore_older影响(指超过该设置的时间未更新), 则 harvester 首先读取该文件并在达到close_inactive时间到达时关闭该文件, 并在这之后忽略该文件.- 从没有被 harvested 的文件
close_*这一类选项是用于配置让 harvester 在经过特定的时间或策略后自动关闭(即关闭文件句柄).
若文件对应的 harvester 关闭后被更新, 那么会在
scan_frequency时间后再起启动.但是如果在文件对应的 harvester 关闭时, 文件被移动或修改, 则这部分数据会丢失.
The
close_*settings are applied synchronously when Filebeat attempts to read from a file, meaning that if Filebeat is in a blocked state due to blocked output, full queue or other issue, a file that would otherwise be closed remains open until Filebeat once again attempts to read from the file.每个文件有一个对应的 harvester 处理.
这部分英文的不大理解, 我猜测是: 文件对应的 harvester 处于阻塞状态时,
close_*设置会被同步应用, 也就意味着本应该关闭的文件会一致保持打开的状态(指句柄), 直到 filebeat 再次尝试读取该文件.但还是觉得理解得怪怪的.
close_inactive默认是
5m.可以将该值设为
2h(2小时)或5m(5分钟) 这种格式.当文件处于未被 harvest 一段时间后(并非文件的 modification time), filebeat 会关闭该文件句柄.
若后续文件又被更新, 则 filebeat 会在最多
scan_frequency时间内再次启动新的 harvester 来处理.通常建议将该值设置为比文件最小更新频率大的一个值, 比如日志文件每几秒更新一次, 那么可以安全地将该值设为
1m.若不同类型文件的更新频率不一致, 那么可以通过多个配置中设置不同的值来处理.
将
close_inactive设置为一个更小的值意味着文件句柄会很快被关闭(指距最后一次 harvest 空闲一小段时间). 这会导致如果 harvester 关闭时, 新的日志不能近实时地被收集到.close_renamed设置该值可能会导致潜在的数据丢失, 请谨慎.
默认关闭.
默认情况下, 文件被重命名后, 其 inode(对应所在的 device)不会发生改变, 因此 harvester 能继续跟踪处理该文件, 但若开启该选项后, filebeat 会在文件被重命名后关闭该文件句柄, 这会导致潜在的数据丢失.
这个选项一般没啥用, 可能只在 windows 中会用到.
close_removed默认开启.
若禁用该选项, 则必须同时禁用
clean_removedclose_eof设置该值可能会导致潜在的数据丢失, 请谨慎.
默认关闭
开启该选项后, harvester 会在 harvest 到文件末尾时关闭文件.
这适用于当文件仅仅是一次性写入完毕, 且不怎么更新的情况.
close_timeout设置该值可能会导致潜在的数据丢失, 请谨慎.
其另一个副作用是多行(multiline)的事件有可能在 timeout 前未写入完整, 从而丢失数据.
默认值为 0, 表示关闭.
若设置该值, 则每次 harvester 启动后会在经过
close_timeout时间后自动关闭(这意味着 multiline 事件有可能丢失一部分).若在上一次处理完之后有新的数据产生(即文件更新), 则会在经过
scan_frequency时间后再次启动新的 harvster,close_timeout仍然对新的 harvster 有效.在 output 阻塞的情况时, 设置该选项是很有用的, 从而避免 filebeat 一直持有已经被删除的文件的句柄. 将该选项设置为
5m可以确保定期删除文件, 以便操作系统释放它们.如果将
close_timeout设置的值同ignore_older一样时, 若 harvester 处于关闭状态时修改了该文件, 那么也不会再次启动对其的 harveste. 这种组合通常会导致数据丢失, 并且不会发送完整的文件.
clean_*这些选项是用于清理 registry 文件中的状态项, 不仅可以帮助减少 registry 文件的大小, 还可以防止 inode reuse 引起的问题.
-
clean_inactive设置该值可能会导致潜在的数据丢失, 请谨慎.
若设置该项, 则 filebeat 会在指定的不活动周期(???)结束后删除文件的 registry 状态. 只有在文件已经被 filebeat 忽略时(指文件比
ignore_older还老), 其 state 才会被移除.该值必须大于
ignore_older+scan_frequency以确保不会有文件还在 harvest 时, 其 state 被移除的情况.文件的 state 被移除后, 若该文件再次更新/出现时, 文件会从头开始读.
若每天会生成大量的新文件时, 使用
clean_inactive选项可以有效地帮助减少 registry 文件的大小.
clean_removed默认开启.
如果禁用了
close_removed, 那么必须同时禁用该选项.如果文件被移动了(指在硬盘上的路径发生变化), 那么这个文件会被从 registry 中移除.
scan_frequency默认是 10s
该选项指定 Filebeat 多久确认一次符合条件的日志文件状态.
若要尽可能快的让 filebeat 扫描, 那么建议设置为 1s. 非常不建议设置低于 1s 的值, 这会导致性能消耗过大.
如果需要新增的日志行以近实时的速度捕获并发送, 那么不建议将
scan_frequency设置得非常小, 而是建议调整close_inactive, 从而使文件句柄保持打开并不断轮询日志文件.tail_files默认设置为 false
适用于在运行 filebeat 前有一堆不想捕获的旧日志文件, 此时可以将该选项设置为 true, 并执行. 这里需注意, 在执行完毕后, 要记得将该选项设置回 false, 以避免后续对日志可能进行 rotation 操作导致丢失数据.
若开启该选项, filebeat 会从日志文件的最末尾开始读(即在 registry 文件中记录日志文件的最后读取位置是在当前的末尾), 若当前系统对这些日志进行 rotation 操作, 那么前面的一些日志项可能会丢失.
若开启该选项前, 文件已经被 filebeat 处理过, 那么该选项无效, 若未被处理过, 则 filebeat 会从文件末尾开始读.
symlinks默认是 false
.....
backoff默认是 1s, 这适用于大多数情况.
该选项用于控制, 当 harvester 读取到文件末尾(EOF)后, 间隔多久再去检测是否有新的行写进来.
max_backoff默认是 10s
设置最大的 backoff 等待时间
backoff_factor默认是 1s
在读到文件末尾后, 每次去检测若无新行写入, 则下一次的等待时间是在
min(max_backoff, 上一次等待时间 * backoff_factor), 最早的一次等待时间是backoff设定的值.harvester_limit默认是 0, 表示不限制.
该选项用于限制每个 input 中可同时启动的 harvester 数量(这主要跟操作系统对 filebeat 文件句柄数限制有关)
若设置了该选项, 那么建议同时设置
close_*选项以确保 harvester 尽可能频繁的停止, 以确保其他(新)文件能够得到处理.file_identity对于不同的日志消息手机环境, 可以设置不同的文件标识(file identity)方式来适应环境.
可选的值:
native默认.
使用设备id 和 inode来区分
file_identity.native: ~path使用文件路径作为文件标识, 因此若文件改名或移动路径(但仍处于该 input 的处理范围), 则会导致重复的日志被搜集.
file_identity.path: ~inode_marker不支持 windows
若日志所在的设备id经常改变, 那么必须使用这种方式来区分文件.
设置标记文件(marker file)的路径示例:
file_identity.inode_marker.path: /logs/.filebeat-marker
简单示例
filebeat.inputs:
  - type: log
    enabled: true
    paths:
      - /var/log/system.log
      - /var/log/wifi.log
      # 这里会处理 /path/to/log 目录下的所有 *.log 文件(仅处理该层)
      - /path/to/log/*.log
      # 这里会处理 /path/to/log 目录的直接子目录下所有 *.log 文件(仅处理下一级子目录的所有 *.log 文件, 下下层的则不会处理)
      - /path/to/log/*/*.log
  - type: log
    enabled: true
    paths:
      - "/var/log/apache2/*"
    fields:
      apache: true
    fields_under_root: true
    include_lines: ['^ERR', '^WARN']
    exclude_lines: ['^DBG']
Modules
这里只整理一些官方文档未详细说明的部分.
Module 提供了最快的开箱即用的方式.
Nginx Log
Filebeat 中 Nginx Module 的默认配置支持 Nginx 默认的 Combined 日志格式, 但若是需要新增一些字段, 则需要额外在 Ingest Pipeline 中新增对新字段的 Grok 捕获.
参考链接:
以 nginx 以下日志格式
http {
    map $http_x_forwarded_for $clientRealIp {
        ""  $remote_addr;
#        ~^(?P[0-9\.]+),?.*$ $firstAddr;
        ~^.*?,?(?P[0-9\.]+)$ $lastAddr;
    }
    log_format main '$clientRealIp - $remote_user [$time_local] "$request" $status $body_bytes_sent "$http_referer" "$http_user_agent" '
                    '"$upstream_addr" $upstream_response_time $request_time';

    # ...
}
相较 nginx 默认的 combined 日志格式, 这里的变化:
将第一个参数由 $remote_addr 改为 $clientRealIp.
由于 nginx 的上游是一个高防 ip, 因此这里取 $http_x_forwarded_for 的最后一个 ip 作为用户真实 ip.- 日志最后面追加了 3 个字段
对应的 log:
117.136.57.132 - - [19/Nov/2020:19:21:38 +0800] "POST /ccbp/server/p6_gamma/src/public/s1/index.php?_m=GetUserActivity&_uid=3031001 HTTP/1.1" 200 1094 "-" "libcurl" "127.0.0.1:9000" 0.020 0.020
116.140.27.57 - - [19/Nov/2020:19:21:38 +0800] "POST /ccbp/server/p6_gamma/src/public/s1/index.php?_m=EndPlayFb&_uid=2108001 HTTP/1.1" 200 555 "-" "libcurl" "127.0.0.1:9000" 0.058 0.058
218.67.252.171 - - [19/Nov/2020:19:21:38 +0800] "POST /ccbp/server/p6_gamma/src/public/s1/index.php?_m=Guild_GetGuildData&_uid=2099001 HTTP/1.1" 200 1528 "-" "libcurl" "127.0.0.1:9000" 0.018 0.018
117.136.57.132 - - [19/Nov/2020:19:21:38 +0800] "POST /ccbp/server/p6_gamma/src/public/s1/index.php?_m=Guild_GetGuildData&_uid=3031001 HTTP/1.1" 200 253 "-" "libcurl" "127.0.0.1:9000" 0.007 0.007
61.186.27.216 - - [19/Nov/2020:19:21:38 +0800] "POST /ccbp/server/p6_gamma/src/public/s1/index.php?_m=ReportUserState&_uid=3069001 HTTP/1.1" 200 303 "-" "libcurl" "127.0.0.1:9000" 0.008 0.008
116.140.27.57 - - [19/Nov/2020:19:21:38 +0800] "POST /ccbp/server/p6_gamma/src/public/s1/index.php?_m=Guild_GetGuildData&_uid=2108001 HTTP/1.1" 200 1525 "-" "libcurl" "127.0.0.1:9000" 0.012 0.012
117.136.57.132 - - [19/Nov/2020:19:21:38 +0800] "POST /ccbp/server/p6_gamma/src/public/s1/index.php?_m=WorldBoss_GetData&_uid=3031001 HTTP/1.1" 200 477 "-" "libcurl" "127.0.0.1:9000" 0.012 0.012
110.176.211.27 - - [19/Nov/2020:19:21:38 +0800] "POST /ccbp/server/p6_gamma/src/public/s1/index.php?_m=HeroUpLv&_uid=2483001 HTTP/1.1" 200 438 "-" "libcurl" "127.0.0.1:9000" 0.119 0.119
若 Filebeat 还未写入过 Nginx 日志, 则此时处理 Nginx 日志的 Ingest Pipeline 就还未创建, 那么可以先修改 Filebeat 所在主机的
/usr/share/filebeat/module/nginx/access/ingest/pipeline.ymlFilebeat 7.9.3 创建的对应 Ingest Pipeline 是: filebeat-7.9.3-nginx-access-pipeline 以及 filebeat-7.9.3-nginx-error-pipeline
description: Pipeline for parsing Nginx access logs. Requires the geoip and user_agent
  plugins.
processors:
- grok:
    field: message
    patterns:
    # 这里追加了 3 个字段
    - (%{NGINX_HOST} )?"?(?:%{NGINX_ADDRESS_LIST:nginx.access.remote_ip_list}|%{NOTSPACE:source.address})
     %{NUMBER:http.response.status_code:long} %{NUMBER:http.response.body.bytes:long}
     "(-|%{DATA:http.request.referrer})" "(-|%{DATA:user_agent.original})"
   pattern_definitions:
     NGINX_HOST: (?:%{IP:destination.ip}|%{NGINX_NOTSEPARATOR:destination.domain})(:%{NUMBER:destination.port})?
     NGINX_NOTSEPARATOR: "[^\t ,:]+"
     NGINX_ADDRESS_LIST: (?:%{IP}|%{WORD})("?,?\s*(?:%{IP}|%{WORD}))*
   ignore_missing: true
grok:
field: nginx.access.info
patterns:
    - '%{WORD:http.request.method} %{DATA:url.original} HTTP/%{NUMBER:http.version}'
    - ""
ignore_missing: truegrok:
field: url.original
patterns:
    - '%{URIPATH:url.path}(%{URIPARAM:url.param})?'
   ignore_missing: true
   description: "从 uri 中解析出 path 和 param"
grok:
field: url.param
patterns:
    - '[?&]_uid=%{NUMBER:game.uid:long}'
   ignore_missing: true
   description: "从 param 中解析出 uid"
grok:
field: url.param
patterns:
    - '[?&]_m=%{WORD:game.method}'
   ignore_missing: true
   description: "从 param 中解析出 method"
grok:
field: url.path
patterns:
    - 'server/%{WORD:game.group}/src/public/s%{NUMBER:game.server_id:long}/'
   ignore_missing: true
   description: "从 url 中抽取游戏组和游戏服 id"
remove:
field: nginx.access.info
...
...
...
> 注意, 上面增加了 3 个新字段:
>
> - nginx.upstream_addr
> - nginx.upstream_time
> - nginx.request_time

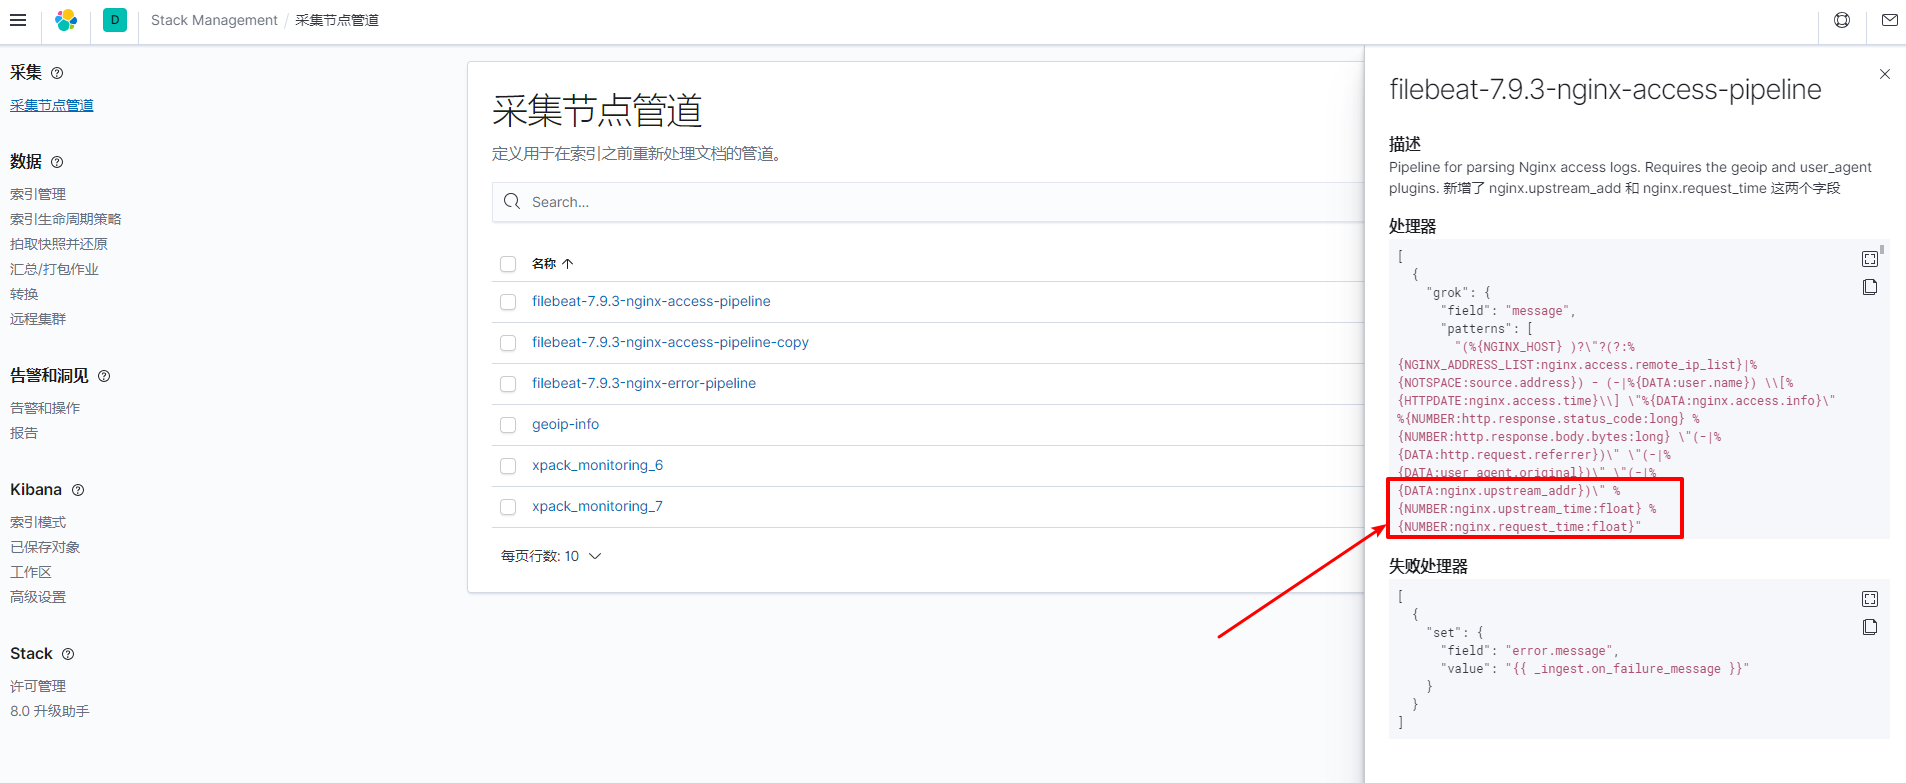
2. 若 Filebeat 之前已写入过 nginx 日志, 那么此时日志的 Ingest Pipeline 已经创建, 则可以直接在 kibana 上修改 *filebeat-7.9.3-nginx-access-pipeline* 这个 ingest pipeline
[
 {
   "grok": {
     "field": "message",
     "patterns": [
       // 这里追加了 3 个新字段
       "(%{NGINX_HOST} )?\"?(?:%{NGINX_ADDRESS_LIST:nginx.access.remote_ip_list}|%{NOTSPACE:source.address}) - (-|%{DATA:user.name}) \\[%{HTTPDATE:nginx.access.time}\\] \"%{DATA:nginx.access.info}\" %{NUMBER:http.response.status_code:long} %{NUMBER:http.response.body.bytes:long} \"(-|%{DATA:http.request.referrer})\" \"(-|%{DATA:user_agent.original})\" \"(-|%{DATA:nginx.upstream_addr})\" %{NUMBER:nginx.upstream_time:float} %{NUMBER:nginx.request_time:float}"
     ],
     "pattern_definitions": {
       "NGINX_HOST": "(?:%{IP:destination.ip}|%{NGINX_NOTSEPARATOR:destination.domain})(:%{NUMBER:destination.port})?",
       "NGINX_NOTSEPARATOR": "[^\t ,:]+",
       "NGINX_ADDRESS_LIST": "(?:%{IP}|%{WORD})(\"?,?\\s*(?:%{IP}|%{WORD}))*"
     },
     "ignore_missing": true
   }
 },
 {
   "grok": {
     "field": "nginx.access.info",
     "patterns": [
       "%{WORD:http.request.method} %{DATA:url.original} HTTP/%{NUMBER:http.version}",
       ""
     ],
     "ignore_missing": true
   }
 },
 // 从 uri 中解析出 path 和 param
 {
   "grok": {
     "field": "url.original",
     "patterns": [
       "%{URIPATH:url.path}(%{URIPARAM:url.param})?"
     ],
     "ignore_missing": true,
     "description": "从 uri 中解析出 path 和 param"
   }
 },
 // 从 param 中解析出 uid
 {
   "grok": {
     "field": "url.param",
     "patterns": [
       "[?&]_uid=%{NUMBER:game.uid:long}"
     ],
     "ignore_missing": true,
     "description": "从 param 中解析出 uid"
   }
 },
 // 从 param 中解析出 method
 {
   "grok": {
     "field": "url.param",
     "patterns": [
       "[?&]_m=%{WORD:game.method}"
     ],
     "ignore_missing": true,
     "description": "从 param 中解析出 method"
   }
 },
 // 从 url 中抽取游戏组和游戏服 id
 {
   "grok": {
     "field": "url.path",
     "patterns": [
       "server/%{WORD:game.group}/src/public/s%{NUMBER:game.server_id:long}/"
     ],
     "ignore_missing": true,
     "description": "从 url 中抽取游戏组和游戏服 id"
   }
 },

 ...
 ...
 ...
]
> 相较原始的配置, 这里修改了 `patterns`, 在最后面追加了3个字段配置
建议将本次的修改同步到 `/usr/share/filebeat/module/nginx/access/ingest/pipeline.yml` 中
网上有说要修改 `/etc/filebeat/fields.yml`, 往其中添加新增的字段, 但不理解其意思 但我这里没添加也能用.
> 应该是 `filebeat setup` 初始化时创建
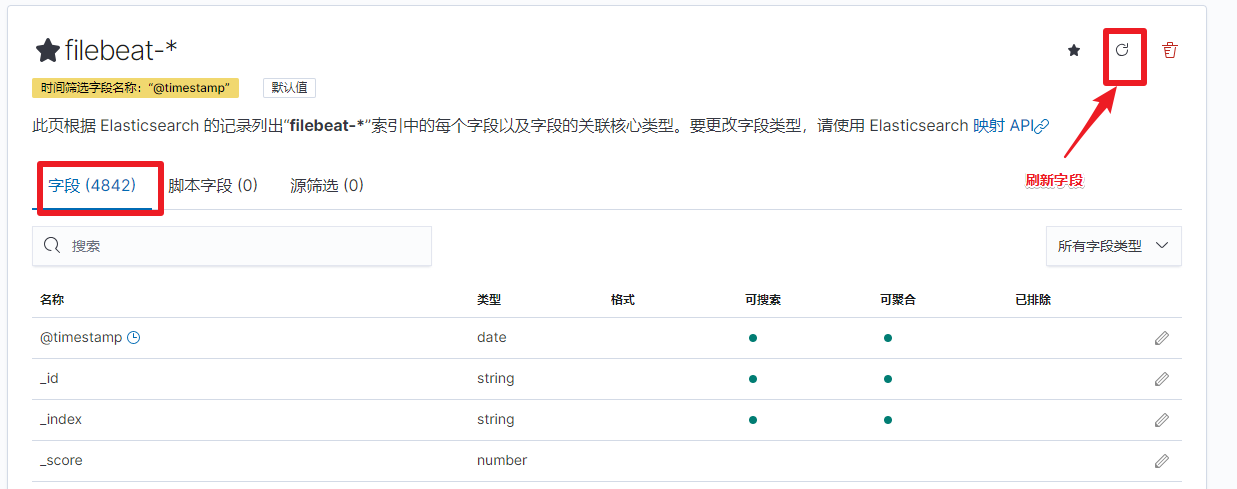
在上面步骤处理完之后, 在 kibana 的 discover 和 日志 界面中就可以看到新字段了, 但是这些新字段暂时无法被用于查询, 聚合操作, 这是因为 `filebeat-*` 索引模式中关于字段的配置还是旧的, 需要更新, 操作步骤:
1. Kibana -> Stack Management -> 索引模式
2. 进入 `filebeat-*` 索引模式页面
3. 点击右上角的刷新按钮进行字段列表刷新
#### Outputs
##### ElasticSearch
[写入 ES](https://www.elastic.co/guide/en/beats/filebeat/7.9/elasticsearch-output.html)
*示例*
output.elasticsearch:
enabled: true
hosts: ["https://myEShost:9200"]
pipeline: my_pipeline_id
compression_level: 0
index: "%{[fields.log_type]}-%{[agent.version]}-%{+yyyy.MM.dd}"
protocol: https
username: "filebeat_writer"
password: "YOUR_PASSWORD"
部分选项说明

- `compression_level` 数据传输时的压缩率(gzip)

  > 默认是 0

  可选值: 1~9 (9的压缩级别最高)

- `index` 当使用每日(daily)索引时的索引名

  > 若使用该选项, 则会禁用 ILM 管理索引
  >
  > 示例:
  >
  > ```yaml
  > output.elasticsearch:
  >   index: "%{[fields.log_type]}-%{[agent.version]}-%{+yyyy.MM.dd}"
  > ```

  每天固定创建一个索引时指定的索引名字,  具体请查看[此处](https://www.elastic.co/guide/en/beats/filebeat/7.9/elasticsearch-output.html#index-option-es).

- `indices`

  > 若使用该选项, 同样会禁用 ILM 管理索引.

  根据规则, 匹配要使用的索引名. 若未匹配到, 则使用  `index` 指定的索引名
output.elasticsearch:
hosts: ["http://localhost:9200"]
indices:
  # 这是采用 condition 的方式
  - index: "warning-%{[agent.version]}-%{+yyyy.MM.dd}"
    when.contains:
      message: "WARN"
  - index: "error-%{[agent.version]}-%{+yyyy.MM.dd}"
    when.contains:
      message: "ERR"
  # 这是采用 mapping 的方式
  - index: "%{[fields.log_type]}"
    mappings:
      critical: "sev1"
      normal: "sev2"
    default: "sev3"
具体的 when 的条件可以参见: https://www.elastic.co/guide/en/beats/filebeat/7.9/defining-processors.html#conditions

- `ilm`

See [*Index lifecycle management (ILM)*](https://www.elastic.co/guide/en/beats/filebeat/7.9/ilm.html) for more information.

- `pipeline`

指定要使用哪个 ingest node pipeline 来写数据.
output.elasticsearch:
hosts: ["http://localhost:9200"]
pipeline: my_pipeline_id
# 也可以动态使用不同的 pipeline
# pipeline: "%{[fields.log_type]}_pipeline"
- `pipelines`

类似 `indices`, 此处同样是指定一系列的 pipelines, 同样是使用第一个匹配的 pipeline, 若未匹配到则使用 `pipeline` 中设置的.
output.elasticsearch:
hosts: ["http://localhost:9200"]
pipelines:
  # 采用 condition 的方式
  - pipeline: "warning_pipeline"
    when.contains:
      message: "WARN"
  - pipeline: "error_pipeline"
    when.contains:
      message: "ERR"
  # 采用 mapping 的方式
  - pipeline: "%{[fields.log_type]}"
    mappings:
      # 自定义字段 log_type 值为 "critical" 时, 使用 "sev1_pipeline" ingest pipeline
      critical: "sev1_pipeline"
      normal: "sev2_pipeline"
    default: "sev3_pipeline"
具体的 when 的条件可以参见: https://www.elastic.co/guide/en/beats/filebeat/7.9/defining-processors.html#conditions

- `bulk_max_size`

filebeat 使用 bulk api 向 ES 写入数据时, 一次最多可以发送的最大 event

- `timeout`

> 默认是 90s

http 超时时间


##### File

一般用作调试


##### Console

[Console](https://www.elastic.co/guide/en/beats/filebeat/7.9/console-output.html) 仅供调试
output.console:
pretty: true
output.console:
codec.json:
pretty: true
escape_html: false
output.console:
codec.format:
string: '%{[@timestamp]} %{[message]}'
# 用Kibana进行数据可视化分析

## 使用Index Pattern配置数据

*导入数据*
curl -H 'Content-Type: application/x-ndjson' -XPOST 'localhost:9200/_bulk?pretty' --data-binary @logs.jsonl
curl -H 'Content-Type: application/x-ndjson' -XPOST 'localhost:9200/bank/account/_bulk?pretty' --data-binary @accounts.json
> 数据来源: https://github.com/geektime-geekbang/geektime-ELK/tree/master/part-4/13.1-%E4%BD%BF%E7%94%A8IndexPattern%E9%85%8D%E7%BD%AE%E6%95%B0%E6%8D%AE
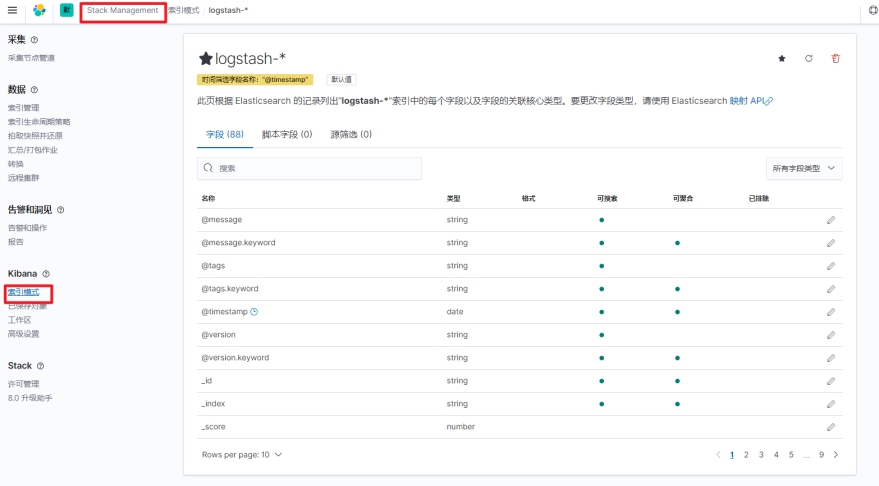
*在 Kibana 中创建 Index Pattern*
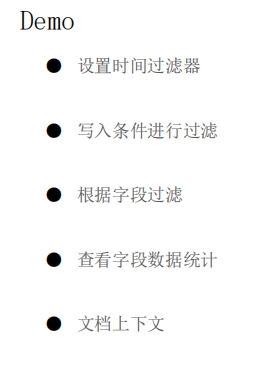
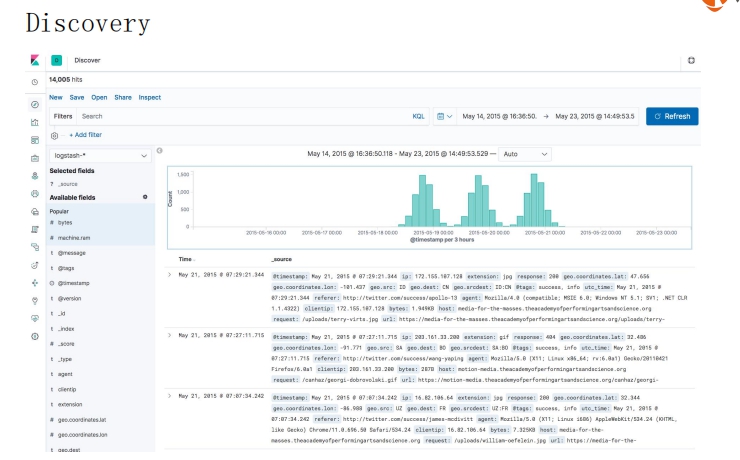
## 使用Kibana Discover探索数据
## 基本可视化组件介绍
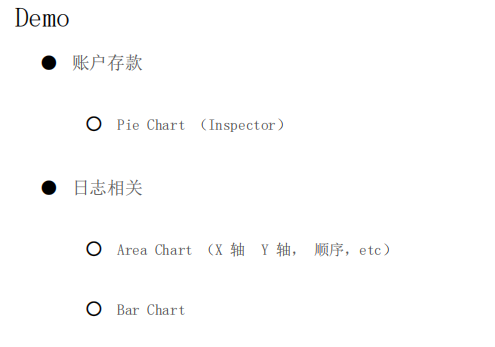
## 构建Dashboard

Dashboard 可将一组相关的可视化组件组合在一起, 展示在同一个面板里.
# 探索X-Pack套件
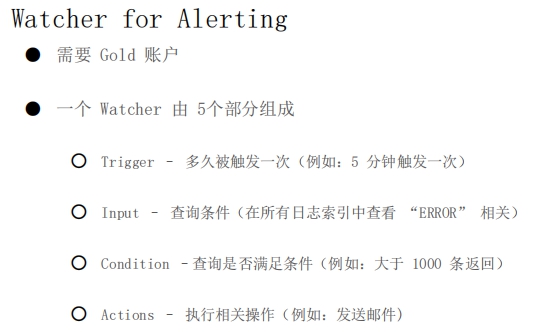
## 用Monitoring和Alerting监控Elasticsearch集群
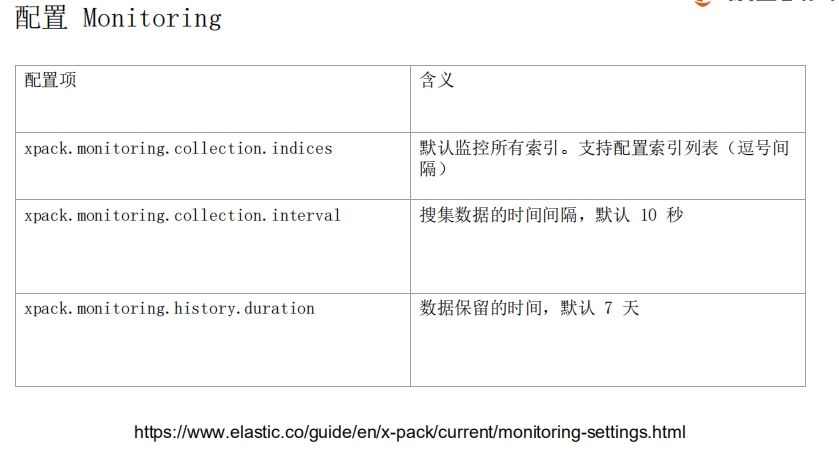

https://www.elastic.co/guide/en/x-pack/current/monitoring-settings.html
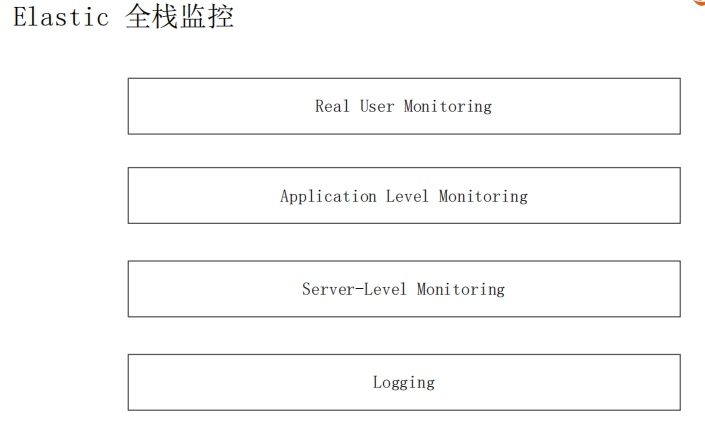
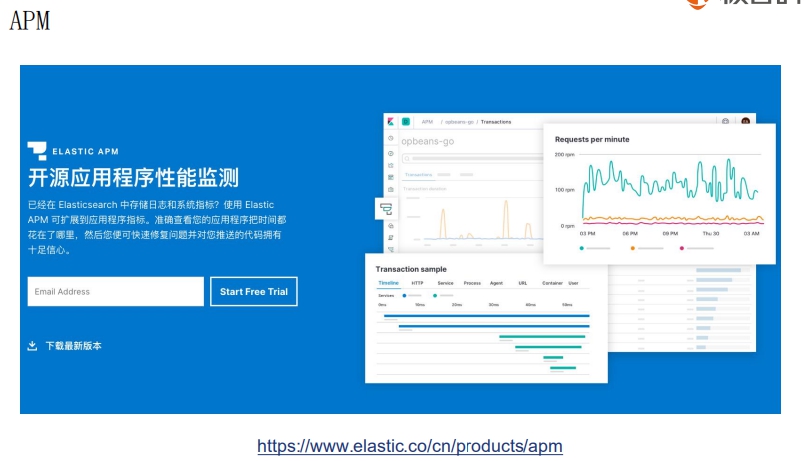
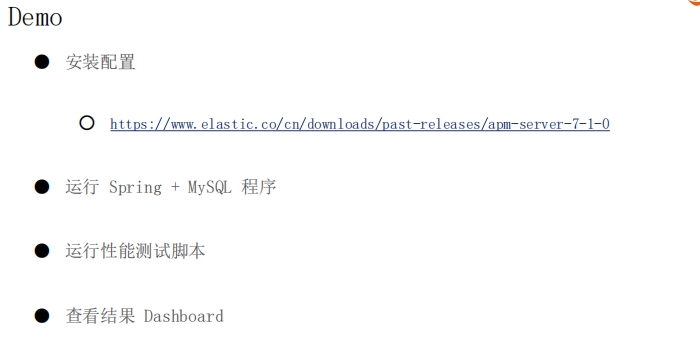
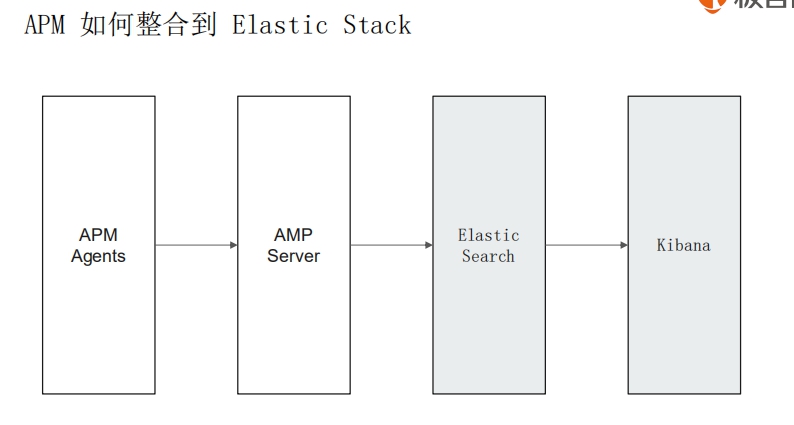
## 用APM进行程序性能监控
!!!! [PHP 版本的 APM Agent](https://github.com/elastic/apm-agent-php) 目前(2020年11月12日 23:53:18)仍处于开发版本, 而非正式版.

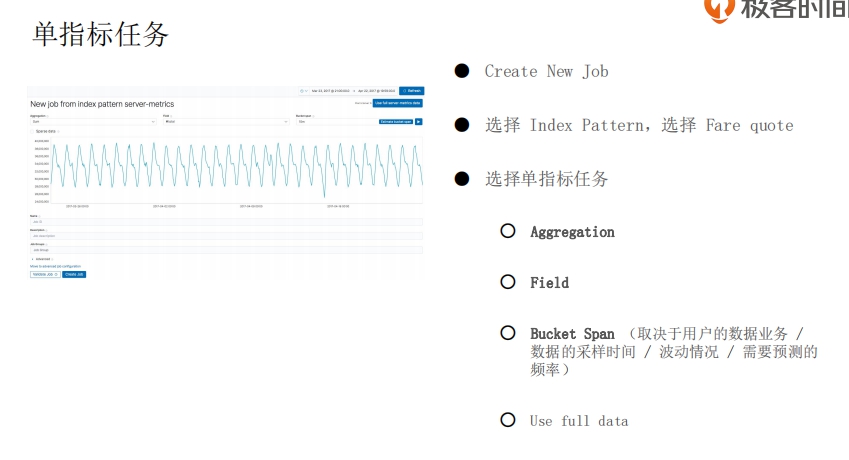
## 用机器学习实现时序数据的异常检测(上)
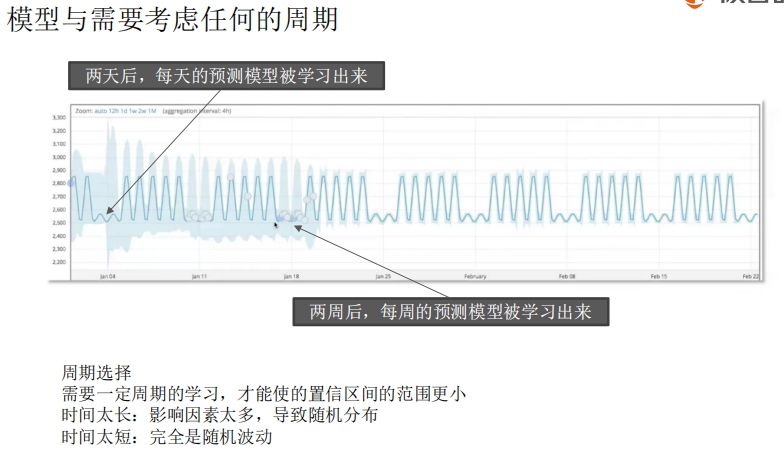
> 机器学习是 xpack 的收费功能






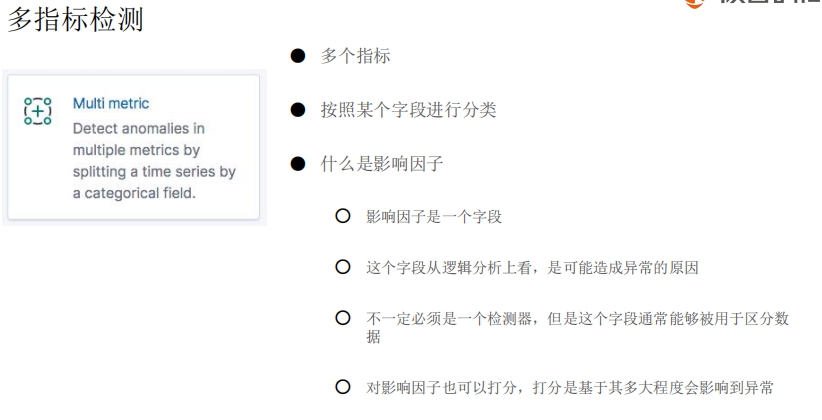
## 用机器学习实现时序数据的异常检测(下)


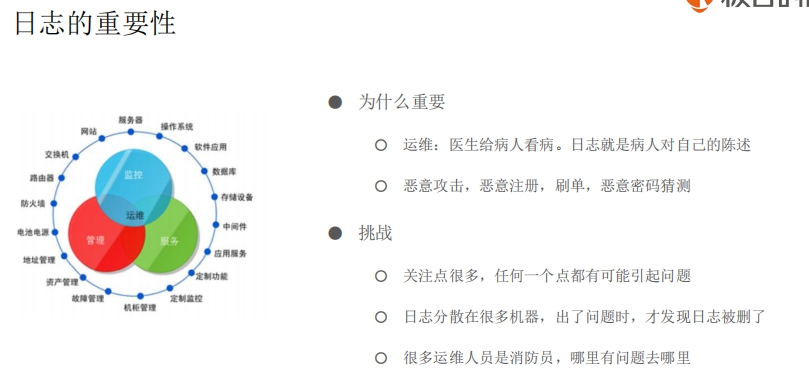
## 用ELK进行日志管理
## 用Canvas做数据演示


