ElasticSearch汇总
一、Elasticsearch介绍和安装
1.1、介绍
用户访问我们的首页,一般都会直接搜索来寻找自己想要购买的商品而商品的数量非常多,而且分类繁杂。如果能正确的显示出用户想要的商品,并进行合理的过滤,尽快促成交易,是搜索系统要研究的核心。面对这样复杂的搜索业务和数据量,使用传统数据库搜索就显得力不从心,一般我们都会使用全文检索技术,比如Solr、Elasticsearch等;
Elasticsearch是一个实时的分布式搜索和分析引擎。它可以帮助你用前所未有的速度去处理大规模数据。ElasticSearch是一个基于Lucene的搜索服务器。它提供了一个分布式多用户能力的全文搜索引擎,基于RESTful web接口。Elasticsearch是用Java开发的,并作为Apache许可条款下的开放源码发布,是当前流行的企业级搜索引擎。设计用于云计算中,能够达到实时搜索,稳定,可靠,快速,安装使用方便。
Elasticsearch具备以下特点
- 分布式:无需人工搭建集群(solr就需要人为配置,使用Zookeeper作为注册中心),可以作为一个大型分布式集群(数百台服务器)技术,处理PB级数据,服务大公司;也可以运行在单机上
- Restful风格:一切API都遵循Rest原则,容易上手
- 近实时搜索:数据更新在Elasticsearch中几乎是完全同步的。
- 开箱即用的,部署简单
- 将全文检索、数据分析以及分布式技术,合并在了一起,才形成了独一无二的ES;
1.2、下载
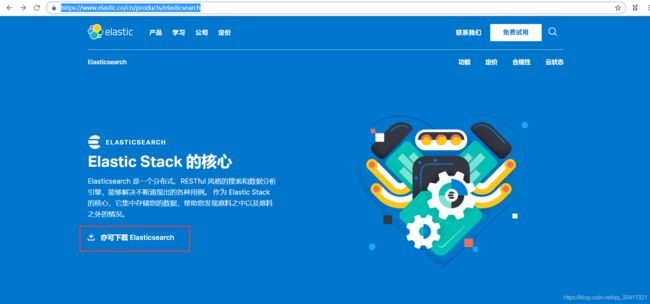
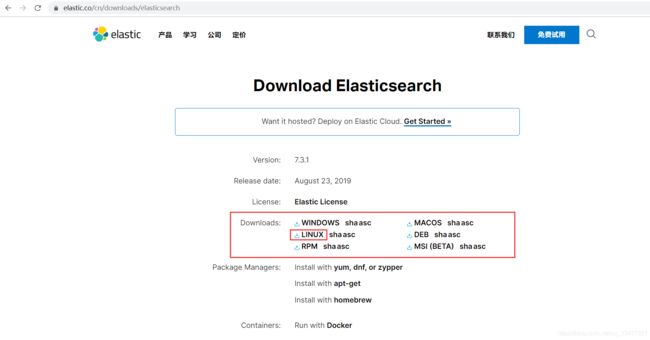
打开官网ElasticsSearch官网,点击左下方的下载链接
我自己是安装在linux上的,所以这里选择linux版(大家根据自己的需要选择对应的文件下载)
1.3、安装ElasticSearch
1.3.1 centos7安装ElasticSearch
目前最新的ElasticSearch是7.3.1,需要JDK11以上的版本支持,所以linux需要先配置jdk11或以上版本,配置jdk参考下边的文章
LINUX配置JDK
出于安全考虑,ElasticSearch默认不允许以root账号运行,所以需要新建用户:
#新建用户
useradd esearch
#设置密码
passwd esearch
#切换用户
su - esearch
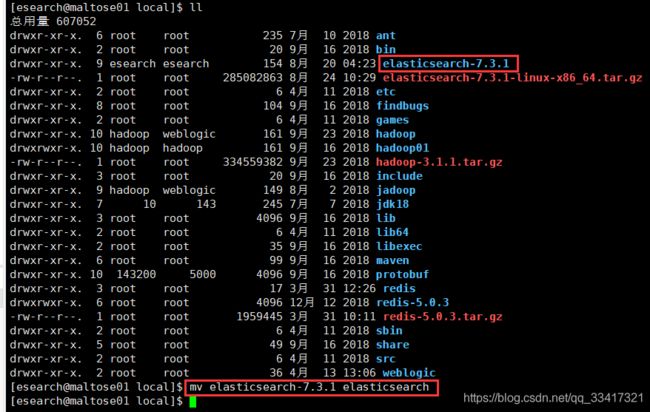
上传ElasticSearch安装包(本人上传到了/usr/local目录下)并解压:
tar -zxvf elasticsearch-7.3.1-linux-x86_64.tar.gz
会有如下错误提示:

切换到root用户,给当前文件夹赋权限
su root
chmod 777 /usr/local
然后再切换回esearch用户,重新解压
su esearch
tar -zxvf elasticsearch-7.3.1-linux-x86_64.tar.gz
此时解压正常:

将目录重新命名,去掉版本号:
mv elasticsearch-7.3.1 elasticsearch
进入解压后的目录,结构如下:

1.3.2 docker安装ElasticSearch
docker镜像下载
docker pull elasticsearch:5.6.8

安装es容器

如果不开启远程连接,则会报错如下

开启远程连接:
登录docker容器

查看目录结构

进入config目录
cd config
查看文件

修改elasticsearch.yml

vi命令,docker无法识别,安装该编辑器


将transport前边的注释去掉,同时添加当前集群节点名称cluster.name

开启跨域

执行如下命令,使得修改内核参数马上生效
dsysctl -p
开机自动启动ES
![]()
docker安装IK分词器

测试IK分词器


1.4、配置
我们进入config配置目录:修改下边这两个文件

1.4.1、配置elasticsearch.yml
vim elasticsearch.yml
1.4.1.1、配置数据和日志目录
path.data: /usr/local/elasticsearch/data
path.logs: /usr/local/elasticsearch/logs
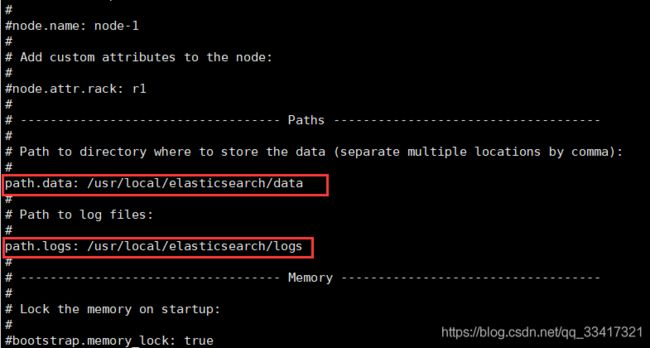
我们把data和logs目录修改指向了elasticsearch的安装目录。但是其中data目录并不存在(logs目录已经有了),因此我们需要创建出来。进入elasticsearch的根目录,然后创建:
mkdir data

1.4.1.2、修改绑定的IP
默认只允许本机访问,修改为0.0.0.0后则可以远程访问(elasticsearch.yml)
network.host: 0.0.0.0 # 绑定到0.0.0.0,允许任何ip来访问
1.4.2、配置jvm.options
进入config文件夹里
vim jvm.options
配置内存
#默认是1g,有点大,我们修改为512M,默认配置如下
#-Xms1g
#-Xmx1g

#修改为512m
-Xms512m
-Xmx512m
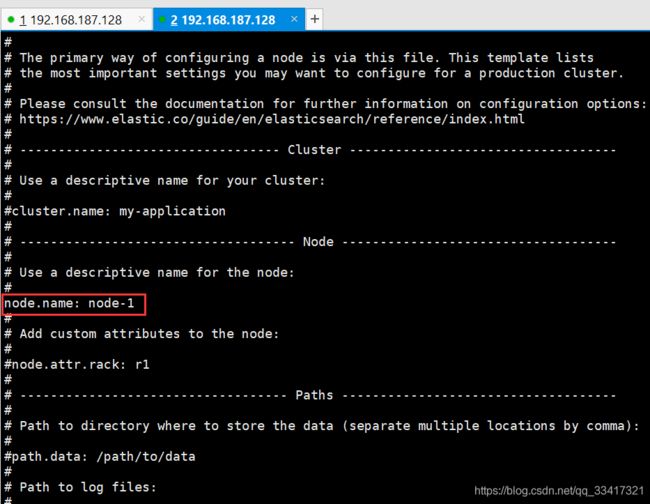
1.4.3、配置ES集群
目前我们是做的单机安装,如果要做集群,只需要在这个配置文件中添加其它节点信息即可,如下:
| 属性名 | 说明 |
|---|---|
| cluster.name | 配置elasticsearch的集群名称,默认是elasticsearch。建议修改成一个有意义的名称。 |
| node.name | 节点名,es会默认随机指定一个名字,建议指定一个有意义的名称,方便管理 |
| path.conf | 设置配置文件的存储路径,tar或zip包安装默认在es根目录下的config文件夹,rpm安装默认在/etc/ elasticsearch |
| path.data | 设置索引数据的存储路径,默认是es根目录下的data文件夹,可以设置多个存储路径,用逗号隔开 |
| path.logs | 设置日志文件的存储路径,默认是es根目录下的logs文件夹 |
| path.plugins | 设置插件的存放路径,默认是es根目录下的plugins文件夹 |
| bootstrap.memory_lock | 设置为true可以锁住ES使用的内存,避免内存进行swap |
| network.host | 设置bind_host和publish_host,设置为0.0.0.0允许外网访问 |
| http.port | 设置对外服务的http端口,默认为9200。 |
| transport.tcp.port | 集群结点之间通信端口 |
| discovery.zen.ping.timeout | 设置ES自动发现节点连接超时的时间,默认为3秒,如果网络延迟高可设置大些 |
| discovery.zen.minimum_master_nodes | 主结点数量的最少值 ,此值的公式为:(master_eligible_nodes / 2) + 1 ,比如:有3个符合要求的主结点,那么这里要设置为2 |
1.5、运行
进入安装目录的bin目录,然后执行如下启动命令
./elasticsearch
1.5.1、报错1、
此时如果是root用户启动的话会报错:

所以一定要使用非root用户启动
1.5.2、报错2
切换为非root用户后可能会报下边警告(不影响运行)
Java HotSpot(TM) 64-Bit Server VM warning: Option UseConcMarkSweepGC was deprecated in version 9.0 and will likely be remov
如果想去掉这个警告的话,编辑config下的jvm.options,将下边关于垃圾回收的配置注释掉即可

1.5.3、报错3
Exception in thread "main" org.elasticsearch.bootstrap.BootstrapException: java.nio.file.AccessDeniedException:
/usr/local/elasticsearch/config/elasticsearch.keystore
原因:elasticsearch.keystore的宿主是root,切换到root用户,将宿主换为esearch用户:
chown -R esearch /usr/local/elasticsearch
1.5.4、报错4
ERROR: [5] bootstrap checks failed
[1]: max file descriptors [4096] for elasticsearch process is too low, increase to at least [65535]
[2]: max number of threads [3802] for user [esearch] is too low, increase to at least [4096]
[3]: max virtual memory areas vm.max_map_count [65530] is too low, increase to at least [262144]
[4]: JVM is using the serial collector but should not be for the best performance; either it's the default for the VM [Java HotSpot(TM) 64-Bit Server VM] or -XX:+UseSerialGC was explicitly specified

1.5.4.1、max file descriptors [4096] for elasticsearch process is too low, increase to at least [65535]
每个进程最大同时打开文件数太小,可通过下面2个命令查看当前数量
ulimit -Hn
ulimit -Sn
解决:切换到root用户,修改/etc/security/limits.conf文件,最上边增加如下配置(解决前两个问题),用户退出后重新登录生效
* soft nofile 65536
* hard nofile 131072
* soft nproc 2048
* hard nproc 4096
执行 sysctl -p 命令,使得配置生效;
1.5.4.2、max virtual memory areas vm.max_map_count [65530] is too low, increase to at least [262144]
内存权限太小,使用root用户:
vi /etc/sysctl.conf
在最后一行添加:
vm.max_map_count=262144
1.5.4.3、JVM is using the serial collector but should not be for the best performance
编辑config下的ElasticSearch.yml文件,将 #cluster.initial_master_nodes: [“node-1”, “node-2”] 注释去掉,改为下边这样
cluster.initial_master_nodes: ["node-1"]
再次启动即可成功;
可以看到绑定了两个端口:

9300:集群节点间通讯接口
9200:客户端访问接口
我们在浏览器中访问:http://192.168.237.128:9200/

二、下载安装Kibana
2.1、下载
下载window版(需要node.js支持,所以需要自己先在window上安装node.js,自行百度安装node.js,node.js官网下载)


2.2、配置
进入安装目录下的config目录,修改kibana.yml文件,修改elasticsearch服务器的地址:
#这是旧版本的配置方法
#elasticsearch.url:"http://192.168.237.128:9200"
#目前是最新版7.3.1,写法如下
elasticsearch.hosts: ["http://192.168.237.128:9200"]
且将下边的注释打开
删除线格式
2.3、运行
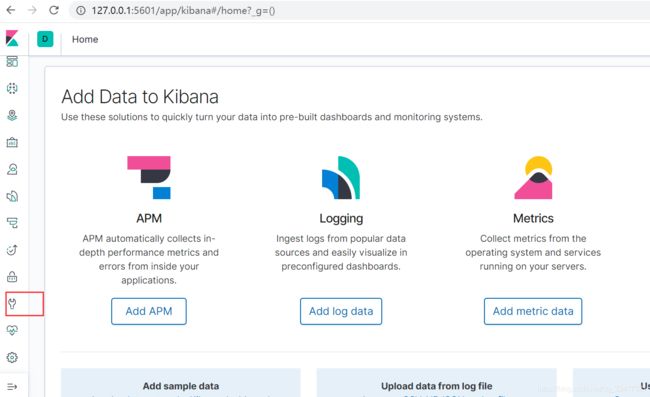
双击bin目录下的kibana.bat即可运行

访问:http://127.0.0.1:5601

2.4、控制台
点击左侧DevTools菜单,即可进入控制台页面:

新版界面是:
2.5、docker下安装kibana
下载镜像
![]()
安装kibana容器

测试:

三、下载配置IK分词器插件
es的IK分词器插件下载
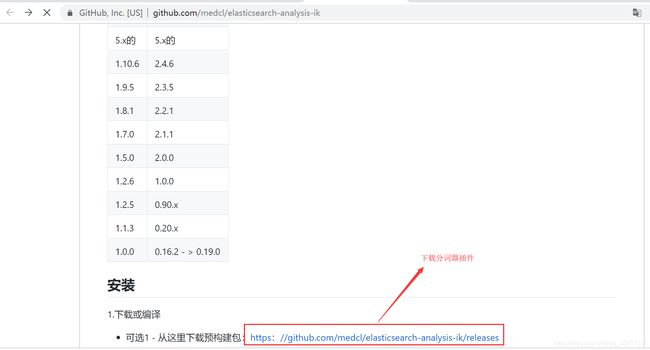
下载后上传到elasticsearch/plugins目录下,并解压:
unzip elasticsearch-analysis-ik-6.3.0.zip -d ik-analyzer
解压后删除压缩包;
或者联网下载:
#注意:将6.3.0改为自己的es版本
./bin/elasticsearch-plugin install https://github.com/medcl/elasticsearch-analysis-ik/releases/download/v6.3.0/elasticsearch-analysis-ik-6.3.0.zip
然后重启elasticsearch:
遇到下边的错

将插件的 plugin-descriptor.properties文件里对jvm, site, isolated的声明行都注释掉,然后修改elasticsearch.version的版本值为当前ES版本;
重启ES即可:

测试分词器,在kibana控制台输入:
{
  "analyzer": "ik_max_word",
  "text":     "我是大学生"
}
得到:
{
  "tokens": [
    {
      "token": "我",
      "start_offset": 0,
      "end_offset": 1,
      "type": "CN_CHAR",
      "position": 0
    },
    {
      "token": "是",
      "start_offset": 1,
      "end_offset": 2,
      "type": "CN_CHAR",
      "position": 1
    },
    {
      "token": "大学生",
      "start_offset": 2,
      "end_offset": 5,
      "type": "CN_WORD",
      "position": 2
    },
    {
      "token": "大学",
      "start_offset": 2,
      "end_offset": 4,
      "type": "CN_WORD",
      "position": 3
    },
    {
      "token": "学生",
      "start_offset": 3,
      "end_offset": 5,
      "type": "CN_WORD",
      "position": 4
    }
  ]
}

四、API
Elasticsearch提供了Rest风格的API,即http请求接口,而且也提供了各种语言的客户端API
ES语法API:
https://www.elastic.co/guide/en/elasticsearch/reference/current/index.html
客户端API:
https://www.elastic.co/guide/en/elasticsearch/client/index.html
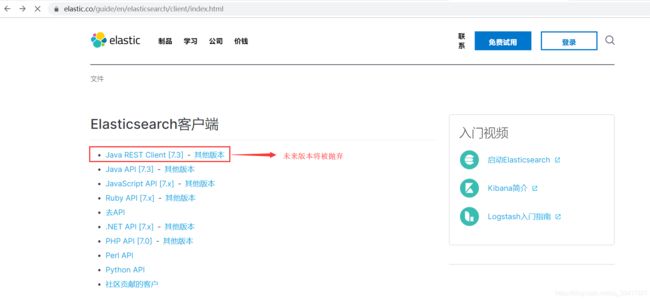
点击Java Rest Client后,会发现又有两个:

Low Level Rest Client是低级别封装,提供一些基础功能,但更灵活;
High Level Rest Client,是在Low Level Rest Client基础上进行的高级别封装,功能更丰富和完善,而且API会变的简单
五、操作索引
5.1、基本概念
Elasticsearch也是基于Lucene的全文检索库,本质也是存储数据,很多概念与MySQL类似的。
对比关系:
索引(indices)--------------------------------Databases 数据库
类型(type)-----------------------------Table 数据表
文档(Document)----------------Row 行
字段(Field)-------------------Columns 列
详细说明:
| 概念 | 说明 |
|---|---|
| 索引库(indices) | indices是index的复数,代表许多的索引 |
| 类型(type) | 类型是模拟mysql中的table概念,一个索引库下可以有不同类型的索引,比如商品索引,订单索引,其数据格式不同。不过这会导致索引库混乱,因此未来版本中会移除这个概念 |
| 文档(document) | 存入索引库原始的数据。比如每一条商品信息,就是一个文档 |
| 字段(field) | 文档中的属性 |
| 映射配置(mappings) | 字段的数据类型、属性、是否索引、是否存储等特性 |
是不是与Lucene和solr中的概念类似。
另外,在SolrCloud中,有一些集群相关的概念,在Elasticsearch也有类似的:
- 索引集(Indices,index的复数):逻辑上的完整索引
- 分片(shard):数据拆分后的各个部分
- 副本(replica):每个分片的复制
要注意的是:Elasticsearch本身就是分布式的,因此即便你只有一个节点,Elasticsearch默认也会对你的数据进行分片和副本操作,当你向集群添加新数据时,数据也会在新加入的节点中进行平衡。
5.2、创建索引
5.2.1、语法
Elasticsearch采用Rest风格API,因此其API就是一次http请求,可以用任何工具发起http请求;
创建索引的请求格式:
-
请求方式:PUT
-
请求路径:/索引库名
-
请求参数:json格式:
{ "settings": { "number_of_shards": 3, "number_of_replicas": 2 } }- settings:索引库的设置
- number_of_shards:分片数量
- number_of_replicas:副本数量
- settings:索引库的设置
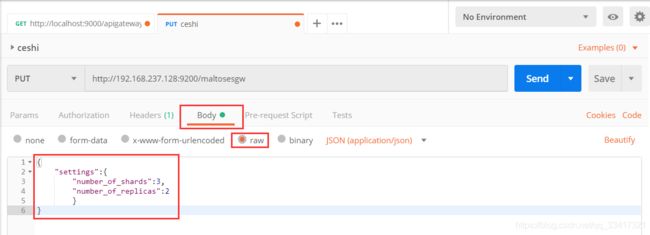
这里先使用postman发起http请求
地址:
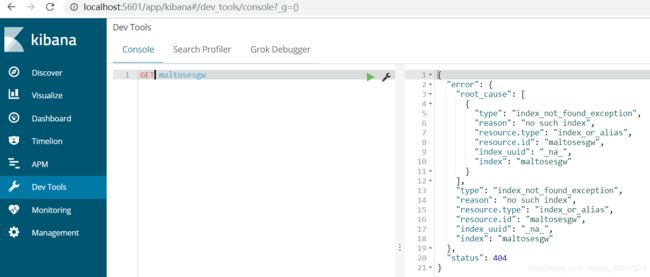
http://192.168.237.128:9200/maltosesgw
json数据:
{
	"settings":{
		"number_of_shards":3,
		"number_of_replicas":2
		}
}
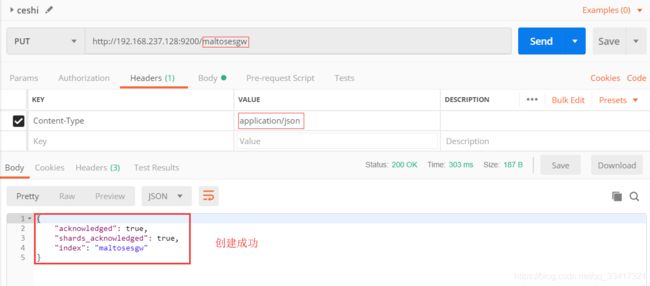
其中发送的json数据:
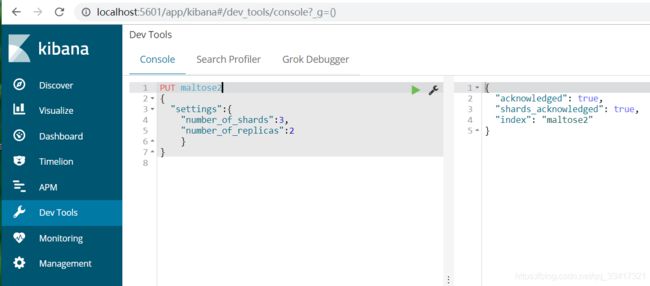
使用kibana创建:
相当于是省去了elasticsearch的服务器地址,而且还有语法提示,非常舒服。
5.3、查看索引
Get请求可以帮我们查看索引信息,格式:
GET /索引库名

或者,我们可以使用*来查询所有索引库配置:

查看存在的所有的索引库
GET _cat/indices?v

5.4、删除索引
删除索引使用DELETE请求,语法:
DELETE /索引库名

我们也可以用HEAD请求,查看索引是否存在:

5.5、映射配置
索引有了,接下来肯定是添加数据。但是,在添加数据之前必须定义映射。
什么是映射?
映射是定义文档的过程,文档包含哪些字段,这些字段是否保存,是否索引,是否分词等,
只有配置清楚,Elasticsearch才会帮我们进行索引库的创建;
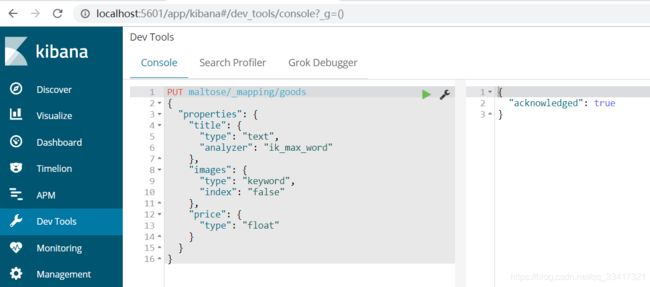
5.5.1、创建映射字段
语法:
PUT /索引库名/_mapping/类型名称
{
  "properties": {
    "字段名": {
      "type": "类型",
      "index": true,
      "store": true,
      "analyzer": "分词器"
    }
  }
}
- 类型名称:就是前面讲的type的概念,类似于数据库中的不同表
字段名:任意填写 ,可以指定许多属性,例如: - type:类型,可以是text、long、short、date、integer、object等
- index:是否索引,默认为true
- store:是否存储,默认为false
- analyzer:分词器,这里的
ik_max_word即使用ik分词器
示例:
PUT maltose/_mapping/goods
{
  "properties": {
    "title": {
      "type": "text",
      "analyzer": "ik_max_word"
    },
    "images": {
      "type": "keyword",
      "index": "false"
    },
    "price": {
      "type": "float"
    }
  }
}
新增文档数据
最后的1是第几条数据,可以写1,2,3…

5.4.2、查看映射关系
语法:
GET /索引库名/_mapping
示例:
GET /maltose/_mapping

5.5.3、字段属性详解
5.5.3.1、type
Elasticsearch中支持的数据类型非常丰富:

我们说几个关键的:
-
String类型,又分两种:
- text:可分词,不可参与聚合
- keyword:不可分词,数据会作为完整字段进行匹配,可以参与聚合
-
Numerical:数值类型,分两类
- 基本数据类型:long、interger、short、byte、double、float、half_float
- 浮点数的高精度类型:scaled_float
- 需要指定一个精度因子,比如10或100。elasticsearch会把真实值乘以这个因子后存储,取出时再还原。
-
Date:日期类型
elasticsearch可以对日期格式化为字符串存储,但是建议我们存储为毫秒值,存储为long,节省空间。
5.5.3.2、index
index影响字段的索引情况。
- true:字段会被索引,则可以用来进行搜索。默认值就是true
- false:字段不会被索引,不能用来搜索
index的默认值就是true,也就是说你不进行任何配置,所有字段都会被索引。
但是有些字段是我们不希望被索引的,比如商品的图片信息,就需要手动设置index为false。
5.5.3.3、store
是否将数据进行额外存储。
在学习lucene和solr时,我们知道如果一个字段的store设置为false,那么在文档列表中就不会有这个字段的值,用户的搜索结果中不会显示出来。
但是在Elasticsearch中,即便store设置为false,也可以搜索到结果。
原因是Elasticsearch在创建文档索引时,会将文档中的原始数据备份,保存到一个叫做_source的属性中。而且我们可以通过过滤_source来选择哪些要显示,哪些不显示。
而如果设置store为true,就会在_source以外额外存储一份数据,多余,因此一般我们都会将store设置为false,事实上,store的默认值就是false。
5.5.3.4、boost
激励因子,这个与lucene中一样,其它的不再一一讲解,用的不多
5.6、新增数据
5.6.1、随机生成id
通过POST请求,可以向一个已经存在的索引库中添加数据。
语法(“类型名”理解为表名):
POST /索引库名/类型名
{
    "key":"value"
}
示例:
POST /maltose/goods/
{
    "title":"小米9手机",
    "images":"https://timgsa.baidu.com1551405834950959.png",
    "price":2599.00
}
通过kibana查看数据:
get _search
{
    "query":{
        "match_all":{}
    }
}
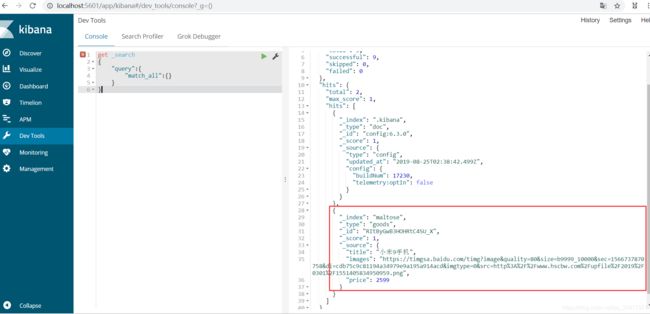
 {
        "_index": "maltose",
        "_type": "goods",
        "_id": "RItByGwB3HOHRtC4SU_X",
        "_score": 1,
        "_source": {
          "title": "小米9手机",
          "images": "https://timgsa.baidu.com/timg?image&quality=80&size=b9999_10000&sec=1566737870758&di=cdb75c9c81194a34979e9a195a914acd&imgtype=0&src=http%3A%2F%2Fwww.hscbw.com%2Fupfile%2F2019%2F0301%2F1551405834950959.png",
          "price": 2599
        }
}
- _source`:源文档信息,所有的数据都在里面。
_id:这条文档的唯一标示,与文档自己的id字段没有关联
5.6.2、自定义id
语法:
POST /索引库名/类型/id值
{
    ...
}
示例:
POST /maltose/goods/123
{
    "title":"huawei手机",
    "images":"http://image.maltose.com/12华为479122.jpg",
    "price":2999.00
}
5.6.3、智能判断
Elasticsearch非常智能,你不需要给索引库设置任何mapping映射,它也可以根据你输入的数据来判断类型,动态添加数据映射
示例:我们额外添加了stock库存,和saleable是否上架两个字段
POST /maltose/goods/456
{
    "title":"魅族手机",
    "images":"http://image.sgw.com/12479122.jpg",
    "price":2199.00,
    "stock": 100,
    "saleable":true
}
结果:
{
  "_index": "maltose",
  "_type": "goods",
  "_id": "456",
  "_version": 1,
  "result": "created",
  "_shards": {
    "total": 2,
    "successful": 1,
    "failed": 0
  },
  "_seq_no": 0,
  "_primary_term": 1
}
查看结果:
 {
        "_index": "maltose",
        "_type": "goods",
        "_id": "456",
        "_score": 1,
        "_source": {
          "title": "魅族手机",
          "images": "http://image.sgw.com/12479122.jpg",
          "price": 2199,
          "stock": 100,
          "saleable": true
        }
}
索引库映射关系:
stock和saleable都被成功映射了。
5.7、修改数据
把上边的新增的请求方式改为PUT,就是修改了。注意:修改必须指定id,
id对应文档存在,则修改;
id对应文档不存在,则新增;
示例:我们把id为123的数据进行修改:
PUT /maltose/goods/123
{
    "title":"iphone100手机",
    "images":"http://image.222.com/12479122.jpg",
    "price":2299.00,
    "stock": 100,
    "saleable":true
}

注意,put是将原始数据删除后再新建一条数据,而post是修改原始数据
5.8、删除数据
删除使用DELETE请求,同样,需要根据id进行删除:
语法:
DELETE /索引库名/类型名/id值
示例:
DELETE /maltose/goods/456
六、查询
我们从以下几个方面来介绍查询:
- 基本查询
_source过滤- 结果过滤
- 高级查询
- 排序
6.1、基本查询
GET /索引库名/_search
{
    "query":{
        "查询类型":{
            "查询条件":"查询条件值"
        }
    }
}
这里的query代表一个查询对象,里面可以有不同的查询属性
- 查询类型:
- 例如:
match_all,match,term,range等等
- 例如:
- 查询条件:查询条件会根据类型的不同,写法也有差异,后面详细讲解
6.1.1、match_all(查询所有)
示例:
GET _search
{
    "query":{
        "match_all":{}
    }
}
- query`:代表查询对象
match_all:代表查询所有
结果:
{
  "took": 5,
  "timed_out": false,
  "_shards": {
    "total": 9,
    "successful": 9,
    "skipped": 0,
    "failed": 0
  },
  "hits": {
    "total": 4,
    "max_score": 1,
    "hits": [
      {
        "_index": ".kibana",
        "_type": "doc",
        "_id": "config:6.3.0",
        "_score": 1,
        "_source": {
          "type": "config",
          "updated_at": "2019-08-25T02:38:42.499Z",
          "config": {
            "buildNum": 17230,
            "telemetry:optIn": false
          }
        }
      },
      {
        "_index": "maltose",
        "_type": "goods",
        "_id": "123",
        "_score": 1,
        "_source": {
          "title": "iphone100手机",
          "images": "http://image.222.com/12479122.jpg",
          "price": 2299,
          "stock": 100,
          "saleable": true
        }
      },
      {
        "_index": "maltose",
        "_type": "goods",
        "_id": "456",
        "_score": 1,
        "_source": {
          "title": "魅族手机",
          "images": "http://image.sgw.com/12479122.jpg",
          "price": 2199,
          "stock": 100,
          "saleable": true
        }
      },
      {
        "_index": "maltose",
        "_type": "goods",
        "_id": "RItByGwB3HOHRtC4SU_X",
        "_score": 1,
        "_source": {
          "title": "小米9手机",
          "images": "https://timgsa.baidu.com/timg?image&quality=80&size=b9999_10000&sec=1566737870758&di=cdb75c9c81194a34979e9a195a914acd&imgtype=0&src=http%3A%2F%2Fwww.hscbw.com%2Fupfile%2F2019%2F0301%2F1551405834950959.png",
          "price": 2599
        }
      }
    ]
  }
}
- took:查询花费时间,单位是毫秒
- time_out:是否超时
- _shards:分片信息
- hits:搜索结果总览对象
- total:搜索到的总条数
- max_score:所有结果中文档得分的最高分
- hits:搜索结果的文档对象数组,每个元素是一条搜索到的文档信息
- _index:索引库
- _type:文档类型
- _id:文档id
- _score:文档得分
- _source:文档的源数据
6.1.2、match(匹配查询)
match类型查询,会把查询条件进行分词,然后进行查询,多个词条之间是or的关系
GET /heima/_search
{
    "query":{
        "match":{
            "title":"小米电视"
        }
    }
}

某些情况下,我们需要更精确查找,我们希望这个关系变成and,可以这样做:
GET /maltose/_search
{
    "query":{
        "match": {
          "title": {
            "query": "小米9",
            "operator": "and"
          }
        }
    }
}

- or和and之间?
在 or 与 and 间二选一有点过于非黑即白。 如果用户给定的条件分词后有 5 个查询词项,想查找只包含其中 4 个词的文档,该如何处理?将 operator 操作符参数设置成 and 只会将此文档排除。
有时候这正是我们期望的,但在全文搜索的大多数应用场景下,我们既想包含那些可能相关的文档,同时又排除那些不太相关的。换句话说,我们想要处于中间某种结果。
match 查询支持 minimum_should_match 最小匹配参数, 这让我们可以指定必须匹配的词项数用来表示一个文档是否相关。我们可以将其设置为某个具体数字,更常用的做法是将其设置为一个百分数,因为我们无法控制用户搜索时输入的单词数量:
GET /maltose/_search
{
    "query":{
        "match":{
            "title":{
            	"query":"小米曲面电视",
            	"minimum_should_match": "75%"
            }
        }
    }
}
本例中,搜索语句可以分为3个词,如果使用and关系,需要同时满足3个词才会被搜索到。这里我们采用最小品牌数:75%,那么也就是说只要匹配到总词条数量的75%即可,这里3*75% 约等于2。所以只要包含2个词条就算满足条件了。
6.1.3、multi_match(多字段查询)
multi_match与match`类似,不同的是它可以在多个字段中查询
GET /maltose/_search
{
    "query":{
        "multi_match": {
            "query":    "小米",
            "fields":   [ "title", "subTitle" ]
        }
	}
}
本例中,我们会在title字段和subtitle字段中查询小米这个词
6.1.4、term(词条匹配)
term 查询被用于精确值 匹配,这些精确值可能是数字、时间、布尔或者那些未分词的字符串
GET /maltose/_search
{
    "query":{
        "term":{
            "price":2699.00
        }
    }
}
结果:
{
  "took": 2,
  "timed_out": false,
  "_shards": {
    "total": 3,
    "successful": 3,
    "skipped": 0,
    "failed": 0
  },
  "hits": {
    "total": 1,
    "max_score": 1,
    "hits": [
      {
        "_index": "maltose",
        "_type": "goods",
        "_id": "r9c1KGMBIhaxtY5rlRKv",
        "_score": 1,
        "_source": {
          "title": "小米手机",
          "images": "http://image.leyou.com/12479122.jpg",
          "price": 2699
        }
      }
    ]
  }
}
6.1.5、terms(多词条精确匹配)
terms查询和 term 查询一样,但它允许你指定多值进行匹配。如果这个字段包含了指定值中的任何一个值,那么这个文档满足条件:
GET /maltose/_search
{
    "query":{
        "terms":{
            "price":[2699.00,2899.00,3899.00]
        }
    }
}
结果:
{
  "took": 4,
  "timed_out": false,
  "_shards": {
    "total": 3,
    "successful": 3,
    "skipped": 0,
    "failed": 0
  },
  "hits": {
    "total": 3,
    "max_score": 1,
    "hits": [
      {
        "_index": "maltose",
        "_type": "goods",
        "_id": "2",
        "_score": 1,
        "_source": {
          "title": "大米手机",
          "images": "http://image.maltose.com/12479122.jpg",
          "price": 2899
        }
      },
      {
        "_index": "maltose",
        "_type": "goods",
        "_id": "r9c1KGMBIhaxtY5rlRKv",
        "_score": 1,
        "_source": {
          "title": "小米手机",
          "images": "http://image.maltose.com/12479122.jpg",
          "price": 2699
        }
      },
      {
        "_index": "maltose",
        "_type": "goods",
        "_id": "3",
        "_score": 1,
        "_source": {
          "title": "小米电视4A",
          "images": "http://image.maltose.com/12479122.jpg",
          "price": 3899
        }
      }
    ]
  }
}
6.2、结果过滤
默认情况下,elasticsearch在搜索的结果中,会把文档中保存在_source的所有字段都返回。如果我们只想获取其中的部分字段,我们可以添加_source的过滤;
6.2.1、直接指定字段
示例:
GET /maltose/_search
{
  "_source": ["title","price"],
  "query": {
    "term": {
      "price": 2699
    }
  }
}
结果:
{
  "took": 12,
  "timed_out": false,
  "_shards": {
    "total": 3,
    "successful": 3,
    "skipped": 0,
    "failed": 0
  },
  "hits": {
    "total": 1,
    "max_score": 1,
    "hits": [
      {
        "_index": "maltose",
        "_type": "goods",
        "_id": "r9c1KGMBIhaxtY5rlRKv",
        "_score": 1,
        "_source": {
          "price": 2699,
          "title": "小米手机"
        }
      }
    ]
  }
}
6.2.2、指定includes和excludes
我们也可以通过:
- includes:来指定想要显示的字段
- excludes:来指定不想要显示的字段
二者都是可选的。
示例:
GET /maltose/_search
{
  "_source": {
    "includes":["title","price"]
  },
  "query": {
    "term": {
      "price": 2699
    }
  }
}
与下面的结果将是一样的:
GET /maltose/_search
{
  "_source": {
     "excludes": ["images"]
  },
  "query": {
    "term": {
      "price": 2699
    }
  }
}
6.3、高级查询
6.3.1、布尔组合(bool)
bool把各种其它查询通过must(与)、must_not(非)、should(或)的方式进行组合
GET /maltose/_search
{
    "query":{
        "bool":{
        	"must":     { "match": { "title": "大米" }},
        	"must_not": { "match": { "title":  "电视" }},
        	"should":   { "match": { "title": "手机" }}
        }
    }
}
结果:
{
  "took": 10,
  "timed_out": false,
  "_shards": {
    "total": 3,
    "successful": 3,
    "skipped": 0,
    "failed": 0
  },
  "hits": {
    "total": 1,
    "max_score": 0.5753642,
    "hits": [
      {
        "_index": "maltose",
        "_type": "goods",
        "_id": "2",
        "_score": 0.5753642,
        "_source": {
          "title": "大米手机",
          "images": "http://image.maltose.com/132432.jpg",
          "price": 2899
        }
      }
    ]
  }
}
6.3.2、范围查询(range)
range 查询找出那些落在指定区间内的数字或者时间
range查询允许以下字符:
| 操作符 | 说明 |
|---|---|
| gt | 大于 |
| gte | 大于等于 |
| lt | 小于 |
| lte | 小于等于 |
示例:
GET /maltose/_search
{
    "query":{
        "range": {
            "price": {
                "gte":  1000.0,
                "lt":   2800.00
            }
    	}
    }
}
6.3.3、模糊查询(fuzzy)
新增一个商品:
POST /maltose/goods/4
{
    "title":"apple手机",
    "images":"http://image.leyou.com/12479122.jpg",
    "price":6899.00
}
fuzzy 查询是 term 查询的模糊等价。它允许用户搜索词条与实际词条的拼写出现偏差,但是偏差的编辑距离不得超过2:
GET /maltose/_search
{
  "query": {
    "fuzzy": {
      "title": "appla"
    }
  }
}
上面的查询,虽然没有完全拼写正确,但是也能查询到apple手机;
可以通过fuzziness来指定允许的编辑距离:
GET /maltose/_search
{
  "query": {
    "fuzzy": {
        "title": {
            "value":"appla",
            "fuzziness":1
        }
    }
  }
}
6.4、过滤(filter)
6.4.1、条件查询中进行过滤
所有的查询都会影响到最终文档的评分及排名。如果我们需要在查询结果中进行过滤,并且不希望过滤条件影响评分或排名,那么就不要把过滤条件作为查询条件来用,而是使用filter方式:
GET /maltose/_search
{
    "query":{
        "bool":{
        	"must":{ "match": { "title": "小米手机" }},
        	"filter":{
                "range":{"price":{"gt":2000.00,"lt":3800.00}}
        	}
        }
    }
}
注意:filter中还可以再次进行bool组合条件过滤。
6.4.2、条件查询中进行过滤
如果一次查询只有过滤,没有查询条件,不希望进行评分,我们可以使用constant_score取代只有 filter 语句的 bool 查询。在性能上是完全相同的,但对于提高查询简洁性和清晰度有很大帮助。
GET /maltose/_search
{
    "query":{
        "constant_score":   {
            "filter": {
            	 "range":{"price":{"gt":2000.00,"lt":3000.00}}
            }
        }
}
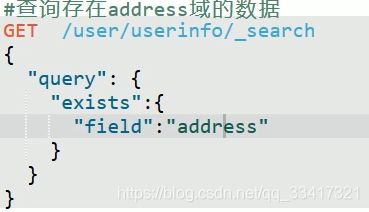
6.4.3、exist存在条件
6.5、排序
6.5.1、单字段排序
sort 可以让我们按照不同的字段进行排序,并且通过order指定排序的方式
示例:
GET /maltose/_search
{
  "query": {
    "match": {
      "title": "小米手机"
    }
  },
  "sort": [
    {
      "price": {
        "order": "desc"
      }
    }
  ]
}
6.5.2、多字段排序
假定我们想要结合使用 price和 _score(得分) 进行查询,并且匹配的结果首先按照价格排序,然后按照相关性得分排序:
GET /goods/_search
{
    "query":{
        "bool":{
        	"must":{ "match": { "title": "小米手机" }},
        	"filter":{
                "range":{"price":{"gt":200000,"lt":300000}}
        	}
        }
    },
    "sort": [
      { "price": { "order": "desc" }},
      { "_score": { "order": "desc" }}
    ]
}
七、聚合aggregations
聚合可以让我们极其方便的实现对数据的统计、分析。例如:
- 什么品牌的手机最受欢迎?
- 这些手机的平均价格、最高价格、最低价格?
- 这些手机每月的销售情况如何?
实现这些统计功能,ES要比数据库的sql要方便的多,而且查询速度非常快,可以实现实时搜索效果。
7.1、基本概念
Elasticsearch中的聚合,包含多种类型,最常用的两种,一个叫桶,一个叫度量:
7.1.1、桶(bucket)
桶的作用,是按照某种方式对数据进行分组,每一组数据在ES中称为一个桶,例如我们根据国籍对人划分,可以得到中国桶、英国桶,日本桶……或者我们按照年龄段对人进行划分:0-10,10-20,20-30,30-60等。
Elasticsearch中提供的划分桶的方式有很多:
- Date Histogram Aggregation:根据日期阶梯分组,例如给定阶梯为周,会自动每周分为一组
- Histogram Aggregation:根据数值阶梯分组,与日期类似
- Terms Aggregation:根据词条内容分组,词条内容完全匹配的为一组
- Range Aggregation:数值和日期的范围分组,指定开始和结束,然后按段分组
- ……
综上所述,我们发现bucket aggregations 只负责对数据进行分组,并不进行计算,因此往往bucket中往往会嵌套另一种聚合:metrics aggregations即度量
7.1.2、度量(metrics)
分组完成以后,我们一般会对组中的数据进行聚合运算,例如求平均值、最大、最小、求和等,这些在ES中称为度量
比较常用的一些度量聚合方式:
- Avg Aggregation:求平均值
- Max Aggregation:求最大值
- Min Aggregation:求最小值
- Percentiles Aggregation:求百分比
- Stats Aggregation:同时返回avg、max、min、sum、count等
- Sum Aggregation:求和
- Top hits Aggregation:求前几
- Value Count Aggregation:求总数
- ……
为了测试聚合,我们先批量导入一些数据
创建索引:
PUT /cars
{
  "settings": {
    "number_of_shards": 1,
    "number_of_replicas": 0
  },
  "mappings": {
    "transactions": {
      "properties": {
        "color": {
          "type": "keyword"
        },
        "make": {
          "type": "keyword"
        }
      }
    }
  }
}
导入数据:
POST /cars/transactions/_bulk
{ "index": {}}
{ "price" : 10000, "color" : "red", "make" : "honda", "sold" : "2014-10-28" }
{ "index": {}}
{ "price" : 20000, "color" : "red", "make" : "honda", "sold" : "2014-11-05" }
{ "index": {}}
{ "price" : 30000, "color" : "green", "make" : "ford", "sold" : "2014-05-18" }
{ "index": {}}
{ "price" : 15000, "color" : "blue", "make" : "toyota", "sold" : "2014-07-02" }
{ "index": {}}
{ "price" : 12000, "color" : "green", "make" : "toyota", "sold" : "2014-08-19" }
{ "index": {}}
{ "price" : 20000, "color" : "red", "make" : "honda", "sold" : "2014-11-05" }
{ "index": {}}
{ "price" : 80000, "color" : "red", "make" : "bmw", "sold" : "2014-01-01" }
{ "index": {}}
{ "price" : 25000, "color" : "blue", "make" : "ford", "sold" : "2014-02-12" }
7.1.3、聚合为桶
首先,我们按照 汽车的颜色color来划分桶
GET /cars/_search
{
    "size" : 0,
    "aggs" : {
        "popular_colors" : {
            "terms" : {
              "field" : "color"
            }
        }
    }
}
- size: 查询条数,这里设置为0,因为我们不关心搜索到的数据,只关心聚合结果,提高效率
- aggs:声明这是一个聚合查询,是aggregations的缩写
- popular_colors:给这次聚合起一个名字,任意。
- terms:划分桶的方式,这里是根据词条划分
- field:划分桶的字段
- terms:划分桶的方式,这里是根据词条划分
- popular_colors:给这次聚合起一个名字,任意。
结果:
{
  "took": 1,
  "timed_out": false,
  "_shards": {
    "total": 1,
    "successful": 1,
    "skipped": 0,
    "failed": 0
  },
  "hits": {
    "total": 8,
    "max_score": 0,
    "hits": []
  },
  "aggregations": {
    "popular_colors": {
      "doc_count_error_upper_bound": 0,
      "sum_other_doc_count": 0,
      "buckets": [
        {
          "key": "red",
          "doc_count": 4
        },
        {
          "key": "blue",
          "doc_count": 2
        },
        {
          "key": "green",
          "doc_count": 2
        }
      ]
    }
  }
}
- hits:查询结果为空,因为我们设置了size为0
- aggregations:聚合的结果
- popular_colors:我们定义的聚合名称
- buckets:查找到的桶,每个不同的color字段值都会形成一个桶
- key:这个桶对应的color字段的值
- doc_count:这个桶中的文档数量
通过聚合的结果我们发现,目前红色的小车比较畅销!
7.1.4、桶内度量
前面的例子告诉我们每个桶里面的文档数量,这很有用。 但通常,我们的应用需要提供更复杂的文档度量。 例如,每种颜色汽车的平均价格是多少?
因此,我们需要告诉Elasticsearch使用哪个字段,使用何种度量方式进行运算,这些信息要嵌套在桶内,度量的运算会基于桶内的文档进行;
现在,我们为刚刚的聚合结果添加 求价格平均值的度量:
GET /cars/_search
{
    "size" : 0,
    "aggs" : {
        "popular_colors" : {
            "terms" : {
              "field" : "color"
            },
            "aggs":{
                "avg_price": {
                   "avg": {
                      "field": "price"
                   }
                }
            }
        }
    }
}
- aggs:我们在上一个aggs(popular_colors)中添加新的aggs。可见度量也是一个聚合,度量是在桶内的聚合
- avg_price:聚合的名称
- avg:度量的类型,这里是求平均值
- field:度量运算的字段
结果:
"aggregations": {
    "popular_colors": {
      "doc_count_error_upper_bound": 0,
      "sum_other_doc_count": 0,
      "buckets": [
        {
          "key": "red",
          "doc_count": 4,
          "avg_price": {
            "value": 32500
          }
        },
        {
          "key": "blue",
          "doc_count": 2,
          "avg_price": {
            "value": 20000
          }
        },
        {
          "key": "green",
          "doc_count": 2,
          "avg_price": {
            "value": 21000
          }
        }
      ]
    }
  }
可以看到每个桶中都有自己的avg_price字段,这是度量聚合的结果
7.1.5、桶内嵌套桶
刚刚的案例中,我们在桶内嵌套度量运算。事实上桶不仅可以嵌套运算, 还可以再嵌套其它桶。也就是说在每个分组中,再分更多组。
比如:我们想统计每种颜色的汽车中,分别属于哪个制造商,按照make字段再进行分桶
GET /cars/_search
{
    "size" : 0,
    "aggs" : {
        "popular_colors" : {
            "terms" : {
              "field" : "color"
            },
            "aggs":{
                "avg_price": {
                   "avg": {
                      "field": "price"
                   }
                },
                "maker":{
                    "terms":{
                        "field":"make"
                    }
                }
            }
        }
    }
}
- 原来的color桶和avg计算我们不变
- maker:在嵌套的aggs下新添一个桶,叫做maker
- terms:桶的划分类型依然是词条
- filed:这里根据make字段进行划分
部分结果:
{"aggregations": {
    "popular_colors": {
      "doc_count_error_upper_bound": 0,
      "sum_other_doc_count": 0,
      "buckets": [
        {
          "key": "red",
          "doc_count": 4,
          "maker": {
            "doc_count_error_upper_bound": 0,
            "sum_other_doc_count": 0,
            "buckets": [
              {
                "key": "honda",
                "doc_count": 3
              },
              {
                "key": "bmw",
                "doc_count": 1
              }
            ]
          },
          "avg_price": {
            "value": 32500
          }
        },
        {
          "key": "blue",
          "doc_count": 2,
          "maker": {
            "doc_count_error_upper_bound": 0,
            "sum_other_doc_count": 0,
            "buckets": [
              {
                "key": "ford",
                "doc_count": 1
              },
              {
                "key": "toyota",
                "doc_count": 1
              }
            ]
          },
          "avg_price": {
            "value": 20000
          }
        },
        {
          "key": "green",
          "doc_count": 2,
          "maker": {
            "doc_count_error_upper_bound": 0,
            "sum_other_doc_count": 0,
            "buckets": [
              {
                "key": "ford",
                "doc_count": 1
              },
              {
                "key": "toyota",
                "doc_count": 1
              }
            ]
          },
          "avg_price": {
            "value": 21000
          }
        }
      ]
    }
  }
}
- 可以看到,新的聚合maker被嵌套在原来每一个color的桶中。
- 每个颜色下面都根据 make字段进行了分组
- 我们能读取到的信息:
- 红色车共有4辆
- 红色车的平均售价是 $32,500 美元。
- 其中3辆是 Honda 本田制造,1辆是 BMW 宝马制造。
7.1.6、划分桶的其它方式
前面说了,划分桶的方式有很多,例如:
- Date Histogram Aggregation:根据日期阶梯分组,例如给定阶梯为周,会自动每周分为一组
- Histogram Aggregation:根据数值阶梯分组,与日期类似
- Terms Aggregation:根据词条内容分组,词条内容完全匹配的为一组
- Range Aggregation:数值和日期的范围分组,指定开始和结束,然后按段分组
刚刚的案例中,我们采用的是Terms Aggregation,即根据词条划分桶。
接下来,我们再学习几个比较常用的:
7.1.6.1、阶梯分桶Histogram
原理:
histogram是把数值类型的字段,按照一定的阶梯大小进行分组。你需要指定一个阶梯值(interval)来划分阶梯大小。
举例:
比如你有价格字段,如果你设定interval的值为200,那么阶梯就会是这样的:
0,200,400,600,...
上面列出的是每个阶梯的key,也是区间的启点。
如果一件商品的价格是450,会落入哪个阶梯区间呢?计算公式如下:
bucket_key = Math.floor((value - offset) / interval) * interval + offset
value:就是当前数据的值,本例中是450;
offset:起始偏移量,默认为0;
interval:阶梯间隔,比如200;
因此你得到的key = Math.floor((450 - 0) / 200) * 200 + 0 = 400;
示例:
比如,我们对汽车的价格进行分组,指定间隔interval为5000:
GET /cars/_search
{
  "size":0,
  "aggs":{
    "price":{
      "histogram": {
        "field": "price",
        "interval": 5000
      }
    }
  }
}
结果:
{
  "took": 21,
  "timed_out": false,
  "_shards": {
    "total": 5,
    "successful": 5,
    "skipped": 0,
    "failed": 0
  },
  "hits": {
    "total": 8,
    "max_score": 0,
    "hits": []
  },
  "aggregations": {
    "price": {
      "buckets": [
        {
          "key": 10000,
          "doc_count": 2
        },
        {
          "key": 15000,
          "doc_count": 1
        },
        {
          "key": 20000,
          "doc_count": 2
        },
        {
          "key": 25000,
          "doc_count": 1
        },
        {
          "key": 30000,
          "doc_count": 1
        },
        {
          "key": 35000,
          "doc_count": 0
        },
        {
          "key": 40000,
          "doc_count": 0
        },
        {
          "key": 45000,
          "doc_count": 0
        },
        {
          "key": 50000,
          "doc_count": 0
        },
        {
          "key": 55000,
          "doc_count": 0
        },
        {
          "key": 60000,
          "doc_count": 0
        },
        {
          "key": 65000,
          "doc_count": 0
        },
        {
          "key": 70000,
          "doc_count": 0
        },
        {
          "key": 75000,
          "doc_count": 0
        },
        {
          "key": 80000,
          "doc_count": 1
        }
      ]
    }
  }
}
会发现,中间有大量的文档数量为0 的桶,看起来很丑。
我们可以增加一个参数min_doc_count为1,来约束最少文档数量为1,这样文档数量为0的桶会被过滤
示例:
GET /cars/_search
{
  "size":0,
  "aggs":{
    "price":{
      "histogram": {
        "field": "price",
        "interval": 5000,
        "min_doc_count": 1
      }
    }
  }
}
结果:
{
  "took": 15,
  "timed_out": false,
  "_shards": {
    "total": 5,
    "successful": 5,
    "skipped": 0,
    "failed": 0
  },
  "hits": {
    "total": 8,
    "max_score": 0,
    "hits": []
  },
  "aggregations": {
    "price": {
      "buckets": [
        {
          "key": 10000,
          "doc_count": 2
        },
        {
          "key": 15000,
          "doc_count": 1
        },
        {
          "key": 20000,
          "doc_count": 2
        },
        {
          "key": 25000,
          "doc_count": 1
        },
        {
          "key": 30000,
          "doc_count": 1
        },
        {
          "key": 80000,
          "doc_count": 1
        }
      ]
    }
  }
}
如果用kibana会将结果变为柱形图,会更漂亮:

7.1.6.2、范围分桶range
范围分桶与阶梯分桶类似,也是把数字按照阶段进行分组,只不过range方式需要你自己指定每一组的起始和结束大小。
8、Spring Data Elasticsearch
Elasticsearch提供的Java客户端有一些不太方便的地方:
- 很多地方需要拼接Json字符串,在java中拼接字符串有多恐怖你懂的
- 需要自己把对象序列化为json存储
- 查询到结果也需要自己反序列化为对象
因此,我们这里就不讲解原生的Elasticsearch客户端API了。
而是学习Spring提供的套件:Spring Data Elasticsearch。
Spring Data 的使命是给各种数据访问提供统一的编程接口,不管是关系型数据库(如MySQL),还是非关系数据库(如Redis),或者类似Elasticsearch这样的索引数据库。从而简化开发人员的代码,提高开发效率。
包含很多不同数据操作的模块:

Spring Data Elasticsearch的页面:
https://projects.spring.io/spring-data-elasticsearch/
特征:
- 支持Spring的基于@Configuration的java配置方式,或者XML配置方式
- 提供了用于操作ES的便捷工具类ElasticsearchTemplate。包括实现文档到POJO之间的自动智能映射。
- 利用Spring的数据转换服务实现的功能丰富的对象映射
- 基于注解的元数据映射方式,而且可扩展以支持更多不同的数据格式
- 根据持久层接口自动生成对应实现方法,无需人工编写基本操作代码(类似mybatis,根据接口自动得到实现)。当然,也支持人工定制查询
九、docker下安装ElasticSearch
9.1、docker安装ElasticSearch安装
下载镜像:
docker pull elasticsearch:5.6.8
创建容器
docker run ‐di ‐‐name=tensquare_elasticsearch ‐p 9200:9200 ‐p 9300:9300
elasticsearch:5.6.8
http://192.168.184.134:9200/ 即可看到如下信息
{

	"name" : "WmBn0H‐",
	"cluster_name" : "elasticsearch",
	"cluster_uuid" : "2g‐VVbm9Rty7J4sksZNJEg",
	"version" : {

	"number" : "5.6.8",
	"build_hash" : "688ecce",
	"build_date" : "2018‐02‐16T16:46:30.010Z",
	"build_snapshot" : false,
	"lucene_version" : "6.6.1"
},
	"tagline" : "You Know, for Search"
}
elasticsearch从5版本以后默认不开启远程连接,项目里连接的话会报错:
NoNodeAvailableException[None of the configured nodes are available:
[{
     #transport#‐1}{
     exvgJLR‐RlCNMJy‐hzKtnA}{
     192.168.184.135}
{
     192.168.184.135:9300}]
]
at
org.elasticsearch.client.transport.TransportClientNodesService.ensureNodes
AreAvailable(TransportClientNodesService.java:347)
at
org.elasticsearch.client.transport.TransportClientNodesService.execute(Tra
nsportClientNodesService.java:245)
at
org.elasticsearch.client.transport.TransportProxyClient.execute(TransportP
roxyClient.java:59)
开启远程连接:
进入容器,执行如下命令
docker exec ‐it tensquare_elasticsearch /bin/bash
此时,我们看到elasticsearch所在的目录为/usr/share/elasticsearch ,进入config看到了配置文件elasticsearch.yml,我们通过vi命令编辑此文件,尴尬的是容器并没有vi命令 ,咋办?我们需要以文件挂载的方式创建容器才行,这样我们就可以通过修改宿主机中的某个文件来实现对容器内配置文件的修改
拷贝配置文件到宿主机
首先退出容器,然后执行命令::
docker cp
tensquare_elasticsearch:/usr/share/elasticsearch/config/elasticsearch.yml
/usr/share/elasticsearch.yml
停止和删除原来创建的容器
docker stop tensquare_elasticsearch
docker rm tensquare_elasticsearch
重新执行创建容器命令
docker run ‐di ‐‐name=tensquare_elasticsearch ‐p 9200:9200 ‐p 9300:9300 ‐v
/usr/share/elasticsearch.yml:/usr/share/elasticsearch/config/elasticsearch
.yml elasticsearch:5.6.8
修改/usr/share/elasticsearch.yml 将 transport.host: 0.0.0.0 前的#去掉后保存文件退出。其作用是允许任何ip地址访问elasticsearch .开发测试阶段可以这么做,生产环境下指定具体的IP
重启启动
docker restart tensquare_elasticsearch
重启后发现重启启动失败了,这时什么原因呢?这与我们刚才修改的配置有关,因为elasticsearch在启动的时候会进行一些检查,比如最多打开的文件的个数以及虚拟内存区域数量等等,如果你放开了此配置,意味着需要打开更多的文件以及虚拟内存,所以我们还需要系统调优;
系统调优
我们一共需要修改两处
修改/etc/security/limits.conf ,追加内容
* soft nofile 65536
* hard nofile 65536
nofile是单个进程允许打开的最大文件个数, soft nofile 是软限制, hard nofile是硬限制;
修改/etc/sysctl.conf,追加内容
vm.max_map_count=655360
限制一个进程可以拥有的VMA(虚拟内存区域)的数量
执行下面命令 修改内核参数马上生效
sysctl ‐p
重新启动虚拟机,再次启动容器,发现已经可以启动并远程访问
9.2、docker下IK分词器的安装
将ik文件夹上传至宿主机(省略)
在宿主机中将ik文件夹拷贝到容器内 /usr/share/elasticsearch/plugins 目录下。
docker cp ik tensquare_elasticsearch:/usr/share/elasticsearch/plugins/
重新启动,即可加载IK分词器
docker restart tensquare_elasticsearch
9.3、HEAD插件安装
修改/usr/share/elasticsearch.yml ,添加允许跨域配置
http.cors.enabled: true
http.cors.allow‐origin: "*"
重新启动elasticseach容器
下载head镜像(此步省略)
docker pull mobz/elasticsearch‐head:5
创建head容器
docker run ‐di ‐‐name=myhead ‐p 9100:9100 docker pull mobz/elasticsearch‐
head:5