MMDetection——2021广东工业智造创新大赛
MMdetection 智能算法赛:瓷砖表面瑕疵质检
目前正在参加一个Tianchi数据竞赛比赛链接 数据下载,是有关于AI深度学习的目标检测,经过了一系列的混沌,在参加比赛的第十二天终于有资格提交成绩了。虽然比起大佬来真的是望其项背,但是作为一位学统计的,首次接触AI,能有成绩已经很欣慰了。

下面是整个流程记录,以便以后再接触有关目标检测的数据竞赛的时候能够有个参照,另一方面也和大家分享分享。
文章目录
- MMdetection 智能算法赛:瓷砖表面瑕疵质检
- 一、赛题背景
- 二、赛题数据说明
-
- 1.数据说明
- 2.标注说明
- 3.类别说明
- 4.提交说明
- 三、切图处理
-
- 1.voc格式数据
- 2.coco格式数据集生成
- 四、MMdetection工具箱的训练
- 五、导出json结果文件
- 总结
一、赛题背景
佛山作为国内最大的瓷砖生产制造基地之一,拥有众多瓷砖厂家和品牌。经前期调研,瓷砖生产环节一般(不同类型砖工艺不一样,这里以抛釉砖为例)经过原材料混合研磨、脱水、压胚、喷墨印花、淋釉、烧制、抛光,最后进行质量检测和包装。得益于产业自动化的发展,目前生产环节已基本实现无人化。而质量检测环节仍大量依赖人工完成。一般来说,一条产线需要配2~6名质检工,长时间在高光下观察瓷砖表面寻找瑕疵。这样导致质检效率低下、质检质量层次不齐且成本居高不下。瓷砖表检是瓷砖行业生产和质量管理的重要环节,也是困扰行业多年的技术瓶颈。
本赛场聚焦瓷砖表面瑕疵智能检测,要求选手开发出高效可靠的计算机视觉算法,提升瓷砖表面瑕疵质检的效果和效率,降低对大量人工的依赖。要求算法尽可能快与准确的给出瓷砖疵点具体的位置和类别,主要考察疵点的定位和分类能力。
二、赛题数据说明
1.数据说明
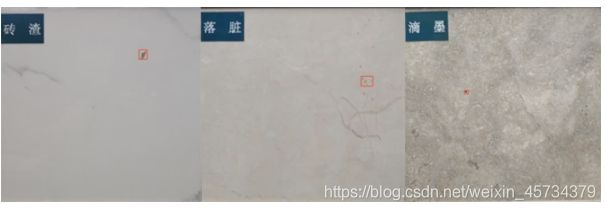
大赛深入到佛山瓷砖知名企业,在产线上架设专业拍摄设备,实地采集生产过程真实数据,解决企业真实的痛点需求。大赛数据覆盖到了瓷砖产线所有常见瑕疵,包括粉团、角裂、滴釉、断墨、滴墨、B孔、落脏、边裂、缺角、砖渣、白边等。实拍图示例如下:
针对某些缺陷在特定视角下的才能拍摄到,每块砖拍摄了三张图,包括低角度光照黑白图、高角度光照黑白图、彩色图,示例如下:

2.标注说明
训练标注是train_annos.json,内容如下:
[
    {

        "name": "226_46_t20201125133518273_CAM1.jpg",
        "image_height": 6000,
        "image_width": 8192,
        "category": 4,
        "bbox": [
            1587,
            4900,
            1594,
            4909
        ]
    },
    '''
    '''
]
3.类别说明
id和瑕疵名的对应关系如下:
{

  "0": "背景",
  "1": "边异常",
  "2": "角异常",
  "3": "白色点瑕疵",
  "4": "浅色块瑕疵",
  "5": "深色点块瑕疵",
  "6": "光圈瑕疵"
 }
4.提交说明
参赛者需要提供一份json文件包含所有预测结果,文件内容如下:
[
    {

        "name": "226_46_t20201125133518273_CAM1.jpg",
        "category": 4,
        "bbox": [
            5662,
            2489,
            5671,
            2497
        ],
        "score": 0.130577
    },
    {

        "name": "226_46_t20201125133518273_CAM1.jpg",
        "category": 2,
        "bbox": [
            6643,
            5416,
            6713,
            5444
        ],
        "score": 0.120612
    },
    ...
    ...
    {

        "name": "230_118_t20201126144204721_CAM2.jpg",
        "category": 5,
        "bbox": [
            3543,
            3875,
            3554,
            3889
        ],
        "score": 0.160216
    }
]
三、切图处理
分析图片得出以下结论:
1.瑕疵太小,并且小目标居多,下图是一个例子:
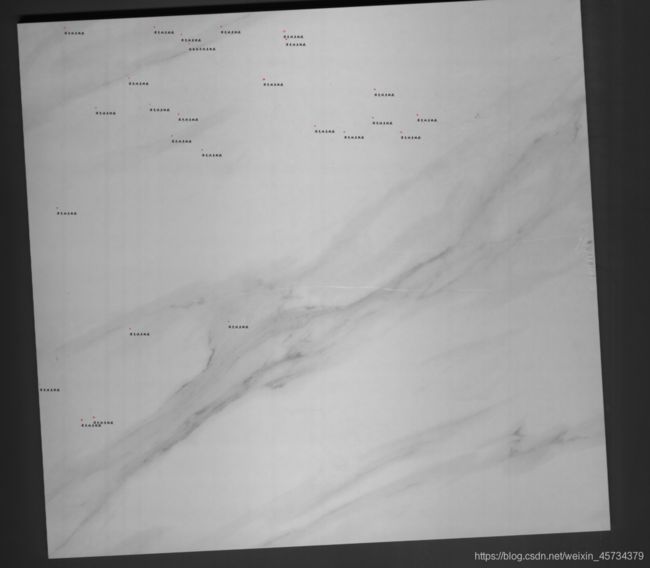
2.图像分片率大(下载数据就10多G)
3.部分标注不明,且有包含关系的框
因此考虑切块处理,但是这里不太建议遍历全图去切,因为这样会带来很多正常的样本,滑窗切块也是会引入大量背景的,这样的训练样本是没有太大意义的。这里根据bbox为中心进行切块(窗口为1333,考虑MMdetection默认image_scale()是1333),也就是将一块砖的每个瑕疵找到并进行切块处理,最终得到13327张照片。
1.voc格式数据
代码如下(这边感谢大佬调包先生uncleT的support):
import json
from xml.etree import ElementTree as ET
import cv2
import math
img_paths = 'F:\\TTTianchi\\tile_round1_train_20201231\\train_imgs\\'#相关路径
rawLabelDir='F:\\TTTianchi\\tile_round1_train_20201231\\train_annos.json'
with open(rawLabelDir) as f:#打开json文件
    image_meta =json.load(f,encoding='utf-8')
each_img_meta = {
     }
for each_item in image_meta:
    each_img_meta[each_item['name']] = []
for idx, each_item in enumerate(image_meta):
    bbox = each_item['bbox']
    bbox.append(each_item['category'])
    each_img_meta[each_item['name']].append(bbox)
# 创建xml文件的函数
def create_tree(image_name, h, w):
    global annotation
    # 创建树根annotation
    annotation = ET.Element('annotation')
    # 创建一级分支folder
    folder = ET.SubElement(annotation, 'folder')
    # 添加folder标签内容
    folder.text = None
    # 创建一级分支filename
    filename = ET.SubElement(annotation, 'filename')
    filename.text = image_name
    # 创建一级分支source
    source = ET.SubElement(annotation, 'source')
    # 创建source下的二级分支database
    database = ET.SubElement(source, 'database')
    database.text = 'Unknown'
    # 创建一级分支size
    size = ET.SubElement(annotation, 'size')
    # 创建size下的二级分支图像的宽、高及depth
    width = ET.SubElement(size, 'width')
    width.text = str(w)
    height = ET.SubElement(size, 'height')
    height.text = str(h)
    depth = ET.SubElement(size, 'depth')
    depth.text = '3'
    # 创建一级分支segmented
    segmented = ET.SubElement(annotation, 'segmented')
    segmented.text = '0'


# 定义一个创建一级分支object的函数
def create_object(root, xi, yi, xa, ya, obj_name):  # 参数依次,树根,xmin,ymin,xmax,ymax
    # 创建一级分支object
    _object = ET.SubElement(root, 'object')
    # 创建二级分支
    name = ET.SubElement(_object, 'name')
    # print(obj_name)
    name.text = str(obj_name)
    pose = ET.SubElement(_object, 'pose')
    pose.text = 'Unspecified'
    truncated = ET.SubElement(_object, 'truncated')
    truncated.text = '0'
    difficult = ET.SubElement(_object, 'difficult')
    difficult.text = '0'
    #     # 创建bndbox
    bndbox = ET.SubElement(_object, 'bndbox')
    xmin = ET.SubElement(bndbox, 'xmin')
    xmin.text = '%s' % xi
    ymin = ET.SubElement(bndbox, 'ymin')
    ymin.text = '%s' % yi
    xmax = ET.SubElement(bndbox, 'xmax')
    xmax.text = '%s' % xa
    ymax = ET.SubElement(bndbox, 'ymax')
    ymax.text = '%s' % ya
#=====================================================================
import os
import random
#手动建立
#os.makedirs('F:/TTTianchi/bb/segment/voc/JPEGImages', exist_ok=True)
#os.makedirs('F:/TTTianchi/bb/segment/voc/Annotations', exist_ok=True)
window_s = 1333
for idx, each_item in enumerate(image_meta):
    print(each_item)
    bbox = each_item['bbox']
    img = cv2.imread(img_paths + each_item['name'])
    # h, w = img.shape[:2]
    h=img.shape[0]
    w=img.shape[1]
    # each_img_meta[each_item['name']].append(bbox)
    center_x, center_y = int(bbox[0] + (bbox[2] - bbox[0]) / 2), int((bbox[3] - bbox[1]) / 2 + bbox[1])
    x, y, r, b = center_x - window_s // 2, center_y - window_s // 2, center_x + window_s // 2, center_y + window_s // 2
    x = x - random.randint(50, 100)
    y = y - random.randint(50, 100)
    x = max(0, x)
    y = max(0, y)
    r = min(r, w)
    b = min(b, h)
    boxes = each_img_meta[each_item['name']]
    annotations = []
    for e_box in boxes:
        if x < e_box[0] < r and y < e_box[1] < b and x < e_box[2] < r and y < e_box[3] < b:
            e_box1 = [int(i) for i in e_box]
            e_box1[0] = math.floor(e_box1[0] - x)
            e_box1[1] = math.floor(e_box1[1] - y)
            e_box1[2] = math.ceil(e_box1[2] - x)
            e_box1[3] = math.ceil(e_box1[3] - y)
            annotations.append(e_box1)
            each_img_meta[each_item['name']].remove(e_box)
    print('process id:', idx, "|", annotations)
    if annotations:
        slice_img = img[y:b, x:r]

        create_tree(each_item['name'], window_s, window_s)

        for anno in annotations:
            create_object(annotation, anno[0], anno[1], anno[2], anno[3], anno[4])
        tree = ET.ElementTree(annotation)

        slice_name = each_item['name'][:-4] + '_' + str(x) + '_' + str(y) + '.jpg'
        xml_name = each_item['name'][:-4] + '_' + str(x) + '_' + str(y) + '.xml'
        cv2.imwrite('F:/TTTianchi/bb/segment/voc/JPEGImages/' + slice_name, slice_img)
        tree.write('F:/TTTianchi/bb/segment/voc/Annotations/' + xml_name)
    else:
        continue
    if x < 0 or y < 0 or r > w or b > h:
        print(idx)
        print(each_item['name'])
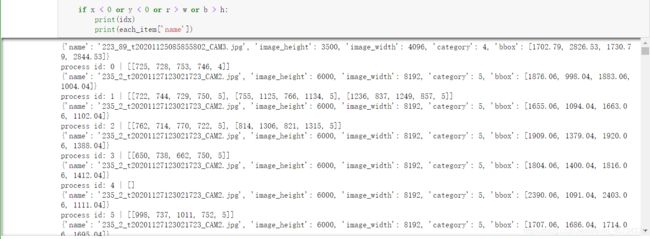
这边就是用自己的笔记本电脑运行的,差不多1个多小时就可以出来一个voc文件夹,里面包含着两个文件夹JPEGImage(存放切割好的图片)和Annotations(对应的xml文件)。
2.coco格式数据集生成
import sys
import os
import shutil
import numpy as np
import json
import xml.etree.ElementTree as ET
import mmcv
# 检测框的ID起始值
START_BOUNDING_BOX_ID = 1
# 类别列表无必要预先创建,程序中会根据所有图像中包含的ID来创建并更新
PRE_DEFINE_CATEGORIES ={

  "1":1,#边异常
  "2":2,#角异常
  "3":3,#白色点瑕疵
  "4":4,#浅色块瑕疵
  "5":5,#深色点块瑕疵
  "6":6#光圈瑕疵
 }
 def get(root, name):
    vars = root.findall(name)
    return vars
def get_and_check(root, name, length):
    vars = root.findall(name)
    if len(vars) == 0:
        raise NotImplementedError('Can not find %s in %s.'%(name, root.tag))
    if length > 0 and len(vars) != length:
        raise NotImplementedError('The size of %s is supposed to be %d, but is %d.'%(name, length, len(vars)))
    if length == 1:
        vars = vars[0]#取第一个东西
    return vars
def convert(xml_list, xml_dir, json_file):
    '''
    :param xml_list: 需要转换的XML文件列表
    :param xml_dir: XML的存储文件夹
    :param json_file: 导出json文件的路径
    :return: None
    '''
    list_fp = xml_list
    image_id=1
    # 标注基本结构
    json_dict = {
     "images":[],
                 "categories": [],
                 "annotations": []}
    categories = PRE_DEFINE_CATEGORIES
    bnd_id = START_BOUNDING_BOX_ID
    for line in list_fp:
        line = line.strip()
        #print(" Processing {}".format(line))
        #Processing 235_2_t20201127123021723_CAM2_2469_4657.xml
        # 解析XML
        xml_f = os.path.join(xml_dir, line)
        tree = ET.parse(xml_f)
        root = tree.getroot()
       # filename = root.find('filename').text
        filename='{}'.format(line)
        filename=filename[:-4]+'.jpg'
        #print(filename)
        # 取出图片名字
        image_id+=1
        size = get_and_check(root, 'size', 1)
        # 图片的基本信息
        width = int(get_and_check(size, 'width', 1).text)
        height = int(get_and_check(size, 'height', 1).text)
        image = {
     'height': height,
                 'width': width,
                 'id':image_id,#计数
                 'file_name': filename}

        #del image['file_name']
        #print(image)
        #=============================
        json_dict['images'].append(image)
        #================================
        # 处理每个标注的检测框
        for obj in get(root, 'object'):
            # 取出检测框类别名称
            category = get_and_check(obj, 'name', 1).text
            # 更新类别ID字典
            if category not in categories:
                new_id = len(categories)
                categories[category] = new_id
            category_id = categories[category]
            bndbox = get_and_check(obj, 'bndbox', 1)
            xmin = int(get_and_check(bndbox, 'xmin', 1).text) - 1
            ymin = int(get_and_check(bndbox, 'ymin', 1).text) - 1
            xmax = int(get_and_check(bndbox, 'xmax', 1).text)
            ymax = int(get_and_check(bndbox, 'ymax', 1).text)
            assert(xmax > xmin)
            assert(ymax > ymin)
            o_width = abs(xmax - xmin)
            o_height = abs(ymax - ymin)
            annotation = dict()
            # 设置分割数据,点的顺序为逆时针方向
            annotation['segmentation'] = [[xmin,ymin,xmin,ymax,xmax,ymax,xmax,ymin]]
            annotation['iscrowd'] = 0
            annotation['image_id'] = image_id
            annotation['bbox'] = [xmin, ymin, o_width, o_height]
            annotation['area'] = o_width*o_height
            annotation['category_id'] = category_id
            annotation['id'] = bnd_id
            #annotation['ignore'] = 0


            json_dict['annotations'].append(annotation)
            bnd_id = bnd_id + 1

    # 写入类别ID字典
    for cate, cid in categories.items():
        cat = {
     'supercategory': 'none', 'id': cid, 'name': cate}
        json_dict['categories'].append(cat)
    # 导出到json
    #mmcv.dump(json_dict, json_file)
    #print(type(json_dict))
    #print(json_dict)
    json_data = json.dumps(json_dict)
    with  open(json_file, 'w') as w:
        w.write(json_data)
if __name__ == '__main__':
    root_path = 'F:/TTTianchi/bb/segment/'

    if not os.path.exists(os.path.join(root_path,'coco/annotations')):
        os.makedirs(os.path.join(root_path,'coco/annotations'))
    if not os.path.exists(os.path.join(root_path, 'coco/train2017')):
        os.makedirs(os.path.join(root_path, 'coco/train2017'))
    if not os.path.exists(os.path.join(root_path, 'coco/val2017')):
        os.makedirs(os.path.join(root_path, 'coco/val2017'))
    xml_dir = os.path.join(root_path,'voc/Annotations') #已知的voc的标注

    xml_labels = os.listdir(xml_dir)
    #print(xml_labels) #总共有六个
    np.random.shuffle(xml_labels)#打乱顺序了·
    #split_point = int(len(xml_labels)/3)
    split_point=4000#自定义val(验证集)里面有4000个样本量
    # validation data
    xml_list = xml_labels[0:split_point]
    json_file = os.path.join(root_path,'coco/annotations/instances_val2017.json')
    convert(xml_list, xml_dir, json_file)

    for xml_file in xml_list:
        img_name = xml_file[0:-4] + '.jpg'
        print(img_name)
        shutil.copy(os.path.join(root_path, 'voc/JPEGImages/', img_name),
                    os.path.join(root_path, 'coco/val2017/', img_name))
    ## train data
    xml_list = xml_labels[split_point:]
    json_file = os.path.join(root_path,'coco/annotations/instances_train2017.json')
    convert(xml_list, xml_dir, json_file)
    for xml_file in xml_list:
        img_name = xml_file[0:-4] + '.jpg'
        shutil.copy(os.path.join(root_path, 'voc/JPEGImages/', img_name),
                    os.path.join(root_path, 'coco/train2017/', img_name))
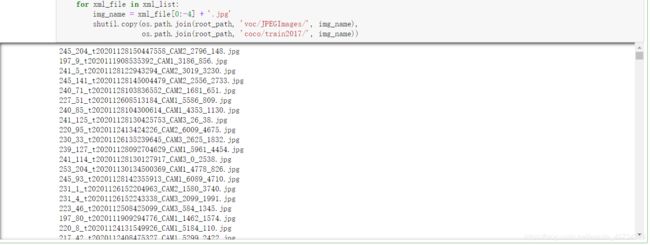
这里也是用笔记本电脑的jupyter notebook编译运行的,运行时间大概40分钟。这里提供网盘的coco格式的数据(大约3.5G)coco数据集 提取码:li6n 。
四、MMdetection工具箱的训练
这里具体内容不多赘述,因为仅仅涉及到最简单的调用函数问题,具体可以参照我的另一篇文章MMDetection目标检测实例,首次尝试的模型是faster-rcnn。
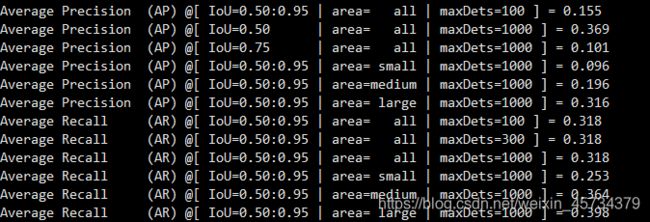
因为训练时间特别长,第一次我仅仅迭代了2次(大约40分钟),最后的结果如下图:
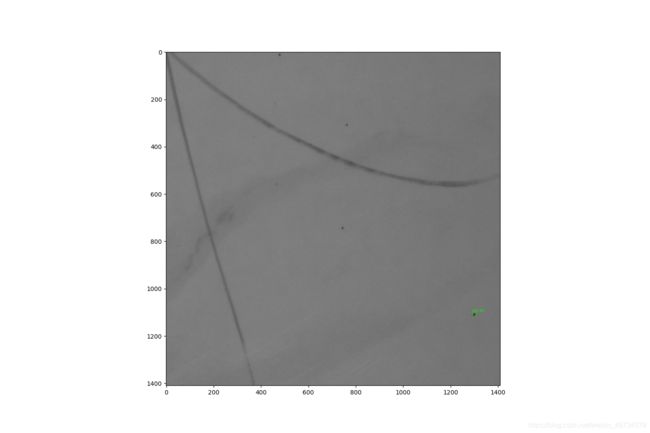
通过单个图片的演示,绿色的框显示是“5,0.4”,也就是检测出该瑕疵有0.4的score是深色点块瑕疵,但是从图中可以看出还有其他很明显的深色点块瑕疵,但是demo的话只会画出score大于0.4阈值的框:
五、导出json结果文件
导出json结果文件代码如下(感谢我爱计算机视觉公众号粉丝 sloan, jianh的分享):
import time
import os
import json
import mmcv
from mmdet.apis import inference_detector, init_detector, show_result_pyplot
def main():
    config_file = 'configs/faster_rcnn/faster_rcnn_r50_fpn_1x_coco.py'  #
    checkpoint_file = 'checkpoints/epoch_2.pth'  #通过python tools/train.py configs/faster_rcnn/faster_rcnn_r50_fpn_1x_coco.py得出的epoch_2.pth
    test_path = 'data/coco/test/tile_round1_testA_20201231/testA_imgs'  #test的图片所在的路径下
    json_name = "result_" + "" + time.strftime("%Y%m%d%H%M%S", time.localtime()) + ".json"
    model = init_detector(config_file, checkpoint_file, device='cuda:0')
    img_list = []
    for img_name in os.listdir(test_path):
        if img_name.endswith('.jpg'):
            img_list.append(img_name)
    result = []
    for i, img_name in enumerate(img_list, 1):
        full_img = os.path.join(test_path, img_name)
        predict = inference_detector(model, full_img)
        for i, bboxes in enumerate(predict, 1):
            if len(bboxes) > 0:
                defect_label = i
                print(i)
                image_name = img_name
                for bbox in bboxes:
                    x1, y1, x2, y2, score = bbox.tolist()
                    x1, y1, x2, y2 = round(x1, 0), round(y1, 0), round(x2, 0), round(y2, 0)  # 没有小数点
                    #if score > 0.2:#只有score大于0.2才写入json文件
                result.append(
                                  {
     'name': image_name, 'category': defect_label, 'bbox': [x1, y1, x2, y2], 'score': score})
    with open(json_name, 'w') as fp:
        json.dump(result, fp, indent=4, separators=(',', ': '))
if __name__ == "__main__":
    main()
针对上图,得出的json文件为:
[
    {

        "name": "m.jpg",
        "category": 5,
        "bbox": [
            1293.0,
            1099.0,
            1310.0,
            1118.0
        ],
        "score": 0.4027006924152374
    },
    {

        "name": "m.jpg",
        "category": 5,
        "bbox": [
            738.0,
            736.0,
            754.0,
            751.0
        ],
        "score": 0.2009522020816803
    },
    {

        "name": "m.jpg",
        "category": 5,
        "bbox": [
            756.0,
            300.0,
            772.0,
            315.0
        ],
        "score": 0.19962109625339508
    },
    {

        "name": "m.jpg",
        "category": 5,
        "bbox": [
            472.0,
            5.0,
            487.0,
            19.0
        ],
        "score": 0.16872453689575195
    },
    {

        "name": "m.jpg",
        "category": 5,
        "bbox": [
            460.0,
            550.0,
            475.0,
            565.0
        ],
        "score": 0.06814242899417877
    }
]
总结
要是有更好的方法会更新,下面有两个想法:
1.增加FASTERRCNN的迭代次数。
2.根据我爱计算机视觉公众号粉丝 sloan, jianh的分享来尝试CascadeRCNN。