【静态站点(三)】之 Gridsome + Strapi + Vercel + Pm2 部署案例
文章前言
笔记来源:拉勾教育 大前端高薪训练营
阅读建议:内容较多,建议通过左侧导航栏进行阅读
Gridsome 案例
案例介绍
-
使用第三方案例模板,嵌入到本次项目中
-
模板地址:https://github.com/zimeng303/startbootstrap-clean-blog
- 为防止项目作者的一些删除操作,建议将其
Fork到自己的仓库中
- 为防止项目作者的一些删除操作,建议将其
-
使用 git 将其下载到本地,
--depth=1表示下载最后一次更新的代码git clone git@github.com:zimeng303/startbootstrap-clean-blog.git --depth=1
基础实现
一、创建项目
-
使用
gridsome创建项目# 创建项目 gridsome create #项目名称 # 进入项目 cd #项目名称 # 启动项目(开发模式) npm run develop
二、基础配置
根据 startbootstrap-clean-blog/index.html,处理首页模板
-
安装相关依赖
npm i bootstrap @fortawesome/fontawesome-free -
在
src/main.js中,引入样式文件import 'bootstrap/dist/css/bootstrap.min.css' import '@fortawesome/fontawesome-free/css/all.min.css' import '~/assets/css/index.css' -
在
src目录下,创建assets/css/index.css文件,用于引入字体文件和书写样式@import url('https://fonts.googleapis.com/css?family=Lora:400,700,400italic,700italic'); @import url('https://fonts.googleapis.com/css?family=Open+Sans:300italic,400italic,600italic,700italic,800italic,400,300,600,700,800'); /* 将 startbootstrap-clean-blog/css/clean-blog.css 中的内容复制到下方 */
三、公共模板
-
每个页面的 头部和底部都是一样的,只有中间部分不一样,因此将其公共部分提取出来
-
将
startbootstrap-clean-blog/index.html的body部分的Navigation和Footer内容,复制到src/layout/Default.vue中 -
src/layout/Default.vue,全局组件<template> <div class="layout"> <nav class="navbar navbar-expand-lg navbar-light fixed-top" id="mainNav"> ...... nav> <slot/> <hr /> <footer> ...... footer> div> template> <style> style>
四、首页模板
-
将
startbootstrap-clean-blog/index.html的body部分的Page Header和Main Content内容,复制到src/pages/index.vue中src/pages/index.vue,创建根节点- 将
startbootstrap-clean-blog/img目录拷贝到static目录下,并修改 url 路径,如下所示:
<template> <Layout> <header class="masthead" style="background-image: url('/img/home-bg.jpg')"> ...... header> ...... Layout> template>- 其他页面模板,与首页模板相似
五、管理 md 数据
使用第三方插件管理文件,从而可以将 本地md文件中的内容 读取到 Graph QL 数据层 中
-
安装插件
npm install @gridsome/source-filesystem -
在
gridsome.config.js中,配置插件,并创建对应路径的 md 文件module.exports = { plugins: [ { use: '@gridsome/source-filesystem', options: { typeName: 'BlogPost', // 抓取文件的路径,即抓取哪些文件 path: './content/blog/**/*.md', } } ] } -
npm run develop,启动服务,报出如下错误:
提示我们,没有安装转换
markdown的转换器,即@gridsome/transformer-remark -
安装
@gridsome/transformer-remark插件,它将 md 文件 转换为 HTML 文件npm install @gridsome/transformer-remark -
生成的数据格式,如图所示:

Strapi
使用 Strapi 内容管理平台,对所需的数据进行配置,即添加 Posts 、Tags 等集合数据。
- 参考网址:https://blog.csdn.net/zimeng303/article/details/113249507
预取数据
一、通过 GraphQL 访问 Strapi
- 参考网址:https://strapi.io/documentation/developer-docs/latest/plugins/graphql.html
基本使用
-
安装
graphql插件yarn strapi install graphql -
启动项目,访问 http://localhost:1337/graphql
npm run develop
二、预取 Strapi 数据
借助于 gridsome 的插件,将 Strapi 数据集成到 Gridsome 应用中
-
安装
@gridsome/source-strapi插件npm install @gridsome/source-strapi -
在
gridsome.config.js文件中,配置插件信息module.exports = { plugins: [ { use: '@gridsome/source-filesystem', options: { typeName: 'BlogPost', // 抓取文件的路径,即抓取哪些文件 path: './content/blog/**/*.md', } }, { use: '@gridsome/source-strapi', options: { apiURL: 'http://localhost:1337', // 接口地址 queryLimit: 1000, // Defaults to 100 contentTypes: ['post'], // 查询的数据类型 // singleTypes: ['impressum'], // 单个节点 // Possibility to login with a Strapi user, // when content types are not publicly available (optional). // loginData: { // 登录信息 // identifier: '', // password: '' // } } } ], } -
重新启动服务,访问 http://localhost:8080/___explore

注意:
若
Strapi中数据等被改变,必须重启Strapi项目,否则新数据无法同步预取到Gridsome中
具体实现
一、设计数据模型
-
设计文章的字段,如图所示:

-
设计标签时,需创建一个
引用字段,用于表示 标签和文章的关系
-
标签字段列表,如图所示:

注意:
标签的数据也要向外暴露 Public,否则,无法访问

二、展示文章列表
-
在
pages/index.vue中,从 GraphQL 数据层 获取数据,进行页面数据动态渲染<template> <Layout> <div class="container"> <div class="row"> <div class="col-lg-8 col-md-10 mx-auto"> <div class="post-preview" v-for="edge in $page.posts.edges" :key="edge.node.id"> <a href="post.html"> <h2 class="post-title"> { { edge.node.title }} h2> a> <p class="post-meta"> Posted by <a href="#">Start Bootstrapa> on { { edge.node.create_at }} p> <p> <span v-for="tag in edge.node.tags" :key="tag.id"> <g-link :to="'/tags/' + tag.id"> { { tag.title }} g-link> span> p> <hr /> div> div> div> div> Layout> template> <page-query> query { posts: allStrapiPosts { edges { node { id title created_at tags { id title } } } } } page-query>
三、文章列表分页
-
参考网址:https://gridsome.org/docs/pagination/
-
使用
Gridsome的@paginate指令,进行分页 -
pages/index.vue,分页的具体实现<Pager :info="$page.posts.pageInfo" /> <page-query> query ($page: Int) { posts: allStrapiPosts (perPage: 1, page: $page) @paginate { pageInfo { totalPages currentPage } edges { node { id title created_at tags { id title } } } } } page-query> <script> // 引入分页组件 import { Pager } from 'gridsome' export default { components: { Pager } }; script>
四、展示文章详情
-
在
gridsome.config.js中,配置模板module.exports = { templates: { // 配置模板 // StrapiPost 表示 gridsome/source-strapi 插件生成的 // 集合名称:typeName + contentTypes StrapiPosts: [ { path: '/posts/:id', component: './src/templates/Post.vue' } ] } } -
./src/templates/Post.vue,具体实现<template> <Layout> <header class="masthead" :style="{ backgroundImage: `url(http://localhost:1337${$page.post.cover.url})` }" > <div class="overlay">div> <div class="container"> <div class="row"> <div class="col-lg-8 col-md-10 mx-auto"> <div class="post-heading"> <h1>{ { $page.post.title }}h1> div> div> div> div> header> <article> <div class="container"> <div class="row"> <div class="col-lg-8 col-md-10 mx-auto" v-html="$page.post.content" > div> div> div> article> Layout> template> <page-query> query ($id: ID!) { post: strapiPosts (id: $id) { id title content cover { url } tags { id title } } } page-query>
五、处理 md 文件
-
参考网址:https://github.com/markdown-it/markdown-it
-
借助
markdown-it插件,将 md 格式的文件,转换为 HTML -
安装
markdown-it插件npm install markdown-it --save -
将插件加载进来,进行转换
<div class="col-lg-8 col-md-10 mx-auto" v-html="mdToHtml($page.post.content)">

<script>
import MarkdownIt from 'markdown-it'
const md = new MarkdownIt()
export default {

  methods: {

    mdToHtml (markdown) {

      return md.render(markdown)
    }
  }
};
script>
六、文章标签页面
-
在
gridsome.config.js中,添加contentTypes,以及配置模板module.exports = { plugins: [ { use: '@gridsome/source-strapi', options: { contentTypes: ['posts', 'tags'], // 查询的数据类型 } } ], templates: { // 配置模板 // StrapiPost 表示 gridsome/source-strapi 插件生成的 // 集合名称:typeName + contentTypes StrapiPosts: [ { path: '/tags/:id', component: './src/templates/Tag.vue' } ] } } -
./src/templates/Tag.vue,具体实现<template> <Layout> <header class="masthead" style="background-image: url('/img/home-bg.jpg')"> <div class="overlay">div> <div class="container"> <div class="row"> <div class="col-lg-8 col-md-10 mx-auto"> <div class="site-heading"> <h1># { { $page.tag.title }}h1> div> div> div> div> header> <div class="container"> <div class="row"> <div class="col-lg-8 col-md-10 mx-auto"> <div class="post-preview" v-for="post in $page.tag.posts" :key="post.id"> <g-link :to="'/posts/' + post.id"> <h2 class="post-title"> { { post.title }} h2> g-link> div> div> div> div> Layout> template> <page-query> query ($id: ID!) { tag: strapiTags (id: $id) { id title posts { id title } } } page-query>
七、处理基本设置
-
在
strapi中新增一个Single Type(单一类型),名称为General,并添加三个字段,如图所示:

-
在
gridsome.config.js的 plugins 选项中,进行配置module.exports = { plugins: [ { use: '@gridsome/source-strapi', options: { apiURL: 'http://localhost:1337', // 接口地址 queryLimit: 1000, // Defaults to 100 contentTypes: ['posts', 'tags'], // 查询的数据类型 // typeName: 'Strapi', singleTypes: ['General'], // 单个节点 } } ] } -
在
src/pages/index.vue中,读取 GraphQL 数据层 的数据,并在视图中渲染<header class="masthead" :style="{ backgroundImage: `url(http://localhost:1337${general.cover.url})`}"> <div class="overlay">div> <div class="container"> <div class="row"> <div class="col-lg-8 col-md-10 mx-auto"> <div class="site-heading"> <h1>{ { general.title }}h1> <span class="subheading">{ { general.subtitle }}span> div> div> div> div> header> <page-query> query ($page: Int) { ...... allStrapiGeneral { edges { node { id title subtitle cover { url } } } } } page-query>
八、联系我页面
-
查看页面布局,如图所示:

-
在
strapi中新增一个Content Type(内容类型),名称为Contact,并添加四个字段,如图所示:
-
使用
Postman,测试接口是否可用,测试结果如下:
-
安装
axios,将添加用户输入信息npm i axios -
在
src/pages/Contact.vue中,添加方法,进行接口请求<script> import axios from "axios"; export default { name: "ContactPage", data() { return { form: { name: "", email: "", phone: "", message: "", }, }; }, methods: { async onSubmit() { try { const { data } = await axios({ method: "POST", url: "http://localhost:1337/contacts", data: this.form, }); alert('发送成功') this.$router.push('/') } catch (err) { throw new Error(err) } }, }, }; script>
部署 Strapi
一、准备工作
-
支持 Node 的服务器
-
数据库 – 建议 MySQL 或者 MongoDB
- 官网地址:https://strapi.io/documentation/developer-docs/latest/concepts/configurations.html#database
-
修改
config/database.js,将原来的sqlite的配置,修改为mysql的配置module.exports = ({ env }) => ({ defaultConnection: 'default', connections: { default: { connector: 'bookshelf', settings: { client: 'mysql', host: env('DATABASE_HOST', 'localhost'), port: env.int('DATABASE_PORT', 3306), // 你的数据库名称 database: env('DATABASE_NAME', 'blog'), // 你的服务器中的数据库的用户名和密码 username: env('DATABASE_USERNAME', 'root'), password: env('DATABASE_PASSWORD', '12345678'), }, options: { }, }, }, }); -
修改
package.json,删除sqlite3,添加mysql,如图所示:

二、上传文件
-
创建 GitHub 远程仓库,将本地代码上传到 GitHub 远程仓库
-
连接服务器,并将代码克隆到服务器上
git clone # 你的GitHub 仓库地址注意:
如果觉得 Git 下载代码较慢,可以将文件压缩后,使用
FileZilla上传到服务器上,然后在服务器上进行解压缩 -
上传文件后,安装项目依赖
npm i注意:
如果安装依赖时,报出
permission denied错误,解决方案:https://blog.csdn.net/zimeng303/article/details/113113546 -
对项目进行打包构建
npm run build -
启动项目
npm run start注意:
直接启动项目,会占用命令行应用,当退出时,则服务也会停止。因此,不建议使用。我们在此使用
pm2,详情参考
三、PM2 启动 web 服务
-
配置网址:https://blog.csdn.net/zimeng303/article/details/112598948
-
启动命令
pm2 start npm -- start --name blog-backend服务启动成功,如图所示:

-
登录
服务器IP + 端口号(1337),将项目中所需的数据进行配置,如图所示:
注意:
设置的必填字段,必须要填上数据,否则会报错。
-
重要提示:
角色和权限,必须要进行配置,否则无法调用接口

本地服务联通远程 Strapi
- 参考网址:https://gridsome.org/docs/environment-variables/
具体实现
-
1,创建
.env.development和.env.production环境文件,配置GRIDSOME_API_URL,代码如下:GRIDSOME_API_URL=http://123.57.28.48:1337 -
2,将
gridsome.config.js中配置的apiURL,修改为环境变量GRIDSOME_API_URLapiURL: process.env.GRIDSOME_API_URL, // 接口地址
Vercel – 部署 Gridsome 应用
使用 Vercel 进行静态应用项目的部署。
- Vercel 官网:https://vercel.com/login
基本使用
-
1,登录 Vercel,可以使用第三方账户,也可以自行注册(在此使用 GitHub 账户登录)

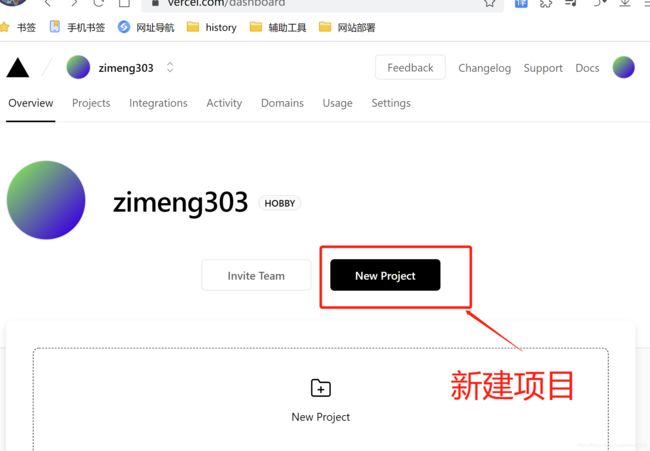
-
2,登录以后,新建项目
-
3,可以导入 Git 仓库,或者克隆其他模板(在此导入 GitHub 中已存在的仓库)

-
4,点击
Continue with GitHub,选择 GitHub 仓库,进行导入

-
5,点击 仓库名称 右侧的
import按钮,进行导入,选择团队

-
6,展示基本配置,点击 Deploy` ,开始安装依赖,构建发布

-
7,最后,会自动弹框,点击
Visit,即可访问生成的静态站点-
访问网址:https://blog-frontend-tau.vercel.app/


-
配置自动构建
当数据改变时,需要告诉 Vercel,触发自动构建。
-
1,在
Vercel中,找到构建的应用项目,然后点击进入

-
点击
Settings,然后点击Git,找到Deploy Hooks

-
创建部署钩子,生成链接地址

生成的 Hook 地址,如图所示:

-
然后,进入 Strapi 内容管理平台,添加
Webhooks
-
填入名称、请求地址等,如图所示:
-
请求地址,指的是在
Vercel中生成的地址
-
-
最后,点击保存,在
Strapi中,添加数据,进行保存发布后,回到Vercel的应用项目中,点击Deployments -
项目正在被构建,如图所示:

注意:
Vercel页面可能会有延时,可以刷新Vercel页面。
完整代码
- GitHub 地址:https://github.com/zimeng303/blog-frontend
- 应用访问地址:https://blog-frontend-tau.vercel.app/