Day16(docker、yapi、portainer、vue、nodejs)
docker复习
telnet IP 端口号
//下载镜像、启动、设置端口号、起别名
docker run --name mytomee -d -p 8081:8080 tomee
//进入容器内部
docker exec -it 别名/IP /bin/bash
退出:exit
//停止容器
docker stop 别名/IP
重命名的容器,重复启动会报错
解决方法:删除容器
docker rm -f mytomee
//删除镜像:需要先关闭启动的容器
docker stop 容器IP/别名
docker rmi -f 镜像IP/别名
//一步到位删除容器
docker rm -f 容器IP/别名
向tomcat导入项目
docker run --privileged=true -v /root/soft/jenkins.war:/usr/local/tomcat/webapps/jenkins.war -p 8083:8080 --name myjenkins -d tomcat
//查看日志信息
docker logs myjenkins
//把项目挂载出来 -v(挂载的意思是映射目录,目的外面直接操作里面)
docker run --privileged=true -v /root/soft/jenkins.war:/usr/local/tomcat/webapps/jenkins.war -v /root/myjenkins:/root/.jenkins -p 8083:8080 --name myjenkins -d tomcat
yapi搭建
接口管理工具
yapi启动服务两部分构成:数据库和服务
第一步:安装mongo
docker run -d --name mongo-yapi mongo
第二步:拉取yapi
docker pull registry.cn-hangzhou.aliyuncs.com/anoy/yapi
第三步:初始化管理员账号和服务
docker run -it --rm \
–link mongo-yapi:mongo \
–entrypoint npm \
–workdir /api/vendors \
registry.cn-hangzhou.aliyuncs.com/anoy/yapi \
run install-server
第四步:初始化管理员账号和服务
启动 YApi 服务
docker run -d \
–name yapi \
–link mongo-yapi:mongo --workdir /api/vendors \
-p 3002:3000 \
registry.cn-hangzhou.aliyuncs.com/anoy/yapi \
server/app.js
ymfe.org
第五步:访问 http://ip:3002
初始化管理员账号成功,账号名:[email protected] 密码:ymfe.org

yapi基础使用
yapi实质是mock
yapi高级功能说明
文件的导入和导出,统计报表
swagger转换成文件地址
http://localhost:8023/v2/api-docs
docker图形化工具:portainer
docker安装运行portainer
docker run -d -p 9000:9000 --restart=always -v /var/run/docker.sock:/var/run/docker.sock -v portainer_data:/data --name prtainer-test portainer/portainer
访问地址:http://ip:9000
设置账户和密码:admin testfan123456
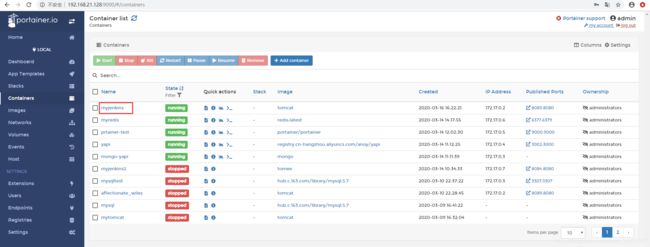
进入容器内部:containers-》点击容器名-》_Console
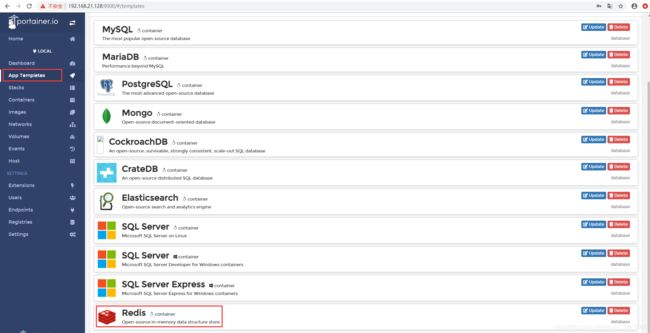
partainer图形工具安装redis
redis数据创建完成
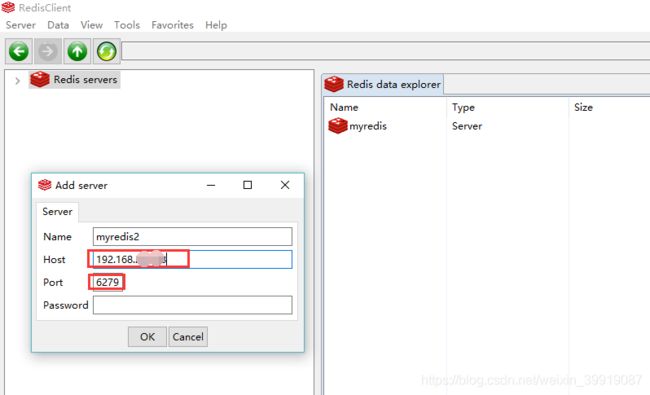
redis客户端远程连接
客户端工具下载连接:
链接:https://pan.baidu.com/s/1qN-Z6zvQMFtRFXnVmT84wg
提取码:675k
![]()
安装方式:
选中.jar文件,右键–》打开方式–》Java™ Platform SE binary
docker搭建redis数据库
docker run --name myredis -p 6379:6379 --restart=always -d redis
java -jar xxx.jar
get set
性能压测
性能命令 10 万次请求 并发 50
redis-benchmark -n 100000 -q
只测指定的性能
redis-benchmark -t set,lpush -n 100000 -q
性能跟redis内存有一定关系
redis与springboot整合
依赖架包
		<dependency>
			<groupId>org.springframework.bootgroupId>
			<artifactId>spring-boot-starter-data-redisartifactId>
		dependency>
连接redis配置文件application.properies
spring.redis.database=0
spring.redis.host=192.168.21.XXX
spring.redis.password=
spring.redis.port=6377
spring.redis.timeout=3000

## \u8fde\u63a5\u6c60\u4e2d\u7684\u6700\u5927\u7a7a\u95f2\u8fde\u63a5\uff0c\u9ed8\u8ba4\u503c\u4e5f\u662f8\u3002
#spring.redis.pool.max-idle=500
##\u8fde\u63a5\u6c60\u4e2d\u7684\u6700\u5c0f\u7a7a\u95f2\u8fde\u63a5\uff0c\u9ed8\u8ba4\u503c\u4e5f\u662f0\u3002
#spring.redis.pool.min-idle=50
## \u5982\u679c\u8d4b\u503c\u4e3a-1\uff0c\u5219\u8868\u793a\u4e0d\u9650\u5236\uff1b\u5982\u679cpool\u5df2\u7ecf\u5206\u914d\u4e86maxActive\u4e2ajedis\u5b9e\u4f8b\uff0c\u5219\u6b64\u65f6pool\u7684\u72b6\u6001\u4e3aexhausted(\u8017\u5c3d)\u3002
#spring.redis.pool.max-active=2000
## \u7b49\u5f85\u53ef\u7528\u8fde\u63a5\u7684\u6700\u5927\u65f6\u95f4\uff0c\u5355\u4f4d\u6beb\u79d2\uff0c\u9ed8\u8ba4\u503c\u4e3a-1\uff0c\u8868\u793a\u6c38\u4e0d\u8d85\u65f6\u3002\u5982\u679c\u8d85\u8fc7\u7b49\u5f85\u65f6\u95f4\uff0c\u5219\u76f4\u63a5\u629b\u51faJedisConnectionException
#spring.redis.pool.max-wait=1000
redis结合junit
package com.testfan;

import java.util.Date;
import java.util.HashMap;
import java.util.Map;
import java.util.Set;
import java.util.concurrent.TimeUnit;
import javax.annotation.Resource;
import org.junit.Test;
import org.junit.runner.RunWith;
import org.slf4j.Logger;
import org.slf4j.LoggerFactory;
import org.springframework.beans.factory.annotation.Autowired;
import org.springframework.boot.test.context.SpringBootTest;
import org.springframework.data.redis.core.StringRedisTemplate;
import org.springframework.test.context.junit4.SpringRunner;

@RunWith(SpringRunner.class)
@SpringBootTest
public class SpringbootRedisApplicationTests {


	private static Logger logger = LoggerFactory.getLogger(SpringbootRedisApplicationTests.class);

	/**
	 * Redis五大类型:字符串(String)、哈希/散列/字典(Hash)、列表(List)、集合(Set)、有序集合(sorted set)五种
	总括:
	RedisTemplate redisTemplate.opsForValue();//操作字符串
	RedisTemplate redisTemplate.opsForHash();//操作hash
	RedisTemplate redisTemplate.opsForList();//操作list
	RedisTemplate redisTemplate.opsForSet();//操作set
	RedisTemplate redisTemplate.opsForZSet();//操作有序set
	---------------------
	 *
	 */
	@Autowired
	StringRedisTemplate stringRedisTemplate;

	/**
	 * String 类型增删改
	 */
	@Test
	public void valueAddResitTest(){

	    stringRedisTemplate.opsForValue().set("key","value");
	}

	@Test
	public void valueGetResitTest(){

	    String value = stringRedisTemplate.opsForValue().get("key");
	    logger.info("value:{}", value);
	}

	@Test
	public void valueDelResitTest(){

	    stringRedisTemplate.delete("key");
	}

	//模拟黑白名单
	@Test
	public void valueTimeoutResitTest(){

	    stringRedisTemplate.opsForValue().set("timeStep", new Date().getTime()+"", 2 ,TimeUnit.MINUTES);
	}


    // list数据类型适合于消息队列的场景:比如12306并发量太高,而同一时间段内只能处理指定数量的数据!
	//必须满足先进先出的原则,其余数据处于等待
	@Test
	public void listPushResitTest(){

	    // leftPush依次由右边添加
	    stringRedisTemplate.opsForList().rightPush("myList","1");
	    stringRedisTemplate.opsForList().rightPush("myList","2");
	    stringRedisTemplate.opsForList().rightPush("myList", "A");
	    stringRedisTemplate.opsForList().rightPush("myList", "B");
	    // leftPush依次由左边添加
	    stringRedisTemplate.opsForList().leftPush("myList", "0");
	}
//
//	@Test
//	public void listGetListResitTest(){

//	    // 查询类别所有元素
//	    List listAll = stringRedisTemplate.opsForList().range( "myList", 0, -1);
//	    logger.info("list all {}", listAll.size());
//	    // 查询前3个元素
//	    List list = stringRedisTemplate.opsForList().range( "myList", 0, 3);
//	    logger.info("list limit {}", list.size());
//	}
//
//	@Test
//	public void listRemoveOneResitTest(){

//	    // 删除先进入的B元素
//	    stringRedisTemplate.opsForList().remove("myList",1, "B");
//	}
//
//	@Test
//	public void listRemoveAllResitTest(){

//	    // 删除所有A元素
//	    stringRedisTemplate.opsForList().remove("myList",0, "A");
//	}


	/**
	 * hash 类型操作
	 */
	@Test
	public void hashPutResitTest(){

	    // map的key值相同,后添加的覆盖原有的
		//user 是reids key value map (key a)
	    stringRedisTemplate.opsForHash().put("user", "a", "b");
	    stringRedisTemplate.opsForHash().put("user", "c", "d");
	    HashMap<String, Object> hashMap = new HashMap<String,Object>();
	    hashMap.put("test1", "1");
	    hashMap.put("test2", "2");
	    stringRedisTemplate.opsForHash().putAll("user",hashMap);
	}

	@Test
	public void hashGetKeysResitTest(){

	    // 获得map的key集合
	    Set<Object> objects =  stringRedisTemplate.opsForHash().keys("user");
	    logger.info("keys objects:{}", objects);
	}

	@Test
	public void hashGetEntiresResitTest(){

	    // 获取map对象
	    Map<Object, Object> map = stringRedisTemplate.opsForHash().entries("user");
	    logger.info("map objects:{}", map);
	}

	@Test
	public void hashGeDeleteResitTest(){

	    // 根据map的key删除这个元素
	    stringRedisTemplate.opsForHash().delete("user", "c");
	}
}
vue入门介绍
VueJS是目前很爆的前端框架,相对于jsp, themaleaf,vue 是javascript体系,相对于jquery,加了model 和前端控制组件 mvc
https://www.runoob.com/vue2/vue-tutorial.html
需要下载vue.js文件
vue例子地址:
链接:https://pan.baidu.com/s/1-tLd0vh66TZ-GNCIx22tIw
提取码:bdd3
<html>

	<head>
		<meta charset="UTF-8">
		<title>title>
		<link rel="stylesheet" href="styles/demo.css" />
	head>

	<body>
		<div id="app">

			<fieldset>
				<legend>
					Create New Person
				legend>
				<div class="form-group">
					<label>Name:label>
					<input type="text" v-model="newPerson.name"/>
				div>
				<div class="form-group">
					<label>Age:label>
					<input type="text" v-model="newPerson.age"/>
				div>
				<div class="form-group">
					<label>Sex:label>
					<select v-model="newPerson.sex">
					<option value="Male">Maleoption>
					<option value="Female">Femaleoption>
				select>
				div>
				<div class="form-group">
					<label>label>
					<button @click="createPerson">Createbutton>
				div>
		fieldset>
		<table>
			<thead>
				<tr>
					<th>Nameth>
					<th>Ageth>
					<th>Sexth>
					<th>Deleteth>
				tr>
			thead>
			<tbody>
				<tr v-for="(person, index) in people">
					<td>{
    { person.name }}td>
					<td>{
    { person.age }}td>
					<td>{
    { person.sex }}td>
					<td :class="'text-center'"><button @click="deletePerson(index)">Deletebutton>td>
				tr>
			tbody>
		table>
		div>
	body>

	<script src="js/vue.js">script>
	<script>
		var vm = new Vue({

			el: '#app',
			data: {

				newPerson: {

					name: 'zhangsan',
					age: 0,
					sex: 'Male'
				},
				people: [{

					name: 'Jack',
					age: 30,
					sex: 'Male'
				}, {

					name: 'Bill',
					age: 26,
					sex: 'Male'
				}, {

					name: 'Tracy',
					age: 22,
					sex: 'Female'
				}, {

					name: 'Chris',
					age: 36,
					sex: 'Male'
				}]
			},
			methods:{

				createPerson: function(){

					this.people.push(this.newPerson);
					// 添加完newPerson对象后,重置newPerson对象
					//this.newPerson = {name: '', age: 0, sex: 'Male'}
				},
				deletePerson: function(index){

					// 删一个数组元素
					this.people.splice(index,1);
				}
			}
		})
	script>

html>
Visual Studio Code入门介绍
VSCode工具下载地址:
https://code.visualstudio.com/Download
或者
链接:https://pan.baidu.com/s/1hJLQYX5gVBGKoIIKgpxx3Q
提取码:2x9j
导入vue测试项目
File–》File Folder
项目地址:
链接:https://pan.baidu.com/s/1WIgcSPS-gn0vkhdv-dH8XA
提取码:yeua
Visual Studio Code开发工具第一,功能强大之处在与插件
1 Vetur (高亮提醒)
2 Vue 2 Snippets (代码提示)
3 open in browser 浏览器支持工具
4 Chinese (Simplified) 汉化
5 ESLint js 代码检查工具
[外链图片转存失败,源站可能有防盗链机制,建议将图片保存下来直接上传(img-L38ley6E-1585103919292)(C:\Users\wys\AppData\Roaming\Typora\typora-user-images\image-20200317195818214.png)]
nodejs工程
下载nodejs依赖包
链接:https://pan.baidu.com/s/1_K_jGMt7T6J1OYRBeldAHg
提取码:xcyy
# install dependencies
npm install
# serve with hot reload at localhost:8080
npm run dev
# build for production with minification
npm run build
nodejs介绍
1 采用nodejs启动 vue工程
https://www.runoob.com/vue2/vue-routing.html
https://github.com/chrisvfritz/vue-2.0-simple-routing-example
nodejs 工程
nodejs 是javascripit 运行环境 ,可以支持javascripit 调用数据库,开发web程序, 做到前后端彻底分离
下载地址
https://npm.taobao.org/mirrors/node
npm支持各种js依赖库安装及测试运行 类似maven
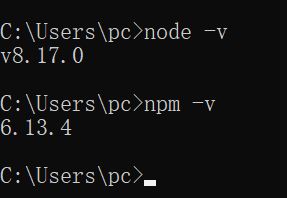
最常见命令 install (安装包) dev (运行) build
# install dependencies
cnpm install

# serve with hot reload at localhost:8080
npm run dev (版本)

# build for production with minification
npm run build
cnpm
采用淘宝镜像优化速度
npm install -g cnpm --registry=https://registry.npm.taobao.org
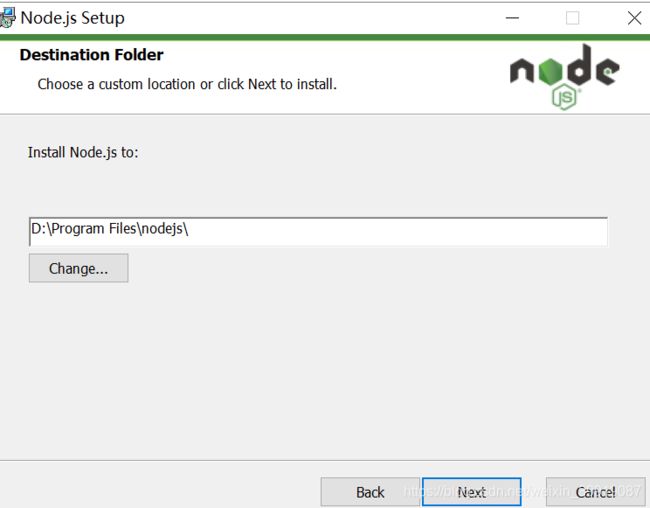
安装在D:\Users\nodejs\node_global 需要配置环境变量
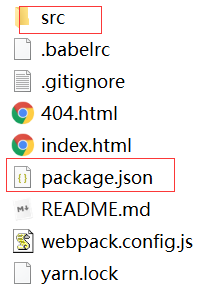
项目标准结构
package.json 内部
dependencies:运行时的依赖,发布后,即生产环境下还需要用的模块
devDependencies:开发时的依赖。里面的模块是开发时用的,发布时用不到它。 类似 maven test
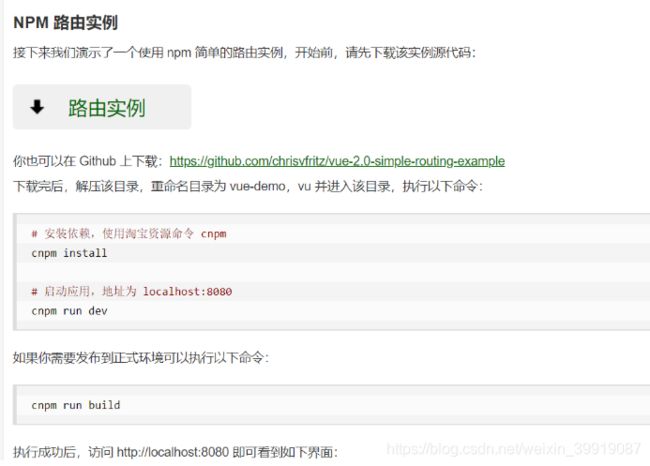
进入工程目录
# 安装依赖,使用淘宝资源命令 cnpm
cnpm install

# 启动应用
cnpm run dev
[Vue的组件为什么要export default]
https://www.cnblogs.com/win-and-coffee/p/10186649.html
2 手工搭建 vue工程
安装webpack ,是一个现代 JavaScript 模块化及打包工具
cnpm install webpack -g
安装vue-cli (vue 工程脚手架)
cnpm install --global vue-cli
新建一个vue项目, 基于"webpack"的项目
vue init webpack vuedemo
vuex
npm install vuex --save
–save -dev
–save:将保存配置信息到pacjage.json。默认为dependencies节点中。
–dev:将保存配置信息devDependencies节点中。
因此:
–save:将保存配置信息到pacjage.json的dependencies节点中。
–save-dev:将保存配置信息到pacjage.json的devDependencies节点中。
dependencies:运行时的依赖,发布后,即生产环境下还需要用的模块
devDependencies:开发时的依赖。里面的模块是开发时用的,发布时用不到它。 类似 maven test
3 vscode vue模板
https://www.jianshu.com/p/8610215a8a84
![[外链图片转存失败,源站可能有防盗链机制,建议将图片保存下来直接上传(img-Ixzqf4Kk-1585103919286)(C:\Users\wys\AppData\Roaming\Typora\typora-user-images\image-20200314095443600.png)]](http://img.e-com-net.com/image/info8/9de0e8deafef4bdcba74f2aabb11e624.jpg)







![[外链图片转存失败,源站可能有防盗链机制,建议将图片保存下来直接上传(img-PSbNTZRI-1585103919299)(C:\Users\wys\AppData\Roaming\Typora\typora-user-images\image-20200325101637060.png)]](http://img.e-com-net.com/image/info8/ed85bf1c484c4876bae304011854d88a.png)
