在本文中,你将学习如何在ASP.NET Core Web API中使用JWT身份验证。我将在编写代码时逐步简化。我们将构建两个终结点,一个用于客户登录,另一个用于获取客户订单。这些api将连接到在本地机器上运行的SQL Server Express数据库。
JWT是什么?
JWT或JSON Web Token基本上是格式化令牌的一种方式,令牌表示一种经过编码的数据结构,该数据结构具有紧凑、url安全、安全且自包含特点。
JWT身份验证是api和客户端之间进行通信的一种标准方式,因此双方可以确保发送/接收的数据是可信的和可验证的。
JWT应该由服务器发出,并使用加密的安全密钥对其进行数字签名,以便确保任何攻击者都无法篡改在令牌内发送的有效payload及模拟合法用户。
JWT结构包括三个部分,用点隔开,每个部分都是一个base64 url编码的字符串,JSON格式:
Header.Payload.Signature:
eyJhbGciOiJIUzI1NiIsInR5cCI6IkpXVCJ9.eyJuYW1laWQiOiIxIiwicm9sZSI6IkFjY291bnQgTWFuYWdlciIsIm5iZiI6MTYwNDAxMDE4NSwiZXhwIjoxNjA0MDExMDg1LCJpYXQiOjE2MDQwMTAxODV9.XJLeLeUIlOZQjYyQ2JT3iZ-AsXtBoQ9eI1tEtOkpyj8Header:表示用于对秘钥进行哈希的算法(例如HMACSHA256)
Payload:在客户端和API之间传输的数据或声明
Signature:Header和Payload连接的哈希
因为JWT标记是用base64编码的,所以可以使用jwt.io简单地研究它们或通过任何在线base64解码器。
由于这个特殊的原因,你不应该在JWT中保存关于用户的机密信息。
准备工作:
下载并安装Visual Studio 2019的最新版本(我使用的是Community Edition)。
下载并安装SQL Server Management Studio和SQL Server Express的最新更新。
开始我们的教程
让我们在Visual Studio 2019中创建一个新项目。项目命名为SecuringWebApiUsingJwtAuthentication。我们需要选择ASP.NET Core Web API模板,然后按下创建。Visual Studio现在将创建新的ASP.NET Core Web API模板项目。让我们删除WeatherForecastController.cs和WeatherForecast.cs文件,这样我们就可以开始创建我们自己的控制器和模型。
准备数据库
在你的机器上安装SQL Server Express和SQL Management Studio,
现在,从对象资源管理器中,右键单击数据库并选择new database,给数据库起一个类似CustomersDb的名称。
为了使这个过程更简单、更快,只需运行下面的脚本,它将创建表并将所需的数据插入到CustomersDb中。
USE [CustomersDb]
GO
/****** Object:  Table [dbo].[Customer]    Script Date: 11/9/2020 1:56:38 AM ******/
SET ANSI_NULLS ON
GO
SET QUOTED_IDENTIFIER ON
GO
CREATE TABLE [dbo].[Customer](
  [Id] [int] IDENTITY(1,1) NOT NULL,
  [Username] [nvarchar](255) NOT NULL,
  [Password] [nvarchar](255) NOT NULL,
  [PasswordSalt] [nvarchar](50) NOT NULL,
  [FirstName] [nvarchar](255) NOT NULL,
  [LastName] [nvarchar](255) NOT NULL,
  [Email] [nvarchar](255) NOT NULL,
  [TS] [smalldatetime] NOT NULL,
  [Active] [bit] NOT NULL,
  [Blocked] [bit] NOT NULL,
 CONSTRAINT [PK_Customer] PRIMARY KEY CLUSTERED
(
  [Id] ASC
)WITH (PAD_INDEX = OFF, STATISTICS_NORECOMPUTE = OFF, IGNORE_DUP_KEY = OFF, _
 ALLOW_ROW_LOCKS = ON, ALLOW_PAGE_LOCKS = ON) ON [PRIMARY]
) ON [PRIMARY]
GO
/****** Object:  Table [dbo].[Order]    Script Date: 11/9/2020 1:56:38 AM ******/
SET ANSI_NULLS ON
GO
SET QUOTED_IDENTIFIER ON
GO
CREATE TABLE [dbo].[Order](
  [Id] [int] IDENTITY(1,1) NOT NULL,
  [Status] [nvarchar](50) NOT NULL,
  [Quantity] [int] NOT NULL,
  [Total] [decimal](19, 4) NOT NULL,
  [Currency] [char](3) NOT NULL,
  [TS] [smalldatetime] NOT NULL,
  [CustomerId] [int] NOT NULL,
 CONSTRAINT [PK_Order] PRIMARY KEY CLUSTERED
(
  [Id] ASC
)WITH (PAD_INDEX = OFF, STATISTICS_NORECOMPUTE = OFF, IGNORE_DUP_KEY = OFF, _
       ALLOW_ROW_LOCKS = ON, ALLOW_PAGE_LOCKS = ON) ON [PRIMARY]
) ON [PRIMARY]
GO
SET IDENTITY_INSERT [dbo].[Customer] ON
GO
INSERT [dbo].[Customer] ([Id], [Username], [Password], [PasswordSalt], _
       [FirstName], [LastName], [Email], [TS], [Active], [Blocked]) _
       VALUES (1, N'coding', N'ezVOZenPoBHuLjOmnRlaI3Q3i/WcGqHDjSB5dxWtJLQ=', _
       N'MTIzNDU2Nzg5MTIzNDU2Nw==', N'Coding', N'Sonata', N'[email protected]', _
       CAST(N'2020-10-30T00:00:00' AS SmallDateTime), 1, 1)
GO
INSERT [dbo].[Customer] ([Id], [Username], [Password], [PasswordSalt], _
       [FirstName], [LastName], [Email], [TS], [Active], [Blocked]) _
       VALUES (2, N'test', N'cWYaOOxmtWLC5DoXd3RZMzg/XS7Xi89emB7jtanDyAU=', _
       N'OTUxNzUzODUyNDU2OTg3NA==', N'Test', N'Testing', N'[email protected]', _
       CAST(N'2020-10-30T00:00:00' AS SmallDateTime), 1, 0)
GO
SET IDENTITY_INSERT [dbo].[Customer] OFF
GO
SET IDENTITY_INSERT [dbo].[Order] ON
GO
INSERT [dbo].[Order] ([Id], [Status], [Quantity], [Total], [Currency], [TS], _
       [CustomerId]) VALUES (1, N'Processed', 5, CAST(120.0000 AS Decimal(19, 4)), _
       N'USD', CAST(N'2020-10-25T00:00:00' AS SmallDateTime), 1)
GO
INSERT [dbo].[Order] ([Id], [Status], [Quantity], [Total], [Currency], [TS], _
       [CustomerId]) VALUES (2, N'Completed', 2, CAST(750.0000 AS Decimal(19, 4)), _
       N'USD', CAST(N'2020-10-25T00:00:00' AS SmallDateTime), 1)
GO
SET IDENTITY_INSERT [dbo].[Order] OFF
GO
ALTER TABLE [dbo].[Order]  WITH CHECK ADD  CONSTRAINT [FK_Order_Customer] _
      FOREIGN KEY([CustomerId])
REFERENCES [dbo].[Customer] ([Id])
GO
ALTER TABLE [dbo].[Order] CHECK CONSTRAINT [FK_Order_Customer]
GO
准备数据库模型和DbContext
创建实体文件夹,然后添加Customer.cs:
using System;
using System.Collections.Generic;
namespace SecuringWebApiUsingJwtAuthentication.Entities
{
public class Customer
{
public int Id { get; set; }
public string Username { get; set; }
public string Password { get; set; }
public string PasswordSalt { get; set; }
public string FirstName { get; set; }
public string LastName { get; set; }
public string Email { get; set; }
public DateTime TS { get; set; }
public bool Active { get; set; }
public bool Blocked { get; set; }
public ICollection Orders { get; set; }
}
} 添加Order.cs:
using System;
using System.Text.Json.Serialization;
namespace SecuringWebApiUsingJwtAuthentication.Entities
{
public class Order
{
public int Id { get; set; }
public string Status { get; set; }
public int Quantity { get; set; }
public decimal Total { get; set; }
public string Currency { get; set; }
public DateTime TS { get; set; }
public int CustomerId { get; set; }
[JsonIgnore]
public Customer Customer { get; set; }
}
}我将JsonIgnore属性添加到Customer对象,以便在对order对象进行Json序列化时隐藏它。
JsonIgnore属性来自 System.Text.Json.Serialization 命名空间,因此请确保将其包含在Order类的顶部。
现在我们将创建一个新类,它继承了EFCore的DbContext,用于映射数据库。
创建一个名为CustomersDbContext.cs的类:
using Microsoft.EntityFrameworkCore;
namespace SecuringWebApiUsingJwtAuthentication.Entities
{
public class CustomersDbContext : DbContext
{
public DbSet Customers { get; set; }
public DbSet Orders { get; set; }
public CustomersDbContext
(DbContextOptions options) : base(options)
{
}
protected override void OnModelCreating(ModelBuilder modelBuilder)
{
modelBuilder.Entity().ToTable("Customer");
modelBuilder.Entity().ToTable("Order");
}
}
} Visual Studio现在将开始抛出错误,因为我们需要为EntityFramework Core和EntityFramework SQL Server引用NuGet包。
所以右键单击你的项目名称,选择管理NuGet包,然后下载以下包:
- Microsoft.EntityFrameworkCore
- Microsoft.EntityFrameworkCore.SqlServer
一旦上述包在项目中被引用,就不会再看到VS的错误了。
现在转到Startup.cs文件,在ConfigureServices中将我们的dbcontext添加到服务容器:
services.AddDbContext(options=> options.UseSqlServer(Configuration.GetConnectionString("CustomersDbConnectionString"))); 让我们打开appsettings.json文件,并在ConnectionStrings中创建连接字符串:
{
  "ConnectionStrings": {
    "CustomersDbConnectionString": "Server=HomeSQLEXPRESS;Database=CustomersDb;
     Trusted_Connection=True;MultipleActiveResultSets=true"
  },
  "Logging": {
    "LogLevel": {
      "Default": "Information",
      "Microsoft": "Warning",
      "Microsoft.Hosting.Lifetime": "Information"
    }
  },
  "AllowedHosts": "*"
}
现在我们已经完成了数据库映射和连接部分。
我们将继续准备服务中的业务逻辑。
创建服务
创建一个名称带有Requests的新文件夹。
我们在这里有一个LoginRequest.cs类,它表示客户将提供给登录的用户名和密码字段。
namespace SecuringWebApiUsingJwtAuthentication.Requests
{
    public class LoginRequest
    {
        public string Username { get; set; }
        public string Password { get; set; }
    }
}
为此,我们需要一个特殊的Response对象,返回有效的客户包括基本用户信息和他们的access token(JWT格式),这样他们就可以通过Authorization Header在后续请求授权api作为Bearer令牌。
因此,创建另一个文件夹,名称为Responses ,在其中,创建一个新的文件,名称为LoginResponse.cs:
namespace SecuringWebApiUsingJwtAuthentication.Responses
{
    public class LoginResponse
    {
        public string Username { get; set; }
        public string FirstName { get; set; }
        public string LastName { get; set; }
        public string Token { get; set; }
    }
}
创建一个Interfaces文件夹:
添加一个新的接口ICustomerService.cs,这将包括客户登录的原型方法:
using SecuringWebApiUsingJwtAuthentication.Requests;
using SecuringWebApiUsingJwtAuthentication.Responses;
using System.Threading.Tasks;
namespace SecuringWebApiUsingJwtAuthentication.Interfaces
{
public interface ICustomerService
{
Task Login(LoginRequest loginRequest);
}
} 现在是实现ICustomerService的部分。
创建一个新文件夹并将其命名为Services。
添加一个名为CustomerService.cs的新类:
using SecuringWebApiUsingJwtAuthentication.Entities;
using SecuringWebApiUsingJwtAuthentication.Helpers;
using SecuringWebApiUsingJwtAuthentication.Interfaces;
using SecuringWebApiUsingJwtAuthentication.Requests;
using SecuringWebApiUsingJwtAuthentication.Responses;
using System.Linq;
using System.Threading.Tasks;
namespace SecuringWebApiUsingJwtAuthentication.Services
{
public class CustomerService : ICustomerService
{
private readonly CustomersDbContext customersDbContext;
public CustomerService(CustomersDbContext customersDbContext)
{
this.customersDbContext = customersDbContext;
}
public async Task Login(LoginRequest loginRequest)
{
var customer = customersDbContext.Customers.SingleOrDefault
(customer => customer.Active && customer.Username == loginRequest.Username);
if (customer == null)
{
return null;
}
var passwordHash = HashingHelper.HashUsingPbkdf2
(loginRequest.Password, customer.PasswordSalt);
if (customer.Password != passwordHash)
{
return null;
}
var token = await Task.Run( () => TokenHelper.GenerateToken(customer));
return new LoginResponse { Username = customer.Username,
FirstName = customer.FirstName, LastName = customer.LastName, Token = token };
}
}
} 上面的登录函数在数据库中检查客户的用户名、密码,如果这些条件匹配,那么我们将生成一个JWT并在LoginResponse中为调用者返回它,否则它将在LoginReponse中返回一个空值。
首先,让我们创建一个名为Helpers的新文件夹。
添加一个名为HashingHelper.cs的类。
这将用于检查登录请求中的密码的哈希值,以匹配数据库中密码的哈希值和盐值的哈希值。
在这里,我们使用的是基于派生函数(PBKDF2),它应用了HMac函数结合一个散列算法(sha - 256)将密码和盐值(base64编码的随机数与大小128位)重复多次后作为迭代参数中指定的参数(是默认的10000倍),运用在我们的示例中,并获得一个随机密钥的产生结果。
派生函数(或密码散列函数),如PBKDF2或Bcrypt,由于随着salt一起应用了大量的迭代,需要更长的计算时间和更多的资源来破解密码。
注意:千万不要将密码以纯文本保存在数据库中,要确保计算并保存密码的哈希,并使用一个键派生函数散列算法有一个很大的尺寸(例如,256位或更多)和随机大型盐值(64位或128位),使其难以破解。
此外,在构建用户注册屏幕或页面时,应该确保应用强密码(字母数字和特殊字符的组合)的验证规则以及密码保留策略,这甚至可以最大限度地提高存储密码的安全性。
using System;
using System.Security.Cryptography;
using System.Text;
namespace SecuringWebApiUsingJwtAuthentication.Helpers
{
public class HashingHelper
{
public static string HashUsingPbkdf2(string password, string salt)
{
using var bytes = new Rfc2898DeriveBytes
(password, Convert.FromBase64String(salt), 10000, HashAlgorithmName.SHA256);
var derivedRandomKey = bytes.GetBytes(32);
var hash = Convert.ToBase64String(derivedRandomKey);
return hash;
}
}
}生成 JSON Web Token (JWT)
在Helpers 文件夹中添加另一个名为TokenHelper.cs的类。
这将包括我们的令牌生成函数:
using Microsoft.IdentityModel.Tokens;
using SecuringWebApiUsingJwtAuthentication.Entities;
using System;
using System.IdentityModel.Tokens.Jwt;
using System.Security.Claims;
using System.Security.Cryptography;
namespace SecuringWebApiUsingJwtAuthentication.Helpers
{
public class TokenHelper
{
public const string Issuer = "http://codingsonata.com";
public const string Audience = "http://codingsonata.com";
public const string Secret =
"OFRC1j9aaR2BvADxNWlG2pmuD392UfQBZZLM1fuzDEzDlEpSsn+
btrpJKd3FfY855OMA9oK4Mc8y48eYUrVUSw==";
//Important note***************
//The secret is a base64-encoded string, always make sure to
//use a secure long string so no one can guess it. ever!.a very recommended approach
//to use is through the HMACSHA256() class, to generate such a secure secret,
//you can refer to the below function
//you can run a small test by calling the GenerateSecureSecret() function
//to generate a random secure secret once, grab it, and use it as the secret above
//or you can save it into appsettings.json file and then load it from them,
//the choice is yours
public static string GenerateSecureSecret()
{
var hmac = new HMACSHA256();
return Convert.ToBase64String(hmac.Key);
}
public static string GenerateToken(Customer customer)
{
var tokenHandler = new JwtSecurityTokenHandler();
var key = Convert.FromBase64String(Secret);
var claimsIdentity = new ClaimsIdentity(new[] {
new Claim(ClaimTypes.NameIdentifier, customer.Id.ToString()),
new Claim("IsBlocked", customer.Blocked.ToString())
});
var signingCredentials = new SigningCredentials
(new SymmetricSecurityKey(key), SecurityAlgorithms.HmacSha256Signature);
var tokenDescriptor = new SecurityTokenDescriptor
{
Subject = claimsIdentity,
Issuer = Issuer,
Audience = Audience,
Expires = DateTime.Now.AddMinutes(15),
SigningCredentials = signingCredentials,
};
var token = tokenHandler.CreateToken(tokenDescriptor);
return tokenHandler.WriteToken(token);
}
}
}我们需要引用这里的另一个库
- Microsoft.AspNetCore.Authentication.JwtBearer
让我们仔细看看GenerateToken函数:
在传递customer对象时,我们可以使用任意数量的属性,并将它们添加到将嵌入到令牌中的声明里。但在本教程中,我们将只嵌入客户的id属性。
JWT依赖于数字签名算法,其中推荐的算法之一,我们在这里使用的是HMac哈希算法使用256位的密钥大小。
我们从之前使用HMACSHA256类生成的随机密钥生成密钥。你可以使用任何随机字符串,但要确保使用长且难以猜测的文本,最好使用前面代码示例中所示的HMACSHA256类。
你可以将生成的秘钥保存在常量或appsettings中,并将其加载到Startup.cs。
创建控制器
现在我们需要在CustomersController使用CustomerService的Login方法。
创建一个新文件夹并将其命名为Controllers。
添加一个新的文件CustomersController.cs。如果登录成功,它将有一个POST方法接收用户名和密码并返回JWT令牌和其他客户细节,否则它将返回404。
using Microsoft.AspNetCore.Mvc;
using SecuringWebApiUsingJwtAuthentication.Interfaces;
using SecuringWebApiUsingJwtAuthentication.Requests;
using System.Threading.Tasks;
namespace SecuringWebApiUsingJwtAuthentication.Controllers
{
[Route("api/[controller]")]
[ApiController]
public class CustomersController : ControllerBase
{
private readonly ICustomerService customerService;
public CustomersController(ICustomerService customerService)
{
this.customerService = customerService;
}
[HttpPost]
[Route("login")]
public async Task Login(LoginRequest loginRequest)
{
if (loginRequest == null || string.IsNullOrEmpty(loginRequest.Username) ||
string.IsNullOrEmpty(loginRequest.Password))
{
return BadRequest("Missing login details");
}
var loginResponse = await customerService.Login(loginRequest);
if (loginResponse == null)
{
return BadRequest($"Invalid credentials");
}
return Ok(loginResponse);
}
}
} 正如这里看到的,我们定义了一个POST方法用来接收LoginRequest(用户名和密码),它对输入进行基本验证,并调用客户服务的 Login方法。
我们将使用接口ICustomerService通过控制器的构造函数注入CustomerService,我们需要在启动的ConfigureServices函数中定义此注入:
services.AddScoped(); 现在,在运行API之前,我们可以配置启动URL,还可以知道IIS Express对象中http和https的端口号。
这就是你的launchsettings.json文件:
{
  "schema": "http://json.schemastore.org/launchsettings.json",
  "iisSettings": {
    "windowsAuthentication": false,
    "anonymousAuthentication": true,
    "iisExpress": {
      "applicationUrl": "http://localhost:60057",
      "sslPort": 44375
    }
  },
  "profiles": {
    "IIS Express": {
      "commandName": "IISExpress",
      "launchBrowser": true,
      "launchUrl": "",
      "environmentVariables": {
        "ASPNETCORE_ENVIRONMENT": "Development"
      }
    },
    "SecuringWebApiUsingJwtAuthentication": {
      "commandName": "Project",
      "launchBrowser": true,
      "launchUrl": "",
      "applicationUrl": "https://localhost:5001;http://localhost:5000",
      "environmentVariables": {
        "ASPNETCORE_ENVIRONMENT": "Development"
      }
    }
  }
}
现在,如果你在本地机器上运行API,应该能够调用login方法并生成第一个JSON Web Token。
通过PostMan测试Login
打开浏览器,打开PostMan。
打开新的request选项卡,运行应用程序后,填写设置中的本地主机和端口号。
从body中选择raw和JSON,并填写JSON对象,这将使用该对象通过我们的RESTful API登录到客户数据库。
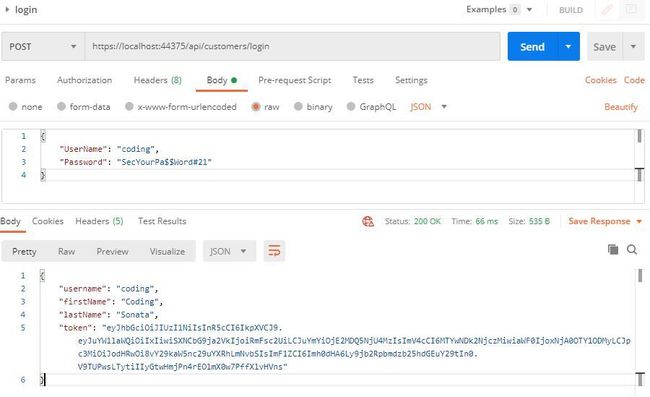
以下是PostMan的请求/回应
这是我们的第一个JWT。
让我们准备API来接收这个token,然后验证它,在其中找到一个声明,然后为调用者返回一个响应。
可以通过许多方式验证你的api、授权你的用户:
1.根据.net core团队的说法,基于策略的授权还可以包括定义角色和需求,这是通过细粒度方法实现API身份验证的推荐方法。
2.拥有一个自定义中间件来验证在带有Authorize属性修饰的api上传递的请求头中的JWT。
3.在为JWT授权标头验证请求标头集合的一个或多个控制器方法上设置自定义属性。
在本教程中,我将以最简单的形式使用基于策略的身份验证,只是为了向你展示可以应用基于策略的方法来保护您的ASP.NET Core Web api。
身份验证和授权之间的区别
身份验证是验证用户是否有权访问api的过程。
通常,试图访问api的未经身份验证的用户将收到一个http 401未经授权的响应。
授权是验证经过身份验证的用户是否具有访问特定API的正确权限的过程。
通常,试图访问仅对特定角色或需求有效的API的未授权用户将收到http 403 Forbidden响应。
配置身份验证和授权
现在,让我们在startup中添加身份验证和授权配置。
在ConfigureServices方法中,我们需要定义身份验证方案及其属性,然后定义授权选项。
在身份验证部分中,我们将使用默认JwtBearer的方案,我们将定义TokenValidationParamters,以便我们验证IssuerSigningKey确保签名了使用正确的Security Key。
在授权部分中,我们将添加一个策略,当指定一个带有Authorize属性的终结点上时,它将只对未被阻止的客户进行授权。
被阻止的登录客户仍然能够访问没有定义策略的其他端点,但是对于定义了 OnlyNonBlockedCustomer策略的端点,被阻塞的客户将被403 Forbidden响应拒绝访问。
首先,创建一个文件夹并将其命名为Requirements。
添加一个名为 CustomerStatusRequirement.cs的新类。
using Microsoft.AspNetCore.Authorization;
namespace SecuringWebApiUsingJwtAuthentication.Requirements
{
public class CustomerBlockedStatusRequirement : IAuthorizationRequirement
{
public bool IsBlocked { get; }
public CustomerBlockedStatusRequirement(bool isBlocked)
{
IsBlocked = isBlocked;
}
}
}然后创建另一个文件夹并将其命名为Handlers。
添加一个名为CustomerBlockedStatusHandler.cs的新类:
using Microsoft.AspNetCore.Authorization;
using SecuringWebApiUsingJwtAuthentication.Helpers;
using SecuringWebApiUsingJwtAuthentication.Requirements;
using System;
using System.Threading.Tasks;
namespace SecuringWebApiUsingJwtAuthentication.Handlers
{
public class CustomerBlockedStatusHandler :
AuthorizationHandler
{
protected override Task HandleRequirementAsync
(AuthorizationHandlerContext context, CustomerBlockedStatusRequirement requirement)
{
var claim = context.User.FindFirst(c => c.Type == "IsBlocked" &&
c.Issuer == TokenHelper.Issuer);
if (!context.User.HasClaim(c => c.Type == "IsBlocked" &&
c.Issuer == TokenHelper.Issuer))
{
return Task.CompletedTask;
}
string value = context.User.FindFirst(c => c.Type == "IsBlocked" &&
c.Issuer == TokenHelper.Issuer).Value;
var customerBlockedStatus = Convert.ToBoolean(value);
if (customerBlockedStatus == requirement.IsBlocked)
{
context.Succeed(requirement);
}
return Task.CompletedTask;
}
}
} 最后,让我们将所有身份验证和授权配置添加到服务集合:
services.AddAuthentication(JwtBearerDefaults.AuthenticationScheme)
.AddJwtBearer(options =>
{
options.TokenValidationParameters = new TokenValidationParameters
{
ValidateIssuer = true,
ValidateAudience = true,
ValidateIssuerSigningKey = true,
ValidIssuer = TokenHelper.Issuer,
ValidAudience = TokenHelper.Audience,
IssuerSigningKey = new SymmetricSecurityKey
(Convert.FromBase64String(TokenHelper.Secret))
};
});
services.AddAuthorization(options =>
{
options.AddPolicy("OnlyNonBlockedCustomer", policy =>
{
policy.Requirements.Add(new CustomerBlockedStatusRequirement(false));
});
});
services.AddSingleton(); 为此,我们需要包括以下命名空间:
- using Microsoft.AspNetCore.Authorization;
- using Microsoft.IdentityModel.Tokens;
- using SecuringWebApiUsingJwtAuthentication.Helpers;
- using SecuringWebApiUsingJwtAuthentication.Handlers;
- using SecuringWebApiUsingJwtAuthentication.Requirements;
现在,上面的方法不能单独工作,身份验证和授权必须通过Startup中的Configure 方法包含在ASP.NET Core API管道:
app.UseAuthentication();
app.UseAuthorization();
这里,我们完成了ASP.NET Core Web API使用JWT身份验证。
创建OrderService
我们将需要一种专门处理订单的新服务。
在Interfaces文件夹下创建一个名为IOrderService.cs的新接口:
using SecuringWebApiUsingJwtAuthentication.Entities;
using System.Collections.Generic;
using System.Threading.Tasks;
namespace SecuringWebApiUsingJwtAuthentication.Interfaces
{
public interface IOrderService
{
Task> GetOrdersByCustomerId(int id);
}
} 该接口包括一个方法,该方法将根据客户Id检索指定客户的订单。
让我们实现这个接口。
在Services 文件夹下创建一个名为OrderService.cs的新类:
using SecuringWebApiUsingJwtAuthentication.Entities;
using SecuringWebApiUsingJwtAuthentication.Interfaces;
using System.Collections.Generic;
using System.Threading.Tasks;
using System.Linq;
using Microsoft.EntityFrameworkCore;
namespace SecuringWebApiUsingJwtAuthentication.Services
{
public class OrderService : IOrderService
{
private readonly CustomersDbContext customersDbContext;
public OrderService(CustomersDbContext customersDbContext)
{
this.customersDbContext = customersDbContext;
}
public async Task> GetOrdersByCustomerId(int id)
{
var orders = await customersDbContext.Orders.Where
(order => order.CustomerId == id).ToListAsync();
return orders;
}
}
} 创建OrdersController
现在我们需要创建一个新的终结点,它将使用Authorize属性和OnlyNonBlockedCustomer策略。
在Controllers文件夹下添加一个新控制器,命名为OrdersController.cs:
using System;
using System.Collections.Generic;
using System.Linq;
using System.Security.Claims;
using System.Threading.Tasks;
using Microsoft.AspNetCore.Authorization;
using Microsoft.AspNetCore.Http;
using Microsoft.AspNetCore.Mvc;
using SecuringWebApiUsingJwtAuthentication.Interfaces;
namespace SecuringWebApiUsingJwtAuthentication.Controllers
{
[Route("api/[controller]")]
[ApiController]
public class OrdersController : ControllerBase
{
private readonly IOrderService orderService;
public OrdersController(IOrderService orderService)
{
this.orderService = orderService;
}
[HttpGet()]
[Authorize(Policy = "OnlyNonBlockedCustomer")]
public async Task Get()
{
var claimsIdentity = HttpContext.User.Identity as ClaimsIdentity;
var claim = claimsIdentity.FindFirst(ClaimTypes.NameIdentifier);
if (claim == null)
{
return Unauthorized("Invalid customer");
}
var orders = await orderService.GetOrdersByCustomerId(int.Parse(claim.Value));
if (orders == null || !orders.Any())
{
return BadRequest($"No order was found");
}
return Ok(orders);
}
}
} 我们将创建一个GET方法,用于检索客户的订单。
此方法将使用Authorize属性进行修饰,并仅为非阻塞客户定义访问策略。
任何试图获取订单的被阻止的登录客户,即使该客户经过了正确的身份验证,也会收到一个403 Forbidden请求,因为该客户没有被授权访问这个特定的端点。
我们需要在Startup.cs文件中包含OrderService。
将下面的内容添加到CustomerService行下面。
services.AddScoped(); 这是Startup.cs文件的完整视图,需要与你的文件进行核对。
using System;
using Microsoft.AspNetCore.Authentication.JwtBearer;
using Microsoft.AspNetCore.Authorization;
using Microsoft.AspNetCore.Builder;
using Microsoft.AspNetCore.Hosting;
using Microsoft.EntityFrameworkCore;
using Microsoft.Extensions.Configuration;
using Microsoft.Extensions.DependencyInjection;
using Microsoft.Extensions.Hosting;
using Microsoft.IdentityModel.Tokens;
using SecuringWebApiUsingJwtAuthentication.Entities;
using SecuringWebApiUsingJwtAuthentication.Handlers;
using SecuringWebApiUsingJwtAuthentication.Helpers;
using SecuringWebApiUsingJwtAuthentication.Interfaces;
using SecuringWebApiUsingJwtAuthentication.Requirements;
using SecuringWebApiUsingJwtAuthentication.Services;
namespace SecuringWebApiUsingJwtAuthentication
{
public class Startup
{
public Startup(IConfiguration configuration)
{
Configuration = configuration;
}
public IConfiguration Configuration { get; }
// This method gets called by the runtime.
// Use this method to add services to the container.
public void ConfigureServices(IServiceCollection services)
{
services.AddDbContext
(options => options.UseSqlServer(Configuration.GetConnectionString
("CustomersDbConnectionString")));
services.AddAuthentication(JwtBearerDefaults.AuthenticationScheme)
.AddJwtBearer(options =>
{
options.TokenValidationParameters = new TokenValidationParameters
{
ValidateIssuer = true,
ValidateAudience = true,
ValidateIssuerSigningKey = true,
ValidIssuer = TokenHelper.Issuer,
ValidAudience = TokenHelper.Audience,
IssuerSigningKey = new SymmetricSecurityKey
(Convert.FromBase64String(TokenHelper.Secret))
};
});
services.AddAuthorization(options =>
{
options.AddPolicy("OnlyNonBlockedCustomer", policy => {
policy.Requirements.Add(new CustomerBlockedStatusRequirement(false));
});
});
services.AddSingleton();
services.AddScoped();
services.AddScoped();
services.AddControllers();
}
// This method gets called by the runtime.
// Use this method to configure the HTTP request pipeline.
public void Configure(IApplicationBuilder app, IWebHostEnvironment env)
{
if (env.IsDevelopment())
{
app.UseDeveloperExceptionPage();
}
app.UseHttpsRedirection();
app.UseRouting();
app.UseAuthentication();
app.UseAuthorization();
app.UseEndpoints(endpoints =>
{
endpoints.MapControllers();
});
}
}
} 通过PostMan测试
运行应用程序并打开Postman。
让我们尝试用错误的密码登录:
现在让我们尝试正确的凭证登录:
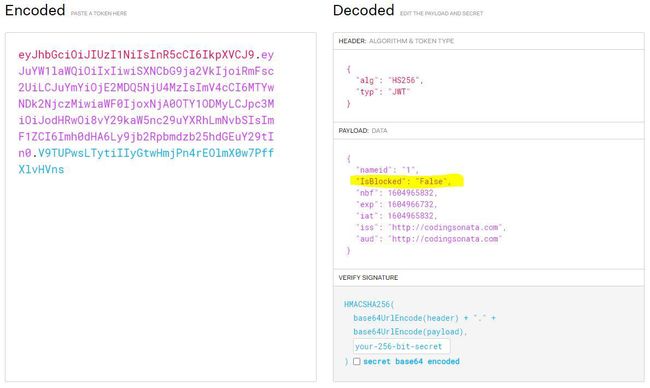
如果你使用上面的令牌并在jwt.io中进行验证,你将看到header和payload细节:
现在让我们测试get orders终结点,我们将获取令牌字符串并将其作为Bearer Token 在授权头传递:
为什么我们的API没有返回403?
如果你回到前面的一步,你将注意到我们的客户被阻止了(“IsBlocked”:True),即只有非阻止的客户才被授权访问该端点。
为此,我们将解除该客户的阻止,或者尝试与另一个客户登录。
返回数据库,并将用户的Blocked更改为False。
现在再次打开Postman并以相同的用户登录,这样我们就得到一个新的JWT,其中包括IsBlocked类型的更新值。
接下来在jwt.io中重新查看:
你现在注意到区别了吗?
现在不再被阻止,因为我们获得了一个新的JWT,其中包括从数据库读取的声明。
让我们尝试使用这个新的JWT访问我们的终结点。
它工作了!
已经成功通过了策略的要求,因此订单现在显示了。
让我们看看如果用户试图访问这个终结点而不传递授权头会发生什么:
JWT是防篡改的,所以没有人可以糊弄它。
我希望本教程使你对API安全和JWT身份验证有了很好的理解。
欢迎关注我的公众号——码农译站,如果你有喜欢的外文技术文章,可以通过公众号留言推荐给我。![]()


