开源自主导航小车MickX4(六)cartographer 室外2D建图
开源自主导航小车MickX4(六)cartographer 室外2D建图
- 1 cartographer环境安装
-
- 1.1 安装ceres库
- 1.2 安装cartographer
- 2 cartographer demo测试
-
- 2.1 启动2D 建图demo
- 2.2 启动2D 定位demo
- 2.3 小结
- 3 在小车上实现2D室外建图
- 4 在小车上基于已有2D地图定位
- 5 大范围场景2D建图
- 参考资料
1 cartographer环境安装
cartographer安装主要分为三个部分 ceres优化库[5]、cartographer[4]和 cartographer_ros[3]
1.1 安装ceres库
这里由于我需要使用其他的视觉SLAM框架,因此我安装的是1.14.0的版本,如果使用的是ubuntu18,clone 最新版的ceres库就行
下载编译ceres库
sudo apt-get install cmake libeigen3-dev libatlas-base-dev liblapack-dev libgflags-dev libgoogle-glog-dev libgtest-dev libsuitesparse-dev
cd ~/soft
wget http://ceres-solver.org/ceres-solver-1.14.0.tar.gz
tar zxf ceres-solver-1.14.0.tar.gz
cd ceres-solver-1.14.0
mkdir build
cd build
cmake ..
make -j3
sudo make install
ubuntu18安装最新库的使用下面命令
git clone https://ceres-solver.googlesource.com/ceres-solver
cd ceres-solver
mkdir build
cd build
cmake ..
make -j3
sudo make install
1.2 安装cartographer
安装依赖项目
sudo apt-get update
sudo apt-get install -y python-wstool python-rosdep ninja-build stow
sudo apt-get install -y python-wstool python-rosdep ninja-build
sudo apt-get install -y cmake g++ git google-mock libboost-all-dev libcairo2-dev libeigen3-dev libgflags-dev libgoogle-glog-dev liblua5.2-dev libprotobuf-dev libsuitesparse-dev libwebp-dev ninja-build protobuf-compiler python-sphinx
下载源代码
cd catkin_cartographer_ws/src

git clone https://github.com/cartographer-project/cartographer.git
git clone https://github.com/googlecartographer/cartographer_ros.git

cd ~/catkin_cartographer_ws/src/cartographer/scripts
./install_proto3.sh
./install_abseil.sh

catkin_make_isolated --install --use-ninja
如果提示缺少其他的依赖项可以使用 cartographer/scripts 目录下的脚本进行安装。这里 cartographer 使用的编译命令不是 catkin_make 因此建议不与其他工作空间放一起。

环境安装尽量多参考官网的教程,官方的教程在更新。也可参考hitcm博主[1]的教程或者我以前的博客[2] ( cartographer 在机器人上运行建图与定位)。
2 cartographer demo测试
通过官方提供的bag测试 cartographer 安装是否正确,下载测试包:
- 百度云(提取码:46fq )
- 官网链接
2.1 启动2D 建图demo
source devel_isolated/setup.bash
roslaunch cartographer_ros demo_backpack_2d.launch bag_filename:=/home/administrator/cartograph/b2-2016-04-05-14-44-52.bag
bag_filename表示的是ROS bag的数据包。
注意:由于发现 offline_backpack_2d.launch 这个文件没有启动地图保存服务。这里把官网上的 offline_backpack_2d.launch 文件替换为了 demo_backpack_2d.launch。
cartograph_数据集2D建图(x8)
先将地图保存为 .pbstream 文件
rosservice call /write_state ~/cartograph_test.pbstream
用 cartographer 自带的转换节点将.pbstream 文件转化为pgm和yaml文件
source devel_isolated/setup.bash
rosrun cartographer_ros cartographer_pbstream_to_ros_map -pbstream_filename /home/administrator/cartograph_test.pbstream -map_filestem /home/administrator/cartograph_test
启动节点以后可以看到文件夹下生成的pgm 和 yaml文件

但是如果你需要使用 cartographer 进行定位的话,就没有必要去转换为pgm格式的。
2.2 启动2D 定位demo
接下来我们使用已有的地图进行定位
source devel_isolated/setup.bash
roslaunch cartographer_ros demo_backpack_2d_localization.launch load_state_filename:=/home/crp/ cartograph_test.pbstream bag_filename:=/home/administrator/cartograph/b2-2016-04-27-12-31-41.bag
其中cartograph_test.pbstream 是我们上一个步骤中生成的一个地图文件,bag_filename:表示的是当前输入的激光雷达的数据
cartograph_数据集2D定位增量式更新地图
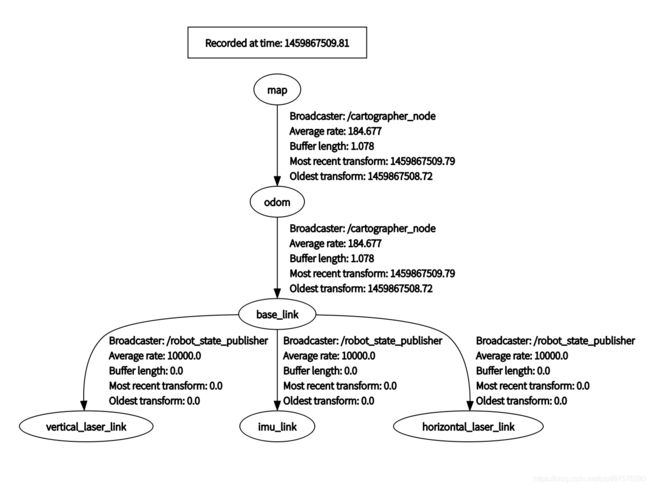
其中定位数据是输出在TF坐标系中的。通过base_link 和 odom 之间的tf 变换输出结果,可通过以下命令打印
rostopic echo /tf
2.3 小结
- 2D demo包中没有提供里程计数据,只有激光数据和IMU 数据,输出以下3个topic
/horizontal_laser_2d
/imu
/vertical_laser_2d
- 2D demo 运行的条件是需要已知base_link到 imu_link, horizontal_laser_link 和 vertical_laser_link(2D demo中只使用了水平激光数据)的变换数据。这个关系通过 cartographer_ros/cartographer_ros/urdf/backpack_2d.urdf 目录下的urdf文件提供
3 在小车上实现2D室外建图
这里我们是参考demo的历程来配置参数文件的,这里主要需要注意lua文件中的几个坐标系的配置。
- a) 在只使用激光雷达的时候(tracking_frame=”laser”, publish_frame=”laser”)。 如果你自己发布有TF树,提供了激光雷达到base_link之间的变换,把这两个参数设置为base_link也是可以的。
- b) 使用里程计+激光雷达时(tracking_frame=”base_link”, publish_frame=”odom”)
- c) 使用IMU+激光+里程计时(tracking_frame=”imu_link”, publish_frame=”odom”)
注意: 每次修改cartographer工作空间里面的文件都需要重新编译
catkin_make_isolated --install --use-ninja
其余参数只要参考demo里面的进行配置就可以了,我所使用的launch文件(” mickx4_cartographer.launch”)和lua文件(“mickx4.lua”)配置如下:
在 mick_navigation/launch目录下新建launch 文件:
mickx4_carto_2D.launch
<?xml version="1.0"?>
<launch>
  <arg name="rviz" default="true"/>
   <!-- chassis -->
  <include file="$(find mick_bringup)/launch/mickx4_bringup_v2.launch" />

   <!-- imu -->
  <include file="$(find imu_driver)/launch/wit_imu.launch" />

   <!-- urdf -->
  <include file="$(find mick_description)/launch/state_publisher.launch" />

   <!-- rslidar -->
  <include file="$(find rslidar_pointcloud)/launch/rs_lidar_16.launch" />

   <!-- pointcloud_to_laserscan -->
  <include file="$(find pointcloud_to_laserscan)/launch/rslidar.launch" />

 <node name="cartographer_node" pkg="cartographer_ros"
      type="cartographer_node" args="
          -configuration_directory $(find cartographer_ros)/configuration_files
          -configuration_basename mickx4_mapping.lua"
      output="screen">
    <remap from="scan" to="/scan" />
    <remap from="odom" to="/odom" />
  </node>

  <node name="cartographer_occupancy_grid_node" pkg="cartographer_ros"
      type="cartographer_occupancy_grid_node" args="-resolution 0.05" />

 <!-- RViz -->
  <node if="$(arg rviz)" pkg="rviz" type="rviz" name="$(anon rviz)" respawn="false" output="screen" args="-d $(find mick_navigation)/rviz/mickx4_cartographer.rviz" />

</launch>
mickx4.lua
include "map_builder.lua"
include "trajectory_builder.lua"

options = {

  map_builder = MAP_BUILDER,
  trajectory_builder = TRAJECTORY_BUILDER,
  map_frame = "map",
  tracking_frame = "rslidar",
  published_frame = "base_link",
  odom_frame = "odom",
  provide_odom_frame = true, --算法内部提供里程计
  publish_frame_projected_to_2d = false,
  use_odometry = false, --使用里程计
  use_nav_sat = false,
  use_landmarks = false,

  num_laser_scans = 1,
  num_multi_echo_laser_scans = 0,
  num_subdivisions_per_laser_scan = 1,
  num_point_clouds = 0,
  lookup_transform_timeout_sec = 0.2,
  submap_publish_period_sec = 0.3,
  pose_publish_period_sec = 5e-3,
  trajectory_publish_period_sec = 30e-3,
  rangefinder_sampling_ratio = 1.,
  odometry_sampling_ratio = 1.,
  fixed_frame_pose_sampling_ratio = 1.,
  imu_sampling_ratio = 1.,
  landmarks_sampling_ratio = 1.,
}

MAP_BUILDER.use_trajectory_builder_2d = true

TRAJECTORY_BUILDER_2D.submaps.num_range_data = 35
TRAJECTORY_BUILDER_2D.min_range = 0.3
TRAJECTORY_BUILDER_2D.max_range = 8.
TRAJECTORY_BUILDER_2D.missing_data_ray_length = 1.
TRAJECTORY_BUILDER_2D.use_imu_data = false
TRAJECTORY_BUILDER_2D.imu_gravity_time_constant = 9.8
TRAJECTORY_BUILDER_2D.use_online_correlative_scan_matching = true
TRAJECTORY_BUILDER_2D.real_time_correlative_scan_matcher.linear_search_window = 0.1
TRAJECTORY_BUILDER_2D.real_time_correlative_scan_matcher.translation_delta_cost_weight = 10.
TRAJECTORY_BUILDER_2D.real_time_correlative_scan_matcher.rotation_delta_cost_weight = 1e-1
POSE_GRAPH.optimization_problem.huber_scale = 1e2
POSE_GRAPH.optimize_every_n_nodes = 35
POSE_GRAPH.constraint_builder.min_score = 0.65

return options
lua文件的参数说明可以参考博客(cartographer系列—lua配置文件[6])和官方说明[7], 这里我将常用的几个参数罗列了过来
- map_frame:一般为“map”.用来发布submap的ROS帧ID.
- tracking_frame :SLAM算法要跟踪的ROS 帧ID.
- published_frame :用来发布pose的帧ID.?
- odom_frame: 是否使用算法内部通过匹配sacn计算的里程计
- provide_odom_frame:如果为true,the local, non-loop-closed, continuous pose将会在map_frame里以odom_frame发布?
- publish_frame_projected_to_2d:如果为true,则已经发布的pose将会被完全成2D的pose,没有roll,pitch或者z-offset?
- use_odometry:如果为true,需要外部提供里程计信息,并话题/odom会订阅nav_msgs/Odometry类型的消息
下图是一个在室外的演示视频
MickX4 Cartographer 2D建图
(感谢师弟(图契图卡)、师妹帮忙录视频)
4 在小车上基于已有2D地图定位
接下来我们使用建好的地图进行定位,同时进行增量式更新地图
mickx4_cartographer_localization.launch
<launch>
   <!-- chassis -->
  <include file="$(find mick_bringup)/launch/mickx4_bringup.launch" />

   <!-- imu -->
  <include file="$(find imu_driver)/launch/wit_imu.launch" />

   <!-- urdf -->
  <include file="$(find mick_description)/launch/state_publisher.launch" />

   <!-- rslidar -->
  <include file="$(find rslidar_pointcloud)/launch/rs_lidar_16.launch" />

   <!-- pointcloud_to_laserscan -->
  <include file="$(find pointcloud_to_laserscan)/launch/rslidar.launch" />

   <node name="cartographer_node" pkg="cartographer_ros"
      type="cartographer_node" args="
          -configuration_directory $(find cartographer_ros)/configuration_files
          -configuration_basename mickx4_localization.lua
	  -load_state_filename $(arg load_state_filename)"
      output="screen">
    <remap from="echoes" to="/scan" />
  </node>


  <node name="cartographer_occupancy_grid_node" pkg="cartographer_ros"
      type="cartographer_occupancy_grid_node" args="-resolution 0.05" />

  <node name="rviz" pkg="rviz" type="rviz" required="true"
      args="-d $(find cartographer_ros)/configuration_files/demo_2d.rviz" />

</launch>
mickx4_localization.lua 定位模式下的lua配置文件,只是在建图的基础上增加了两个配置参数
include "mickx4.lua"

TRAJECTORY_BUILDER.pure_localization = true
POSE_GRAPH.optimize_every_n_nodes = 20

return options
MickX4 基于已有2D地图定位
在其他小车上的定位&增量更新地图视频:
kobuki_Cartograph_定位&增量式建图
5 大范围场景2D建图
总体上来讲cartographer要比gmapping稳定鲁棒一点,cartographer支持接入IMU和里程计,而且也支持支持地图在线更新和重定位功能。
cartographer 室外大范围2D建图
经过两次建图测试也发现四轮差速底盘的里程计确实有待提升,首先应当是接入IMU数据,直接设置航向角为IMU的融合后的yaw角,这样可以减轻航向角的误差,其次轮式里程计的误差需对轮子进行简单的标定,以提升里程计的精度。
参考资料
[1] https://www.cnblogs.com/hitcm/p/5939507.html
[2] https://blog.csdn.net/crp997576280/article/details/103279649
[3] https://github.com/cartographer-project/cartographer_ros
[4] https://github.com/cartographer-project/cartographer
[5] https://github.com/ceres-solver/ceres-solver
[6] https://blog.csdn.net/weixin_40863346/article/details/89675041
[7] https://google-cartographer-ros.readthedocs.io/en/latest/configuration.html
欢迎大家点赞在评论区交流讨论([email protected]) O(∩_∩)O

