循环神经网络--SimpleRNN与PyTorch实现
PyTorch中用于SimpleRNN的方法主要是nn.RNN及nn.RNNCell。两者的区别是前者输入一个序列,而后者输入单个时间步,必须我们手动完成时间步之间的操作。前者比较简单,为了能更深入地了解SimpleRNN的运作过程,我决定用两种方法都呈现一下。
———————————————————————————————————————
from torch import nn

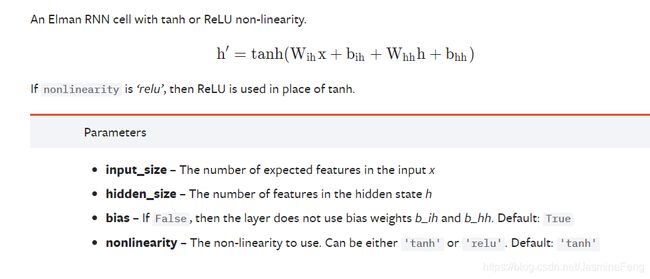
nn.RNNCell(input_size: int, hidden_size: int, bias: bool = True, nonlinearity: str = 'tanh')
这是初始化RNNCell需要的一些参数。官方文档中给出了详细的解释:

从上图还可以看到PyTorch官方文档中给出的公式。但我个人觉得,这里可以把两个偏置合为一个偏置,事实上在花书中也确实是这么给公式的:

RNN详细的来源、发展过程、各种变体大家感兴趣的可以去看相关专著或blog,这里不赘述了,直接看一个例子吧~

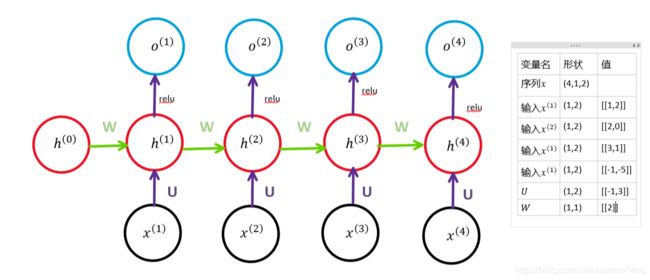
x x x表示待输入序列,序列长度是4,batch_size是1,特征数是2;
h h h表示隐藏单元,初始状态 h ( 0 ) h^{(0)} h(0)是0,形状是(1,1);
o o o表示输出,序列长度是4,为了简化计算,我用的是relu作为激活函数;
W W W是隐藏单元之间的连接权,形状是(1,1),值是[[2]],PyTorch中可以通过rnn_cell.weight__hh.data访问及设置;
U U U是输入与隐藏单元之间的连接权,形状是(1,2),值是[[-1,3]]PyTorch中可以通过rnn_cell.weight__ih.data访问及设置;
为了简化计算,这里不设置偏置,故bias是None。
人工计算过程如下:

注意到h都是正数,激活函数是ReLU,所以这里激活与否不会影响最终结果。
PyTorch实现如下:
import torch
from torch import nn
from torch.autograd import Variable

# simpleRNN cell
seq, batch_size = 4, 1
input_size, hidden_size = 2,1
rnn_cell = nn.RNNCell(input_size=input_size, hidden_size=hidden_size,
                      bias=False,nonlinearity='relu').cuda()
rnn_cell.weight_ih.data = torch.Tensor([[-1,3]]).cuda()
rnn_cell.weight_hh.data = torch.Tensor([[2]]).cuda()
x = Variable(torch.Tensor([[[1,2]],[[2,0]],[[3,1]],[[-1,-5]]])).cuda()
hx = Variable(torch.Tensor([[0]])).cuda()
print('this is x:\n',x)
print('this is h0:\n',hx)
output = []
for step in range(seq):
    hx = rnn_cell(x[step],hx)  # 当前得到的hx作为下个时间步的输入
    output.append(hx)
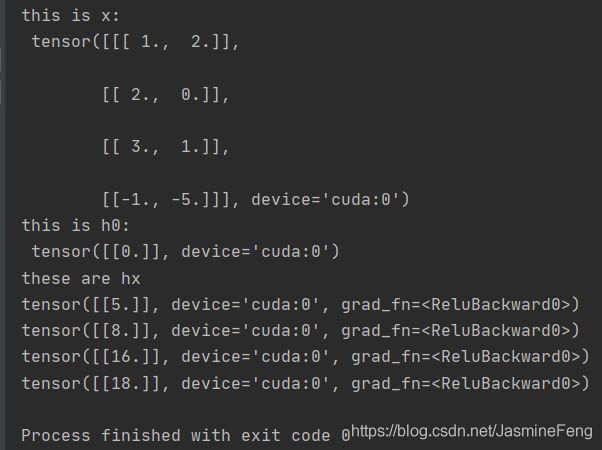
print('these are hx')
for i in range(seq):
    print(output[i])
# RNN
# RNN
seq, batch_size = 4, 1
input_size, hidden_size = 2, 1
rnn = nn.RNN(input_size=input_size, hidden_size=hidden_size,
             bias=False, nonlinearity='relu', num_layers=1)
rnn.weight_ih_l0.data = torch.Tensor([[-1, 3]]).cuda()
rnn.weight_hh_l0.data = torch.Tensor([[2]]).cuda()
rnn.flatten_parameters()
x = Variable(torch.Tensor([[[1, 2]], [[2, 0]], [[3, 1]], [[-1, -5]]])).cuda()
hx = Variable(torch.Tensor([[[0]]])).cuda()
print('this is x:\n', x)
print('this is h0:\n', hx)
output, hn = rnn(x,hx)
print('these are hx')
print(output)
print('this is hn')
print(hn)
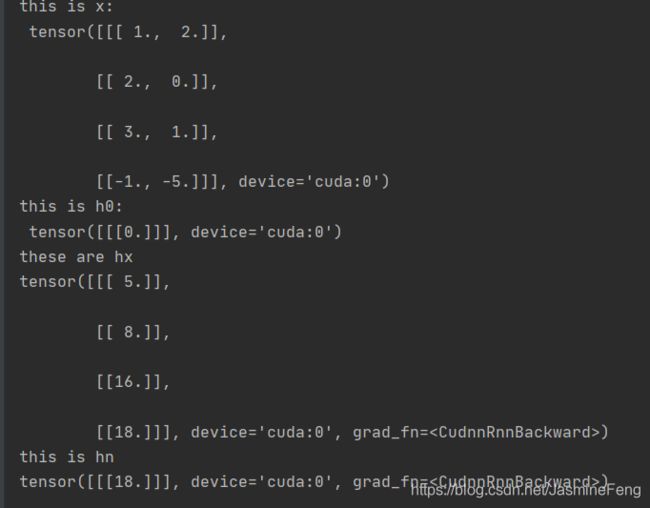
一个主要的区别在于这里得指定层数num_layers,那么顺理成章地,hx应该有三层括号了,形状是(1,1,1),也就是(num_layers*num_directions, batch_size, hidden)
关于为什么要调用flatten_parameters()方法,参考这个大佬的博客
不用flatten_parameters()就会给我弹出一个warning,所以最好还是加一下。
然后就是rnn(x,hx)会有两个输出,一个是 o ( i ) , i = 1 , 2 , 3 , 4 o^{(i)}, i=1,2,3,4 o(i),i=1,2,3,4构成的序列,另一个是 h ( 4 ) h^{(4)} h(4),也就是 o ( 4 ) o^{(4)} o(4),用于下一个时间步的输入(虽然这里已经结束了)。
打印结果:

