build打包后怎么查看源码 vue_想进阶?必须看源码!手把手带你解读Vue源码(一)...
引言
Vue作为当前前端开发中比较重要的框架,在企业级开发中应用十分广泛。目前也是我的主要技术栈之一。在接下来的系列文章中,我将带大家一起探秘Vue.js底层源码。
本篇文章是Vue源码探秘的第一篇。在这一篇中,我主要是带大家做一些准备工作,介绍一下flow、源码目录和源码构建流程。
认识flow
flow是facebook 出品的 JavaScript 静态类型检查工具。Vue.js 的源码利用了 flow 来做静态类型检查,所以了解 flow 有助于我们阅读源码。
为什么用flow
JavaScript 是动态类型语言,它的灵活性有目共睹,但是过于灵活的副作用就是很容易就写出非常隐蔽的隐患代码,在编译期甚至运行时看上去都不会报错,但是可能会发生各种各样奇怪的和难以解决的 bug。
项目越复杂就越需要通过工具的手段来保证项目的维护性和增强代码的可读性。Vue.js 在做 2.0 重构的时候,在 ES2015 的基础上,除了 ESLint 保证代码风格之外,也引入了 flow 做静态类型检查。
flow 在 Vue.js源码中的应用
flow常用的两种类型检查方式是:
类型推断:通过变量的使用上下文来推断出变量类型,然后根据这些推断来检查类型。类型注释:事先注释好我们期待的类型,flow 会基于这些注释来判断。
在 Vue.js 的主目录下有 .flowconfig 文件, 它是 flow 的配置文件。
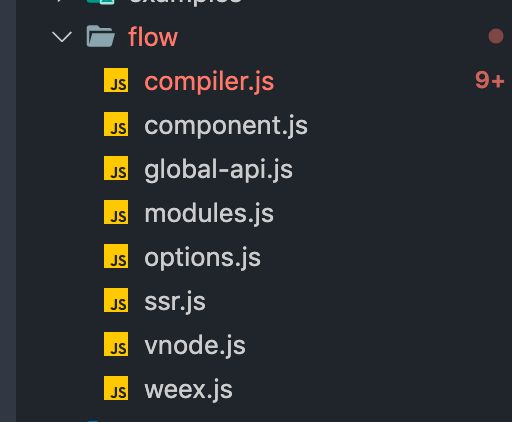
其中的[libs]用来描述包含指定库定义的目录,这里指向的是项目根目录下的flow文件夹。打开此目录,可以发现文件结构如下:
里面每个文件分别对应如下:
compiler.js: 编译相关component.js: 组件数据结构global-api.js: 全局 api 相关modules.js: 第三方库定义options.js: 选项相关ssr.js: 服务端渲染相关vnode.js: 虚拟 node 相关weex.js: weex 相关
可以看到Vue.js对于每个模块分别对应的类型定义非常清晰,在阅读源码的过程中,遇到一些想具体了解的类型定义时,可以来到flow文件夹下,查看具体的类型数据结构的定义。
vue.js源码目录设计
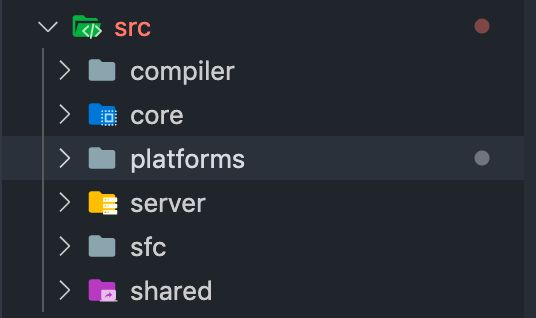
Vue.js的源码都在src目录下:
每个文件夹分别对应如下:
compiler(编译相关)
├── compiler    # 模板解析相关
    ├── codegen       # 代码生成,把 AST(抽象语法树)转换为 render 函数
    ├── directives    # 转换为 render 函数前要执行的指令
    ├── parser        # 把模板解析为 AST
compiler 目录包含 Vue.js 所有编译相关的代码。将 template 模板编译为 render 函数。
在 Vue 中使用 render 函数来创建 VNode,而在开发的时候我们更多的是使用 template 来编写 HTML,所以需要将 template 编译为 render 函数。
编译工作可以在构建项目的时候借助 webpack、vue-loader 等插件来完成,也可以在项目运行时使用 Vue 的构建功能来完成。相对应的构建输出有 runtime 和 runtime-with-compiler 两个版本。由于编译是一项消耗性能的工作,因此推荐使用第一种方式。
core(核心代码)
├── core        # Vue 核心代码
    ├── components    # 全局通用组件 Keep-Alive
    ├── global-api    # 全局 api,即 Vue 对象上的方法,如 extend,mixin,use 等
    ├── instance      # Vue 实例化相关代码,如初始化,事件,渲染,生命周期等
    ├── observer      # 响应式数据修改代码
    ├── util          # 工具函数
    ├── vdom          # 虚拟 DOM 相关代码
core 目录存放了 Vue 的核心代码,里面包括 内置组件、全局 api,Vue 实例化、观察者(响应式数据)、虚拟 DOM、工具函数等相关代码。
platforms(不同平台的支持)
├── platforms   # 平台相关代码
    ├── web           # web 平台
        ├── compiler        # 编译时相关
        ├── runtime         # 运行时相关
        ├── server          # 服务端渲染相关
        ├── util            # 工具函数
    ├── weex          # 配合 weex 运行在 native 平台
Vue 作为跨平台框架,既可以运行在 web 端,也可以配合 weex 运行在移动端。
platforms 是 Vue.js 的入口,目录下的两个文件夹就分别对应了两种不同平台对应的打包入口文件。
server
Vue 从 2.0 起支持服务端渲染(SSR)。server 目录下存放的是与服务端渲染相关代码,这也就意味着这些代码是运行在服务端的 Node.js 代码,而不是运行在浏览器端。
sfc
sfc 下只有一个 parser.js,实际上就是一个解析器,用于将我们编写的 .vue 文件解析成一个 js 对象.
shared
shared 目录中定义了常量和工具函数,供其他文件引用。
看完Vue.js的目录设计,可以看到作者把功能模块拆分的非常清楚,相关的逻辑放在一个独立的目录下维护,并且把复用的代码也抽成一个独立目录。
这样的目录设计使得代码阅读性变强,也更易维护,是非常值得大家学习的。
vue.js 源码构建
了解Rollup
Vue.js 源码使用 Rollup 构建。Rollup 和 Webpack 都是打包工具,但两者的应用场景不同。
Webpack 功能相比 Rollup 更加强大,它可以将各种静态资源(包括 css,js,图片等)通通打包成一个或多个 bundle,并按需加载;同时正因为 Webpack 功能强大,打包出来的文件体积也较大。因此 Webpack 更适用于应用的开发。
而 Rollup 相对于 Webpack 更加轻量,它只处理 js 文件而不处理其他静态资源文件,打包出来的文件体积也更小,因此 Rollup 更适用于像类库这种只有 js 代码的项目构建。所以大部分类库例如 Vue,React,Angular 等都采用 Rollup 来打包。
构建脚本
通常一个基于 NPM 托管的项目都会有一个 package.json 文件,它是对项目的描述文件,它的内容实际上是一个标准的 JSON 对象。
要了解 Vue.js 的项目构建,自然要从 package.json 这个文件开始了解。下面介绍 package.json 中几个重要的字段。
name / module
{

"main": "dist/vue.runtime.common.js",
"module": "dist/vue.runtime.esm.js",
}
这两个字段都是构建出来的 Vue runtime 版本,都放在 dist 目录下,一个是 CommonJS 模块,一个是 ES Module。
script
script 字段定义了 npm 的执行脚本,其中将 src 下的源码构建出各种版本的 Vue 后存放在 dist 目录的相关脚本是下面这三条:
{

"build": "node scripts/build.js",
"build:ssr": "npm run build -- web-runtime-cjs,web-server-renderer",
"build:weex": "npm run build -- weex",
}
可以看到,后面两条命令都是基于第一条加上不同的参数。简单来讲:
build构建 web 平台相关build:ssr构建服务端渲染相关build:weex构建的是weex平台相关。
这三条命令都是运行 scripts 目录下的 build.js 文件。接下来一起来看下build.js 文件里的内容。
构建过程
build.js 文件代码基本结构如下:
// scripts/build.js
// 引入所需模块
const fs = require('fs')
const path = require('path')
const zlib = require('zlib')
const rollup = require('rollup')
const terser = require('terser')

// 检查是否存在dist目录,不存在则创建dist目录
if (!fs.existsSync('dist')) {

  fs.mkdirSync('dist')
}

[1]
let builds = require('./config').getAllBuilds()

[2]
// filter builds via command line arg
if (process.argv[2]) {

const filters = process.argv[2].split(',')
  builds = builds.filter(b => {

return filters.some(f => b.output.file.indexOf(f) > -1 || b._name.indexOf(f) > -1)
  })
} else {

// filter out weex builds by default
  builds = builds.filter(b => {

return b.output.file.indexOf('weex') === -1
  })
}

build(builds)

// build函数声明
function build (builds) {


}
上述代码 标号 [1] 处引入并调用了 config.js 文件中的 getAllBuilds 函数,先来看看这个函数在 config.js 是如何定义的:
// scripts/config.js
if (process.env.TARGET) {

module.exports = genConfig(process.env.TARGET)
} else {

  exports.getBuild = genConfig
  exports.getAllBuilds = () => Object.keys(builds).map(genConfig)
}
这里 getAllBuilds 函数的处理是取出 builds 对象的所有属性组成的数组在 genConfig 函数处理后返回。builds 对象的定义如下所示:
const builds = {

// Runtime only (CommonJS). Used by bundlers e.g. Webpack & Browserify
'web-runtime-cjs-dev': {

entry: resolve('web/entry-runtime.js'),
dest: resolve('dist/vue.runtime.common.dev.js'),
format: 'cjs',
env: 'development',
    banner
  },
'web-runtime-cjs-prod': {

entry: resolve('web/entry-runtime.js'),
dest: resolve('dist/vue.runtime.common.prod.js'),
format: 'cjs',
env: 'production',
    banner
  },
// Runtime+compiler CommonJS build (CommonJS)
'web-full-cjs-dev': {

entry: resolve('web/entry-runtime-with-compiler.js'),
dest: resolve('dist/vue.common.dev.js'),
format: 'cjs',
env: 'development',
alias: { he: './entity-decoder' },
    banner
  },
'web-full-cjs-prod': {

entry: resolve('web/entry-runtime-with-compiler.js'),
dest: resolve('dist/vue.common.prod.js'),
format: 'cjs',
env: 'production',
alias: { he: './entity-decoder' },
    banner
  },
// Runtime only ES modules build (for bundlers)
'web-runtime-esm': {

entry: resolve('web/entry-runtime.js'),
dest: resolve('dist/vue.runtime.esm.js'),
format: 'es',
    banner
  },
// Runtime+compiler ES modules build (for bundlers)
'web-full-esm': {

entry: resolve('web/entry-runtime-with-compiler.js'),
dest: resolve('dist/vue.esm.js'),
format: 'es',
alias: { he: './entity-decoder' },
    banner
  },
// Runtime+compiler ES modules build (for direct import in browser)
'web-full-esm-browser-dev': {

entry: resolve('web/entry-runtime-with-compiler.js'),
dest: resolve('dist/vue.esm.browser.js'),
format: 'es',
transpile: false,
env: 'development',
alias: { he: './entity-decoder' },
    banner
  },
// Runtime+compiler ES modules build (for direct import in browser)
'web-full-esm-browser-prod': {

entry: resolve('web/entry-runtime-with-compiler.js'),
dest: resolve('dist/vue.esm.browser.min.js'),
format: 'es',
transpile: false,
env: 'production',
alias: { he: './entity-decoder' },
    banner
  },
// runtime-only build (Browser)
'web-runtime-dev': {

entry: resolve('web/entry-runtime.js'),
dest: resolve('dist/vue.runtime.js'),
format: 'umd',
env: 'development',
    banner
  },
// runtime-only production build (Browser)
'web-runtime-prod': {

entry: resolve('web/entry-runtime.js'),
dest: resolve('dist/vue.runtime.min.js'),
format: 'umd',
env: 'production',
    banner
  },
// Runtime+compiler development build (Browser)
'web-full-dev': {

entry: resolve('web/entry-runtime-with-compiler.js'),
dest: resolve('dist/vue.js'),
format: 'umd',
env: 'development',
alias: { he: './entity-decoder' },
    banner
  }
// 这里只列出了部分代码,weex、ssr部分未列出
}
可以看到, builds 对象中是一个个结构相似的对象,从这些对象的名称和属性可以判断出,这些对象对应编译不同 Vue 版本的配置。
配置对象里面的 format 表示构建出来的 Vue 的各种格式(如 CommonJS,ESModule 等)。entry 代表入口文件,dest 代表目标文件。这两个属性都是调用 resolve 这个方法并传入一个路径参数。resolve 函数是这样定义的:
// scripts/config.js
const resolve = p => {

const base = p.split('/')[0]
if (aliases[base]) {

return path.resolve(aliases[base], p.slice(base.length + 1))
  } else {

return path.resolve(__dirname, '../', p)
  }
}
这里 resolve 函数又引用了 aliases。aliases 存放在 alias.js中,来看看 aliases 怎么定义的:
// scripts/alias.js
const path = require('path')

const resolve = p => path.resolve(__dirname, '../', p)

module.exports = {

vue: resolve('src/platforms/web/entry-runtime-with-compiler'),
compiler: resolve('src/compiler'),
core: resolve('src/core'),
shared: resolve('src/shared'),
web: resolve('src/platforms/web'),
weex: resolve('src/platforms/weex'),
server: resolve('src/server'),
sfc: resolve('src/sfc')
}
结合 resolve 函数和 alias.js 代码,可以看出,其实 alias 对象就是路径别名到真实路径的映射。
举个例子,比如 builds 对象中的 web-full-dev,它的 entry 值为 web/entry-runtime-with-compiler.js。调用 resolve 后会先提取出 web 这个别名,到 alias 对象去找,而 web 别名对应的真实路径是 ../src/platforms/web ,与文件名 entry-runtime-with-compiler.js 拼接后得到了文件的完整真实路径 ../src/platforms/web/entry-runtime-with-compiler.js。
由于 web-full-de 的 dest 的别名部分 dist 并没有出现在 alias 对象中,所以会走 resolve 的 else 逻辑,直接返回路径 ../dist/vue.js。
了解完 builds 对象后,我们知道在 getAllBuilds 函数中 builds 对象每个属性都执行了 genConfig 函数,来看看 genConfig 函数是怎么处理的:
// scripts/config.js
function genConfig (name) {

const opts = builds[name]
const config = {

input: opts.entry,
external: opts.external,
plugins: [
      flow(),
      alias(Object.assign({}, aliases, opts.alias))
    ].concat(opts.plugins || []),
output: {

file: opts.dest,
format: opts.format,
banner: opts.banner,
name: opts.moduleName || 'Vue'
    },
onwarn: (msg, warn) => {

if (!/Circular/.test(msg)) {

        warn(msg)
      }
    }
  }

// built-in vars
const vars = {

__WEEX__: !!opts.weex,
__WEEX_VERSION__: weexVersion,
__VERSION__: version
  }
// feature flags
Object.keys(featureFlags).forEach(key => {

    vars[`process.env.${key}`] = featureFlags[key]
  })
// build-specific env
if (opts.env) {

    vars['process.env.NODE_ENV'] = JSON.stringify(opts.env)
  }
  config.plugins.push(replace(vars))

if (opts.transpile !== false) {

    config.plugins.push(buble())
  }

Object.defineProperty(config, '_name', {

enumerable: false,
value: name
  })

return config
}
这个函数的功能是把 builds 里面的配置对象转换为一个 Rollup对应需要的配置对象。
以上就是 build.js 中 标号[1]处代码的执行流程。
然后来到 标号 [2] 处,代码如下:
// scripts/build.js
// filter builds via command line arg
if (process.argv[2]) {

const filters = process.argv[2].split(',')
  builds = builds.filter(b => {

return filters.some(f => b.output.file.indexOf(f) > -1 || b._name.indexOf(f) > -1)
  })
} else {

// filter out weex builds by default
  builds = builds.filter(b => {

return b.output.file.indexOf('weex') === -1
  })
}
这里的 process.argv,根据 Node.js 官网的定义,它会返回一个数组, 第一个元素是 process.execPath,第二个元素是正在执行的 js 文件的路径,其余元素将是任何其他命令行参数。
所以这里通过判断是否有额外命令行参数来判断命令是哪条,并对 builds 数组做对应的过滤处理,把不需要的 Rollup 配置项过滤掉。
比如说如果命令是 npm run build 说明是构建 web 版本,对应代码的 else 逻辑,就是把与 web 不相关的 weex 过滤掉。
builds 数组处理完后就调用 build 函数进行构建,来看看 build 函数的代码:
// scripts/build.js

function build (builds) {

let built = 0
const total = builds.length
const next = () => {

    buildEntry(builds[built]).then(() => {

      built++
if (built < total) {

        next()
      }
    }).catch(logError)
  }

  next()
}
build 函数其实就是让 builds 数组每一项都执行 buildEntry 这个函数,下面是 buildEntry 及相关函数的代码:
// scripts/build.js
function buildEntry (config) {

const output = config.output
const { file, banner } = output
const isProd = /(min|prod)\.js$/.test(file)
return rollup.rollup(config)
    .then(bundle => bundle.generate(output))
    .then(({ output: [{ code }] }) => {

if (isProd) {

const minified = (banner ? banner + '\n' : '') + terser.minify(code, {

toplevel: true,
output: {

ascii_only: true
          },
compress: {

pure_funcs: ['makeMap']
          }
        }).code
return write(file, minified, true)
      } else {

return write(file, code)
      }
    })
}
这里 buildEntry 函数调用了 rollup.rollup 进行编译,最终得到一个结果 output,然后判断这个 output 是否是生产版本来决定是否压缩,然后调用 write 函数。write 函数代码如下:
function write (dest, code, zip) {

return new Promise((resolve, reject) => {

function report (extra) {

console.log(blue(path.relative(process.cwd(), dest)) + ' ' + getSize(code) + (extra || ''))
      resolve()
    }

    fs.writeFile(dest, code, err => {

if (err) return reject(err)
if (zip) {

        zlib.gzip(code, (err, zipped) => {

if (err) return reject(err)
          report(' (gzipped: ' + getSize(zipped) + ')')
        })
      } else {

        report()
      }
    })
  })
}

function getSize (code) {

return (code.length / 1024).toFixed(2) + 'kb'
}

function logError (e) {

console.log(e)
}

function blue (str) {

return '\x1b[1m\x1b[34m' + str + '\x1b[39m\x1b[22m'
}
write 函数的作用就是调用 fs.writeFile 生成对应的 js 文件放在 dist 目录下。
以上就是通过 rollup 编译 Vue 的基本过程。
学习 axios 源码整体架构,打造属于自己的请求库
一年内的前端看不懂前端框架源码怎么办?
16个方面深入前端工程化开发技巧《上》


