WordVec和Bert词向量实践
目录
- 一、Word2Vec词向量
-
- 1.分词
-
- ①经典工具
- ②方法比较
- 2.训练
-
- ①使用Word2Vec
- ②使用gensim
- 二、Bert词向量
-
- 方法一:直接生成
-
- 1.下载Bert项目
- 2.下载Bert中文预训练模型
- 3.句向量特征提取
- 方法二:Bert-as-Service
-
- 1.安装Bert-as-Service
- 2.下载Bert中文预训练模型
- 3.开启服务
- 4.加载句向量
- 5.加载词向量
- 方法三:不开启servers服务生成句向量
一、Word2Vec词向量
1.分词
①经典工具
- 中科院NLPIR分词
- 北大pkuseg分词(不能直接词性标注)
- 清华THULAC分词
- HanLP分词
- 哈工大LTP分词
- jieba分词
②方法比较
- 八款中文词性标注工具使用及在线测试
- 中文分词工具比较 6大中文分词器测试(哈工大LTP、中科院计算所NLPIR、清华大学THULAC和jieba、FoolNLTK、HanLP)
2.训练
①使用Word2Vec
- 安装模块
pip install word2vec
- 构建词向量
import word2vec
word2vec.word2vec('corpusSegDone.txt', 'corpusWord2Vec.bin', size=300, verbose=True)
- 显示并使用词向量
②使用gensim
- 安装模块
pip install gensim
import logging
import multiprocessing
import os.path
import sys
import jieba

from gensim.models import Word2Vec
from gensim.models.word2vec import PathLineSentences

if __name__ == '__main__':

    # 日志信息输出
    program = os.path.basename(sys.argv[0])
    logger = logging.getLogger(program)
    logging.basicConfig(format='%(asctime)s: %(levelname)s: %(message)s')
    logging.root.setLevel(level=logging.INFO)
    logger.info("running %s" % ' '.join(sys.argv))

    # check and process input arguments
    # if len(sys.argv) < 4:
    #     print(globals()['__doc__'] % locals())
    #     sys.exit(1)
    # input_dir, outp1, outp2 = sys.argv[1:4]

    input_dir = 'segment'
    outp1 = 'baike.model'
    outp2 = 'word2vec_format'
    fileNames = os.listdir(input_dir)
    # 训练模型
    # 输入语料目录:PathLineSentences(input_dir)
    # embedding size:256 共现窗口大小:10 去除出现次数5以下的词,多线程运行,迭代10次
    model = Word2Vec(PathLineSentences(input_dir),
                     size=256, window=10, min_count=5,
                     workers=multiprocessing.cpu_count(), iter=10)
    model.save(outp1)
    model.wv.save_word2vec_format(outp2, binary=False)

    # 运行命令:输入训练文件目录 python word2vec_model.py data baike.model baike.vector
二、Bert词向量
- Bert本质上是一个两段式的NLP模型。第一个阶段:Pre-training,跟WordEmbedding类似,利用现有无标记的语料训练一个语言模型。第二个阶段:Fine-tuning,利用预训练好的语言模型,完成具体的NLP下游任务。
方法一:直接生成
1.下载Bert项目
- 项目地址:https://github.com/google-research/bert
extract_features.py——句向量生成文件
2.下载Bert中文预训练模型
- 模型地址:https://storage.googleapis.com/bert_models/2018_11_03/chinese_L-12_H-768_A-12.zip
1.TensorFlow 模型文件(bert_model.ckpt) :包含预训练模型的权重,模型文件有三个
2.字典文件(vocab.txt) :记录词条与 id 的映射关系
3.配置文件(bert_config.json ) :记录模型的超参数
- 或使用中文效果更好的哈工大版Bert:Chinese-BERT-wwm
3.句向量特征提取
- 传入参数
--input_file="./data/input.txt"
--output_file="./data/output.jsonl"
--vocab_file="./chinese_L-12_H-768_A-12/vocab.txt"
--bert_config_file="./chinese_L-12_H-768_A-12/bert_config.json"
--init_checkpoint="./chinese_L-12_H-768_A-12/bert_model.ckpt"
--layers=-2
--max_seq_length=128
--batch_size=8
layers: 是输出那些层的参数,-1就是最后一层,-2是倒数第二层,一次类推
max_seq_length: 是最大句子长度,根据自己的任务配置。如果你的GPU内存比较小,可以减小这个值,节省存储
- 输出
{
     "linex_index": 1, "features": [{
     "token": "[CLS]", "layers": [{
     "index": -1, "values": [-0.2844, 0.450896, 0.285645, 0.421341, 0.411053, ...
方法二:Bert-as-Service
- 详细介绍文章:https://zhuanlan.zhihu.com/p/50582974
- github地址:https://github.com/hanxiao/bert-as-service
1.安装Bert-as-Service
pip install bert-serving-server  # server
pip install bert-serving-client  # client, independent of `bert-serving-server`
2.下载Bert中文预训练模型
3.开启服务
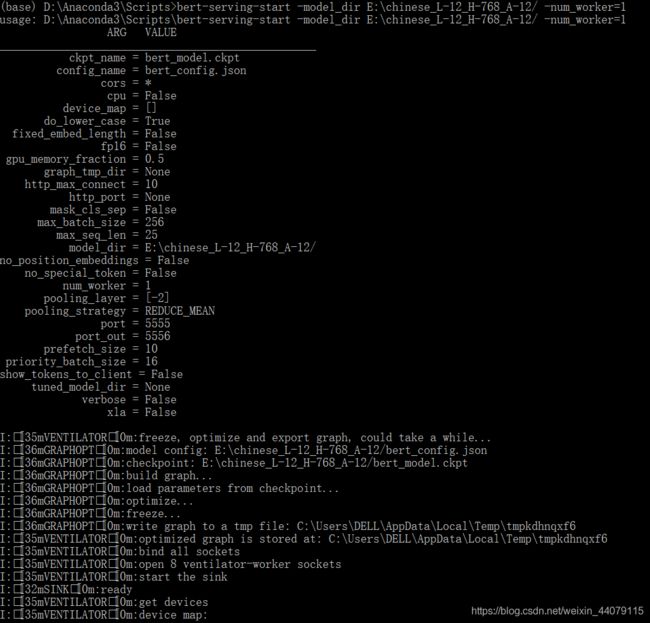
- cmd进入bert-serving-start.exe所在的文件夹,一般这个文件夹在python安装路径下的Scripts文件夹下
cd D:\Anaconda3\Scripts
bert-serving-start -model_dir E:/chinese_L-12_H-768_A-12 -num_worker=1
- 其中,-model_dir 是预训练模型的路径,-num_worker 是线程数,表示同时可以处理多少个并发请求
- 注意: 路径名中间千万不要有空格
- 当出现:ready and listening! 表明此时已经开启了bert-as-service,但是注意此时 cmd窗口不要关闭
4.加载句向量
- 转到pycharm,创建一个py文件然后输入如下代码,如果产生了向量矩阵则说明配置成功
from bert_serving.client import BertClient
bc = BertClient()
vec = bc.encode(["今天天气真好", "我感冒了"])
print(vec)
- 输出
- 或
from bert_serving.client import BertClient
import numpy as np
bc = BertClient()
result = []
value = 0.90
f = open('1.txt', 'r', encoding='utf-8-sig')
for line in f:
    result.append(line.strip('\n'))
Input = bc.encode(result)
print(Input)
- 这样可以将1.txt中的每一行文字转化成词向量表示的矩阵,但bert默认最大句子的长度为32,去除首尾CLS和SEP则只剩下30个字符,因此这里在处理文本时会出现只能处理一行30个字符的情况,超过30个部分则不会算进去。
5.加载词向量
- 启动服务时将参数 pooling_strategy 设置为 None
bert-serving-start -pooling_strategy NONE -model_dir E:/chinese_L-12_H-768_A-12/
- 此时返回的是语料中每个 token 对应 embedding 的矩阵
from bert_serving.client import BertClient
bc = BertClient()
vec = bc.encode(['hey you', 'whats up?'])
print('vec.shape:', vec.shape)
![]()
vec # [2, 25, 768]
vec[0] # [1, 25, 768], sentence embeddings forhey you
vec[0][0] # [1, 1, 768], word embedding for[CLS]
vec[0][1] # [1, 1, 768], word embedding forhey
vec[0][2] # [1, 1, 768], word embedding foryou
vec[0][3] # [1, 1, 768], word embedding for[SEP]
vec[0][4] # [1, 1, 768], word embedding for padding symbol
vec[0][25] # error, out of index!
方法三:不开启servers服务生成句向量
- github地址:https://github.com/terrifyzhao/bert-utils
- 代码:
from bert.extrac_feature import BertVector
bv = BertVector()
bv.encode(['今天天气不错'])
- 输出:
[[ 1.21984698e-01  7.84057677e-02 -1.06496774e-01 -3.25891018e-01
   4.94978607e-01 -4.69692767e-01  2.54333645e-01 -8.82656407e-03...

