Vue+SpringBoot(一)简单登录界面的实现
【SpringBoot总结】历史文章
SpringBoot总结(一)——第一个SpringBoot项目
SpringBoot总结(二)——Spring Boot的自动配置
SpringBoot总结(三)——SpringBoot的配置文件
SpringBoot总结(四)——@Value和@ConfigurationProperties的区别
SpringBoot总结(五)——@PropertySource注解与@ImportResource注解
SpringBoot总结(六)——SpringBoot配置文件占位符
SpringBoot总结(七)——Profile的使用
SpringBoot总结(八)——配置文件的加载位置
SpringBoot总结(九)——@Conditional注解与自动配置报告
SpringBoot总结(十)——SpringBoot+Mybatis实现数据库的CRUD(从创建到实现【超详细附代码】)
SpringBoot总结(十一)——SpringBoot的静态资源映射规则
SpringBoot总结(十二)——登录界面的实现
Vue+SpringBoot简单登录界面的实现
文章目录
- Vue+SpringBoot简单登录界面的实现
- 前言
- 一、创建Vue项目
-
- 1.1、安装node.js
- 二、页面实现
- 三、页面路由的配置
- 四、运行项目
- 五、后端的实现
-
- 5.1、创建实体
- 5.2、创建结果集
- 5.3、创建Controller
- 5.4、创建Service
- 5.5、创建数据库访问DAO
- 5.6、配置文件
- 5.7、解决跨域问题
- 六、运行效果
- 总结
前言
在[SpringBoot总结(十二)——登录界面的实现]这篇文章中使用了thymeleaf模板引擎,实现了登录操作;本篇文章将会用Vue+SpringBoot实现一个简单的Demo,包括登录界面、注册、以及修改密码的功能,(页面有点丑);后端使用了SpringBoot与Mybatis整合的方式操作数据库。开发工具及环境:HBuilderX、 IDEA、Maven、jdk1.8、Mysql、
一、创建Vue项目
Vue的脚手架是依赖于node.js,因此我们要先安装node.js。
1.1、安装node.js
从node.js官网node.js官网下载nodejs,安装过程很简单,一直Next即可。

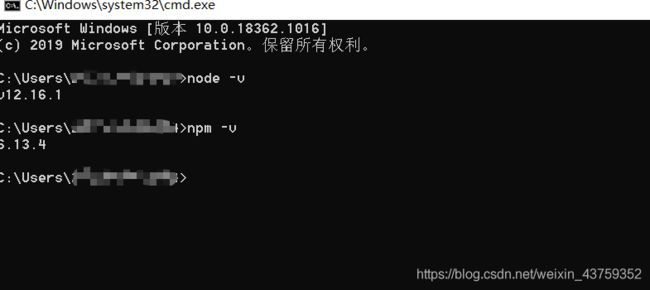
(1)安装完成后,用下面命令检查安装是否成功(出现版本号,则安装成功);同样的npm(node.js的包管理工具)会自动安装上。同样输入npm -v 查看版本。
node -v
npm -v
npm install -g cnpm --registry=https://registry.npm.taobao.org
(3)安装vue-cli(全局安装vue-cli)
cnpm install vue-cli -g
(4)初始化项目
vue init webpack +项目名
(5)启动项目
用cd命令进入项目目录,用npm install 安装项目所需依赖,npm run dev启动项目即可。
二、页面实现
登录界面
Login.vue
<template>
  <div >

    用户名:<input type="text" v-model="userName" placeholder="请输入用户名" />
    <br><br>
    密码:<input type="password" v-model="password" placeholder="请输入密码" />
    <br><br>
    <button @click="login()">登录</button>
    <br><br>

    <router-link to='/Register'>
      <span style="text-align:center;font-size: 14px;">账号注册</span>
    </router-link>

    <router-link to='/ChangePwd'>
      <span style="text-align:center;font-size: 14px; color:red;">修改密码</span>
    </router-link>

  </div>
</template>

<script>
  import Cookies from 'js-cookie';

  export default {

    name: 'Login',
    data() {

      return {

        userName: "",
        password: "",

      }
    },
    created() {


    },
    methods: {

      login: function() {

        let fd = new FormData();
        fd.append("userName", this.userName);
        fd.append("passwd", this.password);
        // console.log(fd.get("passwd"));

        let config = {

          headers: {

            'Content-Type': 'multipart/form-data'
          }
        }

        this.$axios.post("user/login", fd, config).then(res => {

          alert(res.data.msg)
          if (res.data.code === 200) {

            Cookies.set('userName', fd.get('userName'));
            this.$router.push({

              path: '/success'
            })
          } else {


          }
        }).catch(res => {

          alert(res.data.msg)
        })
      }

    }
  }
</script>
注册页面
Register.vue
<template>
  <div>
    用户名: <input id="userName" type="text" v-model="userName" placeholder="请输入用户名" />
    <br><br>
    密码: <input id="password" type="password" v-model="password" placeholder="请输入密码" />
    <br><br>
    确认密码: <input id="password2" type="password" v-model="password2" placeholder="请再次输入密码" />
    <br><br>
    <button @click="register()">注册</button>
    <br><br>

    <router-link to='/'>
    <span style="text-align:center;font-size: 14px; color:red;">现在登录</span>
    </router-link>

  </div>
</template>

<script>
  export default {

    name: 'Register',
    data() {

      return {

        userName: "",
        userName: "",
        password2: ""
      }
    },
    created() {


    },
    methods: {

      register: function() {

        let fd = new FormData();
        fd.append("userName", this.userName);
        fd.append("passwd", this.password);

        let config = {

          headers: {

            'Content-Type': 'multipart/form-data'
          }
        }

        if (this.password === this.password2) {

          this.$axios.post("user/register", fd, config).then(res => {

            alert(res.data.msg)
            if (res.data.code === 200) {

              // 回到登录界面
              this.$router.push({

                path: '/'
              })
            }
          }).catch(res => {

            alert(res.data.msg)
          })
        } else {

          alert("两次输入的密码不同")
        }

      }

    }
  }
</script>

<!-- 添加“scoped”属性以将CSS仅限于此组件 -->
<style scoped>

</style>
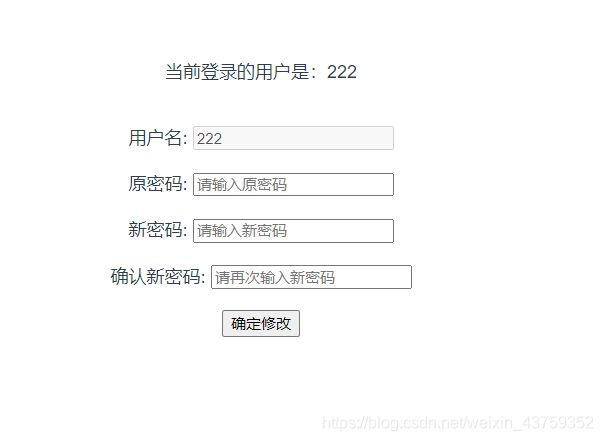
修改密码页面
ChangePwd.vue
<template>
  <div>
    <div class="top_div">当前登录的用户是:{
     {
      LoginuserName }}</div>
    <br><br>
    用户名: <input id="Username" type="text" v-model="LoginuserName" disabled="disabled" />
    <br><br>
    原密码: <input id="oldpassword" type="password" v-model="oldpassword" placeholder="请输入原密码" />
    <br><br>
    新密码: <input id="newpassword" type="password" v-model="newpassword" placeholder="请输入新密码" />
    <br><br>
    确认新密码: <input id="newpassword2" type="password" v-model="newpassword2" placeholder="请再次输入新密码" />
    <br><br>
    <button @click="ChangePwd()">确定修改</button>
  </div>
</template>

<script>
  import Cookies from 'js-cookie';
  export default {

    name: 'ChangePwd',
    data() {

      return {

        oldpassword: "",
        newpassword: "",
        newpassword2: ""
      }
    },
    created() {


    },
    computed: {

      LoginuserName() {

        return Cookies.get('userName');
      }
    },
    methods: {

      ChangePwd: function() {

        let fd = new FormData();
        fd.append("username", this.LoginuserName);
        fd.append("oldpassword", this.oldpassword);
        fd.append("newpassword", this.newpassword);

        let config = {

          headers: {

            'Content-Type': 'multipart/form-data'
          }
        }

        if (this.oldpassword.length === 0 || this.newpassword.length === 0 || this.newpassword2.length === 0) {

          alert("密码不能为空");
          return;
        } else if (this.newpassword === this.newpassword2) {

          this.$axios.post("user/changepwd", fd, config).then(res => {

            alert(res.data.msg)
            if (res.data.code === 200) {

              // 回到登录界面
              this.$router.push({

                path: '/'
              })
            }
          }).catch(res => {

            alert(res.data.msg);
          })
        } else {

          alert("两次输入的新密码不同")
        }

      }

    }
  }
</script>


<!-- 添加“scoped”属性以将CSS仅限于此组件 -->
<style scoped>

</style>
成功页面
Success.vue
<template>
   <div style="text-align:center">
    <h2>欢迎你 {
     {
      username }}登录成功!</h2>
     <img src="">
     <router-link to='/'>
       <span>返回登录界面</span>
     </router-link>
   </div>
</template>

<script>
  import Cookies from 'js-cookie';
  export default{

    computed:{

      username(){

        return Cookies.get('userName');
      }
    }
  }


</script>
<!-- 添加“scoped”属性以将CSS仅限于此组件 -->
<style scoped>


</style>
三、页面路由的配置
src\router\index.js
import Vue from 'vue'
import Router from 'vue-router'
import Register from '@/components/Register'
import Login from '@/components/Login'
import Success from '@/components/Success'
import ChangePwd from '@/components/ChangePwd'

Vue.use(Router)

export default new Router({

  // 修改为History路由模式
  mode: 'history',
  routes: [

    {

      path: '/',
      name: '登录',
      component: Login
    },
    {

      path: '/Register',
      name: '注册',
      component: Register
    },
    {

      path: '/Success',
      name: '登录成功',
      component: Success
    },
    {

      path: '/ChangePwd',
      name: '修改密码',
      component: ChangePwd
    },


  ]

})
将路由添加到程序入口,设置反向代理:修改main.js
// The Vue build version to load with the `import` command
// (runtime-only or standalone) has been set in webpack.base.conf with an alias.
import Vue from 'vue'
import App from './App'
import router from './router'
//import axios from 'axios'
var axios = require('axios')
axios.defaults.baseURL = 'http://localhost:8002';
Vue.prototype.HOST='/user'
Vue.prototype.$axios = axios
Vue.config.productionTip = false
/* eslint-disable no-new */
new Vue({
el: '#app',
router,
components: {
App }, //调用组件
template: '四、运行项目
五、后端的实现
关于详细的SpringBoot与Mybatis整合步骤:SpringBoot总结(十)——SpringBoot+Mybatis实现数据库的CRUD(从创建到实现【超详细附代码】)
这里只展示主要的实现代码。
5.1、创建实体
package com.example.demo.entity;
public class User {

    private Integer userId;
    private String userName;
    private String passwd;
    private String status;
    private String registTime;
	public Integer getUserId() {

		return userId;
	}
	public void setUserId(Integer userId) {

		this.userId = userId;
	}
	public String getUserName() {

		return userName;
	}
	public void setUserName(String userName) {

		this.userName = userName;
	}
	public String getPasswd() {

		return passwd;
	}
	public void setPasswd(String passwd) {

		this.passwd = passwd;
	}
	public String getStatus() {

		return status;
	}
	public void setStatus(String status) {

		this.status = status;
	}
	public String getRegistTime() {

		return registTime;
	}
	public void setRegistTime(String registTime) {

		this.registTime = registTime;
	}

	@Override
	public String toString() {

		return "User{" +
				"userId=" + userId +
				", userName='" + userName + '\'' +
				", passwd='" + passwd + '\'' +
				", status='" + status + '\'' +
				", registTime='" + registTime + '\'' +
				'}';
	}
}
5.2、创建结果集
package com.example.demo.core;
public class Result {

    private int code;
    private String msg;
    private Object data;
	public int getCode() {

		return code;
	}

	public void setCode(int code) {

		this.code = code;
	}
	public String getMsg() {

		return msg;
	}
	public void setMsg(String msg) {

		this.msg = msg;
	}
	public Object getData() {

		return data;
	}
	public void setData(Object data) {

		this.data = data;
	}

}
5.3、创建Controller
UserContrloller.java
@Api(description = "用户接口")
@RestController
@RequestMapping("/user")
@CrossOrigin
public class UserController {


    @Autowired
    private UserService userService;

    @ApiOperation(value = "用户注册", notes = "用户注册")
    @RequestMapping(value = "/register", method = RequestMethod.POST)
    @CrossOrigin
    public Result register(@RequestParam String userName,
                                        @RequestParam String passwd) {

        Result result = new Result();

        if (StringUtils.isEmpty(userName) || StringUtils.isEmpty(passwd)) {

            result.setMsg("用户名和密码不能为空");
            return result;
        }
        // 验证用户名是否已经注册
        User exsitUser = userService.selectByName(userName);
        if (exsitUser != null) {

            result.setMsg("该用户名已存在");

            return result;
        }
        SimpleDateFormat sdf = new SimpleDateFormat("yyyy-MM-dd HH:mm:ss");
        String format = sdf.format(new Date());
        User user = new User();
        user.setUserName(userName);
        user.setRegistTime(format);
        user.setStatus("1");
        user.setPasswd(Md5Util.MD5(passwd) );
        int count = userService.insert(user);
        System.out.println(count);
        if (count != 1) {

            result.setMsg("注册失败");

            return result;
        }
        result.setMsg("注册成功");
        result.setCode(200);
        return result;
    }

    @ApiOperation(value = "用户登录", notes = "用户登录")
    @RequestMapping(value = "/login", method = RequestMethod.POST)
    @CrossOrigin
    public Result login(@RequestParam String userName,
                        @RequestParam String passwd,
                        HttpSession session,
                        HttpServletResponse response) {

       Result result = new Result();
        User exsitUser = userService.selectByName(userName);
        if (exsitUser == null) {

            result.setMsg("该用户未注册");
            result.setCode(400);
            return result;
        }
        if (!exsitUser.getPasswd().equals(Md5Util.MD5(passwd))) {

            result.setMsg("密码错误,请重新输入");
            result.setCode(400);
            return result;
        }
        session.setAttribute("username", userName);
        result.setCode(200);
       result.setMsg("登录成功");
       return result;
    }

    @RequestMapping(value = "/changepwd", method = RequestMethod.POST)
    @CrossOrigin
    public Result   changepwd(@RequestParam String username,@RequestParam String oldpassword,@RequestParam String newpassword, HttpSession session) {

        Result result = new Result();
        User exsitUser = userService.selectByName(username);

        if (!Md5Util.MD5(oldpassword).equals(exsitUser.getPasswd())) {

            System.out.println(oldpassword);
            result.setMsg("原密码输入错误");
            return result;
        }else {

            int count = userService.updatePwd(username, Md5Util.MD5(newpassword));
            if (count>0) {

                result.setMsg("密码修改成功");
                result.setCode(200);
                return result;
            }
            result.setMsg("密码修改错误");
            return result;
        }
    }
}
5.4、创建Service
UserService.java
package com.example.demo.service;

import com.example.demo.entity.User;
import com.example.demo.mapper.UserMapper;
import org.springframework.beans.factory.annotation.Autowired;
import org.springframework.stereotype.Service;

@Service
public class UserService {


    @Autowired
    public UserMapper userMapper;

    public User selectByName(String userName){

        return userMapper.getUserByName(userName);
    }


    public int insert(User user){

        return userMapper.addUser(user);
    }


    public int updatePwd(String username,String newpassword) {

        return userMapper.updateUser(username,newpassword);
    }
}
5.5、创建数据库访问DAO
UserMapper.java
package com.example.demo.mapper;

import com.example.demo.entity.User;
import org.apache.ibatis.annotations.Insert;
import org.apache.ibatis.annotations.Mapper;
import org.apache.ibatis.annotations.Select;
import org.apache.ibatis.annotations.Update;

/**
 *
 */
@Mapper
public interface UserMapper {


    @Select("select * from t_user where userName = #{userName}")
    public User getUserByName(String userName);


    @Insert("insert into t_user (userName,passwd,status,registTime)  values (#{userName}, #{passwd}, #{status}, #{registTime})")
    public int addUser(User user);


    @Update("update  t_user set passwd = #{newpassword}  where userName = #{username}")
    public int updateUser(String username, String newpassword);


}
5.6、配置文件
server.port=8002

spring.datasource.url=jdbc:mysql://localhost:3306/vue?useUnicode=true&characterEncoding=UTF-8&serverTimezone=Asia/Shanghai
spring.datasource.username=root
spring.datasource.password=123
spring.datasource.driver-class-name=com.mysql.jdbc.Driver
5.7、解决跨域问题
这里使用的是用配置类的方式。也可以在后端相关Controller添加跨域注解@CrossOrigin实现。
package com.example.demo.config;
import org.springframework.web.servlet.config.annotation.CorsRegistry;
import org.springframework.web.servlet.config.annotation.WebMvcConfigurer;
@Configuration
public class CrosConfig implements WebMvcConfigurer {


    @Override
    public void addCorsMappings(CorsRegistry registry) {

        registry.addMapping("/**")
                .allowedOrigins("*")
                .allowedMethods("GET", "HEAD", "POST", "PUT", "DELETE", "OPTIONS")
                .allowCredentials(true)
                .maxAge(3600)
                .allowedHeaders("*");
    }
}
六、运行效果
总结
用一个十分简陋的界面,实现了登录、注册、修改密码的功能,希望能给予大家帮助。
下一篇:Vue+SpringBoot(二)实现后台获取数据在前台显示


