SpringBoot总结(十)——SpringBoot+Mybatis实现数据库的CRUD(从创建到实现【超详细附代码】)
一、创建项目。
这里创建的项目名是springboot-web3-mybatis。
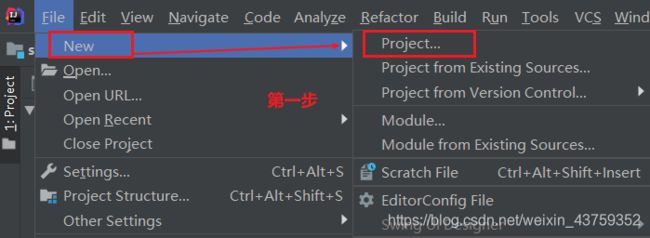
1、点击左上角的File——>Project
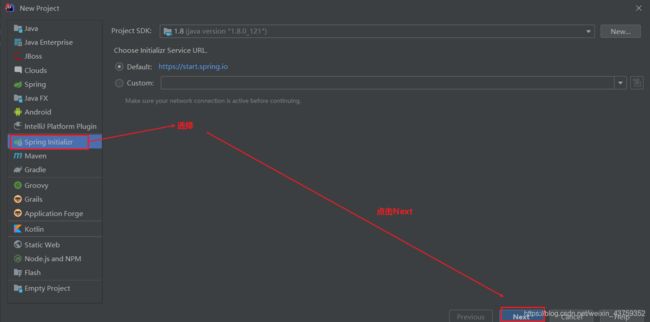
2、选择Spring Initializr 点击Next。
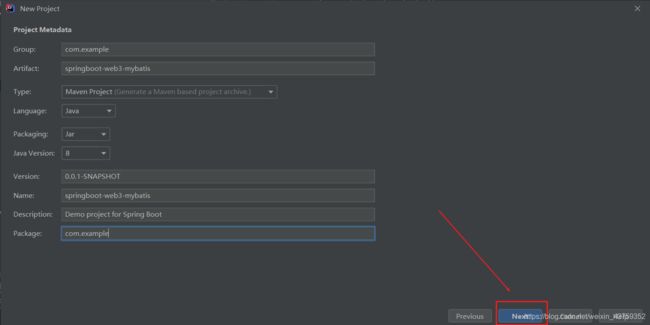
3、填写相应的项目名、工程名等,点击Next。
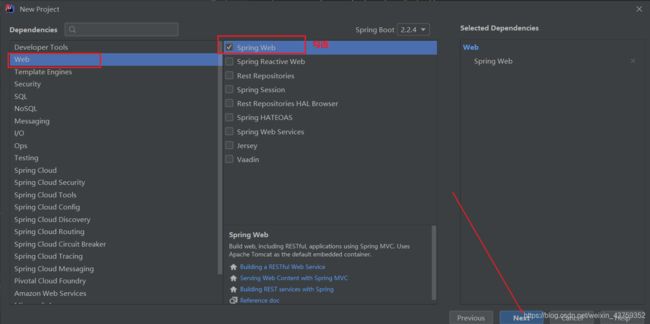
4、选择Web 勾选Spring Web 点击Next。
5、项目创建成功。
二、导入依赖。
 <!-- mybatis-spring-boot-starter 整合 -->
        <dependency>
            <groupId>org.mybatis.spring.boot</groupId>
            <artifactId>mybatis-spring-boot-starter</artifactId>
            <version>2.1.1</version>
        </dependency>
        <!--Springboot官方的-->
        <dependency>
            <groupId>org.springframework.boot</groupId>
            <artifactId>spring-boot-starter-jdbc</artifactId>
        </dependency>
        <!--lombok-->
        <dependency>
            <groupId>org.projectlombok</groupId>
            <artifactId>lombok</artifactId>
        </dependency>
        <!--thymeleaf模板-->
        <dependency>
            <groupId>org.thymeleaf</groupId>
            <artifactId>thymeleaf-spring5</artifactId>
        </dependency>
        <dependency>
            <groupId>org.thymeleaf.extras</groupId>
            <artifactId>thymeleaf-extras-java8time</artifactId>
        </dependency>
        <dependency>
            <groupId>mysql</groupId>
            <artifactId>mysql-connector-java</artifactId>
            <version>5.1.37</version>
            <scope>runtime</scope>
        </dependency>
三、创建页面、导入静态资源。
- 静态资源css、js、image等放在static文件夹下。
- html文件放在templates文件下。
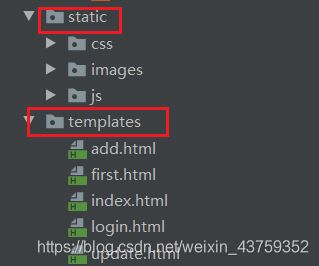
具体页面:
add.html ——增加学生信息的页面
first.html —— 首页
index.html ——页面展示页
login.html ——登录页面
update.html——更改信息页面
四、更改引用资源文件,让项目能够运行。
这里使用的是thymeleaf模板,具体详解可以参考以下文章thymeleaf使用
五、编写controller。
UserController.java
package com.example.Controller;
import com.example.mapper.UserMapper;
import com.example.pojo.User;
import org.springframework.beans.factory.annotation.Autowired;
import org.springframework.stereotype.Controller;
import org.springframework.ui.Model;
import org.springframework.util.StringUtils;
import org.springframework.web.bind.annotation.RequestMapping;
import org.springframework.web.bind.annotation.RequestParam;
import javax.servlet.http.HttpSession;
@Controller
public class UserController {

    @Autowired
    private UserMapper userMapper;
    @RequestMapping("/login")
        public String login(@RequestParam("username") String username, @RequestParam("password") String password, Model
        model, HttpSession session){

        User user=userMapper.selectUser(username, password);
            if(!StringUtils.isEmpty(user)){

                session.setAttribute("loginUser", username);
                return "/first";       //登录成功!
            }else{

                model.addAttribute("msg","用户名或密码错误");
                return "login";
            }
    }
}
StudentController.java
package com.example.Controller;
import com.example.mapper.StudentMapper;
import com.example.pojo.Student;
import org.springframework.beans.factory.annotation.Autowired;
import org.springframework.stereotype.Controller;
import org.springframework.ui.Model;
import org.springframework.web.bind.annotation.GetMapping;
import org.springframework.web.bind.annotation.PathVariable;
import org.springframework.web.bind.annotation.PostMapping;
import java.util.Collection;
@Controller
public class StudentController {

    @Autowired
    private StudentMapper studentMapper;
    //查找学生的所有信息
    @GetMapping("/queryStudentList")
    public String queryStudentList(Model model) {

        Collection<Student> studentList = studentMapper.queryStudentList();
        model.addAttribute("queryStudentList",studentList);
        return "index";
    }

    //增加学生信息
    @GetMapping("/add")
    public String toAddpage(){

        return "add";
    }
    @PostMapping("/addStudent")
    public String addStudent(Student student) {

        studentMapper.addStudent(student);
        return "redirect:/queryStudentList";
    }

    //更改学生信息
    @GetMapping("/update/{id}")
    public  String  toUpdatepage(@PathVariable("id")Integer id, Model model){

        //查出所有的数据
       Student  stu=studentMapper.queryStudentById(id);
        model.addAttribute("stud",stu);
        return "update";
    }
    @PostMapping("/updateStudent")
    public String updateUser(Student student) {

      studentMapper.updateStudent(student);
        return "redirect:/queryStudentList";
    }

    //根据学号id删除学生信息
    @GetMapping("/deleteStudent/{id}")
    public String deleteUser(@PathVariable("id")int id) {

       studentMapper.deleteStudent(id);
        return "redirect:/queryStudentList";
    }
}
六、编写mapper。
UserMapper.java
package com.example.mapper;

import com.example.pojo.User;
import org.apache.ibatis.annotations.Mapper;
import org.springframework.stereotype.Repository;

//这个注解表示了这是一个mybatis的mapper
@Mapper
@Repository
public interface UserMapper {

    User selectUser(String username, String password);
}
StudentMapper.java
package com.example.mapper;
import com.example.pojo.Student;
import org.apache.ibatis.annotations.Mapper;
import org.springframework.stereotype.Repository;
import java.util.List;
//这个注解表示了这是一个mybatis的mapper
@Mapper
@Repository
public interface StudentMapper {

    List<Student> queryStudentList();   //查找学生的所有信息

    Student queryStudentById(int id);    //根据学号id查找信息

    int addStudent(Student student);       //增加学生信息

    int updateStudent(Student student);     //更改学生信息

    int deleteStudent(int id);           //根据学号id删除学生信息

}
七、编写pojo类。
User.java
package com.example.pojo;
public class User {

    private int id;
    private String username;
    private String password;

    public User() {

    }

    public User(int id, String username, String password) {

        this.id = id;
        this.username = username;
        this.password = password;
    }

    public int getId() {

        return id;
    }

    public void setId(int id) {

        this.id = id;
    }

    public String getUsername() {

        return username;
    }

    public void setUsername(String username) {

        this.username = username;
    }

    public String getPassword() {

        return password;
    }

    public void setPassword(String password) {

        this.password = password;
    }

    @Override
    public String toString() {

        return "User{" +
                "id=" + id +
                ", username='" + username + '\'' +
                ", password='" + password + '\'' +
                '}';
    }
}
Student.java
package com.example.pojo;
import java.util.Date;
public class Student {

    private int id;
    private String name;
    private Integer sex;
    private int age;
    private String score;
    private  String address;
    private Date date;
    public Student() {

    }
    public Student(int id, String name, Integer sex, int age, String score, String address, Date date) {

        this.id = id;
        this.name = name;
        this.sex = sex;
        this.age = age;
        this.score = score;
        this.address = address;
        this.date = date;
    }

    public int getId() {

        return id;
    }

    public void setId(int id) {

        this.id = id;
    }

    public String getName() {

        return name;
    }

    public void setName(String name) {

        this.name = name;
    }

    public Integer getSex() {

        return sex;
    }

    public void setSex(Integer sex) {

        this.sex = sex;
    }

    public int getAge() {

        return age;
    }

    public void setAge(int age) {

        this.age = age;
    }

    public String getScore() {

        return score;
    }

    public void setScore(String score) {

        this.score = score;
    }

    public String getAddress() {

        return address;
    }

    public void setAddress(String address) {

        this.address = address;
    }

    public Date getDate() {

        return date;
    }

    public void setDate(Date date) {

        this.date = date;
    }

    @Override
    public String toString() {

        return "Student{" +
                "id=" + id +
                ", name='" + name + '\'' +
                ", sex=" + sex +
                ", age=" + age +
                ", score='" + score + '\'' +
                ", address='" + address + '\'' +
                ", date=" + date +
                '}';
    }
}
八、编写具体Mybatis的配置文件。
UserMapper.xml
<?xml version="1.0" encoding="UTF-8" ?>
<!DOCTYPE mapper
        PUBLIC "-//mybatis.org//DTD Mapper 3.0//EN"
        "http://mybatis.org/dtd/mybatis-3-mapper.dtd">
<mapper namespace="com.example.mapper.UserMapper">
    <select id="selectUser" resultType="User">
        select * from user  where username = #{
     username} and password=#{
     password}
    </select>

</mapper>
StudentMapper.xml
<?xml version="1.0" encoding="UTF-8" ?>
<!DOCTYPE mapper
        PUBLIC "-//mybatis.org//DTD Mapper 3.0//EN"
        "http://mybatis.org/dtd/mybatis-3-mapper.dtd">
<mapper namespace="com.example.mapper.StudentMapper">
    <select id="queryStudentList" resultType="Student">
        select * from student
    </select>
    <select id="queryStudentById" resultType="Student">
        select * from student where id = #{
     id}
    </select>

    <insert id="addStudent" parameterType="Student">
        insert into student (id,name,sex,age,score,address,date) values (#{
     id},#{
     name},#{
     sex},#{
     age},#{
     score},#{
     address},#{
     date})
    </insert>

    <update id="updateStudent" parameterType="Student">
        update student set name=#{
     name},sex=#{
     sex},age=#{
     age},score=#{
     score},address=#{
     address},date=#{
     date} where id = #{
     id}
    </update>

    <delete id="deleteStudent" parameterType="int">
        delete from student where id = #{
     id}
    </delete>
</mapper>
九、配置文件,applicatiuon.yml。
spring:
  datasource:
    driver-class-name: com.mysql.jdbc.Driver
    url: jdbc:mysql://localhost:3306/springboot_data?serverTimezone=UTC&useUnicode=true&characterEncoding=utf-8
    username: root
    password: 123

  thymeleaf:
    cache: false


    #    整合mybatis
mybatis:
  type-aliases-package: com.example.pojo
  mapper-locations: classpath:mybatis/mapper/*.xml
十、数据库,数据库springboot_data 表:user、student表。
十一、启动项目。
1、项目启动成功后、访问http://localhost:8080/默认的端口号。
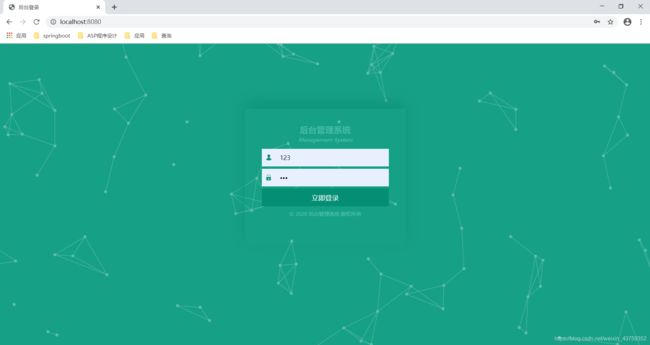
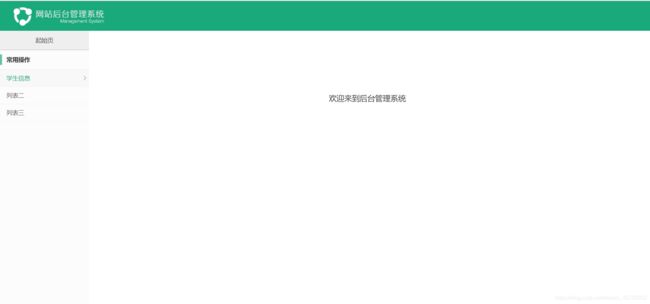
2、用户名123 密码123登录成功。进入首页。
3、点击学生信息。
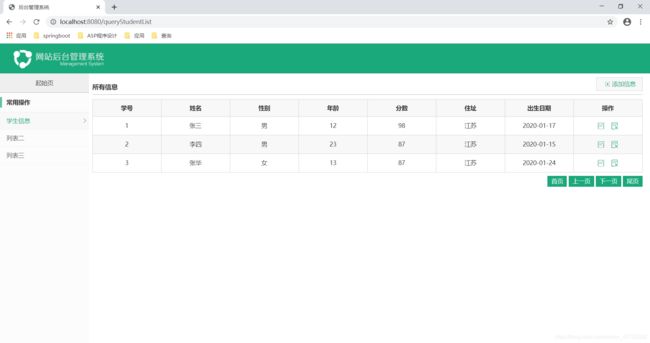
4、增加学生。
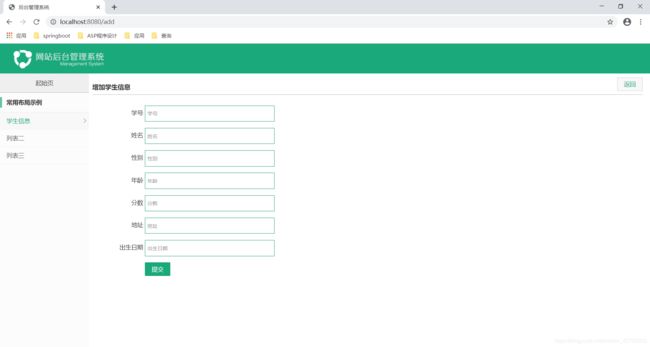
5、修改学生信息。
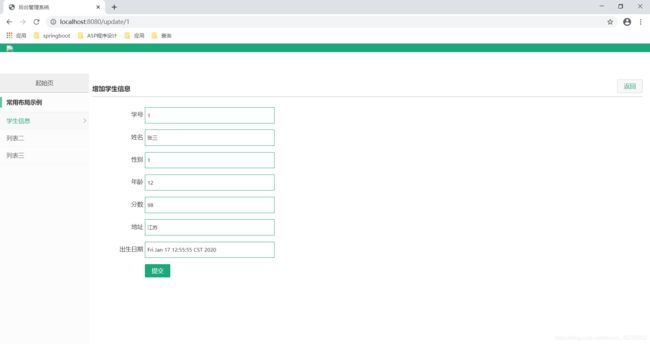
本篇是简单的实现数据库的操作,希望给大家一些帮助。
项目完整源码私信可以获取哦

