pytest 自动化测试框架(一)
本文节选自霍格沃玆测试学院内部教材,文末链接进阶学习.
简介
pytest 是一个成熟的全功能 Python 测试工具,可以帮助您编写更好的程序。它与 Python 自带的 Unittest 测试框架类似,但 pytest 使用起来更简洁和高效,并且兼容 unittest 框架。pytest 有以下实用特性:
- pytest 能够支持简单的单元测试和复杂的功能测试;
- pytest 本身支持单元测试;
- 可以结合 Requests 实现接口测试;
- 结合 Selenium、Appium 实现自动化功能测试;
- 使用 pytest 结合 Allure 集成到 Jenkins 中可以实现持续集成。工作中一般会使用持续集成来完成代码集成到主干分支之后的回归测试,通过自动化测试的手段来实现产品的快速迭代,同时还能保证产品的高质量。
- pytest 支持 315 种以上的插件;
参考网站:
http://plugincompat.herokuapp.com/
https://docs.pytest.org/
安装
pip install -U pytest
查看版本
pytest --version
用例的识别与运行
用例编写规范:
- 测试文件以 test_ 开头(以 _test 结尾也可以)
- 测试类以 Test 开头,并且不能带有 init 方法
- 测试函数以 test_ 开头
- 断言使用基本的 assert 即可
创建一个 python 文件,命名以 test_ 开头(或者以 test 结尾),创建测试方法以 test 开头,测试类需要以 Test 开头。创建文件名为 test_add.py 文件,代码如下:
#!/usr/bin/env python
# -*- coding: utf-8 -*-
def add(x, y):
    return x + y

def test_add():
    assert add(1, 10) == 11
    assert add(1, 1) == 2
    assert add(1, 99) == 100

class TestClass:
    def test_one(self):
        x = "this"
        assert "h" in x

    def test_two(self):
        x = "hello"
        assert hasattr(x, "check")
运行 test_add.py 文件,在命令行进入到这个文件所在的路径,可以直接使用 pytest 命令运行,pytest 会找当前目录以及递查找子目录下所有的 test_*.py 或 *_test.py 的文件,把其当作测试文件。在这些文件里,pytest 会收集符合编写规范的函数,类以及方法,当作测试用例并且执行,执行如下:
 $ pytest
....

test_add.py ..F  [100%]
....

self = <test_cases.test_add.TestClass object at 0x1091810d0>

    def test_two(self):
        x = "hello"
>       assert hasattr(x, "check")
E       AssertionError: assert False
E        +  where False = hasattr('hello', 'check')

test_add.py:18: AssertionError
===================================================== 1 failed, 2 passed in 0.05s
...
结果分析:执行结果中,F代表用例未通过(断言错误),.用例通过。如果有报错会有详细的错误信息。pytest 也支持 Unittest 模式的用例定义。
运行参数
pytest 带有很多参数,可以使用 pytest --help 来查看帮助文档,下面介绍几种常用的参数:
无参数
读取路径下所有符合规则的文件,类,方法,函数全部执行。使用方法如下:
pytest 或者 py.test
-v 参数
打印详细运行日志信息,一般在调试的时候加上这个参数,终端会打印出每条用例的详细日志信息,方便定位问题。使用方法如下:
pytest -v
-s 参数
带控制台输出结果,当你的代码里面有 print 输出语句,如果想在运行结果中打印 print 输出的代码,在运行的时候可以添加 -s 参数,一般在调试的时候使用,使用方法如下:
pytest -s
-k 参数
跳过运行某个或者某些用例。
应用场景:在测试场景中,开发人员有一部分功能代码还没实现,测试人员已经将测试用例设计出来,或者测试人员发现了某功能上的 bug 需要开发人员修复之后再测试这部分有缺陷的测试用例,可以将这部分测试用例在运行的时候暂时跳过,等功能实现或者 bug 解决之后再加入运行。
使用方法如下:
pytest -k '类名'
pytest -k '方法名'
pytest -k '类名 and not 方法名' //运行类里所有的方法,不包含某个方法
-x 参数
遇到用例失败立即停止运行。
应用场景:在回归测试过程中,假如一共有10条基础用例,当开发人员打完包提交测试的时候,需要先运行这10条基础用例,全部通过才能提交给测试人员正式测试。如果有一条用例失败,都将这个版本打回给开发人员。这时就可以添加 -x 参数,一旦发现有失败的用例即中止运行。
使用方法如下:
pytest -x
–maxfail 参数
用例失败个数达到阀值停止运行。具体用法:
pytest --maxfail=[num]
应用场景:在回归测试过程中,假如一共有10条基础用例,当开发人员打完包提交测试的时候,需要先运行这10条基础用例,全部通过才能提交给测试人员正式测试。如果运行过程中有 [num] 条用例失败,即中止运行,后面测试用例都放弃执行,直接退出。这时可以使用 --maxfail 参数。
使用方法如下:
-m 参数
将运行有 @pytest.mark.[标记名] 这个标记的测试用例。
应用场景:在自动化测试过程中可以将测试用例添加标签进行分类,比如登录功能、搜索功能、购物车功能、订单结算功能等,在运行的时候可以只运行某个功能的所有的测试用例,比如这个版本只想验证登录功能,那就在所有登录功能的测试用例方法上面加上装饰符 @pytest.mark.login ,运行的时候使用命令添加一个 -m 参数,例如执行 pytest -m login 命令就可以只执行登录功能这部分的测试用例。
使用方法如下:
pytest -m [标记名]
运行模式
pytest 提供了多种运行模式,让开发和调试更得心应手。指定某个模块,执行单独一个 pytest 模块。
应用场景:在编写测试用例的时候,经常会单独调试某个类,或者某个方法,这时可以使用 Pycharm 里面自带的调试方式,点击用例方法名前面的绿色按钮,也可以使用命令行的方式单独运行某个用例。
pytest 中可以使用 pytest 文件名.py 单独执行某个 Python 文件,也可以使用 pytest 文件名.py::类名 单独执行某个文件中的类,使用 pytest 文件名.py::类名::方法名 单独执行类中的某个方法。
使用方法如下:
pytest 文件名.py
pytest 文件名.py::类名
pytest 文件名.py::类名::方法名
在 Pycharm 中运行 pytest 用例
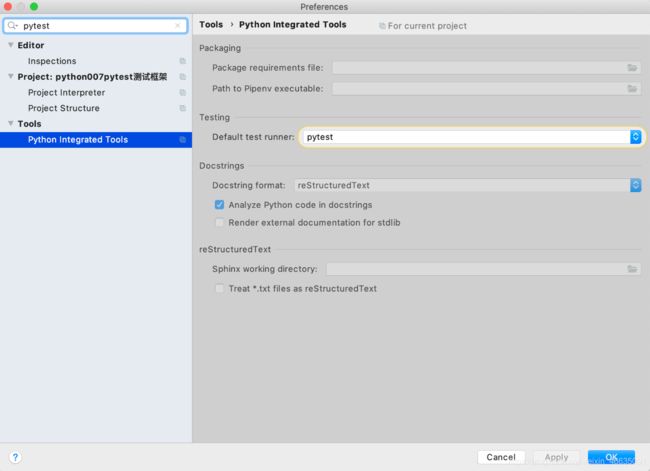
打开 Pycharm -> 设置 -> Tools -> Python Integrated Tools -> Testing: pytest
首先次设置成 pytest ,需要安装 pytest,可以直接按照这个页面的提示点击“fix”,也可以在 Project interpreter 里面添加 pytest 依赖包。安装完 pytest 之后,编写的符合规则的测试用例都能被识别出来并且标出一个绿色的执行按钮,点击这个按钮也能执行某个方法或者某个类。例如:

Pycharm 设置运行方式为 pytest 之后,用例左侧会显示绿色按钮,可以直接点击这个按钮来执行这条用例。
pytest 框架结构
与 unittest 类似,执行用例前后会执行 setup,teardown 来增加用例的前置和后置条件。pytest 框架中使用 setup,teardown 更灵活,按照用例运行级别可以分为以下几类:
- 模块级(setup_module/teardown_module)在模块始末调用
- 函数级(setup_function/teardown_function)在函数始末调用(在类外部)
- 类级(setup_class/teardown_class)在类始末调用(在类中)
- 方法级(setup_method/teardown_methond)在方法始末调用(在类中)
- 方法级(setup/teardown)在方法始末调用(在类中)
调用顺序:
setup_module > setup_class >setup_method > setup > teardown > teardown_method > teardown_class > teardown_module
验证上面的执行顺序,看下面的案例。
创建文件名为 test_run_step.py ,代码如下:
#!/usr/bin/env python
# -*- coding: utf-8 -*-

def setup_module():
    print("\nsetup_module,只执行一次,当有多个测试类的时候使用")

def teardown_module():
    print("\nteardown_module,只执行一次,当有多个测试类的时候使用")

class TestPytest1(object):

    @classmethod
    def setup_class(cls):
        print("\nsetup_class1,只执行一次")

    @classmethod
    def teardown_class(cls):
        print("\nteardown_class1,只执行一次")

    def setup_method(self):
        print("\nsetup_method1,每个测试方法都执行一次")

    def teardown_method(self):
        print("teardown_method1,每个测试方法都执行一次")

    def test_three(self):
        print("test_three,测试用例")

    def test_four(self):
        print("test_four,测试用例")

class TestPytest2(object):

    @classmethod
    def setup_class(cls):
        print("\nsetup_class2,只执行一次")

    @classmethod
    def teardown_class(cls):
        print("\nteardown_class2,只执行一次")

    def setup_method(self):
        print("\nsetup_method2,每个测试方法都执行一次")

    def teardown_method(self):
        print("teardown_method2,每个测试方法都执行一次")

    def test_two(self):
        print("test_two,测试用例")

    def test_one(self):
        print("test_one,测试用例")
上面的代码执行完成后,查看测试结果来分析执行测试顺序:
...
plugins: html-2.0.1, rerunfailures-8.0, xdist-1.31.0, ordering-0.6, forked-1.1.3, allure-pytest-2.8.11, metadata-1.8.0
collecting ... collected 4 items

test_run.py::TestPytest1::test_three
setup_module,只执行一次,当有多个测试类的时候使用
setup_class1,只执行一次
setup_method1,每个测试方法都执行一次  PASSED      [ 25%]test_three,测试用例
teardown_method1,每个测试方法都执行一次
test_run.py::TestPytest1::test_four
setup_method1,每个测试方法都执行一次    PASSED    [ 50%]test_four,测试用例
teardown_method1,每个测试方法都执行一次
teardown_class1,只执行一次
test_run.py::TestPytest2::test_two
setup_class2,只执行一次
setup_method2,每个测试方法都执行一次    PASSED    [ 75%]test_two,测试用例
teardown_method2,每个测试方法都执行一次
test_run.py::TestPytest2::test_one
setup_method2,每个测试方法都执行一次    PASSED     [100%]test_one,测试用例
teardown_method2,每个测试方法都执行一次
teardown_class2,只执行一次
teardown_module,只执行一次,当有多个测试类的时候使用
============================== 4 passed in 0.03s ===============================
...
从上面的结果可以看出 setup_module 和 teardown_module 在整个模块只执行一次,setup_class 和 teardown_class 在类里面只执行一次,setup_method 和 teardown_method 在每个方法前后都会调用。
控制用例的执行顺序
pytest 加载所有的测试用例是乱序的,如果想指定用例的顺序,可以使用 pytest-order 插件,指定用例的执行顺序只需要在测试用例的方法前面加上装饰器 @pytest.mark.run(order=[num]) 设置order的对应的num值,它就可以按照 num 的大小顺序来执行。
应用场景:有时运行测试用例需要指定它的顺序,比如有些场景需要先运行完登录,才能执行后续的流程比如购物流程,下单流程,这时就需要指定测试用例的顺序。通过 pytest-ordering 这个插件可以完成用例顺序的指定。
安装
pip install pytest-ordering
案例
创建一个测试文件“test_order.py”,代码如下:
import pytest

class TestPytest(object):

    @pytest.mark.run(order=-1)
    def test_two(self):
        print("test_two,测试用例")

    @pytest.mark.run(order=3)
    def test_one(self):
        print("test_one,测试用例")

    @pytest.mark.run(order=1)
    def test_three(self):
        print("\ntest_three,测试用例")
执行结果,如下查看执行顺序:
省略...
plugins: html-2.0.1, rerunfailures-8.0, xdist-1.31.0, \
ordering-0.6, forked-1.1.3, allure-pytest-2.8.11, metadata-1.8.0
collecting ... collected 3 items

test_order.py::TestPytest::test_three
test_order.py::TestPytest::test_one
test_order.py::TestPytest::test_two
省略...
从上面的执行结果可以看出,执行时以 order 的顺序执行:order=1,order=3,order=-1。
