router vue 动态改变url_2020年 vue常见面试问题总结(干货)!
1.什么是mvvm模式,谈谈你的理解?
- MVVM - Model View ViewModel,数据,视图,视图模型
- view 可以通过 事件绑定 的方式影响 model,
- model 可以通过 数据绑定 的形式影响到view,
- viewModel是把 model 和 view 连起来的桥梁,
- 这样就实现了数据的双向绑定。
2.vue构建初始化工程的步骤(vuecli3)?
终端执行:
- 1.npm install -g @vue/cli
- 2.vue create hello-world
- 3.cd hello-world
- 4.npm run serve
3.列举几个vuecli 项目目录中文件夹以及它们的作用?
|-- dist # 打包后文件夹
|-- public # 静态文件夹
| |-- favicon.ico
| |-- index.html #入口页面
|-- src # 源码目录
| |--assets # 模块资源
| |--components # vue组件
| |--views # 视图文件
| |--App.vue # 公共主组件
| |--main.js # 入口文件,加载公共组件
| |--router.js # 路由配置
|-- vue.config.js # 配置文件
|-- .gitignore
|-- babel.config.js # babel语法编译
|-- package.json # 项目基本信息 ,npm包管理
4.谈谈vuecli如何解决本地调用api的跨域问题?
以vuecli3为例,配置vue.config.js中的proxy
module.exports = {
 devServer: {
 proxy: {
   '/api': {
     target:'http://xxxxxx',//api地址
     changeOrigin:true, //是否跨域
     secure: false,  //https改为true
     pathRewrite: {'^/api' : ''},

    }
  },
       host: 'localhost', // can be overwritten by process.env.HOST
       port: 8080,
    },
    publicPath: './',
  }
5.vue.js 的优点?
- 渐进式框架,只关注视图层,mvvm架构模式实现数据的双向绑定;
- 数据驱动,组件系统;
- 体积小,速度快 。
6.vue.js双向绑定的原理?
利用Object.defineProperty()这个方法重新定义了对象获取属性值(get)和设置属性值(set)的操作来实现的。
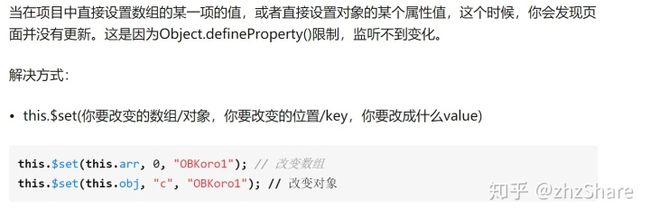
7.vue页面不重新渲染?
或者调用this.$forceUpdate()方法
8.请谈谈你对vue.js 生命周期的理解?
1.什么是vue.js的生命周期:Vue 实例有一个完整的生命周期,也就是从开始创建、初始化数据、编译模版、挂载 Dom -> 渲染、更新 -> 渲染、卸载等一系列过程,我们称这是 Vue 的生命周期。
2.各个生命周期的作用
9.在那个生命周期下调用异步请求?
mounted和created下都可以,本人建议是在created下调用。
10.为什么vue中组件里面的data是一个函数而不是一个对象呢?
因为组件可能被用来创建多个实例,如果data仍然是一个纯粹的对象,则所有的实例将共享引用一个数据对象,通过提供data函数,每次创建一个新的实例之后,我们能够调用data函数从而返回一个全新的副本数据对象,这样每一个实例都有自己私有的数据空间不会互相影响
11.vue-router路由模式有几种?请谈谈你对它们的理解?
常用的路由模式有hash和history;
最直观的区别是hash模式url上会携带有一个#,而history不携带;
- hash:
即地址栏URL中的#符号,它的特点在于hash值虽然出现在URL中,但不会被包括在HTTP请求中,对服务端完全没影响,因此改变hash值不会重新加载页面。
- history:
利用了HTML5 History interface 中新增的pushState() 和 replaceState()方法。
这两个方法应用于浏览器历史记录栈,提供了修改历史记录的功能,执行修改时虽然改变了URL但是不会立即的向服务端发起请求。
因此可以说
hash和history模式都属于浏览器自身的特性,vue-router只是利用了这两个特性来实现前端路由
但是在history模式下会出现刷新404的问题,对于这个问题,我们只需要在服务器配置nginx如果URL匹配不到任何静态资源,就跳转到默认的index.html
location /{
        root   /data/nginx/html;
        index  index.html index.htm;
        if (!-e $request_filename) {
            rewrite ^/(.*) /index.html last;
            break;
        }
    }
12.vue-router传参方式以及如何获取参数?
- 通过router.js文件中配置path的地方动态传递参数,'/detail/:id'
- 传递的时候 this.$router.push({name:"",params:{id:""}})
- 获取的时候 this.$route.params.id
- 或者用query的方式 this.$route.query.id
13.vue-router有几种常用的路由守卫,谈谈他们各自的作用?
守卫的种类:
- 全局前置守卫
const router = new VueRouter({ ... })

router.beforeEach((to, from, next) => {
  // ...
})- 全局后置守卫
router.afterEach((to, from) => {
  // ...
})- 全局解析守卫
在 2.5.0+ 你可以用 router.beforeResolve 注册一个全局守卫;
这和 router.beforeEach 类似;
区别是在导航被确认之前,同时在所有组件内守卫和异步路由组件被解析之后,解析守卫就被调用。- 路由独享守卫
const router = new VueRouter({
  routes: [
    {
      path: '/',
      component: Index,
      beforeEnter: (to, from, next) => {
        // ...
      }
    }
  ]
})
14.如何使用vuex?
第一步安装
npm install vuex -S第二步创建store.js
import Vue from 'vue';
import Vuex from 'vuex';
Vue.use(Vuex);
//创建Vuex实例对象
const store = new Vuex.Store({
    strict:debug,//在不是生产环境下都开启严格模式
    state:{
    },
    getters:{
    },
    mutations:{
    },
    actions:{
    }
})
export default store;
第三步注入vuex
import Vue from 'vue';
import App from './App.vue';
import store from './store';
const vm = new Vue({
    store:store,
    render: h => h(App)
}).$mount('#app')
15.vuex中有几个核心属性,分别是什么?
一共有5个核心属性,分别是:
- state 唯一数据源,Vue 实例中的 data 遵循相同的规则
- getters 可以认为是 store 的计算属性,就像计算属性一样,getter 的返回值会根据它的依赖被缓存起来,且只有当它的依赖值发生了改变才会被重新计算。Getter 会暴露为 store.getters 对象,你可以以属性的形式访问这些值。
const store = new Vuex.Store({
  state: {
    todos: [
      { id: 1, text: '...', done: true },
      { id: 2, text: '...', done: false }
    ]
  },
  getters: {
    doneTodos: state => {
      return state.todos.filter(todo => todo.done)
    }
  }
})

store.getters.doneTodos // -> [{ id: 1, text: '...', done: true }]- mutation 更改 Vuex 的 store 中的状态的唯一方法是提交 mutation,非常类似于事件,通过store.commit 方法触发
const store = new Vuex.Store({
  state: {
    count: 1
  },
  mutations: {
    increment (state) {
      // 变更状态
      state.count++
    }
  }
})

store.commit('increment')- action Action 类似于 mutation,不同在于Action 提交的是 mutation,而不是直接变更状态,Action 可以包含任意异步操作
const store = new Vuex.Store({
  state: {
    count: 0
  },
  mutations: {
    increment (state) {
      state.count++
    }
  },
  actions: {
    increment (context) {
      context.commit('increment')
    }
  }
})- module 由于使用单一状态树,应用的所有状态会集中到一个比较大的对象。当应用变得非常复杂时,store 对象就有可能变得相当臃肿。为了解决以上问题,Vuex 允许我们将 store 分割成模块(module)。
const moduleA = {
  state: () => ({ ... }),
  mutations: { ... },
  actions: { ... },
  getters: { ... }
}

const moduleB = {
  state: () => ({ ... }),
  mutations: { ... },
  actions: { ... }
}

const store = new Vuex.Store({
  modules: {
    a: moduleA,
    b: moduleB
  }
})

store.state.a // -> moduleA 的状态
store.state.b // -> moduleB 的状态
16.axios请求代码应该写在组件的methods中还是vuex的actions中
- 如果请求来的数据是不是要被其他组件公用,仅仅在请求的组件内使用,就不需要放入vuex 的state里。
- 如果被其他地方复用,这个很大几率上是需要的,如果需要,请将请求放入action里,方便复用。
17.从vuex中获取的数据能直接更改吗?
- 从vuex中取的数据,不能直接更改,需要浅拷贝对象之后更改,否则报错;
18.vuex中的数据在页面刷新后数据消失
- 用sessionstorage 或者 localstorage 存储数据
存储: sessionStorage.setItem( '名', JSON.stringify(值) )
使用: sessionStorage.getItem('名') ---得到的值为字符串类型,用JSON.parse()去引号;
19.mutation和action有什么区别
- action 提交的是 mutation,而不是直接变更状态。mutation可以直接变更状态
- action 可以包含任意异步操作。mutation只能是同步操作
- 提交方式不同
action 是用this.store.dispatch('ACTION_NAME',data)来提交。
mutation是用this.$store.commit('SET_NUMBER',10)来提交- 接收参数不同,mutation第一个参数是state,而action第一个参数是context,其包含了
{
    state,      // 等同于 `store.state`,若在模块中则为局部状态
    rootState,  // 等同于 `store.state`,只存在于模块中
    commit,     // 等同于 `store.commit`
    dispatch,   // 等同于 `store.dispatch`
    getters,    // 等同于 `store.getters`
    rootGetters // 等同于 `store.getters`,只存在于模块中
}
20.在v-model上怎么用Vuex中state的值?
需要通过computed计算属性来转换。
// ...
computed: {
    message: {
        get () {
            return this.$store.state.message
        },
        set (value) {
            this.$store.commit('updateMessage', value)
        }
    }
}
21.请谈谈watch,computed以及methods的区别?
- computed一般是一个依赖值衍生新的值,值结果会被缓存,除非依赖值发生变化才会重新计算( eg:购物车结算 )
- watch一般监听一个对象键值是需要观察的变量或者表达式,键值对应是回调函数,主要是负责监听某些特定数据的变化,从而进行某些具体的业务逻辑
- methods方法表示一个具体的操作,负责书写主要业务逻辑
22.说出几个vue.js常用指令?
- v-model
- v-for
- v-text
- v-html
- v-on
- v-bind
- v-if
- v-show
- v-cloak
- 畅所欲言...
23.v-show与v-if有什么区别?
- v-if
是真正的条件渲染,因为它会确保在切换过程中条件块内的事件监听器和子组件适当地被销毁和重建;也是惰性的:如果在初始渲染时条件为假,则什么也不做——直到条件第一次变为真时,才会开始渲染条件块。
- v-show
就简单得多——不管初始条件是什么,元素总是会被渲染,并且只是简单地基于 CSS 的 display 属性进行切换。
所以,v-if 适用于在运行时很少改变条件,不需要频繁切换条件的场景;v-show 则适用于需要非常频繁切换条件的场景。
24.class和style如何动态绑定?
1.Class 可以通过对象语法和数组语法进行动态绑定:
- 对象语法:
data: {
  isActive: true,
  hasError: false
}- 数组语法:
 data: {
   activeClass: 'active',
   errorClass: 'text-danger'
}
2.Class 可以通过对象语法和数组语法进行动态绑定:
- 对象语法:
 data: {
   activeColor: 'red',
   fontSize: 30
} - 数组语法:
 data: {
  styleColor: {
   color: 'red'
  },
  styleSize:{
   fontSize:'23px'
  }
}
25.vue事件修饰符以及各个的作用?
- .stop:阻止事件冒泡
- .native:绑定原生事件
- .once:事件只执行一次
- .self 将事件绑定在自身身上,相当于阻止事件冒泡
- .prevent:阻止默认事件
- .passive: 2.3.0 新增,滚动事件的默认行为 (即滚动行为) 将会立即触发,不能和.prevent 一起使用
26.vue中获取dom的方式?
在标签中加上ref='dom',然后在代码中this.$refs.dom这样就拿到了页面元素
例如:
让你好的颜色显示为红色:this.$refs.myBox.style.color = 'red
27.vue中$nextTick的使用?
- vue中DOM的异步更新,提前获取更新之后的DOM this.$nextTick(()=>{})
28.vue初始化页面会出现闪动问题,该如何解决?
- 在App.vue 根dom上面加一个v-cloak,css内加一个[v-cloak] { display: none;}
29.vue如何优化页面加载?
- UI组件库尽量使用cdn的方式引入;
- 配置路由懒加载的方式;
- 增加loading图,提升用户体验
30.v-on可以监听多个方法吗?
- 可以监听多个不同类型的方法,不可以监听同一种事件
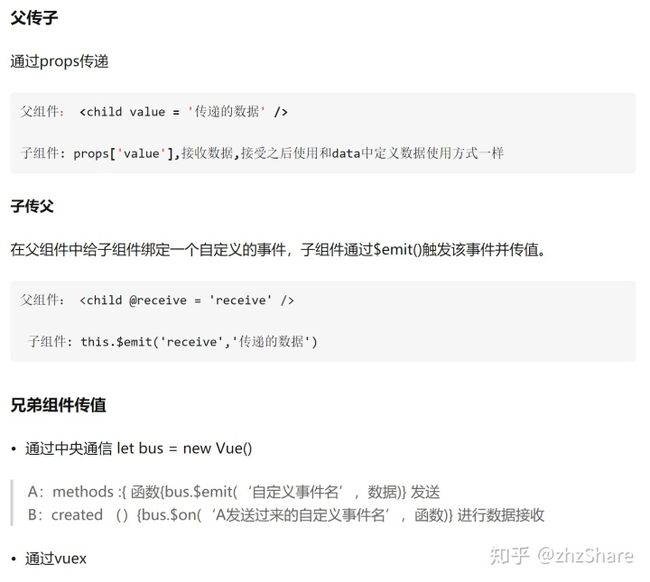
31.列举vue组件通信的几种方式?
32.父组件和子组件生命周期执行的顺序?
1.加载渲染过程:
父 beforeCreate -> 父 created -> 父 beforeMount -> 子 beforeCreate
-> 子 created -> 子 beforeMount -> 子 mounted -> 父 mounted 2.子组件更新过程:
父 beforeUpdate -> 子 beforeUpdate -> 子 updated -> 父 updated 3.父组件更新过程:
父 beforeUpdate -> 父 updated 4.销毁过程:
父 beforeDestroy -> 子 beforeDestroy -> 子 destroyed -> 父 destroyed
33.父组件可以监听到子组件的生命周期吗?
@hook:监听的生命周期 = "自定义事件名"
// Parent.vue
34.vue引入组件的步骤?
- 1.script 里面用import 引入组件
- 2.在export default里面用components:{}注册组件名字
- 3.在template中挂载组件
35.谈谈对keep-alive的了解?
- 一般是用来配合路由缓存组件
36.ES6常用知识点?
- https://www.cnblogs.com/ainyi/p/8537027.html
37.谈谈你对深浅拷贝的理解?
- 本质区别在于复制的是引用还是复制的实例
- 所谓浅拷贝是仅仅复制了引用,换句话说复制的变量和被复制的指向是同一个引用,彼此之间操作会互相影响
- 深拷贝是将原对象层级属性一一复制,相当于直接复制的实例,形成两个独立的对象,彼此操作不会互相影响,
- 实现深拷贝的方式一般有递归遍历
- es6 实现数组深拷贝的方法 :var arr2 = [...arr1] or var arr2 = Array.from(arr1)
- 或者是通过json对象来实现var newObj=JSON.parse(JSON.stringfy(obj))
38.说出你了解的前端安全问题以及解决方案?
- xss跨站脚本攻击
- CSRF跨站请求伪造
- sql注入
- https://blog.csdn.net/m0_48446542/article/details/108271860


