Soul网关源码分析-4期(周总结)
文章目录
- 插件链总结
-
- AbstractSoulPlugin
- SoulPluginChain
- 插件项目结构
- DividePlugin
-
- 负载均衡
- Hash
- RandomLoadBalance
- RoundRobinLoadBalance
- WebClientPlugin
- WebClientResponseClient
插件链总结
从一个类关系图说起:
其中两个最基本的插件类:
-
SoulPlugin: 定义插件职责的接口, 重点方法
execute()被上层调用,skip()方法可以使某些插件在某些请求中被跳过. -
AbstractPlugin: 抽象类, 实现接口的
execute(), 定义一套通用的执行流程, 并使用模板方法的设计模式, 提供doExecute()抽象方法供实现类写自己的逻辑.
AbstractSoulPlugin
具体分析下 AbstractSoulPlugin 类的 execute():
public Mono<Void> execute(final ServerWebExchange exchange, final SoulPluginChain chain) {

  String pluginName = named();
  final PluginData pluginData = BaseDataCache.getInstance().obtainPluginData(pluginName);
  // 如果 pluginData.getEnabled() 为 false, 会直接跳到下个插件, 仅有为数不多的插件会进入这个条件判断 (DividePlugin、AlibabaDubboPlugin等)
  if (pluginData != null && pluginData.getEnabled()) {

    // 获得插件上的所有选择器
    final Collection<SelectorData> selectors = BaseDataCache.getInstance().obtainSelectorData(pluginName);
    if (CollectionUtils.isEmpty(selectors)) {

      return CheckUtils.checkSelector(pluginName, exchange, chain);
    }
    // 检查上下文中的请求路径, 是否与选择器匹配, 并得到唯一一个匹配的选择器数据
    final SelectorData selectorData = matchSelector(exchange, selectors);
    if (Objects.isNull(selectorData)) {

      if (PluginEnum.WAF.getName().equals(pluginName)) {

        return doExecute(exchange, chain, null, null);
      }
      return CheckUtils.checkSelector(pluginName, exchange, chain);
    }
    if (selectorData.getLoged()) {

      log.info("{} selector success match , selector name :{}", pluginName, selectorData.getName());
    }
    // 获得选择器中的各个资源规则
    final List<RuleData> rules = BaseDataCache.getInstance().obtainRuleData(selectorData.getId());
    if (CollectionUtils.isEmpty(rules)) {

      if (PluginEnum.WAF.getName().equals(pluginName)) {

        return doExecute(exchange, chain, null, null);
      }
      return CheckUtils.checkRule(pluginName, exchange, chain);
    }
    RuleData rule;
    if (selectorData.getType() == SelectorTypeEnum.FULL_FLOW.getCode()) {

      rule = rules.get(rules.size() - 1);
    } else {

      // 匹配路径, 获得唯一一个规则
      rule = matchRule(exchange, rules);
    }
    if (Objects.isNull(rule)) {

      return CheckUtils.checkRule(pluginName, exchange, chain);
    }
    if (rule.getLoged()) {

      log.info("{} rule success match ,rule name :{}", pluginName, rule.getName());
    }
    // 执行子类的方法
    return doExecute(exchange, chain, selectorData, rule);
  }
  // 执行插件链上的下个插件
  return chain.execute(exchange);
}
通过代码分析, 可以得到一些结论:
- execute() 有两个逻辑: 一是请求路径与选择器和规则的匹配, 最终确认一个唯一规则, 并调用子类 doExecute(); 二是执行插件链上的下个插件.
- execute() 实际抽象了一套规则匹配逻辑, 供所有"转发类型"的插件使用的, 转发类型的插件目前我了解的有
DividePlugin(http请求) 和AlibabaDubboPlugin(dubbo请求), 其他类型的插件如果不重写 execute() 的方法, 会直接走入下个插件.
SoulPluginChain
这里还有个点, 就是插件链的形成与链式调用, 我们来分析下 SoulPluginChain 这块:
SoulPluginChain 接口同样定义了 execute() 方法供调用者使用, 它的唯一子类 DefaultSoulPluginChain 实现了链式调用:
public Mono<Void> execute(final ServerWebExchange exchange) {

  return Mono.defer(() -> {

    // plugins 中包含所有网关加载的插件
    if (this.index < plugins.size()) {

      // 每次调用execute()方法, index索引自增, 会调用到下一个插件
      SoulPlugin plugin = plugins.get(this.index++);
      // 结合上下文判断当前插件是否需要跳过
      Boolean skip = plugin.skip(exchange);
      if (skip) {

        return this.execute(exchange);
      } else {

        return plugin.execute(exchange, this);
      }
    } else {

      return Mono.empty();
    }
  });
}
看到这会很好奇 plugins 这个插件列表是哪里来的, 这里来解释下, DefaultSoulPluginChain 是 SoulWebHandler 的静态内部类, plugins就是 SoulWebHandle 中的一个属性:
public final class SoulWebHandler implements WebHandler {


    private List<SoulPlugin> plugins;

    public SoulWebHandler(final List<SoulPlugin> plugins) {

        this.plugins = plugins;
        // ...
    }

  	@Override
  	public Mono<Void> handle(@NonNull final ServerWebExchange exchange) {

				// ...
        return new DefaultSoulPluginChain(plugins).execute(exchange).subscribeOn(scheduler)
                .doOnSuccess(t -> startTimer.ifPresent(time -> MetricsTrackerFacade.getInstance().histogramObserveDuration(time)));
    }

  	private static class DefaultSoulPluginChain implements SoulPluginChain {

    }
}
那么 SoulWebHandler 中的 plugins 又是怎么来的呢? 可以继续追溯下它构造器被调用的地方:
@Configuration
public class SoulConfiguration {


    @Bean("webHandler")
    public SoulWebHandler soulWebHandler(final ObjectProvider<List<SoulPlugin>> plugins) {

        List<SoulPlugin> pluginList = plugins.getIfAvailable(Collections::emptyList);
        final List<SoulPlugin> soulPlugins = pluginList.stream()
                .sorted(Comparator.comparingInt(SoulPlugin::getOrder)).collect(Collectors.toList());
        soulPlugins.forEach(soulPlugin -> log.info("loader plugin:[{}] [{}]", soulPlugin.named(), soulPlugin.getClass().getName()));
        return new SoulWebHandler(soulPlugins);
    }
}
可以看到是通过 Spring Bean的方式开始写入 plugins, 即在容器启动时, 加载了所有插件. 这里入口参数使用 ObjectProvider 就是延迟加载所有 SoulPlugin 类型的 Bean(若一个都没有也不会报错), 并注入到 SoulWebHandler 中.
有个小坑需要注意 !
包括 DividePlugin、AlibabaDubboPlugin等等的所有插件, 都是由各自的 soul-spring-boot-starter-plugin-xx 项目中的 XXPluginConfiguration 配置类, 注册自己的插件成为 Bean, 类似下面示例:
@Configuration
public class DividePluginConfiguration {


    @Bean
    public SoulPlugin dividePlugin() {

        return new DividePlugin();
    }
}
所以在网关项目 soul-bootstrap 中, 如果需要用到某个插件, 不仅仅是在管理后台开启这个插件, 还需要确认下 soul-bootstrap 的 pom.xml 中是否存在相关插件所在的 soul-spring-boot-starter-plugin-xx 依赖, 比如:
<dependency>
  <groupId>org.dromaragroupId>
  <artifactId>soul-spring-boot-starter-plugin-divideartifactId>
  <version>${project.version}version>
dependency>
如果这里你给注释了或者根本不存在, 不要幻想在插件链上看到它…
插件项目结构
最后简单说下各个插件项目的功能:
-
首先是刚刚提到的spring bean启动类项目 , 列出个大概:
soul-spring-boot-starter-plugin-alibaba-dubbo
soul-spring-boot-starter-plugin-apache-dubbo
soul-spring-boot-starter-plugin-context-path
soul-spring-boot-starter-plugin-divide
soul-spring-boot-starter-plugin-global
soul-spring-boot-starter-plugin-httpclient
soul-spring-boot-starter-plugin-hystrix
soul-spring-boot-starter-plugin-monitor
soul-spring-boot-starter-plugin-ratelimiter
soul-spring-boot-starter-plugin-resilience4j
soul-spring-boot-starter-plugin-rewrite
soul-spring-boot-starter-plugin-sentinel
soul-spring-boot-starter-plugin-sign
soul-spring-boot-starter-plugin-sofa
soul-spring-boot-starter-plugin-springcloud
soul-spring-boot-starter-plugin-tars
soul-spring-boot-starter-plugin-waf
它们的主要作用刚刚也提到了, 将自身的 SoulPlugin子类注册为 spring bean, 以及注册 spring bean 给 AbstractSoulPlugin 中调用到的 PluginDataHandler 接口, 提供自身的实现子类, 比如 DividePluginDataHandler.
-
具体的插件类所在项目:
soul-plugin-alibaba-dubbo
soul-plugin-apache-dubbo
soul-plugin-api
soul-plugin-base
soul-plugin-context-path
soul-plugin-divide
soul-plugin-global
soul-plugin-httpclient
soul-plugin-hystrix
soul-plugin-monitor
soul-plugin-ratelimiter
soul-plugin-resilience4j
soul-plugin-rewrite
soul-plugin-sentinel
soul-plugin-sign
soul-plugin-sofa
soul-plugin-springcloud
soul-plugin-tars
soul-plugin-waf
拿
soul-plugin-divide项目举例, 刚刚提到的 DividePlugin 与 DividePluginDataHandler 就在其中. 并且项目里还有节点信息缓存管理器 UpstreamCacheManager, 负载均衡策略类 LoadBalance 等等.
DividePlugin
DividePlugin 的作用是匹配 Http 请求, 既然有 Http 请求自然也有转发下游和返回响应, 所以这里我们会分析到三个插件: DividePlugin、WebClientPlugin、WebClientResponsePlugin.
首先来看 DividePlugin 中 doExecute() 具体实现, 这里我只保留了核心点:
@Override
protected Mono<Void> doExecute(final ServerWebExchange exchange, final SoulPluginChain chain, final SelectorData selector, final RuleData rule) {

  final SoulContext soulContext = exchange.getAttribute(Constants.CONTEXT);
  final DivideRuleHandle ruleHandle = GsonUtils.getInstance().fromJson(rule.getHandle(), DivideRuleHandle.class);
  // 通过选择器ID, 在缓存中得到服务节点集群
  final List<DivideUpstream> upstreamList = UpstreamCacheManager.getInstance().findUpstreamListBySelectorId(selector.getId());
	// 调用负载均衡方法并传入策略类型, 得到唯一节点
  DivideUpstream divideUpstream = LoadBalanceUtils.selector(upstreamList, ruleHandle.getLoadBalance(), ip);
	// 获得节点的真实url, 并放入 exchange 上下文中
  String domain = buildDomain(divideUpstream);
  String realURL = buildRealURL(domain, soulContext, exchange);
  exchange.getAttributes().put(Constants.HTTP_URL, realURL);
  // 继续调用下个插件
  return chain.execute(exchange);
}
可以看到, 在执行完 DividePlugin 的 doExecute() 方法后, 我们的 ServerWebExchange 上下文中已经有了下游服务节点的真实路径, 接下来只要请求它就搞定. 不过先别着急, 这里的负载均衡策略也是关键点, 接着分析下.
负载均衡
Soul网关的负载均衡如何执行, 不止涉及到各种策略 (hasn、随机、轮询), 也涉及到 “权重分数” 这个概念, 管理后台的具体配置如下:

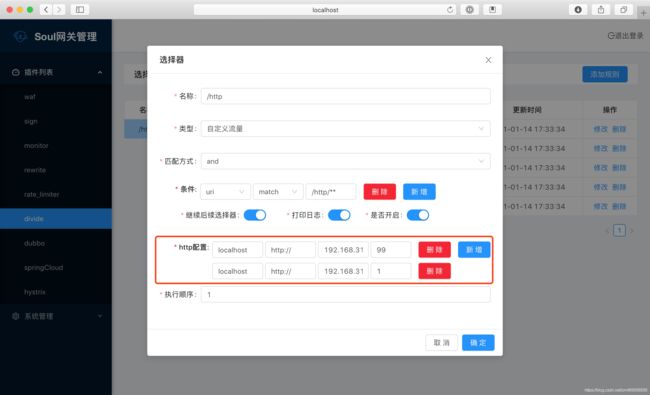

展示完后台配置, 我们具体看看各个策略的代码实现.
Hash
public DivideUpstream doSelect(final List<DivideUpstream> upstreamList, final String ip) {

  final ConcurrentSkipListMap<Long, DivideUpstream> treeMap = new ConcurrentSkipListMap<>();
  for (DivideUpstream address : upstreamList) {

    // 每个节点*VIRTUAL_NODE_NUM(默认5), 使hash更加均匀
    for (int i = 0; i < VIRTUAL_NODE_NUM; i++) {

      long addressHash = hash("SOUL-" + address.getUpstreamUrl() + "-HASH-" + i);
      treeMap.put(addressHash, address);
    }
  }
  // 从当前ip得到一个hash值, 并比对treemap(有序), 找到大于此hash值的位置
  long hash = hash(String.valueOf(ip));
  SortedMap<Long, DivideUpstream> lastRing = treeMap.tailMap(hash);
  // 只要服务节点不增减, 同一个ip得到的节点就可以保持不变
  if (!lastRing.isEmpty()) {

    return lastRing.get(lastRing.firstKey());
  }
  return treeMap.firstEntry().getValue();
}
hash算法的负载均衡, 并没有使用到 “权重分数” 这个概念, 也就是说针对每个未知的 IP 各个节点被访问的可能性是一致的. (当然, 同一个 IP 多次调用只会访问同个节点)
RandomLoadBalance
public DivideUpstream doSelect(final List<DivideUpstream> upstreamList, final String ip) {

  // 总个数
  int length = upstreamList.size();
  // 总权重
  int totalWeight = 0;
  // 权重是否都一样
  boolean sameWeight = true;
  for (int i = 0; i < length; i++) {

    int weight = upstreamList.get(i).getWeight();
    // 累计总权重
    totalWeight += weight;
    if (sameWeight && i > 0
        && weight != upstreamList.get(i - 1).getWeight()) {

      // 计算所有权重是否一样
      sameWeight = false;
    }
  }
  if (totalWeight > 0 && !sameWeight) {

    // 如果权重不相同且权重大于0则按总权重数随机
    int offset = RANDOM.nextInt(totalWeight);
    // 并确定随机值落在哪个片断上
    for (DivideUpstream divideUpstream : upstreamList) {

      offset -= divideUpstream.getWeight();
      if (offset < 0) {

        return divideUpstream;
      }
    }
  }
  // 如果权重相同或权重为0则均等随机
  return upstreamList.get(RANDOM.nextInt(length));
}
当使用 random 规则时, 所有节点权重分累加并随机得到数字, 看具体是落在那个节点的权重片段上; 如果分数0或者相同则很直接的随机集群长度即可.
RoundRobinLoadBalance
public DivideUpstream doSelect(final List<DivideUpstream> upstreamList, final String ip) {

  String key = upstreamList.get(0).getUpstreamUrl();
  ConcurrentMap<String, WeightedRoundRobin> map = methodWeightMap.get(key);
  if (map == null) {

    methodWeightMap.putIfAbsent(key, new ConcurrentHashMap<>(16));
    map = methodWeightMap.get(key);
  }
  int totalWeight = 0;
  long maxCurrent = Long.MIN_VALUE;
  long now = System.currentTimeMillis();
  DivideUpstream selectedInvoker = null;
  WeightedRoundRobin selectedWRR = null;
  for (DivideUpstream upstream : upstreamList) {

    String rKey = upstream.getUpstreamUrl();
    // 取出节点在缓存中的信息
    WeightedRoundRobin weightedRoundRobin = map.get(rKey);
    int weight = upstream.getWeight();
    if (weightedRoundRobin == null) {

      weightedRoundRobin = new WeightedRoundRobin();
      weightedRoundRobin.setWeight(weight);
      map.putIfAbsent(rKey, weightedRoundRobin);
    }
    if (weight != weightedRoundRobin.getWeight()) {

      weightedRoundRobin.setWeight(weight);
    }
    // 这里是第一个关键: 缓存中的分数增加当前节点权重分
    long cur = weightedRoundRobin.increaseCurrent();
    weightedRoundRobin.setLastUpdate(now);
    // 选择缓存分值高的节点
    if (cur > maxCurrent) {

      maxCurrent = cur;
      selectedInvoker = upstream;
      selectedWRR = weightedRoundRobin;
    }
    totalWeight += weight;
  }
  if (!updateLock.get() && upstreamList.size() != map.size() && updateLock.compareAndSet(false, true)) {

    try {

      ConcurrentMap<String, WeightedRoundRobin> newMap = new ConcurrentHashMap<>(map);
      newMap.entrySet().removeIf(item -> now - item.getValue().getLastUpdate() > recyclePeriod);
      methodWeightMap.put(key, newMap);
    } finally {

      updateLock.set(false);
    }
  }
  if (selectedInvoker != null) {

    // 这里是第二个关键: 缓存中的分数, 减少总节点权重分
    selectedWRR.sel(totalWeight);
    return selectedInvoker;
  }
  return upstreamList.get(0);
}
这个算法有点复杂, 我解释下核心计算权重的方面:
- 两个分值分别为2、100的节点进入, 缓存中保留它们各自, 分值从0开始
- 经过for循环后, 两个节点在缓存中的分值会以自身为基数增加, 假设后面步骤不进行, 则缓存第一次为2、100, 第二次为4、200, 依次类推.
- 关键的第三步, 选出节点缓存中分值最高的, 进行"处罚"措施, 减少所有节点的累计分值, 即102.
根据这个算法的步骤, 一直没有被选中的节点, 作为"成长奖励", 会持续以自身为基数自增; 而被选中的节点, 作为"惩罚", 会减少其他节点的权重分之和.
可以预见, 权重分小的节点, 要自增到很久之后, 才会等来自身被选中的一刻, 然而那一刻它被惩罚的力度会非常大, 导致它一朝回到解放前, 又要开始漫长的积蓄力量. 而权重分大的节点, 每次被选上的惩罚力度很小, 即使多次后分数太低没被选上, 他的奖励分数(自身)也特别高, 一次增加就远远超越其他节点.
WebClientPlugin
经过 DividePlugin 插件的调用后, 下游服务节点路径被确定, 接着就是 WebClientPlugin 插件发挥作用了. 它直接实现了 SoulPlugin 接口并实现了 execute() 方法 (仅保留核心代码):
public Mono<Void> execute(final ServerWebExchange exchange, final SoulPluginChain chain) {

  String urlPath = exchange.getAttribute(Constants.HTTP_URL);
  // 请求类型: Get请求orPost请求等
  HttpMethod method = HttpMethod.valueOf(exchange.getRequest().getMethodValue());
  // 构建一个请求对象空壳, 注入请求类型和URL
  WebClient.RequestBodySpec requestBodySpec = webClient.method(method).uri(urlPath);
  return handleRequestBody(requestBodySpec, exchange, timeout, chain);
}

private Mono<Void> handleRequestBody(final WebClient.RequestBodySpec requestBodySpec,
                                         final ServerWebExchange exchange,
                                         final long timeout,
                                         final SoulPluginChain chain) {

  return requestBodySpec.headers(httpHeaders -> {

    // 补充上下文中请求头... 后面也是补充些属性, 不赘述
    httpHeaders.addAll(exchange.getRequest().getHeaders());
    httpHeaders.remove(HttpHeaders.HOST);
  })
    .contentType(buildMediaType(exchange))
    .body(BodyInserters.fromDataBuffers(exchange.getRequest().getBody()))
    // 开始异步http调用下游服务
    .exchange()
    .doOnError(e -> log.error(e.getMessage()))
    .timeout(Duration.ofMillis(timeout))
    // 回调接收返回值
    .flatMap(e -> doNext(e, exchange, chain));
}

// 这里是异步的回调方法, 在另一个线程中工作
private Mono<Void> doNext(final ClientResponse res, final ServerWebExchange exchange, final SoulPluginChain chain) {

  // ...
  // 继续完成剩下的插件链调用
  return chain.execute(exchange);
}
简单看下 handleRequestBody() 中 exchange() 这个方法的实现, 这里有关键的Http调用:
class DefaultWebClient implements WebClient {

  @Override
  public Mono<ClientResponse> exchange() {

    ClientRequest request = (this.inserter != null ?
                             initRequestBuilder().body(this.inserter).build() :
                             initRequestBuilder().build());
    // 这里是关键调用, 会走到 spring-web-reactive
    return Mono.defer(() -> exchangeFunction.exchange(request)
                      .checkpoint("Request to " + this.httpMethod.name() + " " + this.uri + " [DefaultWebClient]")
                      .switchIfEmpty(NO_HTTP_CLIENT_RESPONSE_ERROR));
  }
}
总结下, 经过 WebClientPlugin 的处理会异步调用下游服务, 等待响应后再在另一个线程中, 执行后续的插件链调用.
WebClientResponseClient
最后插件链走到 WebClientResponseClient 这一环, 封装响应信息:
public Mono<Void> execute(final ServerWebExchange exchange, final SoulPluginChain chain) {

  return chain.execute(exchange).then(Mono.defer(() -> {

    // 获取上下文中存放的响应信息
    ServerHttpResponse response = exchange.getResponse();
    ClientResponse clientResponse = exchange.getAttribute(Constants.CLIENT_RESPONSE_ATTR);
    if (Objects.isNull(clientResponse)
        || response.getStatusCode() == HttpStatus.BAD_GATEWAY
        || response.getStatusCode() == HttpStatus.INTERNAL_SERVER_ERROR) {

      Object error = SoulResultWarp.error(SoulResultEnum.SERVICE_RESULT_ERROR.getCode(), SoulResultEnum.SERVICE_RESULT_ERROR.getMsg(), null);
      return WebFluxResultUtils.result(exchange, error);
    } else if (response.getStatusCode() == HttpStatus.GATEWAY_TIMEOUT) {

      Object error = SoulResultWarp.error(SoulResultEnum.SERVICE_TIMEOUT.getCode(), SoulResultEnum.SERVICE_TIMEOUT.getMsg(), null);
      return WebFluxResultUtils.result(exchange, error);
    }
    // 各种拼装
    response.setStatusCode(clientResponse.statusCode());
    response.getCookies().putAll(clientResponse.cookies());
    response.getHeaders().putAll(clientResponse.headers().asHttpHeaders());
    return response.writeWith(clientResponse.body(BodyExtractors.toDataBuffers()));
  }));
}