SpringCloud微服务搭建(Hoxton.SR8)(一)-- Eurka的注册与发现
这里我们不再介绍SpringCloud的知识,直接搭建框架。
这里我们选择将不同的模块创建在一个父项目下。
一、创建父项目
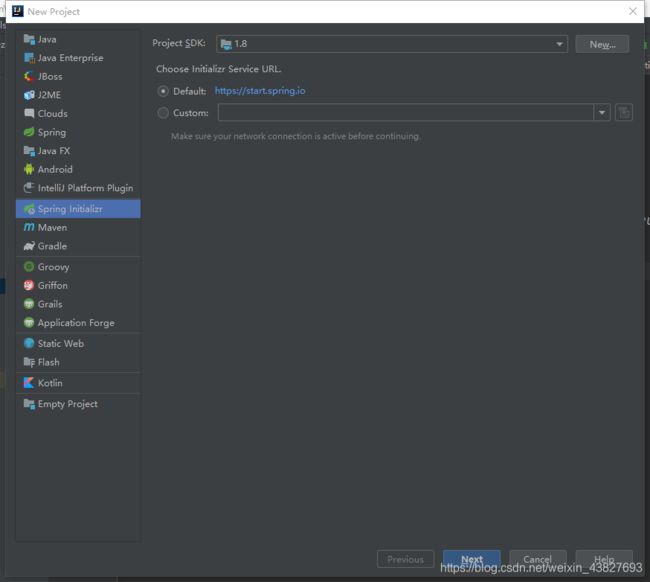
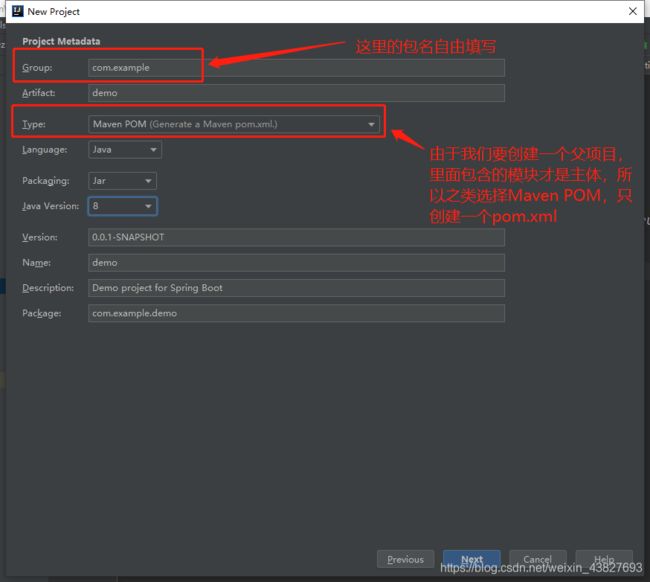
1、新建一个springboot项目
2、pom文件内容(依赖)
	<properties>
        <project.build.sourceEncoding>UTF-8project.build.sourceEncoding>
        <project.reporting.outputEncoding>UTF-8project.reporting.outputEncoding>
        <java.version>1.8java.version>
        <spring-cloud.version>Hoxton.SR8spring-cloud.version>
        <skipTests>trueskipTests>
    properties>

    <dependencyManagement>
        <dependencies>
            <dependency>
                <groupId>org.springframework.cloudgroupId>
                <artifactId>spring-cloud-dependenciesartifactId>
                <version>${spring-cloud.version}version>
                <type>pomtype>
                <scope>importscope>
            dependency>
        dependencies>
    dependencyManagement>
二、创建Eureka注册中心
1、在父项目下新建一个模块
2、引用的依赖
	<parent>
        <groupId>com.hezhangroupId>
        <artifactId>springcloudartifactId>
        <version>0.0.1-SNAPSHOTversion>
    parent>

    <artifactId>serverartifactId>
    <version>0.0.1-SNAPSHOTversion>
    <name>servername>
    <description>Demo project for Spring Clouddescription>

    <properties>
        <java.version>1.8java.version>
    properties>

    <dependencies>
        <dependency>
            <groupId>org.springframework.cloudgroupId>
            <artifactId>spring-cloud-starter-netflix-eureka-serverartifactId>
        dependency>

        <dependency>
            <groupId>org.springframework.bootgroupId>
            <artifactId>spring-boot-starter-testartifactId>
            <scope>testscope>
        dependency>

        <dependency>
            <groupId>org.springframework.bootgroupId>
            <artifactId>spring-boot-starterartifactId>
        dependency>
    dependencies>
3、配置启动类
4、配置文件
server:
  port: 8761
eureka:
  client:
    # 让自己不需要注册在eureka上,表明自己是一个eureka server
#    register-with-eureka: false
    fetch-registry: false
    service-url:
      defaultZone: http://localhost:8761/eureka/
  server:
    enable-self-preservation: false
  instance:
    prefer-ip-address: true
spring:
  application:
    name: eureka-server
5、启动
运行这个子模块,然后在浏览器输入:http://localhost:8761

三、创建Eureka客户端
1、在父项目下创建一个子模块
这步和上面的Eureka注册中心创建的子模块一样。
2、引用的依赖
这里由于都是子模块,所以pom.xml中,parent都是父项目的包,这点儿和上面的注册中心的那个子模块一致
		<dependency>
            <groupId>org.springframework.cloudgroupId>
            <artifactId>spring-cloud-starter-netflix-eureka-clientartifactId>
        dependency>
这里引入spring-cloud-starter-netflix-eureka-client依赖,表明是一个Eureka客户端。并且,启动了上不需要再添加 @EnableEurekaClient 注解,运行时自动会作为客户端注册到Eureka上面。
3、配置文件
server:
  port: 9092
spring:
  application:
    name: client

eureka:
  client:
    service-url:
      defaultZone: http://localhost:8761/eureka/
  instance:
    prefer-ip-address: true
    ip-address: 127.0.0.1
然后启动此模块,刷新上面打开的注册中心的页面,就会发现对应的服务已经注册上去了。
四、高可用的Eureka注册中心
上面说的注册中心,我们只有一个节点,假如这个注册中心服务挂掉了,那么在上面注册的服务都会受到影响,所以这里我们可以建一个高可用的注册中心集群。
这里我们依然还用上面创建的注册中心的模块,只不过添加三个配置文件

我们这里选择使用三个节点组成一个集群
其中peer1中的配置文件为:
server:
  port: 8761
eureka:
  client:
    # 让自己不需要注册在eureka上,表明自己是一个eureka server
#    register-with-eureka: false
    fetch-registry: false
    service-url:
      # 这里的地址是另外两个注册中心的地址
      defaultZone: http://localhost:8861/eureka/,http://localhost:8961/eureka/
  server:
    enable-self-preservation: false
  instance:
    prefer-ip-address: true
spring:
  application:
    name: eureka-server
peer2的配置文件:
server:
  port: 8861
eureka:
  client:
#    register-with-eureka: false
    fetch-registry: false
    service-url:
      defaultZone: http://localhost:8761/eureka/,http://localhost:8961/eureka/
  server:
    enable-self-preservation: false
  instance:
    prefer-ip-address: true
spring:
  application:
    name: eureka-server
peer3配置文件:
server:
  port: 8961
eureka:
  client:
#    register-with-eureka: false
    fetch-registry: false
    service-url:
      defaultZone: http://localhost:8761/eureka/,http://localhost:8861/eureka/
  server:
    enable-self-preservation: false
  instance:
    prefer-ip-address: true
spring:
  application:
    name: eureka-server
我们发现这三个配置文件只有 defaultZone 这个配置的值不同,这个配置的值是除自己之外的其他几个注册中心的地址。
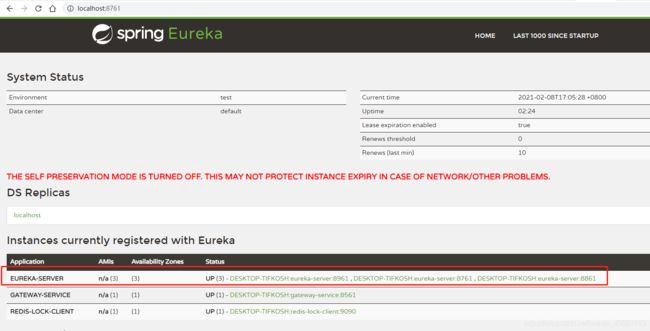
然后分别运行这三个配置文件的项目,启动成功后,随便打开其中一个注册中心的地址,我们可以看到:

这几个配置中心都已经注册上来了,并且互相之间可以共享注册数据,客户端注册时,只需要注册到其中的一个配置中心上,就会同步到其余的配置中心里。


