git使用——15.搭建自己的gitlab服务器来存放我们的git项目
文章目录
- 一、创建一台虚拟机
- 二、开始安装gitlab
- 三、安装目录代码翻译如下(先看一下四再来看三,三纯粹就是个翻译,看看就好,四提供了更为高速的下载)
-
- 1.安装和配置必要的依赖项
- 2.添加GitLab软件包存储库并安装软件包
- 3.浏览到主机名并登录
- 4.设置您的通信首选项
- 5.建议的后续步骤
- 四、为了加快速度我们需要换一个网站来处理才好,不然下载到一半你断网或者连接失败,那你得去恢复快照了。
-
- 最后做一个对比:
- 五、gitlab服务进行初始化操作及测试是否成功
-
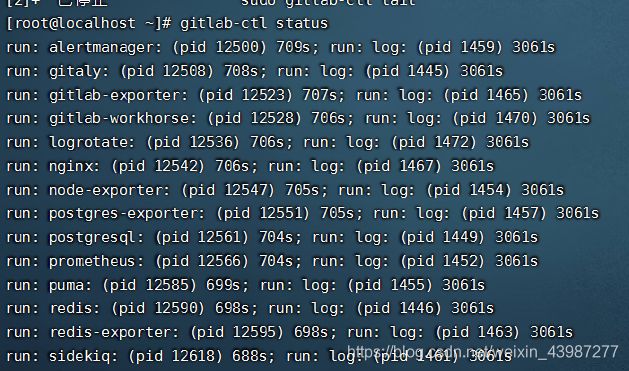
- 查看gitlab启动情况
- gitlab的一些指令
- 访问测试结果
- 错误总结(个人觉得启动后可能要等待一段时间才行。之前一直502错误,后面改了不少东西然后还不行,之后等一会就可以了应该要重启一下)
一、创建一台虚拟机
https://blog.csdn.net/weixin_43987277/article/details/113725779
二、开始安装gitlab
先来看看gitlab的官网:
https://about.gitlab.com/
这里要选下载那个

选中之后向下滚动可以找到不同虚拟机需要的版本,在这里要根据你虚拟机具体安装的服务器来进行选择,点击一下自己的服务器

点击一下之后得到一下内容

三、安装目录代码翻译如下(先看一下四再来看三,三纯粹就是个翻译,看看就好,四提供了更为高速的下载)
1.安装和配置必要的依赖项
在CentOS 7(和RedHat / Oracle / Scientific Linux 7)上,以下命令还将在系统防火墙中打开HTTP,HTTPS和SSH访问。
sudo yum install -y curl policycoreutils-python openssh-server perl
sudo systemctl enable sshd
sudo systemctl start sshd

sudo firewall-cmd --permanent --add-service=http
sudo firewall-cmd --permanent --add-service=https
sudo systemctl reload firewalld
这里这一步是非必须的。(翻译过来是这样的:接下来,安装Postfix发送通知电子邮件。如果要使用其他解决方案发送电子邮件,请跳过此步骤, 并在安装GitLab之后配置外部SMTP服务器。)
在这里插入代码片
在安装Postfix的过程中,可能会出现一个配置屏幕。选择“ Internet网站”,然后按Enter。使用服务器的外部DNS作为“邮件名”,然后按Enter。如果出现其他屏幕,请继续按Enter接受默认设置。
2.添加GitLab软件包存储库并安装软件包
添加GitLab软件包存储库。
curl https://packages.gitlab.com/install/repositories/gitlab/gitlab-ee/script.rpm.sh | sudo bash
接下来,安装GitLab软件包。确保已正确设置DNS,然后更改https://gitlab.example.com为要访问GitLab实例的URL。安装将自动配置并在该URL上启动GitLab。
对于https://URL,GitLab将使用Let’s Encrypt自动请求证书,这需要入站HTTP访问和有效的主机名。您也可以使用自己的证书或只使用http://。
sudo EXTERNAL_URL="https://gitlab.example.com" yum install -y gitlab-ee
3.浏览到主机名并登录
首次访问时,您将被重定向到密码重置屏幕。提供初始管理员帐户的密码,您将被重定向回登录屏幕。使用默认帐户的用户名root登录。
有关安装和配置的详细说明,请参见我们的文档。
4.设置您的通信首选项
请访问我们的 电子邮件订阅首选项中心, 以告知我们何时与您联系。我们有明确的电子邮件接收政策,因此您可以完全控制我们向您发送电子邮件的时间和频率。
我们每月两次发送您需要了解的GitLab新闻,包括新功能,集成,文档以及我们开发团队的幕后故事。有关与错误和系统性能有关的重要安全更新,请注册我们的专用安全时事通讯。
重要说明:如果您不选择加入安全时事通讯,则不会收到安全警报。
5.建议的后续步骤
完成安装后,请考虑建议的后续步骤,包括身份验证选项和注册限制。
四、为了加快速度我们需要换一个网站来处理才好,不然下载到一半你断网或者连接失败,那你得去恢复快照了。
有两个不同的gitlab,ee和ce,ee是企业版的,ce是社区版的。显而易见,企业版要付费,社区版不用付费,所以呢,你还是老老实实的下载社区版吧。
先说一句,你别傻傻跟着官网给你的安装步骤走,跟着走的话,你访问的是外国网站,你觉得下载速度会快到什么地步呢?你还是先在本地先下载好吧,不然的话中途下载失败了,你可是需要恢复快照的。
首先,下载地址如下:
https://packages.gitlab.com/gitlab/gitlab-ce
这里由于是centos7系统,所以我选这个el/7的,就随便选第一个好了。(ps:下面是我下载好的云盘链接:
链接:https://pan.baidu.com/s/1BLbp2aTH4vwKp4J9la1dtw
提取码:0sld
复制这段内容后打开百度网盘手机App,操作更方便哦)

这里你上传到那个文件夹进行安装好呢?为什么要在opt文件夹呢?因为opt文件夹是主机额外安装软件所摆放的目录。默认是空的。 一般安装软件的时候,可以自己指定安装到这个目录下,便于查找和管理。
cd /opt/
![]()
文件上传后,加入脚本
vi installGitlab.sh
![]()
脚本内容如下:(修改原网站脚本内容如下:在这里倒数第二行是我加入的脚本,先在本地装一手好了,倒数第一行和第三行的ee要改为ce)
sudo yum install -y curl policycoreutils-python openssh-server perl
sudo systemctl enable sshd
sudo systemctl start sshd

sudo firewall-cmd --permanent --add-service=http
sudo firewall-cmd --permanent --add-service=https
sudo systemctl reload firewalld

sudo yum install postfix
sudo systemctl enable postfix
sudo systemctl start postfix

curl https://packages.gitlab.com/install/repositories/gitlab/gitlab-ce/script.rpm.sh | sudo bash
sudo rpm -ivh /opt/gitlab-ce-13.8.3-ce.0.el7.x86_64.rpm
sudo EXTERNAL_URL="https://gitlab.example.com" yum install -y gitlab-ce
修改文件权限
chmod 755 installGitlab.sh
![]()
为了保险起见,最好还是先存个快照以为出现什么问题
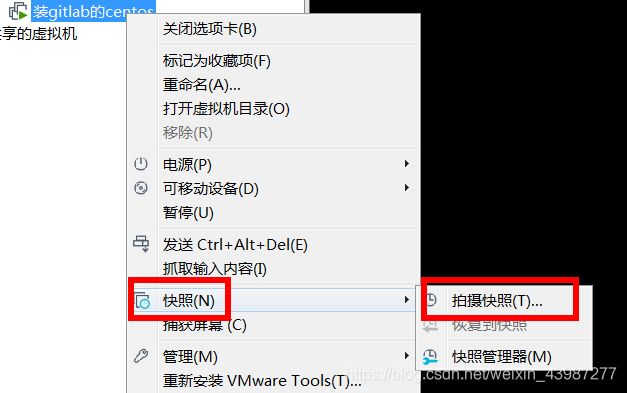
先别执行,直接执行会有异常,必须配置一个dns,不配置安装的时候会一直重连导致无法安装成功。
vi /etc/resolv.conf //编辑 resolv.conf文件
修改里面内容如下,没有这个8.8.8.8你执行脚本会无限重连网站的
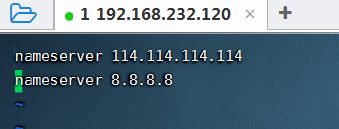
然后开始执行脚本:
./installGitlab.sh
sudo reboot
最后做一个对比:
官网的下载步骤如下:
sudo yum install -y curl policycoreutils-python openssh-server perl
sudo systemctl enable sshd
sudo systemctl start sshd

sudo firewall-cmd --permanent --add-service=http
sudo firewall-cmd --permanent --add-service=https
sudo systemctl reload firewalld

sudo yum install postfix
sudo systemctl enable postfix
sudo systemctl start postfix

curl https://packages.gitlab.com/install/repositories/gitlab/gitlab-ee/script.rpm.sh | sudo bash

sudo EXTERNAL_URL="https://gitlab.example.com" yum install -y gitlab-ee
修正后步骤如下:(这里改了什么呢?第一,先一步安装了gitlab-ce,然后检验安装的时候就不会再去下载一个了,第二步,这里的要写成gitlab-ce,而不能写成上面的gitlab-ee)
sudo yum install -y curl policycoreutils-python openssh-server perl
sudo systemctl enable sshd
sudo systemctl start sshd

sudo firewall-cmd --permanent --add-service=http
sudo firewall-cmd --permanent --add-service=https
sudo systemctl reload firewalld

sudo yum install postfix
sudo systemctl enable postfix
sudo systemctl start postfix

curl https://packages.gitlab.com/install/repositories/gitlab/gitlab-ce/script.rpm.sh | sudo bash
sudo rpm -ivh /opt/gitlab-ce-13.8.3-ce.0.el7.x86_64.rpm
sudo EXTERNAL_URL="https://gitlab.example.com" yum install -y gitlab-ce
五、gitlab服务进行初始化操作及测试是否成功
初始化配置 gitlab的配置
gitlab-ctl reconfigure
温馨提示:这里会有很多很多的action run要等很久哦,慢慢等吧,你可以看部电影了,ps:我的用了半个多小时。

完成之后如果你想要直接访问是比较慢的,因为有防火墙,所以你需要去关闭防火墙
比较慢的情况示例:

关闭防火墙:
systemctl stop firewalld.service
加权限
chmod -R o+x /var/opt/gitlab/gitlab-rails/
查看gitlab启动情况
出现以下情况代表安装及初始化成功
gitlab-ctl status
gitlab的一些指令
启动 gitlab 服务
gitlab-ctl start
停止 gitlab 服务
gitlab-ctl stop
重启gitlab服务
gitlab-ctl restart
访问测试结果
直接访问对应服务器的ip地址,我的是http://192.168.232.120
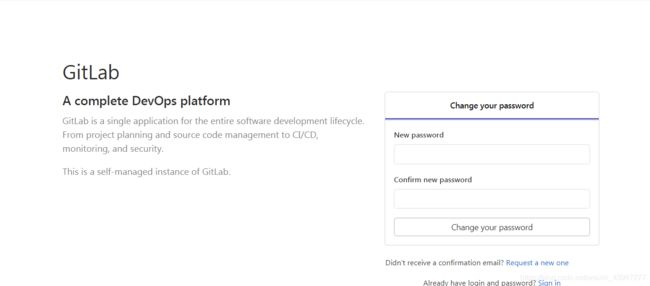
在这里设置管理员密码,登录用户账号为root,密码为你刚刚设置的,然后登入如下。

其他配置跟github大同小异,没什么问题的啦。
错误总结(个人觉得启动后可能要等待一段时间才行。之前一直502错误,后面改了不少东西然后还不行,之后等一会就可以了应该要重启一下)
1:、安装一直报连接失败,安装手册那里有提示说明的
设置dns
2.浏览器访问报502错误且查看异常后发现报的异常如下
通过这个指令查看日志,寻找error
sudo gitlab-ctl tail
发现在这里
==> /var/log/gitlab/gitlab-workhorse/current <==
{
     "correlation_id":"01EY6D8A9TH9M9RYPFV7EKYTB1","duration_ms":8,"error":"badgateway: failed to receive response: dial unix /var/opt/gitlab/gitlab-rails/sockets/gitlab.socket: connect: no such file or directory","level":"error","method":"GET","msg":"","time":"2021-02-11T00:44:10+08:00","uri":"/favicon.ico"}
{
     "content_type":"text/html; charset=utf-8","correlation_id":"01EY6D8A9TH9M9RYPFV7EKYTB1","duration_ms":66,"host":"192.168.232.120","level":"info","method":"GET","msg":"access","proto":"HTTP/1.1","referrer":"http://192.168.232.120/","remote_addr":"127.0.0.1:0","remote_ip":"127.0.0.1","route":"","status":502,"system":"http","time":"2021-02-11T00:44:10+08:00","ttfb_ms":66,"uri":"/favicon.ico","user_agent":"Mozilla/5.0 (Windows NT 6.1; Win64; x64) AppleWebKit/537.36 (KHTML, like Gecko) Chrome/71.0.3578.98 Safari/537.36","written_bytes":2940}
解决办法:给那个对应的文件加权限
chmod -R o+x /var/opt/gitlab/gitlab-rails/
3、然后看一下虚拟机发现,其实是:内存溢出了导致服务被关闭所以我的服务启动失败了。

修改虚拟机运行内存为4g再次运行。

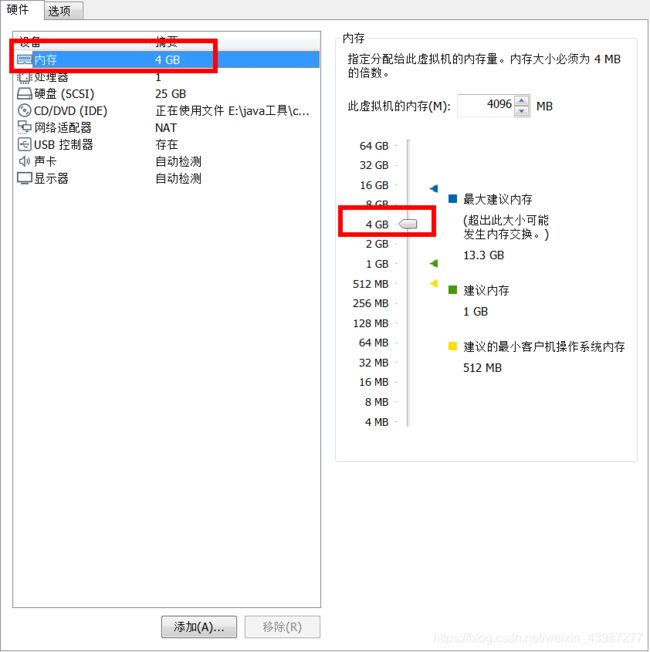
最后确认就好了
4、关闭防火墙(这个也是影响它网络的原因之一)
centos关闭防火墙
systemctl stop firewalld.service  // 停止firewalld服务

systemctl disable firewalld.service // 开机禁用firewalld服务

iptables -L   //列出所有iptables规则
关闭SELinux防火墙,改完需要重启。
vi /etc/sysconfig/selinux       //编辑selinux文件

SELINUX=disabled         //把文件中的SELINUX=enforcing 改成 SELINUX=disabled 即可

sestatus    //查看SELinux状态
5、如果出现了需要配置调整,那么可以看看这个,不过我一开始搭起来就算不错了哈哈。
https://www.cnblogs.com/HansBug/p/9813627.html
