二 Ubuntu系统上需要安装的软件
这一部分主要是写给我自己看的,做一个整理,所以有些简便,说的不是太清楚。请有需要的查看其他人写的。这些网上都写烂了,随便一搜就是一大堆。
1 安装列表
| 软件名 | 安装方式 |
|---|---|
| 谷歌浏览器 | sudo apt-get install google-chrome-stable |
| 信使 | sudo apt install iptux |
| VSCode | 本地安装 |
| 微信 | 使用wine或者deepin-wine安装 |
| wps | 本地安装 |
| meshlab | sudo apt install meshlab |
| 搜狗输入法 | 本地安装 |
| vim | sudo apt install vim |
| anaconda3 | 本地安装 |
| cuda | ‘https://www.jianshu.com/p/59b0cbdaa38c’ |
| cudnn | ‘https://www.jianshu.com/p/59b0cbdaa38c’ |
| pytorch-gpu | conda install pytorch-cpu torchvision -c pytorch |
| tensorflow-gpu | pip install -i https://pypi.tuna.tsinghua.edu.cn/simple/ tensorflow-gpu |
2 装机后第一步:换源
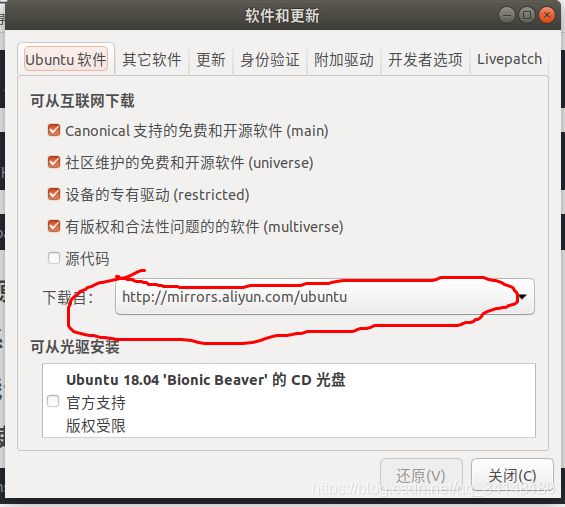
2.1 系统源
(1)打开系统与更新,选择画框部分;
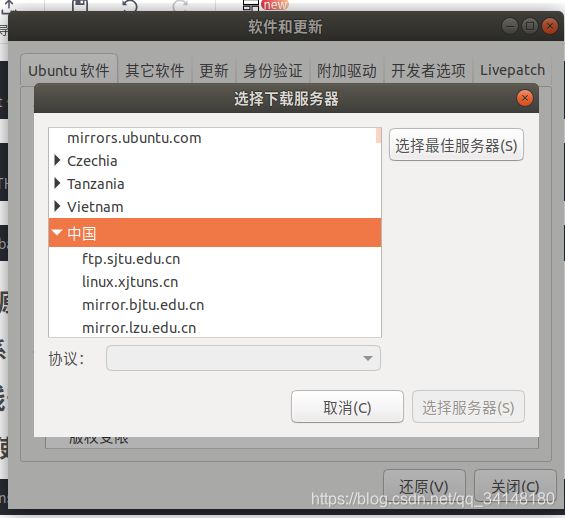
(2)选择其他站点,点击中国,选择一个自己想要的。建议清华源或者阿里源。
2.2 安装显卡驱动
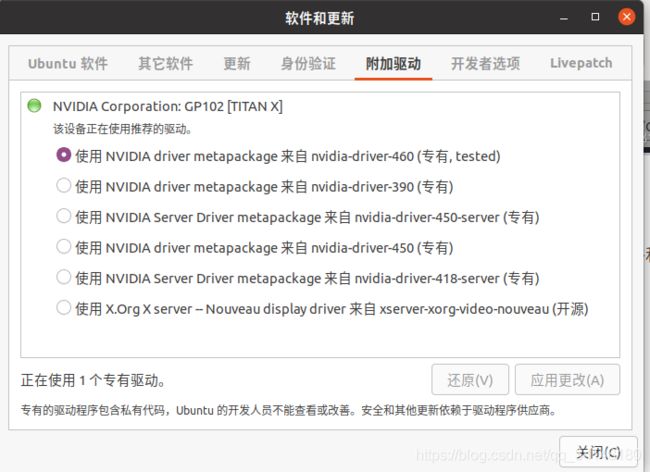
显卡驱动,需要的可以本地安装,听说是最稳定的。我直接在‘软件和更新’中安装的,反正用到现在没有因为因为它崩溃过,对于我来说够用了。打开‘软件和更新’中的‘附加驱动’,选择括号中有‘tested’的。
2.3 关闭自动更新
这个东西有时候会影响显卡驱动,让它失效;或者影响自己的一些设置。毕竟开发对环境的依赖太大了,向我这种菜鸟,有时候完全不知道为什么昨天能运行的程序今天突然不能跑了,查找原因的话没有人交有时候两三天都解决不了。一般的做法就是重装系统,或者使用docker这样的把需要的环境隔离开。
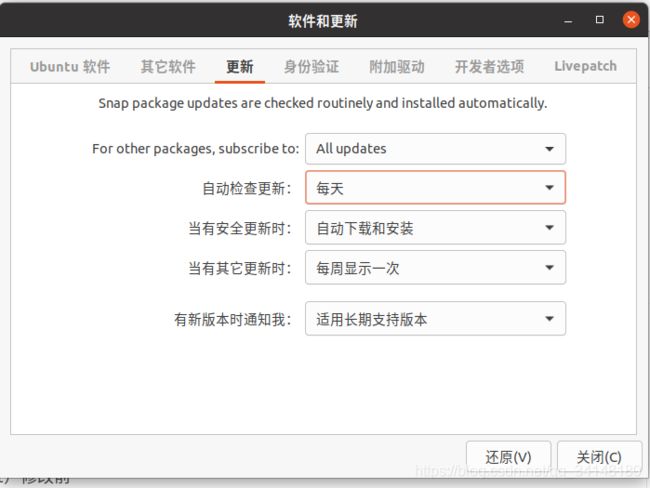
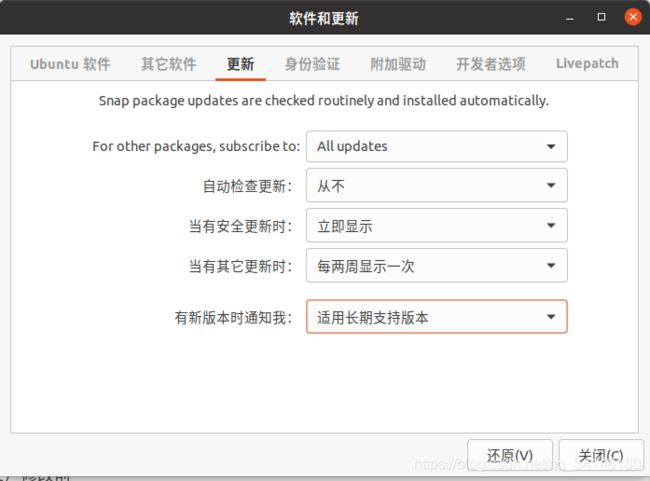
2.3.1 修改‘软件和更新’中的‘更新’
(2)修改后
2.3.2 禁止内核自动更新
(1) 打开终端,终端输入‘uname -a‘查看正在使用的内核。
(2) 禁止更新
sudo apt-mark hold linux-headers-5.8.0-41-generic
sudo apt-mark hold linux-image-5.8.0-41-generic
sudo apt-mark hold linux-modules-extra-5.8.0-41-generic
(3)允许更新
sudo apt-mark unhold ***
3 安装
3.1 终端在线安装
3.1.1 终端直接安装
git :从github上下载的,上传也用它
vim: IDE
iptux:信使,局域网传文件,消息的
meshlab:三维点云软件
sudo apt install iptux meshlab vim git # 能简单尽量简单
3.1.2 安装vscode
实际上我对pycharm更熟悉,但是不知道为什么,在ubuntu上安装pycharm,总是卡住了,修改内存都没有用。希望懂的朋友可以教教我。
sudo snap install --classic code
3.2 本地安装
3.2.1 安装anaconda3并换源
(1) 安装anaconda3
- 下载
- 安装
bash 安装包名 # 建议默认路径
(2)检查是否加入了环境变量
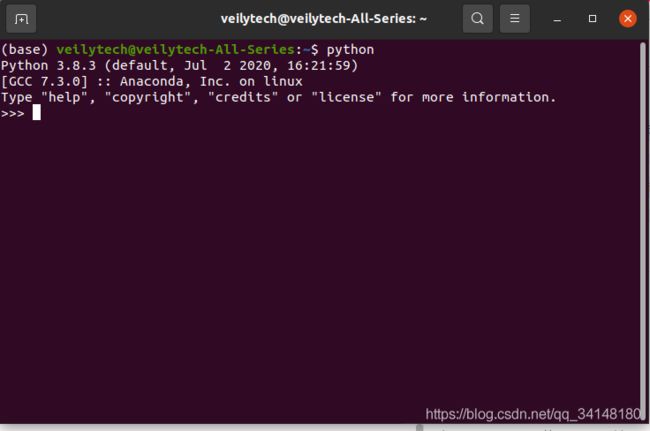
打开一个新终端,输入:python,若出现下面的,则成功:
若没有,则:
sudo gedit ~/.bashrc
export PATH="/home/Ubuntu/ljj/anaconda3/bin:$PATH" # anaconda3中bin文件夹的路径
source ~/.bashrc # 重启bashrc
(3) 换源
- conda换源,打开终端,在其中输入:
conda config --add channels https://mirrors.tuna.tsinghua.edu.cn/anaconda/pkgs/free/
conda config --add channels https://mirrors.tuna.tsinghua.edu.cn/anaconda/pkgs/main/
conda config --set show_channel_urls yes
其他三方源:
- Conda Forge
conda config --add channels https://mirrors.tuna.tsinghua.edu.cn/anaconda/cloud/conda-forge/
- msys2
conda config --add channels https://mirrors.tuna.tsinghua.edu.cn/anaconda/cloud/msys2/
- bioconda
conda config --add channels https://mirrors.tuna.tsinghua.edu.cn/anaconda/cloud/bioconda/
- menpo
conda config --add channels https://mirrors.tuna.tsinghua.edu.cn/anaconda/cloud/menpo/
- pytorch
conda config --add channels https://mirrors.tuna.tsinghua.edu.cn/anaconda/cloud/pytorch/
- pip换源
- 在主目录下创建.pip文件夹,然后在该目录下创建pip.conf文件
mkdir ~/.pip
vim ~/.pip/pip.conf
- pip.conf文件编写如下内容(更换为清华大学镜像源)
[global]
index-url = https://pypi.tuna.tsinghua.edu.cn/simple
- 保存退出
3.2.2 安装谷歌浏览器
这个浏览器其它的不清楚,最让我满意的是它的翻译功能,直接右键就行,谁让谷歌翻译最好而我英语又太喳哩。ubuntu自带的火狐的翻译插件不是太慢就是翻译不了。
- 下载,.deb的
- 安装,直接单击.deb文件即可。
3.2.3 安装wps
(1) 下载
(2)安装wps
进入放有wps安装包的文件夹,打开终端:
sudo dpkg -i -i wps-office_10.1.0.6757_amd64.deb
(3)安装字体(提取码: n9xc)
- 打开终端,输入:
sudo unzip wps_symbol_fonts.zip -d /usr/share/fonts/wps-office
- 进入/usr/share/fonts/wps-office目录,依次点击每个文件并安装,然后重启wps
3.2.4 安装wine
(1)现在基本都是64为系统,故默认64位。
(2)启用32为架构
sudo dpkg --add-architecture i386
(3)下载添加数据源的秘钥
wget -nc http://dl.winehq.org/wine-builds/winehq.key
sudo apt-key add winehq.key
(4)添加数据源,根据Ubuntu版本的 不同需要添加不同的源(ubuntu20.04)。
sudo add-apt-repository 'deb https://dl.winehq.org/wine-builds/ubuntu/ focal main'
(5)安装wine-stable
sudo apt update
sudo apt install --install-recommends winehq-stable # 稳定版
wine --version # 查看版本
(6)安装字体
- 输入: winecfg, 之后弹窗提示缺少组件,确定自动安装。默认即可。
- 安装winetricks : sudo apt install winetricks
- 安装字体 winetricks corefonts
3.2.5 安装微信
微信没有Ubuntu版本,需要使用wine进行安装。这也是我安装wine的原因。
(1)先下载微信包
(2)安装,进入安装包路径。
wine WeChat.exe
3.2.6 安装cuda和cudnn
安装cuda和cudnn,建议使用.run文件安装,直接根据官方教程安装步骤即可。
(1)下载cuda10.1安装包
(2)下载cudnn7.6安装包
