opencv用python实现学习笔记(一)
文章目录
-
-
- Note of Opencv to Python
-
- Opencv 在Pycharm中的配置
- 常见图像坐标系
- 基本操作
-
- 将照片读入到矩阵中,并显示
- 图像与原始字节之间的转换
- 窗口操作
- waitKey函数
- 视频与电脑摄像头输入、存储
- 获取图片的信息
- 绘图功能
- 鼠标操作响应
- 滑动条的实现
- 核心操作
-
- 色彩空间转换
- Print函数Tips
- 遍历像素点
- 矩阵操纵(创建一幅图像)
- 获取程序执行时间
- 提取某颜色对应的像素
- 图像通道的合并、分离、单通道操作、单像素操作
- 图像算术运算、逻辑运算
- 调整对比度和亮度
- ROI选择
- 图像处理
-
- 泛洪填充
- 图像模糊(图像平滑)
-
- 概述
- 分类及应用场景
- 图像梯度
-
- Laplacian 算子
- Prewitt算子
- Sobel算子和Scharr算子
- 边缘检测
-
- Canny边缘检测
- 轮廓检测
- 图像阈值
-
- 简单阈值
- 使用git, Typora,github创建笔记
- 在matlab中使用hough变换检测圆
-
- 1.编程思路
- 2.代码实现
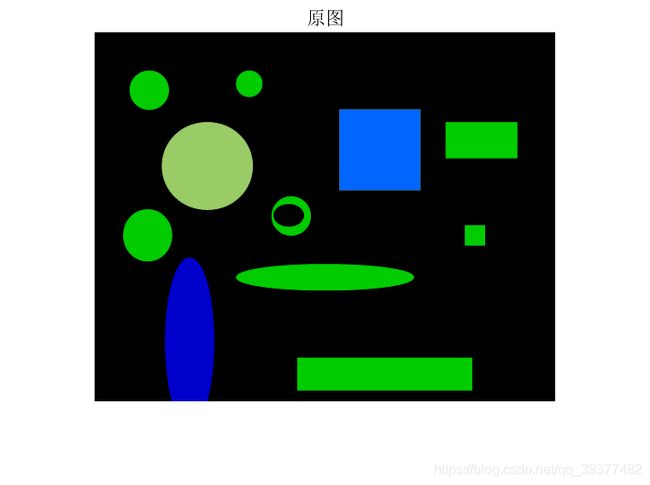
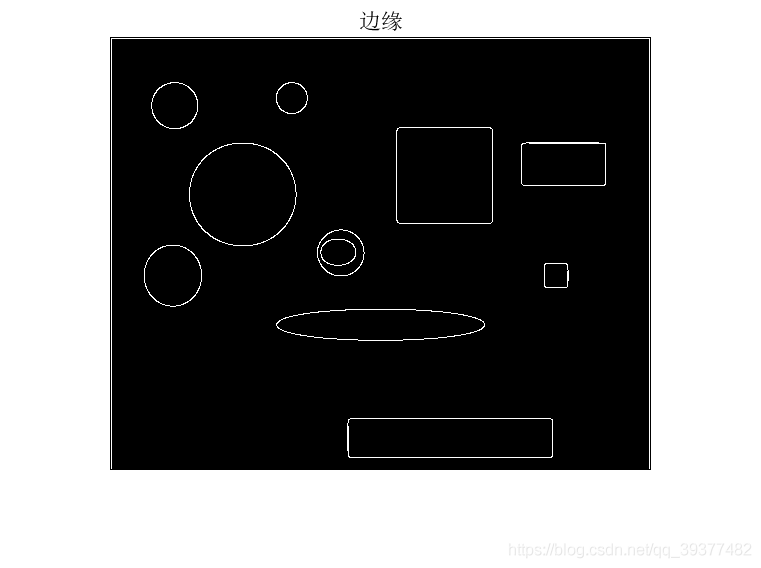
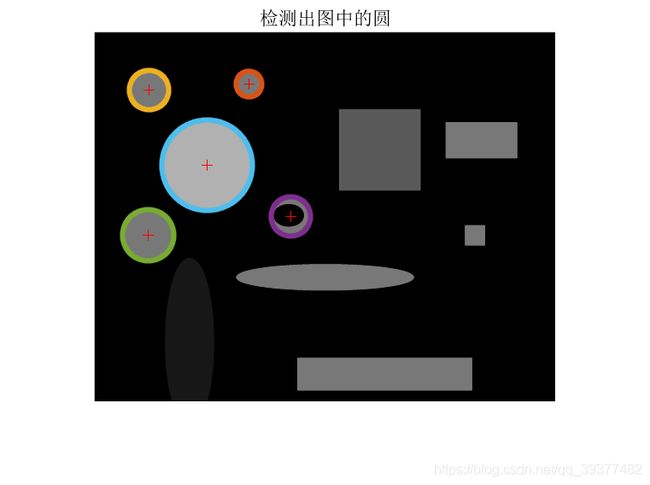
- 3.结果展示
-
Note of Opencv to Python
Opencv 在Pycharm中的配置
pip install opencv-python
pip install opencv-contrib-python #扩展库
pip install pytesseract
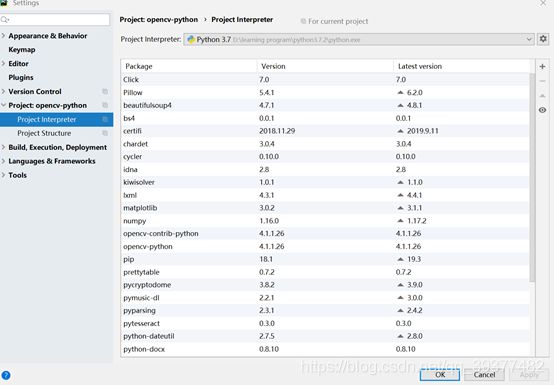
新建python项目,注意解释器正确配置应该如下:
常见图像坐标系
Opencv:
Matlab:
基本操作
将照片读入到矩阵中,并显示
src = cv.imread("D:/IMG_20161227_154705.jpg")
cv.imshow("input", src) #input为窗口名
cv.waitKey(0) 必须要有
cv.imwrite("D:/result.jpg", gray)
cv.waitKey(0)
cv.destroyAllWindows()
cv.IMREAD_COLOR:读入一副彩色图像,将其转换为BGR模式,图像的透明度会被忽略,这是默认参数。
cv.IMREAD_GRAYSCALE:以灰度模式读入图像
cv.IMREAD_UNCHANGED:读入一幅图像,并且包括图像的alpha 通道
cv.IMREAD_ANYDEPTH : 若设置返回相应深度图像(16位/32位),否则将其转换为8位
IMREAD_LOAD_GDAL :使用gda驱动载入图像
可使用python自带的Matplotlib显示图像。但注意opencv为BGR,Matplotlib为RGB,被opencv的imread读入后,不能被Matplotlib显示.
imwrite要求图像为BGR或灰度格式,并且每个通道有一定的位,BMP每通道8位,PNG每通道8位/16位
图像与原始字节之间的转换
import os


randombytearray = bytearray(os.urandom(120000))  #生成含有随机字节的bytearray数组
nparray = np.array(randombytearray) #将其转换为numpy数组
grayimage = nparray.reshape((300, 400)) #生成单通道数组
bgrimage = nparray.reshape([100, 400, 3]) #生成三通道数组
src = np.random.randint(0, 255, 120000).reshape(300, 400)  #可随机生成numpy数组
print(src)
窗口操作
cv.namedWindow("input", cv.WINDOW_AUTOSIZE) 适应图片大小
cv.WINDOW_NORMAL 窗口大小可调节
CV_WINDOW_OPENGL 支持OpenGL
namedWindow()创建一个窗口。imshow可以直接指定窗口名,可以省去此函数(默认调用),但如果显示图像之前需要其他窗口操作时,需要调用此函数
destroyWindow() 关闭特定窗口 # cv.destroyWindow("video")
destroyAllWindows()关闭所有的HighGUI窗口
cv.startWindowThread()
在调用cv.startWindowThread();后,即使没有调用waitKey()函数,图片也依然实时刷新。opencv的imshow()函数调用以后,并不立即刷新显示图片,而是等到waitKey()后才会刷新图片显示,所以cv.startWindowThread();是新开一个线程实时刷新图片显示。
waitKey函数
1.waitKey()返回的为-1(没有键被按下)或ASCII码值,
2.使用OpenCV的imshow函数显示图片,必须配合waitKey 函数使用,才能将图片显示在windows窗体上。否则,imshow 函数单独使用只能弹出空白窗体,而无法显示图片。
3.waitKey的时间延迟,只对Windows窗体有效,而且是 namedWindow 函数创造的OpenCV窗体,对于MFC或者Qt这种GUI窗体是否有效是一种未知结果,
不设置参数:特定的几毫秒之内,如果按下任意键,这个函数会返回按键的ASCII 码值,程序将会继续运行。如果没有键盘输入,返回值为-1
ASCII码值:0~127,共128个
设置参数:使用waitKey(0) (无限等待)来判断相应按键操作,若为64位电脑,则需设置为k=cv2.waitKey(0)&0xFF。
3.真正能起到程序暂停的作用的是我们熟悉的Windows API函数Sleep
k = cv2.waitKey(0)&0xFF
if k == 27: # wait for ESC key to exit
	cv2.destroyAllWindows()
elif k == ord('s'): # wait for 's' key to save and exit
	cv2.imwrite('messigray.png',img)
	cv2.destroyAllWindows()
视频与电脑摄像头输入、存储
def video_demo(): #无输入值
	#capture = cv.VideoCapture("D:/IMG_9764.MP4") #0为读取电脑摄像头,读取的视频无声音,大小有限制
	capture = cv.VideoCapture(0) #0为设备索引号,自带摄像头一般为0
	# Define the codec and create VideoWriter object
	fourcc = cv.VideoWriter_fourcc(*'XVID')
	out = cv2.VideoWriter('output.avi',fourcc, 20.0, (640,480)) #编码类型,帧速率,帧大小
    if capture.isOpened() == 1:
        print("camera has been initialized correctly")
    elif capture.isOpened() == 0:
        print("camera has not been initialized correctly")
    ret, frame = capture.read()
	while(True):
		ret, frame = capture.read() #返回一个布尔值,若帧读取正确,则为True,每一帧
		frame1 = cv.flip(frame, 1) #镜像变换 1为左右 -1为上下
		frame2 = cv.transpose(frame) #顺时针旋转90°
		cv.imshow("video", frame) #每一帧循环显示
		cv.imshow("video1", frame1)
    	out.write(frame1)
    	print(capture.get(3)) #获取每一帧的宽度
		cv.imshow("video2", frame2)
		c = cv.waitKey(1) #响应用户操作
		#if c == 27:
			#break
    	#capture.release() #Closes video file or capturing device
    	if c & oxFF ==ord('q')
        	capture.release()
    		break
cv.VideoCapture为一个类,get(CV_CAP_PROP_FPS)可返回视频帧速率的准确值,但不能返回摄像头帧速率的准确值(总是返回0),可使用计时器来测量
视频写入时FourCC码以cv.FOURCC(‘M’,‘J’,‘P’,‘G’) 或者cv.FOURCC(*‘MJPG’)传给fourcc,编码格式如下:
cv2.VideoWriter_fourcc('I','4','2','0'): This option is an
uncompressed YUV encoding, 4:2:0 chroma subsampled. This encoding is
widely compatible but produces large files. The file extension should be .avi.
• cv2.VideoWriter_fourcc('P','I','M','1'): This option is MPEG-1. The
file extension should be .avi.
• cv2.VideoWriter_fourcc('X','V','I','D'): This option is MPEG-4 and
a preferred option if you want the resulting video size to be average. The file
extension should be .avi.
• cv2.VideoWriter_fourcc('T','H','E','O'): This option is Ogg Vorbis.
The file extension should be .ogv.
• cv2.VideoWriter_fourcc('F','L','V','1'): This option is a Flash video.
The file extension should be .flv.
从文件播放视频时,使用cv.waiKey() 设置适当的持续时间,一般25ms合适,设置地高的话,视频播放地慢
cap.read():若帧读取正确,返回True,检查其返回值判断视频文件是否到结尾
cap.isOpened():摄像头成功初始化,返回True,否则使用cap.open()
cap.get(propId):获得视频的参数信息,propId 可以是0 到18 之间的任何整数,见下表:
• CV_CAP_PROP_POS_MSEC #Current position of the video file in milliseconds.
• CV_CAP_PROP_POS_FRAMES #0-based index of the frame to be decoded/captured next.
• CV_CAP_PROP_POS_AVI_RATIO #Relative position of the video file: 0 - start of the film, 1 - end of the film.
• CV_CAP_PROP_FRAME_WIDTH #Width of the frames in the video stream.
• CV_CAP_PROP_FRAME_HEIGHT #Height of the frames in the video stream.
• CV_CAP_PROP_FPS #Frame rate. 每秒帧数/帧速率/FPS
• CV_CAP_PROP_FOURCC #4-character code of codec.
• CV_CAP_PROP_FRAME_COUNT #Number of frames in the video file.
• CV_CAP_PROP_FORMAT #Format of the Mat objects returned by retrieve() .
• CV_CAP_PROP_MODE #Backend-specific value indicating the current capture mode.
• CV_CAP_PROP_BRIGHTNESS #Brightness of the image (only for cameras).
• CV_CAP_PROP_CONTRAST #Contrast of the image (only for cameras).
• CV_CAP_PROP_SATURATION #Saturation of the image (only for cameras).
• CV_CAP_PROP_HUE #Hue of the image (only for cameras).
• CV_CAP_PROP_GAIN #Gain of the image (only for cameras).
• CV_CAP_PROP_EXPOSURE #Exposure (only for cameras).
• CV_CAP_PROP_CONVERT_RGB #Boolean flags indicating whether images should be converted to RGB.
• CV_CAP_PROP_WHITE_BALANCE #Currently unsupported
• CV_CAP_PROP_RECTIFICATION #Rectification flag for stereocameras (note: only supported by DC1394 v 2.x backend currently)
cap.set(propId,value):修改视频参数,value为新值
3—width,4—hight
使用一组摄像头时:
success0 = cameraCapture0.grab()
success1 = cameraCapture1.grab()
if success0 and success1:
	frame0 = cameraCapture0.retrieve()
	frame1 = cameraCapture1.retrieve()
获取图片的信息
def get_image_info(image):
print(type(image)) # 绘图功能
img:想要绘图的图像
color:BGR模式输入
thickness:默认为1,对于封闭图形设置为-1可实现填充
lineType:8连接,抗锯齿型连接(平滑性好,cv2.LINE_AA)
shift:坐标点与数轴的精度,默认为0
后五个参数的顺序一般如上
Drawing Line:
img = np.zeros((512,512,3), np.uint8)
img = cv2.line(img,(0,0),(511,511),(255,0,0),5) #指定直线的起点和终点,画多条线时可用cv.polylines()
img = cv2.rectangle(img,(384,0),(510,128),(0,255,0),3) #指定矩形的左上顶点和右下顶点
img = cv2.circle(img,(447,63), 63, (0,0,255), -1) #指定圆心,半径
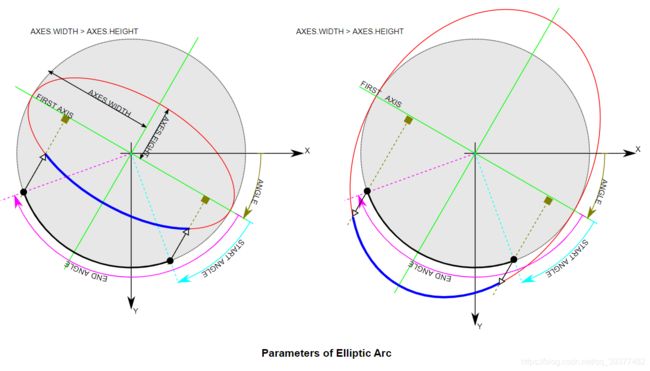
img = cv2.ellipse(img,(256,256),(100,50),0,0,180,(255, 0, 0),-1)
#img	=	cv.ellipse(	img, center, axes, angle, startAngle, endAngle, color[, thickness[, lineType[, shift]]]	)

pts = np.array([[10,5],[20,30],[70,20],[50,10]], np.int32)
pts = pts.reshape((-1,1,2)) #reshape 的第一个参数为-1, 表明这一维的长度是根据后面的维度的计算出来的。
img = cv2.polylines(img,[pts],True,(0,255,255)) #若为第三个参数为False,则该多边形不封闭,首尾不想连

font = cv2.FONT_HERSHEY_SIMPLEX
cv2.putText(img,'OpenCV',(10,500), font, 4,(255,255,255),2,cv2.LINE_AA) #位置,字体类型,字体大小,颜色,粗细,线条的类型
鼠标操作响应
事件列表:
# mouse callback function
def draw_circle(event,x,y,flags, param):
    if event == cv.EVENT_LBUTTONDBLCLK:
        cv.circle(img, [x, y], 10, (255, 0, 0), -1)


# Create a black image, a window and bind the function to window
img = np.zeros((512, 512, 3), np.uint8)
cv.namedWindow('image')
cv.setMouseCallback('image', draw_circle)
while(1):
    cv.imshow('image',img)
    if cv.waitKey(20) & 0xFF == 27:
        break
cv.destroyAllWindows()
通过按键来控制不同的鼠标事件响应:
# 当鼠标按下时变为True
drawing = False
# 如果mode 为true 绘制矩形。按下'm' 变成绘制曲线。
mode = True
ix, iy = -1, -1


# 创建鼠标事件回调函数
def draw_circle(event,x,y,flags,param):
    global ix, iy, drawing, mode
# 当按下左键是返回起始位置坐标
    if event == cv.EVENT_LBUTTONDOWN:
        drawing=True
        ix, iy = x, y
# 当鼠标左键按下并移动是绘制图形。event 可以查看移动,flag 查看是否按下
    elif event == cv.EVENT_MOUSEMOVE and flags == cv.EVENT_FLAG_LBUTTON:
        if drawing == True:
            if mode == True:
                cv.rectangle(img,(ix,iy),(x,y),(0,255,0),-1)
            else:
                #cv.circle(img,(x,y),10,(0,0,255),-1) # 绘制圆圈,小圆点连在一起就成了线,3 代表了笔画的粗细
                # 下面注释掉的代码是起始点为圆心,起点到终点为半径的
                r=int(np.sqrt((x-ix)**2+(y-iy)**2))
                cv.circle(img,(ix,iy),r,(0,0,255),-1)
                # 当鼠标松开停止绘画。
    elif event == cv.EVENT_LBUTTONUP:
        drawing=False
        # if mode==True:
        #     cv.rectangle(img,(ix,iy),(x,y),(0,255,0),-1)
        # else:
        #     cv.circle(img,(x,y),5,(0,0,255),-1)


img = np.zeros((512, 512, 3), np.uint8)
cv.namedWindow('image')
cv.setMouseCallback('image',draw_circle)
while(1):
    cv.imshow('image', img)
    k = cv.waitKey(1) & 0xFF
    if k == ord('m'): #ord()可将字符转换为ASCII码
        mode = not mode
    elif k == 27:
        break
cv.destroyAllWindows()
opencv有限的事件处理能力与GUI处理能力,将其集成到其他应用程序框架更受欢迎
滑动条的实现
import cv2
import numpy as np


def nothing(x):
    pass
# 创建一副黑色图像
img=np.zeros((300,512,3),np.uint8)
cv2.namedWindow('image')
cv2.createTrackbar('R','image',0,255,nothing)
cv2.createTrackbar('G','image',0,255,nothing)
cv2.createTrackbar('B','image',0,255,nothing)
switch='0:OFF\n1:ON'
cv2.createTrackbar(switch,'image',0,1,nothing)
while(1):
    cv2.imshow('image',img)
    k=cv2.waitKey(1)&0xFF
    if k==27:
        break
    r=cv2.getTrackbarPos('R','image')
    g=cv2.getTrackbarPos('G','image')
    b=cv2.getTrackbarPos('B','image')
    s=cv2.getTrackbarPos(switch,'image')
    if s==0:
        img[:]=0
    else:
        img[:]=[b,g,r]
        #img = cv2.merge([b, g, r])
cv2.destroyAllWindows()
核心操作
色彩空间转换
gray = cv.cvtColor(src, cv.COLOR_BGR2GRAY) #获取灰度图像
dst = cv.bitwise_not(image) # 通过逻辑非运算来获得负片
gray = cv.cvtColor(image, cv.COLOR_BGR2GRAY)
back_rgb = cv.cvtColor(gray, cv.COLOR_GRAY2BGR)
灰度:去除彩色信息将其转换成灰阶,对人脸检测等中间处理特别有效
HSV:H(Hue)色调,S(Saturation)饱和度,V(Value)表示黑暗程度或光谱另一端的明亮程度,便于色彩区分 ,opencv中将hue值设为0-180,便于用uint8表示
Print函数Tips
打印变量值
print("width : %s, height : %s channels : %s" % (width, height, channels))
打印矩阵
print(image)
遍历像素点
def access_pixels(image):
	height = image.shape[0]
	width = image.shape[1]
	channels = image.shape[2]
	print("width : %s, height : %s channels : %s" % (width, height, channels))
	for row in range(height):
		for col in range(width):
			for c in range(channels):
				pv = image[row, col, c]
				image[row, col, c] = 255 – pv
	cv.imshow("demo", image)
优先使用索引等方法对像素点、面进行操作,使用循环会使得效率低下,尤其对于视频处理
矩阵操纵(创建一幅图像)
ones创建任意维度和元素个数的数组,其元素值均为1
empty一样,只是它所常见的数组内所有元素均为空
zeros([m,n…],int8) 创建任意维度和元素个数的数组,其元素值均为0
img = np.zeros([400, 400, 3], np.uint8)
#img = np.ones([400, 400, 3]) * 255
# img[:, :, 2] = np.ones([400, 400])*255 #对2通道像素平面进行操作
# cv.imshow("new image", img)
matrix = np.ones([6, 6], np.float32) # 有浮点数计算一定选float
fill用来填充矩阵,
reshape可以进行矩阵重组,元素数相同
matrix.fill(1625.35)
cv.convertScaleAbs() 可以将浮点数转化为uint8 ,负数转换为绝对值
m2 = matrix.reshape([3, 12])
array生成任意矩阵,可以作为算子
m3 = np.array([[1,2,3], [4,5,6], [7,8,9]],np.int32)
获取程序执行时间
t1 = cv.getTickCount()
create_image() #程序
t2 = cv.getTickCount()
time = (t2 - t1) / cv.getTickFrequency()
print("time = %s ms" % (time * 1000))
可以通过调用opencv自带的API来减少程序执行时间
提取某颜色对应的像素
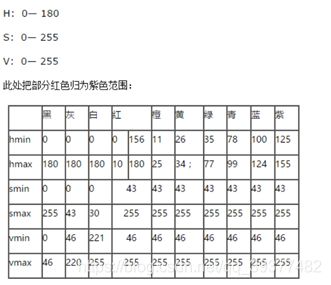
思路:转换到HSV空间,再参考下表设置inRange函数的参数(红色设置为第二列较佳)
def extract_object_demo():
	capture = cv.VideoCapture("D:/IMG_9764.MP4")
	while(True):
		ret, frame = capture.read() # 先将每一帧读入
	if ret == False:
		break
	hsv = cv.cvtColor(frame, cv.COLOR_BGR2HSV)
	lower_hsv = np.array([0, 43, 46]) # 找出白色
	upper_hsv = np.array([10, 255, 255])
	mask = cv.inRange(hsv, lowerb=lower_hsv, upperb=upper_hsv)
	dst = cv.bitwise_and(frame, frame, mask=mask)
	cv.imshow("video", frame)
	cv.imshow("mask", dst) #将含有红色的像素提取以红色在黑色视频中显示
	c = cv.waitKey(50)
	if c == 27:
		break  # escape
图像通道的合并、分离、单通道操作、单像素操作
b, g, r = cv.split(src)
cv.imshow("blue", b)
cv.imshow("green", g)
cv.imshow("red", r)
src = cv.merge([b, g, r]) # 注意此处的输入
src[:, :, 0] = 0
src.itemset((150, 120, 0), 255) #将蓝色通道值变为255
print(src.itemset((150, 120, 0)))
cv.imshow("changed image", src)
h, w = src.shape[0:2] #获取图像的高与宽,0可以不输入
print(src[30, 30, :]) #打印某位置上的三个像素值
图像算术运算、逻辑运算
dst = cv.add(m1, m2) #相加
dst = cv.subtract(m1, m2) #相减
dst = cv.divide(m1, m2) #除
dst = cv.multiply(m1, m2) #乘
M1 = cv.mean(m1) #获取均值
M2, dev2 = cv.meanStdDev(m2) #获取均值和方差
Tips:方差越小,则该图片包含的信息越少,可设置阈值来过滤无意义的图片
dst1 = cv.bitwise_or(m1, m2)
dst2 = cv.bitwise_and(m1, m2) # 可以作为一个“遮罩”
dst3 = cv.bitwise_not(m1) #获得负片
调整对比度和亮度
def contrast_brightness_demo(image, c, b):
	h, w, ch = image.shape #取出shape的前两位【:2】
	blank = np.zeros([h, w, ch], image.dtype)
	dst = cv.addWeighted(image, c, blank, 1-c, b) #调整对比度和亮度,none的均可以接收,dst = 	src1*alpha + src2*beta + gamma
	cv.imshow("con_bri_demo", dst)
像素运算式:dst = src1*alpha + src2*beta + gamma
ROI选择
face = src[50:250, 100:300] # [height, width]
gray = cv.cvtColor(face, cv.COLOR_BGR2GRAY)
backrgb = cv.cvtColor(gray, cv.COLOR_GRAY2BGR)
src[50:250, 100:300] = backrgb
cv.imshow("face", src)
图像处理
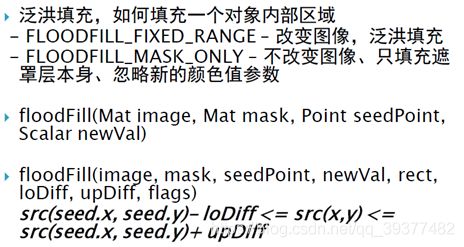
泛洪填充
def fill_color_demo(image):
	copyImg = image.copy()
	h, w = image.shape[:2]
	mask = np.zeros([h+2, w+2], np.uint8) #底层代码要求必须这么写
	cv.floodFill(copyImg, mask, (30, 30), (0, 255, 255), (100, 100, 100), (50, 50, 50), 	cv.FLOODFILL_FIXED_RANGE)
	cv.imshow("fill_color_demo", copyImg)
def fill_binary():
	image = np.zeros([400, 400, 3], np.uint8)
	image[100:300, 100:300, :] = 255
	cv.imshow("fill_binary", image)
	mask = np.ones([402, 402, 1], np.uint8)
	mask[100:300, 100:300] = 0
	cv.floodFill(image, mask, (200, 200), (255, 255, 0), cv.FLOODFILL_MASK_ONLY)#只填充mask标记为(0,0)的像素点
	cv.imshow("filled binary", image)
图像模糊(图像平滑)
概述
低通滤波:去噪,模糊图像,但去除了高频成分(噪声、边界)
高通滤波(图像梯度):找到边缘
空间滤波的数学原理:二维空间卷积
分类及应用场景
平均:卷积框覆盖区域所有像素的平均值来代替中心元素
高斯(低通滤波器之一):方框中心的值最大,其余方框根据距离中心元素的距离递减,构成一个高斯小山包。原来的求平均数现在变成求加权平均数,权就是方框里的值,X与y方向的标准差相等,若设置为0,则函数根据核的大小自动计算
# 0是指根据窗口大小(5,5)来计算高斯函数标准差
blur = cv2.GaussianBlur(img,(5,5),0)
只考虑像素之间的空间关系,而不会考虑像素值之间的关系(像素的相似度)
中值:用与卷积框对应像素的中值来替代中心像素的值,去除椒盐噪声、数字化的视频噪声尤其是彩色图像的噪声,但对于较大ksize,代价较高
双边:保持边界清晰的情况下有效的去除噪音,使用空间高斯权重(位置差异越小权重越大)与灰度值相似性高斯权重(灰度值差异越小权重越大),边缘处灰度值与中心像素灰度值相比变化大,权重小不会被模糊
# 9是邻域直径,两个75分别是空间高斯函数标准差,灰度值相似性高斯函数标准差
blur = cv2.bilateralFilter(img,9,75,75)
关于算子:元素个数为奇数(奇数行奇数列),总和为0:进行边缘和梯度计算,
总和为1:进行增强锐化等,相当于将感兴趣像素与其邻近像素值间的差放大,图像的亮度没有改变
Tips:blurry模糊的,不清楚的,污脏的
dst = cv.blur(image, (1, 15)) #均值模糊,模糊只是卷积的表象
dst = cv.medianBlur(image, 5) #中值模糊
def custom_blur_demo(image): #自定义卷积核来模糊
	# kernel = np.ones([5, 5], np.float32)/25 #最多25个255,防止溢出
	kernel = np.array([[0, -1, 0], [-1, 5, -1], [0, -1, 0]], np.float32)
	dst = cv.filter2D(image, -1, kernel=kernel) #-1表示目标图像与源图像的位深度相同
	cv.imshow("custom_blur_demo" ,dst)
filter2D()对每个通道使用相同的核,若要每个通道的核不同,则使用split分离通道,再用merge合并
from scipy import ndimage


kernel_3x3 = np.array([[-1, -1, -1],
                   [-1,  8, -1],
                   [-1, -1, -1]])
k3 = ndimage.convolve(img, kernel_3x3) #通过numpy的ndimage的convolve可以实现两个矩阵之间的卷积
图像梯度
二维函数的梯度定义为向量,其幅度即模如下:
∇ f = [ g x g y ] = [ ∂ f ∂ x ∂ f ∂ y ] ∇ f = mag ( ∇ f ) = [ x x 2 + g y 2 ] 1 / 2 = [ ( ∂ f / ∂ x ) 2 + ( ∂ f / ∂ y ) 2 ] 1 / 2 \begin{array}{c}{\nabla \boldsymbol{f}=\left[\begin{array}{c}{g_{x}} \\ {g_{y}}\end{array}\right]=\left[\begin{array}{c}{\frac{\partial f}{\partial x}} \\ {\frac{\partial f}{\partial y}}\end{array}\right]} \\ {\nabla f=\operatorname{mag}(\nabla \boldsymbol{f})=\left[\begin{array}{c}{x_{x}^{2}+g_{y}^{2}}\end{array}\right]^{1 / 2}=\left[(\partial f / \partial x)^{2}+(\partial f / \partial y)^{2}\right]^{1 / 2}}\end{array} ∇f=[gxgy]=[∂x∂f∂y∂f]∇f=mag(∇f)=[xx2+gy2]1/2=[(∂f/∂x)2+(∂f/∂y)2]1/2
可由绝对值来近似:
∇ f ≈ ∣ g x ∣ + ∣ g y ∣ \nabla f \approx\left|g_{x}\right|+\left|g_{y}\right| ∇f≈∣gx∣+∣gy∣
离散化表示:
g x = ∂ f ( x , y ) ∂ x = f ( x + 1 , y ) − f ( x , y ) g y = ∂ f ( x , y ) ∂ y = f ( x , y + 1 ) − f ( x , y ) \begin{aligned} g_{x} &=\frac{\partial f(x, y)}{\partial x}= f(x+1, y)-f(x, y) \\ g_{y} &=\frac{\partial f(x, y)}{\partial y}= f(x, y+1)-f(x, y) \end{aligned} gxgy=∂x∂f(x,y)=f(x+1,y)−f(x,y)=∂y∂f(x,y)=f(x,y+1)−f(x,y)
Laplacian 算子
可用来计算图像的二阶导数,推导在Matlab图像坐标系下进行:
∇ 2 f ( x , y ) = ∂ 2 f ( x , y ) ∂ x 2 + ∂ 2 f ( x , y ) ∂ y 2 ∂ 2 f ( x , y ) ∂ x 2 = f ( x + 1 , y ) + f ( x − 1 , y ) − 2 f ( x , y ) ∂ 2 f ( x , y ) ∂ y 2 = f ( x , y + 1 ) + f ( x , y − 1 ) − 2 f ( x , y ) ∇ 2 f ( x , y ) = [ f ( x + 1 , y ) + f ( x − 1 , y ) + f ( x , y + 1 ) + f ( x , y − 1 ) ] − 4 f ( x , y ) \begin{array}{c}{\nabla^{2} f(x, y)=\frac{\partial^{2} f(x, y)}{\partial x^{2}}+\frac{\partial^{2} f(x, y)}{\partial y^{2}}} \\ {\frac{\partial^{2} f(x, y)}{\partial x^{2}}=f(x+1, y)+f(x-1, y)-2 f(x, y)} \\ {\frac{\partial^{2} f(x, y)}{\partial y^{2}}=f(x, y+1)+f(x, y-1)-2 f(x, y)} \\{\nabla^{2} f(x, y)=[f(x+1, y)+f(x-1, y)+f(x, y+1)+f(x, y-1)]-4 f(x, y)}\end{array} ∇2f(x,y)=∂x2∂2f(x,y)+∂y2∂2f(x,y)∂x2∂2f(x,y)=f(x+1,y)+f(x−1,y)−2f(x,y)∂y2∂2f(x,y)=f(x,y+1)+f(x,y−1)−2f(x,y)∇2f(x,y)=[f(x+1,y)+f(x−1,y)+f(x,y+1)+f(x,y−1)]−4f(x,y)
0 1 0 − 1 − 4 1 0 1 0 1 1 1 1 − 8 1 1 1 1 \begin{array}{ccc}{0} & {1} & {0} \\ {-1} & {-4} & {1} \\ {0} & {1} & {0} \\ \\ {1} & {1} & {1} \\ {1} & {-8} & {1} \\ {1} & {1} & {1}\end{array} 0−101111−411−81010111
第二个算子为考虑了对角线元素的效果
#cv2.CV_64F 输出图像的深度(数据类型),可以使用-1, 与原图像保持一致np.uint8
laplacian=cv2.Laplacian(img,cv2.CV_64F)
Prewitt算子
g x = ∂ f ∂ x = ( z 7 + z 8 + z 9 ) − ( z 1 + z 2 + z 3 ) g y = ∂ f ∂ y = ( z 3 + z 6 + z 9 ) − ( z 1 + z 4 + z 7 ) \begin{array}{l}{g_{x}=\frac{\partial f}{\partial x}=\left(z_{7}+z_{8}+z_{9}\right)-\left(z_{1}+z_{2}+z_{3}\right)} \\ {g_{y}=\frac{\partial f}{\partial y}=\left(z_{3}+z_{6}+z_{9}\right)-\left(z_{1}+z_{4}+z_{7}\right)}\end{array} gx=∂x∂f=(z7+z8+z9)−(z1+z2+z3)gy=∂y∂f=(z3+z6+z9)−(z1+z4+z7)
对角线方向:
g x ′ = ( z 2 + z 3 + z 6 ) − ( z 4 + z 7 + z 8 ) g y ′ = ( z 6 + z 8 + z 9 ) − ( z 1 + z 2 + z 4 ) \begin{array}{l}{g_{x}^{\prime}=\left(z_{2}+z_{3}+z_{6}\right)-\left(z_{4}+z_{7}+z_{8}\right)} \\ {g_{y}^{\prime}=\left(z_{6}+z_{8}+z_{9}\right)-\left(z_{1}+z_{2}+z_{4}\right)}\end{array} gx′=(z2+z3+z6)−(z4+z7+z8)gy′=(z6+z8+z9)−(z1+z2+z4)

Sobel算子和Scharr算子
Sobel 算子是高斯平滑与微分操作的结合体,所以它的抗噪声能力很好。你可以设定求导的方向(xorder 或yorder)。还可以设定使用的卷积核的大小(ksize)。如果ksize=-1,会使用3x3 的Scharr 滤波器,它的的效果要比3x3 的Sobel 滤波器好(而且速度相同,所以在使用3x3 滤波器时应该尽量使用Scharr 滤波器)。3x3 的
Sobel算子的卷积核:
g x = ∂ f ∂ x = ( z 7 + 2 z 8 + z 9 ) − ( z 1 + 2 z 2 + z 3 ) g y = ∂ f ∂ y = ( z 3 + 2 z 6 + z 9 ) − ( z 1 + 2 z 4 + z 7 ) \begin{array}{l}{g_{x}=\frac{\partial f}{\partial x}=\left(z_{7}+2 z_{8}+z_{9}\right)-\left(z_{1}+2 z_{2}+z_{3}\right)} \\ {g_{y}=\frac{\partial f}{\partial y}=\left(z_{3}+2 z_{6}+z_{9}\right)-\left(z_{1}+2 z_{4}+z_{7}\right)}\end{array} gx=∂x∂f=(z7+2z8+z9)−(z1+2z2+z3)gy=∂y∂f=(z3+2z6+z9)−(z1+2z4+z7)

Scharr 滤波器卷积核如下:
X方向:
− 3 0 3 − 10 0 10 − 3 0 3 \begin{array}{|c|c|c|}\hline-3 & {0} & {3} \\ \hline-10 & {0} & {10} \\ \hline-3 & {0} & {3} \\ \hline\end{array} −3−10−30003103
Y方向:
− 3 − 10 − 3 0 0 0 3 10 3 \begin{array}{|c|c|c|}\hline-3 & {-10} & {-3} \\ \hline 0 & {0} & {0} \\ \hline 3 & {10} & {3} \\ \hline\end{array} −303−10010−303
# 参数1,0 为只在x 方向求一阶导数,最大可以求2 阶导数。
sobelx=cv2.Sobel(img,cv2.CV_64F,1,0,ksize=5)
# 参数0,1 为只在y 方向求一阶导数,最大可以求2 阶导数。
sobely=cv2.Sobel(img,cv2.CV_64F,0,1,ksize=5)
当我们可以通过参数 -1 来设定输出图像的深度(数据类型)与原图像保持一致,但是我们在代码中使用的却是 cv2.CV_64F。这是为什么呢?想象一下一个从黑到白的边界的导数是正数,而一个从白到黑的边界点导数却是负数。如果原图像的深度是np.int8 时,所有的负值都会被截断变成 0,换句话说就是把把边界丢失掉。所以如果这两种边界你都想检测到,最好的的办法就是将输出的数据类型设置的更高,比如 cv2.CV_16S,cv2.CV_64F 等。取绝对值然后再把它转回到 cv2.CV_8U
# Output dtype = cv2.CV_8U
sobelx8u = cv2.Sobel(img,cv2.CV_8U,1,0,ksize=5)# 也可以将参数设为-1
#sobelx8u = cv2.Sobel(img,-1,1,0,ksize=5)
# Output dtype = cv2.CV_64F. Then take its absolute and convert to cv2.CV_8U
sobelx64f = cv2.Sobel(img,cv2.CV_64F,1,0,ksize=5)
abs_sobel64f = np.absolute(sobelx64f)
sobel_8u = np.uint8(abs_sobel64f)
边缘检测
Laplacian(),sobel,scharr等会将噪声错误地识别为边缘,故在此之前应进行中值滤波和灰度化
核的元素值之和为0,将边缘转为白色,非边缘转为黑色
Canny边缘检测
John F.Canny 在1986 年提出的,分为以下五步:
-
使用高斯滤波器去噪
-
使用Sobel算子计算水平方向和垂直方向梯度,找到边界的梯度和方向
Edge-Gradient ( G ) = G x 2 + G y 2 Angle ( θ ) = tan − 1 ( G x G y ) \begin{array}{c}{\text { Edge-Gradient }(G)=\sqrt{G_{x}^{2}+G_{y}^{2}}} \\ {\text { Angle }(\theta)=\tan ^{-1}\left(\frac{G_{x}}{G_{y}}\right)}\end{array} Edge-Gradient (G)=Gx2+Gy2 Angle (θ)=tan−1(GyGx)梯度的方向一般总是与边界垂直。梯度方向被归为四类:垂直,水平,和两个对角线
3.在边缘上使用非最大抑制(NMS)
在获得梯度的方向和大小之后,应该对整幅图像做一个扫描,去除那些非边界上的点。对每一个像素进行检查,看这个点的梯度是不是周围具有相同梯度方向的点中最大的。
4.检测到的边缘上使用双阈值去除假阳性:
当图像的灰度梯度高于maxVal 时被认为是真的边界,那些低于minVal 的边界会被抛弃。如果介于两者之间的话,就要看这个点是否与某个被确定为真正的边界点相连,如果是就认为它也是边界点,如果不是就抛弃
5.分析所有边缘及其间的连接,保留真正的边缘,消除不明显的边缘
函数实现:cv2.Canny()
第一个参数是输入图像。第二和第三个分别是minVal 和maxVal。第三个参数设置用来计算图像梯度的Sobel
卷积核的大小,默认值为3。最后一个参数是L2gradient,它可以用来设定求梯度大小的方程。若为True,平方和开根号,若为False,用绝对值之和来近似,默认为False。
img=cv2.Canny(img, 50, 150, apertureSize=3, L2gradient=True)
用滑动条观看阈值对检测效果的影响:
# something wrong
def nothing(x):
     pass

img = cv2.imread("../images/statue_small.jpg", 1)

cv2.namedWindow('canny')
cv2.createTrackbar('minval','canny',0,255, nothing)
cv2.createTrackbar('maxval','canny',0,255, nothing)
while(1):
    minval = cv2.getTrackbarPos('minval','canny')
    maxval = cv2.getTrackbarPos('maxval','canny')
    canny = cv2.Canny(img, minval, maxval)
    cv2.imshow("image", img)
    cv2.imshow("canny", canny)
    k = cv2.waitKey(0)
    if k == 27:
        break
cv2.destroyAllWindows()
轮廓检测
图像阈值
简单阈值
cv2.threshhold():
-
第一个参数就是原图像,原图像应该是灰度图
-
第二个参数就是用来对像素值进行分类的阈值
-
第三个参数就是当像素值高于(有时是小于)阈值时应该被赋予的新的像素值
-
第四个参数表示阈值方法
cv2.THRESH_BINARY:
dst ( x , y ) = { maxval i f src ( x , y ) > thresh 0 otherwise \operatorname{dst}(x, y)=\left\{\begin{array}{c}{\text { maxval } i f \operatorname{src}(x, y)>\text { thresh }} \\ {0 \text { otherwise }}\end{array}\right. dst(x,y)={ maxval ifsrc(x,y)> thresh 0 otherwise
cv2.THRESH_BINARY_INV:
dst ( x , y ) = { 0 if src ( x , y ) > thresh maxval otherwise \operatorname{dst}(x, y)=\left\{\begin{array}{c}{0 \text { if } \operatorname{src}(x, y)>\text { thresh }} \\ {\text { maxval otherwise }}\end{array}\right. dst(x,y)={ 0 if src(x,y)> thresh maxval otherwise
cv2.THRESH_TRUNC:
dst ( x , y ) = { threshold i f src ( x , y ) > thresh src ( x , y ) otherwise \operatorname{dst}(x, y)=\left\{\begin{array}{c}{\text { threshold } i f \operatorname{src}(x, y)>\text { thresh }} \\ {\operatorname{src}(x, y) \text { otherwise }}\end{array}\right. dst(x,y)={ threshold ifsrc(x,y)> thresh src(x,y) otherwise
cv2.THRESH_TOZERO:
dst ( x , y ) = { src ( x , y ) if src ( x , y ) > thresh 0 otherwise \operatorname{dst}(x, y)=\left\{\begin{array}{c}{\operatorname{src}(x, y) \text { if } \operatorname{src}(x, y)>\text { thresh }} \\ {0 \text { otherwise }}\end{array}\right. dst(x,y)={ src(x,y) if src(x,y)> thresh 0 otherwise
cv2.THRESH_TOZERO_INV:
dst ( x , y ) = { 0 if src ( x , y ) > thresh src ( x , y ) otherwise \operatorname{dst}(x, y)=\left\{\begin{array}{c}{0 \text { if } \operatorname{src}(x, y)>\text { thresh }} \\ {\operatorname{src}(x, y) \text { otherwise }}\end{array}\right. dst(x,y)={ 0 if src(x,y)> thresh src(x,y) otherwise
例如:
import cv2
import numpy as np
from matplotlib import pyplot as plt
img=cv2.imread('gradient.png',0)
ret,thresh1=cv2.threshold(img,127,255,cv2.THRESH_BINARY)
ret,thresh2=cv2.threshold(img,127,255,cv2.THRESH_BINARY_INV)
ret,thresh3=cv2.threshold(img,127,255,cv2.THRESH_TRUNC)
ret,thresh4=cv2.threshold(img,127,255,cv2.THRESH_TOZERO)
ret,thresh5=cv2.threshold(img,127,255,cv2.THRESH_TOZERO_INV)
titles = ['Original Image','BINARY','BINARY_INV','TRUNC','TOZERO','TOZERO_INV']
images = [img, thresh1, thresh2, thresh3, thresh4, thresh5]
for i in xrange(6):
	plt.subplot(2,3,i+1),plt.imshow(images[i],'gray')
	plt.title(titles[i])
	plt.xticks([]),plt.yticks([])
plt.show()
使用git, Typora,github创建笔记
ssh-keygen -t rsa -C "[email protected]" #设置秘钥
github上添加秘钥
git config --global user.email "[email protected]"
git config --global user.name "Your Name"
git init #初始化该文件夹
git status #获取当前git状态
git diff #获取文件更改内容
git log #查看修改记录

git remote add origin [email protected]:perfectism13/learning.git #关联本地与远程仓库
git push -u origin master
git pull [email protected]:perfectism13/learning.git
git add . #ubantu中为./
git commit -m "information of update"
git push [email protected]:perfectism13/learning.git
windows中的ssh key在c/users/闵晨阳1998/.ssh中
ubantu在home/.ssh中
在matlab中使用hough变换检测圆
1.编程思路
1.读入图像,并将其灰度化
2.利用canny算子来检测边缘
3.设定检测时的半径与角度步长,预估被检测圆的半径范围
4.通过圆的参数方程将图像空间(x,y)对应到参数空间(a,b,r)
5.求解半径和圆心
6.合并圆心临近,半径差别不大的圆
7.标记出检测到的圆,并输出圆心坐标和半径
2.代码实现
%author:minchenyang
image = imread('D:/opencv_imagedata/detect_blob.png');
figure(1),imshow(image),title('原图')
% 将原图灰度化
image = rgb2gray(image);
figure(2),imshow(image),title('灰度化的原图')
%采用canny算子来进行边缘检测
edgeimage = edge(image, 'Canny', [0.3, 0.35]);
% 设定检测时的半径与角度步长
step_r = 1;step_angle = 0.1;
%预估被检测圆的半径范围
rmin = 10;  rmax = 100;
% 自动取最优的灰度阈值
thresh = graythresh(image);
r_min = rmin;r_max = rmax;
element=[];  para=[];
p=0.6;%p=thresh
[h,w] = size(edgeimage);
size_r = round((rmax-rmin)/step_r)+1;
size_angle = round(2*pi/step_angle);
hough_space = zeros(h,w,size_r);
%查找二值图像中非零元素的行列坐标
[row,col] = find(edgeimage);
count = size(row);
%通过圆的参数方程将图像空间(x,y)对应到参数空间(a,b,r)
for i=1:count
    for r=1:size_r
        for k=1:size_angle
            a = round(row(i)-(r_min+(r-1)*step_r)*cos(k*step_angle)); % a=x-r*cos(angle)
            b = round(col(i)-(r_min+(r-1)*step_r)*sin(k*step_angle)); % b=y-r*sin(angle)
            if(a>0&&a<=h&&b>0&&b=max_para*p);
length = size(num);
%求解半径和圆心
for i=1:count
    for k=1:length
        para3 = floor(num(k)/(h*w))+1;
        para2 = floor((num(k)-(para3-1)*(h*w))/h)+1;
        para1 = num(k)-(para3-1)*(h*w)-(para2-1)*h;
        if((row(i)-para1)^2+(col(i)-para2)^2<(r_min+(para3-1)*step_r)^2+5&&...
                (row(i)-para1)^2+(col(i)-para2)^2>(r_min+(para3-1)*step_r)^2-5)
            hough_circle(row(i),col(i)) = true;
        end
    end
end
for k=1:length
    para3 = floor(num(k)/(h*w))+1;
    para2 = floor((num(k)-(para3-1)*(h*w))/h)+1;
    para1 = num(k)-(para3-1)*(h*w)-(para2-1)*h;
    element = [element;para1,para2,para3];
    hough_circle(para1,para2)= true;
end
%合并圆心临近,半径差别不大的圆
while size(element,1) >= 1
    num=1;
    xyr=[];
    temp1=element(1,1);temp2=element(1,2);temp3=element(1,3);
    c1=temp1;c2=temp2;c3=temp3;
    temp3= r_min+(temp3-1)*step_r;
    if size(element,1)>1
        for k=2:size(element,1)
          if (element(k,1)-temp1)^2+(element(k,2)-temp2)^2 > temp3^2
             xyr=[xyr;element(k,1),element(k,2),element(k,3)];  %保存剩下圆的圆心和半径位置
          else
            c1=c1+element(k,1);
            c2=c2+element(k,2);
            c3=c3+element(k,3);
            num=num+1;
          end
        end
    end
    c1=round(c1/num);
    c2=round(c2/num);
    c3=round(c3/num);
    c3=r_min+(c3-1)*step_r;
    para=[para;c1,c2,c3]; %保存各个圆的圆心和半径的值
    element=xyr;
end
figure(3),imshow(edgeimage),title('边缘')
figure(4),imshow(hough_circle),title('检测出的圆上的像素点')
element=para;
%标记出检测到的圆,并输出圆心坐标和半径
[r,~]=size(element);
fprintf(1,'  检测出%d个圆\n',r);
fprintf(1,'  圆心     半径\n');
for w=1:r
        fprintf(1,'%d (%d,%d)  %d\n',w,floor(element(w,1)),floor(element(w,2)),floor(element(w,3)));
end
figure(5),imshow(image),title('检测出图中的圆')
hold on;
plot(element(:,2), element(:,1), 'r+');
for k = 1 : r
    t=0:0.01*pi:2*pi;
    x=cos(t).*element(k,3)+element(k,2);
    y=sin(t).*element(k,3)+element(k,1);
    plot(x,y,'.','Markersize',10);
end
