使用QT5+Opencv完成简单的图像处理及视频处理软件
使用QT5+Opencv完成简单的图像处理及视频处理软件
- 一、写在前面
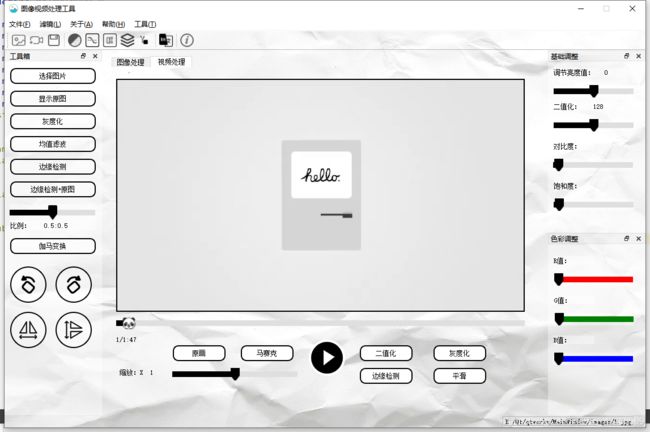
- 二、成品展示
- 三、图像处理
-
- 1.灰度化
- 2.均值滤波
- 3.边缘检测
- 4.伽马变换
- 5.亮度调节(槽函数)
- 6.二值化(可变)(槽函数)
- 7.对比度(函数调用)
- 8.饱和度调整(函数调用)
- 9.保存及水印
- 四、视频处理
-
- 1.打开视频
- 2.进度条随视频移动
- 3.timer触发函数
- 4.Mat转图像函数
- 5.暂停/播放
- 6.各种功能按钮
- 五、源码下载
- 六、补充以及一些常见错误解决方法
一、写在前面
软件介绍:
首先介绍一下该软件,这是我在 QT图形界面编程 这门课程上完成的大作业,主要功能分为图像处理以及视频处理两大块。
图像处理包括:灰度化、均值滤波、边缘检测、伽马变换、旋转镜像、亮度调节、二值化、对比度,饱和度调节、色彩调节、图片保存、水印等。
视频处理包括:二值化、边缘检测、灰度化、平滑、局部马赛克、缩放等。
此外还进行了界面美化、中英翻译等。
需要说明的是,由于完成的比较仓促,很多代码存在格式、效率方面的问题,希望dalao们多多包涵~
环境:
软件使用的是QT 5.12.2+QT Creator 4.8.2+win10,QT5版本应该都可行,视频处理涉及到OpenCV,我使用的是OpenCV4.0.1版本。
关于环境的安装我参考的是这篇文章:win10系统Qt5.12配置OpenCV4.0.1库教程暨Qt,OpenCV,Cmake详细下载安装教程(史上最全!),为我提供了非常大的帮助,非常感谢!!
为了避免出现各种各样奇怪的错误,建议使用和我相同的版本(安装opencv的时候真的踩了很多很多坑)!
二、成品展示
三、图像处理
1.灰度化
效果:
代码:
//灰度化
QImage MainWindow::gray(QImage image){

    QImage newImage =image.convertToFormat(QImage::Format_ARGB32);
    QColor oldColor;
        for(int y = 0; y < newImage.height(); y++)
        {

            for(int x = 0; x < newImage.width(); x++)
            {

                oldColor = QColor(image.pixel(x,y));
                int average = (oldColor.red() + oldColor.green() + oldColor.blue()) / 3;
                newImage.setPixel(x, y, qRgb(average, average, average));
            }
        }
        return newImage;
}
2.均值滤波
效果:
代码:
//均值滤波
QImage MainWindow::junzhi(QImage image){

    int kernel [3][3] = {

        {
     1,1,1},
        {
     1,1,1},
        {
     1,1,1}};
        int sizeKernel = 3;
        int sumKernel = 9;
        QColor color;
         for(int x = sizeKernel/2;x<image.width() - sizeKernel/2;x++)
        {

           for(int y= sizeKernel/2;y<image.height() - sizeKernel/2;y++)
            {

                int r = 0;
                int g = 0;
                int b = 0;
                for(int i = -sizeKernel/2;i<=sizeKernel/2;i++)
                {

                   for(int j = -sizeKernel/2;j<=sizeKernel/2;j++)
                    {

                     color = QColor(image.pixel(x+i,y+j));
                     r+=color.red()*kernel[sizeKernel/2+i][sizeKernel/2+j];
                     g+=color.green()*kernel[sizeKernel/2+i][sizeKernel/2+j];
                     b+=color.blue()*kernel[sizeKernel/2+i][sizeKernel/2+j];
                    }
                }
                r = qBound(0,r/sumKernel,255);
                g = qBound(0,g/sumKernel,255);
                b = qBound(0,b/sumKernel,255);
                image.setPixel(x,y,qRgb( r,g,b));
            }
        }
         return image;
}
3.边缘检测
效果:
代码:
//边缘检测
QImage MainWindow::bianyuan(QImage image){

    QImage newImage =image.convertToFormat(QImage::Format_ARGB32);
    QColor color0;
    QColor color1;
    QColor color2;
    QColor color3;
    int  r = 0;
    int g = 0;
    int b = 0;
    int rgb = 0;
    int r1 = 0;
    int g1 = 0;
    int b1 = 0;
    int rgb1 = 0;
    int a = 0;
    for( int y = 0; y < image.height() - 1; y++)
    {

        for(int x = 0; x < image.width() - 1; x++)
        {

            color0 =   QColor ( image.pixel(x,y));
            color1 =   QColor ( image.pixel(x + 1,y));
            color2 =   QColor ( image.pixel(x,y + 1));
            color3 =   QColor ( image.pixel(x + 1,y + 1));
            r = abs(color0.red() - color3.red());
            g = abs(color0.green() - color3.green());
            b = abs(color0.blue() - color3.blue());
            rgb = r + g + b;

            r1 = abs(color1.red() - color2.red());
            g1= abs(color1.green() - color2.green());
            b1 = abs(color1.blue() - color2.blue());
            rgb1 = r1 + g1 + b1;

            a = rgb + rgb1;
            a = a>255?255:a;

            newImage.setPixel(x,y,qRgb(a,a,a));
        }
    }
    return newImage;
}
4.伽马变换
效果:
代码:
QImage MainWindow::gamma(QImage image){

    double d=1.2;
    QColor color;
    int height = image.height();
    int width = image.width();
    for (int i=0;i<width;i++){

        for(int j=0;j<height;j++){

            color = QColor(image.pixel(i,j));
            double r = color.red();
            double g = color.green();
            double b = color.blue();
            int R = qBound(0,(int)qPow(r,d),255);
            int G = qBound(0,(int)qPow(g,d),255);
            int B = qBound(0,(int)qPow(b,d),255);
            image.setPixel(i,j,qRgb(R,G,B));
        }
    }
    return image;
}
5.亮度调节(槽函数)
代码:
//亮度调节
void MainWindow::on_horizontalSlider_valueChanged(int value)
{

    if(origin_path!=nullptr){
     				//origin_path需要换成你的图片路径
    QImage image(origin_path);
    int red, green, blue;
        int pixels = image.width() * image.height();
        unsigned int *data = (unsigned int *)image.bits();

        for (int i = 0; i < pixels; ++i)
        {

            red= qRed(data[i])+ value;
            red = (red < 0x00) ? 0x00 : (red > 0xff) ? 0xff : red;
            green= qGreen(data[i]) + value;
            green = (green < 0x00) ? 0x00 : (green > 0xff) ? 0xff : green;
            blue= qBlue(data[i]) + value;
            blue =  (blue  < 0x00) ? 0x00 : (blue  > 0xff) ? 0xff : blue ;
            data[i] = qRgba(red, green, blue, qAlpha(data[i]));
        }
        QImage Image=ImageCenter(image,ui->label_show);
        ui->label_show->setPixmap(QPixmap::fromImage(Image));
        ui->label_show->setAlignment(Qt::AlignCenter);
        ui->label_light->setText(QString::number(value));
    }
    else{

        QMessageBox::warning(nullptr, "提示", "请先选择一张图片!", QMessageBox::Yes |  QMessageBox::Yes);
    }

}
6.二值化(可变)(槽函数)
槽函数代码:
//二值化滑动条
void MainWindow::on_horizontalSlider_erzhi_valueChanged(int value)
{

    if(origin_path!=nullptr){

    QImage image(origin_path);
    QImage images=gray(image);
    int height=images.height();
    int width=images.width();
            int bt;
            QColor oldColor;
            for (int i = 0; i < height; ++i)
            {

                for(int j=0;j<width;++j){

                    oldColor = QColor(images.pixel(j,i));
                    bt = oldColor.red();
                if(bt<value){

                    bt=0;
                }else{

                    bt=255;
                }
                images.setPixel(j,i, qRgb(bt, bt, bt));

                }
            }
    QImage Image=ImageCenter(images,ui->label_show);
    ui->label_show->setPixmap(QPixmap::fromImage(Image));
    ui->label_show->setAlignment(Qt::AlignCenter);
    ui->label_yuzhi->setText(QString::number(value));
    }
    else{

        QMessageBox::warning(nullptr, "提示", "请先选择一张图片!", QMessageBox::Yes |  QMessageBox::Yes);
    }
}
7.对比度(函数调用)
需要在槽函数里调用该函数。
函数代码:
//调整对比度函数调用
QImage MainWindow::AdjustContrast(QImage image, int value)
{

    int pixels = image.width() * image.height();
    unsigned int *data = (unsigned int *)image.bits();
    int red, green, blue, nRed, nGreen, nBlue;
    if (value > 0 && value < 256)
    {

        float param = 1 / (1 - value / 256.0) - 1;

        for (int i = 0; i < pixels; ++i)
        {

            nRed = qRed(data[i]);
            nGreen = qGreen(data[i]);
            nBlue = qBlue(data[i]);

            red = nRed + (nRed - 127) * param;
            red = (red < 0x00) ? 0x00 : (red > 0xff) ? 0xff : red;
            green = nGreen + (nGreen - 127) * param;
            green = (green < 0x00) ? 0x00 : (green > 0xff) ? 0xff : green;
            blue = nBlue + (nBlue - 127) * param;
            blue = (blue < 0x00) ? 0x00 : (blue > 0xff) ? 0xff : blue;

            data[i] = qRgba(red, green, blue, qAlpha(data[i]));
        }
    }
    else
    {

        for (int i = 0; i < pixels; ++i)
        {

            nRed = qRed(data[i]);
            nGreen = qGreen(data[i]);
            nBlue = qBlue(data[i]);

            red = nRed + (nRed - 127) * value / 100.0;
            red = (red < 0x00) ? 0x00 : (red > 0xff) ? 0xff : red;
            green = nGreen + (nGreen - 127) * value / 100.0;
            green = (green < 0x00) ? 0x00 : (green > 0xff) ? 0xff : green;
            blue = nBlue + (nBlue - 127) * value / 100.0;
            blue = (blue < 0x00) ? 0x00 : (blue > 0xff) ? 0xff : blue;

            data[i] = qRgba(red, green, blue, qAlpha(data[i]));
        }
    }

    return image;
}
8.饱和度调整(函数调用)
代码:
//饱和度函数调用
QImage MainWindow::AdjustSaturation(QImage Img, int iSaturateValue)
{

    int red, green, blue, nRed, nGreen, nBlue;
    int pixels = Img.width() * Img.height();
    unsigned int *data = (unsigned int *)Img.bits();

    float Increment = iSaturateValue/100.0;

    float delta = 0;
    float minVal, maxVal;
    float L, S;
    float alpha;

    for (int i = 0; i < pixels; ++i)
    {

        nRed = qRed(data[i]);
        nGreen = qGreen(data[i]);
        nBlue = qBlue(data[i]);

        minVal = std::min(std::min(nRed, nGreen), nBlue);
        maxVal = std::max(std::max(nRed, nGreen), nBlue);
        delta = (maxVal - minVal) / 255.0;
        L = 0.5*(maxVal + minVal) / 255.0;
        S = std::max(0.5*delta / L, 0.5*delta / (1 - L));

        if (Increment > 0)
        {

            alpha = std::max(S, 1 - Increment);
            alpha = 1.0 / alpha - 1;
            red = nRed + (nRed - L*255.0)*alpha;
            red = (red < 0x00) ? 0x00 : (red > 0xff) ? 0xff : red;
            green = nGreen + (nGreen - L*255.0)*alpha;
            green = (green < 0x00) ? 0x00 : (green > 0xff) ? 0xff : green;
            blue = nBlue + (nBlue - L*255.0)*alpha;
            blue = (blue < 0x00) ? 0x00 : (blue > 0xff) ? 0xff : blue;
        }
        else
        {

            alpha = Increment;
            red = L*255.0 + (nRed - L * 255.0)*(1+alpha);
            red = (red < 0x00) ? 0x00 : (red > 0xff) ? 0xff : red;
            green = L*255.0 + (nGreen - L * 255.0)*(1+alpha);
            green = (green < 0x00) ? 0x00 : (green > 0xff) ? 0xff : green;
            blue = L*255.0 + (nBlue - L * 255.0)*(1+alpha);
            blue = (blue < 0x00) ? 0x00 : (blue > 0xff) ? 0xff : blue;
        }

        data[i] = qRgba(red, green, blue, qAlpha(data[i]));
    }

    return Img;
}
9.保存及水印
通过一个复选框,选择是否需要添加水印。水印通过一张白底黑字的图片提取,将水印图片的黑色部分添加到要保存的图片中。
代码:
//保存及水印
void MainWindow::on_pushButton_save_clicked()
{

		//需要有一个复选框判断是否要加水印
        if(ui->checkBox->isChecked()){
     					//要加水印
        if(ui->label_show->pixmap()!=nullptr){

            QImage image2(ui->label_show->pixmap()->toImage());
            QImage simage("E:/Qt/qtworks/MainWindow/images/name1.png");
                   int swidth = simage.width();
                   int sheight = simage.height();
                   int r,b,g;

                   for(int i=0; i<sheight; ++i) {

                       for(int j=0; j<swidth; ++j) {

                          QColor oldcolor2=QColor(simage.pixel(j,i));
                          r=oldcolor2.red();
                          b=oldcolor2.blue();
                          g=oldcolor2.green();

                          if(r==0&&b==0&&g==0)
                          {

                              image2.setPixelColor(j,i,qRgb(0,0,0));
                          }else
                          {

                              //image.setPixelColor(j,i,qRgb(red,blue,green));
                          }
                       }

                   }

                QString filename = QFileDialog::getSaveFileName(this,
                    tr("保存图片"),
                    "E:/Qtworks/MainWindow/images/signed_images.png",
                    tr("*.png;; *.jpg;; *.bmp;; *.tif;; *.GIF")); //选择路径
                if (filename.isEmpty())
                {

                    return;
                }
                else
                {

                    if (!(image2.save(filename))) //保存图像
                    {

                        QMessageBox::information(this,
                            tr("图片保存成功!"),
                            tr("图片保存失败!"));
                        return;
                    }
                    ui->statusBar->showMessage("图片保存成功!");
                }
        }
        else{

            QMessageBox::warning(nullptr, "提示", "请先打开图片!", QMessageBox::Yes |  QMessageBox::Yes);
        }

        }
        else //不加水印
        {

            if(ui->label_show->pixmap()!=nullptr){

                QString filename = QFileDialog::getSaveFileName(this,
                tr("保存图片"),
                "E:/Qtworks/MainWindow/images",
                tr("*.png;; *.jpg;; *.bmp;; *.tif;; *.GIF")); //选择路径
            if (filename.isEmpty())
            {

                return;
            }
            else
            {

                if (!(ui->label_show->pixmap()->toImage().save(filename))) //保存图像
                {


                    QMessageBox::information(this,
                        tr("图片保存成功!"),
                        tr("图片保存失败!"));
                    return;
                }
                ui->statusBar->showMessage("图片保存成功!");
            }

        }else{

            QMessageBox::warning(nullptr, "提示", "请先打开图片!", QMessageBox::Yes |  QMessageBox::Yes);
        }
        }
}
四、视频处理
视频中的图像处理函数使用opencv自带函数来提高效率,否则会造成卡顿。
使用多线程方式可以解决卡顿,感兴趣的朋友可以尝试一下。
视频处理的代码直接放在一起贴出来:
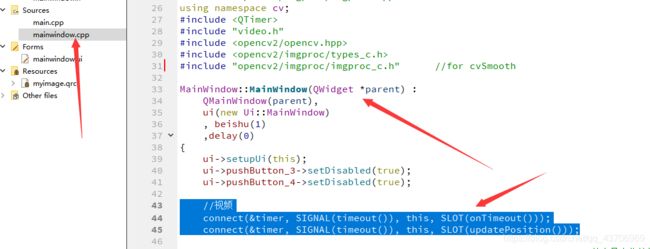
首先在cpp文件的构造函数中加入:
    connect(&timer, SIGNAL(timeout()), this, SLOT(onTimeout()));
    connect(&timer, SIGNAL(timeout()), this, SLOT(updatePosition()));
接着在头文件中添加声明:(直接贴出来头文件代码,包括了图像和视频,请对应自己的命名等做修改)
#ifndef MAINWINDOW_H
#define MAINWINDOW_H
#include 以下代码写在cpp文件中
1.打开视频
//打开视频
void MainWindow::on_action_V_triggered()
{

    QString video_path = QFileDialog::getOpenFileName(this,tr("选择视频"),"E:/Qt/qtworks/MainWindow/images",tr("Video (*.WMV *.mp4 *.rmvb *.flv)"));
    if(video_path!=nullptr){

    //打开视频文件:其实就是建立一个VideoCapture结构
    capture.open(video_path.toStdString());
    //检测是否正常打开:成功打开时,isOpened返回ture
    if (!capture.isOpened())
        QMessageBox::warning(nullptr, "提示", "打开视频失败!", QMessageBox::Yes |  QMessageBox::Yes);
        //ui->textEdit->append("fail to open!");
    ui->tabWidget->setCurrentIndex(1);
    ui->pushButton_6->setEnabled(true);
    //获取整个帧数
    long totalFrameNumber = capture.get(CAP_PROP_FRAME_COUNT);

    //设置开始帧()
    long frameToStart = 0;
    capture.set(CAP_PROP_POS_FRAMES, frameToStart);

    //获取帧率
    double rate = capture.get(CAP_PROP_FPS);

    delay = 1000 / rate;
    timer.start(delay);
    type=0;
    //timer.start();
    isstart=!isstart;
    ui->pushButton_6->setStyleSheet("border-radius:32px;"
                                             "background-image: url(:/myImage/images/stop.png);border:none;") ;
    }
}
2.进度条随视频移动
//进度条随视频移动
void MainWindow::updatePosition(){
    long totalFrameNumber = capture.get(CAP_PROP_FRAME_COUNT);
    ui->VideohorizontalSlider_2->setMaximum(totalFrameNumber);
    long frame=capture.get(CAP_PROP_POS_FRAMES );
    ui->VideohorizontalSlider_2->setValue(frame);
}

//进度条拖动
void MainWindow::on_VideohorizontalSlider_2_valueChanged(int value)
{
    capture.set(CAP_PROP_POS_FRAMES, value);
}

//秒转分函数
QString MainWindow::stom(int s){
    QString m;
    if(s/60==0){
        m=QString::number (s%60);
    }else{
        m=QString::number (s/60)+":"+QString::number (s%60);
    }
    return m;
}
3.timer触发函数
//timer触发函数
void MainWindow::onTimeout()
{
    Mat frame;
    //读取下一帧
    double rate = capture.get(CAP_PROP_FPS);
    double nowframe=capture.get(CAP_PROP_POS_FRAMES );
    int nows=nowframe/rate;
    cout<<"nows:"<label_12->setText(stom(nows)+"/"+stom(totals));

    if (!capture.read(frame))
    {
        //ui->textEdit->append(QString::fromLocal8Bit("fail to load video"));
        return;
    }

    if(type==1){
        //image=gray2(image);
        cvtColor(frame,frame,CV_BGR2GRAY);
    }
    else if(type==2){
        cvtColor(frame, frame, CV_BGR2GRAY);
            //高斯滤波
            GaussianBlur(frame, frame, Size(3, 3),
                0, 0, BORDER_DEFAULT);
            //Canny检测
            int edgeThresh =100;
            Mat Canny_result;
            Canny(frame, frame, edgeThresh, edgeThresh * 3, 3);
    }else if(type==3)
    {
         //Smooth(frame, frame,Size(3, 3), 0, 0);
         GaussianBlur(frame, frame, Size(3, 3), 0, 0);
    }
    else if(type==4){
        cvtColor(frame,frame,CV_BGR2GRAY);
        threshold(frame, frame, 96, 255, THRESH_BINARY);
    }else if (type==5) {
        frame=masaike(frame);
    }


    QImage image=MatToQImage(frame);

    //ui->label_11->setScaledContents(true);
    double scale=ui->horizontalSlider_suofang->value()/100.0;

    QSize qs = ui->label_11->rect().size()*scale;
    ui->label_11->setPixmap(QPixmap::fromImage(image).scaled(qs));
    ui->label_11->setAlignment(Qt::AlignCenter);
    ui->label_11->repaint();
    //这里加滤波程序

    //long totalFrameNumber = capture.get(CAP_PROP_POS_FRAMES);

   // ui->textEdit->append(QString::fromLocal8Bit("正在读取第:第 %1 帧").arg(totalFrameNumber));
}
4.Mat转图像函数
//Mat转图像
QImage MainWindow::MatToQImage(const cv::Mat& mat)
{
    // 8-bits unsigned, NO. OF CHANNELS = 1
    if (mat.type() == CV_8UC1)
    {
        QImage image(mat.cols, mat.rows, QImage::Format_Indexed8);
        // Set the color table (used to translate colour indexes to qRgb values)
        image.setColorCount(256);
        for (int i = 0; i < 256; i++)
        {
            image.setColor(i, qRgb(i, i, i));
        }
        // Copy input Mat
        uchar *pSrc = mat.data;
        for (int row = 0; row < mat.rows; row++)
        {
            uchar *pDest = image.scanLine(row);
            memcpy(pDest, pSrc, mat.cols);
            pSrc += mat.step;
        }
        return image;
    }
    // 8-bits unsigned, NO. OF CHANNELS = 3
    else if (mat.type() == CV_8UC3)
    {
        // Copy input Mat
        const uchar *pSrc = (const uchar*)mat.data;
        // Create QImage with same dimensions as input Mat
        QImage image(pSrc, mat.cols, mat.rows, mat.step, QImage::Format_RGB888);
        return image.rgbSwapped();
    }
    else if (mat.type() == CV_8UC4)
    {
        // Copy input Mat
        const uchar *pSrc = (const uchar*)mat.data;
        // Create QImage with same dimensions as input Mat
        QImage image(pSrc, mat.cols, mat.rows, mat.step, QImage::Format_ARGB32);
        return image.copy();
    }
    else
    {
        return QImage();
    }
}
5.暂停/播放
//暂停/播放
void MainWindow::on_pushButton_6_clicked()
{
    if(isstart)
    {
        timer.stop();
        isstart=false;
        ui->pushButton_6->setStyleSheet("border-radius:32px;"
                                                 "background-image: url(:/myImage/images/start.png);border:none;") ;
    }else {
        timer.start(delay);
        isstart=true;
        ui->pushButton_6->setStyleSheet("border-radius:32px;"
                                                 "background-image: url(:/myImage/images/stop.png);border:none;") ;
    }
}
6.各种功能按钮
//灰度
void MainWindow::on_pushButton_7_clicked()
{
    type=1;
}

void MainWindow::on_pushButton_8_clicked()
{
    type=0;
}


//均值滤波
void MainWindow::on_pushButton_9_clicked()
{
    type=2;
}

//平滑
void MainWindow::on_pushButton_10_clicked()
{
    type=3;
}

//二值化
void MainWindow::on_pushButton_11_clicked()
{
    type=4;
}

//局部马赛克
void MainWindow::on_pushButton_2_clicked()
{
    type=5;
}

//缩放
void MainWindow::on_horizontalSlider_suofang_valueChanged(int value)
{

    ui->label_suofangvalue->setText(QString::number(value/100.0));
    cout<(k, m)[0] = src.at(i, j)[0];
                        src.at(k, m)[1] = src.at(i, j)[1];
                        src.at(k, m)[2] = src.at(i, j)[2];
                    }
                }
            }
        }
        return src;
}
五、源码下载
完整源码已上传至CSDN,包括了ui,图片素材等,点我下载。
六、补充以及一些常见错误解决方法
文章写得也比较仓促,代码较多,无法将一步步详细过程贴出来,只能将核心功能的函数以及界面贴出来,其他包括翻译、界面美化等功能也省略,如果需要完整源码的请自行下载。
-
图像处理是不涉及OpenCV的,如果仅需要图像处理功能则无需配置OpenCV,视频处理需要用到OpenCV的函数,推荐参考这篇文章:win10系统Qt5.12配置OpenCV4.0.1库教程暨Qt,OpenCV,Cmake详细下载安装教程(史上最全!)
-
如果遇到转到槽失败错误,可以参考这篇文章:Qt Creator添加/查找槽错误。我自己写代码的时候经常莫名其妙出现这个错误,有时候文章里的方法可行,有时候又不行,有时候重启QT又好了,就很玄学= =
-
如果有一些找不到函数的错误,可能是函数名与我不一样或是界面ui名称和我不一样,这个需要自己注意一下哦
-
有什么问题的话可以在评论区提出来,我会第一时间回复

