小程序的豆瓣项目练习
小程序的豆瓣项目:
一. tabbar的布局实现
需要创建 pages/welcome board list item search mine
全局配置 —> tabBar
app.json里面进行了配置:
"tabBar":{  //配置底部的tab栏
    "color":"#ccc",  //默认的颜色
    "selectedColor":"#35495e",  //选中tabar的文字颜色
    "borderStyle":"white",      //tabbar的上边框线  white 默认是black
    "backgroundColor":"#f9f9f9", //tabbar的背景色
    "list":[ //数组 规定了2-5
      {
        "text": "榜单",  //tabbar的文字
        "pagePath":"pages/board/board", //tabbar的页面路径
        "iconPath":"images/board.png",  //tabbar的icon图标
        "selectedIconPath":"images/board-actived.png" //tabbar当前选中的图标
      },
      {
        "text": "搜索",
        "pagePath": "pages/search/search",
        "iconPath": "images/search.png",
        "selectedIconPath": "images/search-actived.png"
      },
      {
        "text": "我的",
        "pagePath": "pages/mine/mine",
        "iconPath": "images/mine.png",
        "selectedIconPath": "images/mine-actived.png"
      }
    ]
  }
window的配置:
"window": {
    "backgroundTextStyle": "light",
    "navigationBarBackgroundColor": "#35495e", //导航栏的背景
    "navigationBarTitleText": "豆瓣",  //全局的文字  例如welcome页面没有配置,就用全局
    "navigationBarTextStyle": "white" //文字的颜色  white/black
  },
二. 欢迎页面的实现
2-1 封装ajax请求 (https://www.cnblogs.com/e-cat/p/8656040.html)
utils/douban.js文件:
export default ({
  url,data={start:0,count:20},method='get'
})=>{
  return new Promise((resolve,reject)=>{
    //调用微信的请求数据的方法
    wx.request({
      url,
      data,
      header: {
        'content-type': 'json' //请求头的content-type需要改!
      },
      method,
      success(res) {
        resolve(res)
      },
      fail(err){
        reject(err)
      }
    })
  })
}


//import douban from "XXXX"
/*
  douban({
    url:"https://douban.uieee.com/v2/movie/in_theaters",
    data:{
      start:0,
      count:3
    }
  }).then(res=>{
    console.log(res)
  })

 */
welcome/welcome.js文件:
  onLoad: function (options) {
    douban({
      url:"https://douban.uieee.com/v2/movie/in_theaters",
    }).then(res=>{
      console.log("res",res)
    })
  },
后续发现报错! 需要配置开发=》开发设置=》服务器域名=》request合法域名 (https://douban.uieee.com)
再去重新打开微信开发者工具,就可以正常访问接口了。 (详情=》本地设置=》不校验域名)
welcome/welcome.js文件:
import douban from "../../utils/douban.js"

data: {
	movies:[]
},

onLoad: function (options) {
    douban({
      url:"https://douban.uieee.com/v2/movie/in_theaters",
      data:{
        count:3
      }
    }).then(res=>{
      console.log("res",res)
      let result = [];
      res.data.subjects.map(item=>{
        result.push({
          id:item.id,
          image:item.images.large
        })
      })
      //进行数据的设置
      this.setData({
        movies:result
      })
    })
  },
welcome/welcome.wxml
需要在欢迎页面结构上面显示轮播图了!
welcome/welcome.json:
{
  "navigationStyle":"custom",
  "usingComponents": {}
}
2-2 小程序的事件注意:
小程序的事件绑定方式有两种:bind绑定(支持事件冒泡行为) catch绑定(非冒泡)
小程序的事件参数传递通过data-形式传递。
pages/board/board.wxml
clickme(event){
    console.log(event.target.dataset.a)
},
2-3 小程序的跳转
1) wx.switchTab(Object object)
跳转到 tabBar 页面,并关闭其他所有非 tabBar 页面
wx.switchTab({
	url: '/pages/search/search',
})
2)wx.reLaunch(Object object)
关闭所有页面,打开应用内的某一个页面
 wx.reLaunch({
 	url: '/pages/list/list?id=1&name=zhangsan',
 })
onLoad: function (options) {
	console.log("list-id",options)
},
3)wx.redirectTo(Object object)
关闭当前页面,跳转到应用内的某个页面。但是不允许跳转到 tabbar 页面
wx.redirectTo({
	url:"/pages/list/list?id=1"
})
4)wx.navigateTo(Object object)
保留当前页面,跳转到应用内的某个页面。但是不能跳到 tabbar 页面。使用 wx.navigateBack 可以返回到原页面。小程序中页面栈最多十层
wx.navigateTo({
	url: '/pages/list/list?id=1',
})
5)wx.navigateBack(Object object)
关闭当前页面,返回上一页面或多级页面。可通过 getCurrentPages 获取当前的页面栈,决定需要返回几层
// 注意:调用 navigateTo 跳转时,调用该方法的页面会被加入堆栈,
// 而 redirectTo 方法则不会。见下方示例代码

// 此处是A页面
wx.navigateTo({
  url: 'B?id=1'
})

// 此处是B页面
wx.navigateTo({
  url: 'C?id=1'
})

// 在C页面内 navigateBack,将返回A页面
wx.navigateBack({
  delta: 2  // A=>B=>C  现在从c直接到a,那么就写个2,默认是1,只能返回B
})
三. board的实现
3-1 borad的banner
app.js文件:
globalData: {
    baseUrl:"https://douban.uieee.com/v2/movie/"
  }
utils/douban.js
let app = getApp();
wx.request({
      url:app.globalData.baseUrl+url,
      ...
})
welcome/welcome.js
onLoad: function (options) {
    douban({
      url:"in_theaters",
      data:{
        count:3
      }
    }).....
})
board/board.js
data: {
    banner:{
      key:"coming_soon",
      title:"即将上映",
      content:[]  //[{id,image},{},{}]
    }
 },


 onLoad: async function (options) {
    let res = await douban({
      url:this.data.banner.key,
      data:{count:3}
    })
    //组装数据
    let result = []
    res.data.subjects.map(item=>{
      result.push({
        id:item.id,
        image:item.images.large
      })
    })
    //更改小程序data里面的content
    // this.setData({banner:{content:result}})
    this.setData({
      "banner.content":result
    })
  },
board/board.wxml
board/board.wxss
小程序里面rpx适配:
iphone6下:
1css像素 ~ 2物理像素 ~ 2rpx
.container{
  display: flex;
  flex: 1;
  flex-direction: column;
  box-sizing: border-box;
}
.slide .swp{
  height:400rpx;
}
.slide .nav-img{
  width:100%;
  height:400rpx;
}
3-2 board的列表实现
board/board.js
data: {
    banner:{
      key:"coming_soon",
      title:"即将上映",
      content:[]  //[{id,image},{},{}]
    },
    list:[
      { key: "coming_soon", title: "即将上映" },
      { key: "top250", title: "排行榜" },
      { key: "in_theaters", title: "正在热映" }
    ]
  },
board/board.wxml
     .....


      {
    {item.title}}
board/board.wxss
.container{
  display: flex;
  flex: 1;
  flex-direction: column;
  box-sizing: border-box;
}
.slide .swp{
  height:400rpx;
}
.slide .nav-img{
  width:100%;
  height:400rpx;
}

//榜单列表的样式
.board-item{
  display: flex;
  border:1px solid #999;
  margin:40rpx;
  padding: 40rpx;
}
.board-item .board-item-title{
  flex:1
}

.board-item .arrow{
  width:40rpx;
  height:40rpx;
}
3-3 点击轮播图跳转到item
跳转方式:
小程序里面:
方式一. 编程式导航跳转 (wx.switchTab({url:“url地址”}))
方式二. 声明式导航跳转 ()
vue里面: ( this.$router.push(“url地址”) )
react里面: ( this.props.history(“url地址”)) )
需要在banner的image上面嵌套navigator导航标签,url属性指明跳转目标路由。
3-4 item详情页面的数据搭建
item/item.js
// pages/item/item.js
import douban from "../../utils/douban.js"
Page({

  /**
   * 页面的初始数据
   */
  data: {
    photos:[],  //电影详情剧照
    detail:"",  //电影的所有的信息
    title:''   //电影的标题
  },

  //点击剧照
  clickImage(){
    wx.previewImage({ //实现图片的预览
      urls: this.data.photos,  // Array
    })
  },

  /**
   * 生命周期函数--监听页面加载
   */
  onLoad: function (options) {
    // wx.showNavigationBarLoading()
    // wx.showLoading({
    //   title: '加载中...',
    // })
    douban({
      url: "subject/" + options.id,
      loadingTop:true,//在导航栏上面显示loading
    }).then(res=>{
      let photos = []
      res.data.photos.map(item=>{
        photos.push(item.image)
      })
      this.setData({
        photos,
        detail: res.data,
        title:res.data.title
      })
      //设置导航的标题
      wx.setNavigationBarTitle({
        title: this.data.title
      })
      //设置导航栏颜色
      wx.setNavigationBarColor({
        frontColor: '#ffffff',
        backgroundColor: '#f45332',
        animation: {
          duration: 400,
          timingFunc: 'easeIn'
        }
      })
      // wx.hideNavigationBarLoading()
      // wx.hideLoading()
    })
  },
})
utils/douban
let app = getApp();
export default ({
  url,data={start:0,count:20},method='get',loadingTop,loadingCenter
})=>{
  return new Promise((resolve,reject)=>{
    //显示loading
    if(loadingTop){
      wx.showNavigationBarLoading() //显示导航loading
      wx.setNavigationBarTitle({    //设置导航title
        title: '加载中...',
      })
    }
    if(loadingCenter){
      wx.showLoading({
        title: '加载中...',
      })
    }

    //调用微信的请求数据的方法
    wx.request({
      ....
      complete(){   //不管请求成功还是请求失败,都会调用
        if(loadingTop) wx.hideNavigationBarLoading()
        if(loadingCenter) wx.hideLoading()
      }
    })
  })
}


//import douban from "XXXX"
/*
  douban({
    url:"https://douban.uieee.com/v2/movie/in_theaters",
    data:{
      start:0,
      count:3
    }
  }).then(res=>{
    console.log(res)
  })

 */
item/item.wxml
      {
    {title}}({
    {detail.year}})
      评分:{
    {detail.rating.average || "暂无评分"}}
      导演:{
    {item.name}}
      主演:{
    {item.name}}


      摘要:
      {
    {detail.summary}}
item/item.wxss
.background{
  position: fixed;
  left:0;
  top:0;
  width:100%;
  height:100%;
  z-index: -1;
  opacity: .1;
}

.meta{
  display: flex;
  flex-direction: column;
  align-items: center;
  padding: 50rpx 40rpx;
}
.meta .poster{
  width:100%;
  height:800rpx;
  margin:20rpx;
}
.title{
  font-size: 42rpx;
  color:#222;
}
.info{
  font-size: 28rpx;
  color:#444;
  margin-top: 18rpx;
}

.summary{
  width:90%;
  margin:0 auto;
}
.summary .label{
  display: block;
  font-size: 34rpx;
  margin-bottom: 20rpx;
}
.summary .content{
  font-size: 30rpx;
  color:#555;
  line-height: 60rpx;
}
3-4 点击榜单跳转list
board/board.wxml
        {
    {item.title}}
list/list.js
onLoad: function (options) {
    console.log("list",options)  //{key:"",title:""}
},
四. list的实现
4-1 列表的展示
list/list.js
// pages/list/list.js
import douban from "../../utils/douban.js"
Page({
  /**
   * 页面的初始数据
   */
  data: {
    title:"",
    key:"",
    list:[]
  },

  update(){
    douban({
      url:this.data.key,
      loadingTop:true
    }).then(res=>{
      //整理数据
      let result = []
      res.data.subjects.map(item=>{
        result.push({
          id:item.id,  //电影的id
          image:item.images.small, //电影图片
          average:item.rating.average, //电影评分
          title:item.title,    //电影标题
          original_title: item.original_title, //电影英文标题
          year:item.year,   //电影年份
          directors:item.directors  //电影导演数组
        })
      })
      this.setData({
        list:result
      })
      //设置导航栏标题
      wx.setNavigationBarTitle({
        title: this.data.title,
      })
    })
  },

  /**
   * 生命周期函数--监听页面加载
   */
  onLoad: function (options) {
    let {title,key} = options;
    this.setData({
      title,
      key
    })
    //数据的渲染
    this.update();
  }
})
list/list.wxml
        {
    {item.title}}
        {
    {item.original_title}} ({
    {item.year}})
        导演:{
    {item.name}}

      {
    {item.average}}
4-2 product组件实现
后续我们考虑到list里面的每一项如果很多地方都需要用到的话,我们将要进行拆分成自定义组件,进行复用。
/components/product/xxxx (component)
创建好了之后,必须要进行组件注册!(app.json进行全局注册 or page.json进行局部注册)
选择了app.json里面进行了全局注册,目的就是后续很多页面都可以使用到product组件。
"usingComponents": {
    "product":"/components/product/product"
 }
list/list.wxml里面调用product组件,发现Ok了
后续需要给product传递item这个对象,让其进行渲染
在product.js里面的properties中接收外部传入的item
properties: {
    item:{
      type:Object  //接受外部传入的item,并且是对象类型
    }
},
product.wxml里面进行数据的渲染操作
    {
    {item.title}}
    {
    {item.original_title}} ({
    {item.year}})
    导演:{
    {item.name}}

  {
    {item.average}}
接下来点击product的时候,实现跳转到item页面
...
methods: {
    //点击product的时候跳转方法
    clickHandler(){
      wx.navigateTo({
        url: '/pages/item/item?id='+this.properties.item.id,
      })
    }
}
4-3 list页面开启下拉刷新
list/list.json
{
  "navigationBarTitleText": "",
  "enablePullDownRefresh":true,  //开启当前list页面的下拉刷新
  "backgroundTextStyle":"dark",  //下拉刷新的loading  light or dark
  "usingComponents": {}
}
list/list.js
  /**
   * 页面相关事件处理函数--监听用户下拉动作
   */
  onPullDownRefresh: function () {
    this.update()  //就是保证用户下拉的时候数据是最新的20条数据
  },
五. 云开发
5-1 初始云环境
-开发工具->创建云开发项目(选择云开发)
-填入appId字段
-开发工具->云开发->设置->创建环境->输入环境名称
-开发工具->右键点击项目cloundfunctions目录,切换你所创建的环境
-右键点击cloudfunctions/login云函数 -> 上传并部署 (为了将来小程序可以访问我们的云环境)
5-2 多云环境
初始化云环境多次
注意:目前免费的环境只支持两个,没有多个。 一个用来做测试,一个是正式环境
多云环境的情况下需要指定env:
app.js
onLaunch: function () { //小程序初始化生命周期钩子
    if (!wx.cloud) {
      console.error('请使用 2.2.3 或以上的基础库以使用云能力')
    } else {
      wx.cloud.init({
        // env 参数说明:
        //   env 参数决定接下来小程序发起的云开发调用(wx.cloud.xxx)会默认请求到哪个云环境的资源
        //   此处请填入环境 ID, 环境 ID 可打开云控制台查看
        //   如不填则使用默认环境(第一个创建的环境)
        env: 'demo123-3o9h6',
        traceUser: true,
      })
    }

    this.globalData = {}
  }
5-3 数据库环境
创建集合
开发工具->云开发->数据库->创建集合->权限设置(放大)
添加记录
手动添加: 开发工具->云开发->数据库->添加记录
导入数据:
导入本地mongodb数据
首先需要将mongodb的数据进行出库操作。
mongoexport -h 127.0.0.1 -d 数据库 -c 集合名 -o 输出路径/xx.json
开发工具->云开发->数据库->douban->上传文件(home.json)
导入第三方的数据
导入第三方的数据,需要安装json-view谷歌浏览器插件。
copy到vscode里面去,进行代码格式化,之后对象与对象之间","去掉。再去进行导入即可。
获取openid (前提将login部署上去)
app.js文件
let res = await wx.cloud.callFunction({ //调用云函数
	name:"login"
})
console.log(res.result.openid)
数据库操作
增:
 const db = wx.cloud.database();

 add(){
    db.collection('douban')
      .add({
        data:{ //不能进行批量添加  使用云函数方式进行批量添加
          name: 'apple',
          category: 'fruit',
          price: 10,
        }
      }).then(res => {
        console.log("res",res)
      }).catch(err=>{
        console.log("err",err)
      })
  },
删:
  //删除操作
  remove(){
    db.collection('douban').doc('5e6ebf68efe8d765db7b66e6')
      .remove()
      .then(res => {
        console.log("res", res)
      }).catch(err => {
        console.log("err", err)
      })
  },
改:
db.collection('douban').doc('37e26adb5eb510d1004d4bee74d12799')
	  //.set({}) 替换更新
      .update({  //局部更新
        data: {
          // price: _.inc(10)
          name: 'milk',
          category: 'dairy'
        }
      }).then(res=>console.log(res))
      .catch(err=>console.log(err))
查:
find(){
    db.collection('douban')
      .where({  //查询条件
        price: _.gt(2)  //查询指令  价格大于2的
      })
      .field({  //显示的字段
        name: true,
        price: true,
      })
      .orderBy('price', 'desc')  //按照price进行降序排列
      // .skip(1)
      // .limit(10)
      .get()
      .then(res=>console.log(res))
      .catch(err=>console.log(err))
}
数据推送服务
A页面修改了集合,B页面事先监听了这个集合,就会收到更新后的数据,这个数据就是后端推送来的。
(websocket)
一旦douban的集合数据发生变化了,onChange函数就会执行,在这里面我们可以实现自己的业务逻辑。
   db.collection('douban').where({}).watch({
      onChange: (snapshot)=>{
        console.log(snapshot.docChanges)
      },
      onError:err=>{
        console.log(err)
      }
    })
5-4 云存储
上传图片
//上传图片
  upload(){
    // 选择图片
    wx.chooseImage({
      count: 1,  //图片数量
      sizeType: ['compressed'],  //压缩图
      sourceType: ['album', 'camera'], //拍照  or  相册
      success:  (res)=> {
        wx.showLoading({
          title: '上传中',
        })
        const filePath = res.tempFilePaths[0]  //324324.png
        // 上传图片
        const cloudPath = 'my-image'+Date.now() + filePath.match(/\.[^.]+?$/)[0]
        wx.cloud.uploadFile({ //上传图片到云存储
          cloudPath,  //云存储路径
          filePath,   //本地图片路径
          success: res => {
            console.log('[上传文件] 成功:', res)
            this.setData({
              imgUrl:res.fileID
            })
          },
          fail: e => {
            console.error('[上传文件] 失败:', e)
            wx.showToast({
              icon: 'none',
              title: '上传失败',
            })
          },
          complete: () => {
            wx.hideLoading()
          }
        })
      },
      fail: e => {
        console.error(e)
      }
    })
  },
5-5 云函数(后端接口)
创建云函数
右键cloudfuncitons->新建node云函数->定义函数名->右键函数名->一旦更改了,必须重新上传并部署
// 云函数入口文件
const cloud = require('wx-server-sdk')
cloud.init()

// 云函数入口函数
//第一个参数就是用来接收传递的参数
//第二个参数context用来获取上下文的相关信息   context来获取openid等字段
exports.main = async (event, context) => {
  return {
    sum:event.a+event.b,
    reduce:event.a-event.b
  }
}
test/test.js
  //调用sum云函数
  sum(){
    wx.cloud.callFunction({
      // 需调用的云函数名
      name: 'sum',
      // 传给云函数的参数
      data: {
        a: 1,
        b: 2,
      },
    }).then(res=>{
      console.log(res.result.sum,res.result.reduce)
    })
  },
六. 使用云开发改装项目
6-1 创建云环境
方案一. 创建云开发的模板环境,把之前的douban项目放入到此环境下。
方案二. 在原有的douban项目基础上,融入云开发环境。
1.project.config.js文件
"cloudfunctionRoot":"cloudfunctionRoot",
根目录下面创建与其指明的文件夹。然后里面就会有你的云函数了,同时你也可以再此下面创建自己的一些云函数,一旦云函数进行了内容更改,你需要重新上传并部署。
2.app.js文件
onLaunch(){
	//看一下当前环境是否支持云开发
    if (!wx.cloud) {
      console.error('请使用 2.2.3 或以上的基础库以使用云能力')
    } else {
      //初始化云开发环境,指明env  环境id
      wx.cloud.init({
        env: 'node-78c4ee',
        traceUser: true,
      })
    }

    let storage = wx.getStorageSync("douban_welcome")
    if(storage){
      wx.switchTab({
        url: '/pages/board/board',
      })
    }
  },
3.app.js 测试云函数login是否可用 (前提早就把login函数部署到云函数里面去了)
onLunch(){
	....
	//测试login云函数是否可用
     let res = await wx.cloud.callFunction({
       name:"login"
     })
     console.log("res====》",res)
}
6-2 改装welcome
welcome/welcome.js
//获取数据库对象
const db = wx.cloud.database()
//获取集合in_theaters
const in_theaters = db.collection("in_theaters")

onLoad: async function (options) {
    //从云数据库里面取正在热映的数据
    let res = await in_theaters
      .where({})
      .limit(3)
      .get()
    let result = [];
    res.data.map(item=>{
      result.push({
        id:item.id,
        image:item.images.large
      })
    })
    this.setData({
      movies:result
    })
}
6-3 改装 board
 const db = wx.cloud.database()

 onLoad: async function (options) {
    let res = await db.collection(this.data.banner.key)
            .limit(3)
            .get()
    let result = []
    res.data.map(item=>{
      result.push({
        id:item.id,
        image:item.images.large
      })
    })
    this.setData({
      "banner.content":result
    })
 }
6-3 改装item
先把utils/douban.js文件进行了改版。
let app = getApp();
//获取数据库
let db = wx.cloud.database()

//根据数据库集合查询数据
//collectionName:集合名字
//id  电影的唯一id
//q   电影的名字
export default ({
  collectionName,id=null,data={start:0,count:20,q:null},method='get',loadingTop,loadingCenter
})=>{
  return new Promise((resolve,reject)=>{
    //显示loading
    if(loadingTop){
      wx.showNavigationBarLoading()
      wx.setNavigationBarTitle({
        title: '加载中...',
      })
    }
    if(loadingCenter){
      wx.showLoading({
        title: '加载中...',
      })
    }

    //查询条件  id  q进行查询
    let where = {}
    let title = {
      $regex:'.*'+data.q, //包含data.q就可以
      $options:'i'        //忽略大小写
    }
    where = id ? {...where,id} : where
    where = data.q ? {...where,title} : where

    //根据集合查询对应的数据
    db.collection(collectionName)
      .where(where)  //查询条件
      .skip(data.start * data.count)  // 0 * 20
      .limit(data.count)              // 20
      .get(
        {
          success(res) {
            resolve(res)
          },
          fail(err){
            reject(err)
          },
          complete(){
            if(loadingTop) wx.hideNavigationBarLoading()
            if(loadingCenter) wx.hideLoading()
          }
        }
      )
  })
}
item/item.js文件
在onload里面我们需要一个collectionName,因为要按照集合进行查询。
所以 board/board.wxml
onLoad: function (options) {
    let {id,collectionName} = options;
    douban({
      collectionName,
      id,
      loadingTop:true
    }).then(res=>{
      //通过where条件查找数据,返回的是一个数组
      let detail = res.data[0]
      let photos = []
      detail.casts.map(item=>{
        //如果item.avatars存在,再给photos数组添加大图
        if(item.avatars){
          photos.push(item.avatars.large)
        }
      })
      this.setData({
        photos,
        detail,
        title:detail.title
      })
      //设置导航的标题
      wx.setNavigationBarTitle({
        title: this.data.title
      })
    })
}
6-4 改装list
list/list.js
update(){
    douban({
      collectionName:this.data.key,
      loadingTop: true
    }).then(res=>{
      let result = []
      res.data.map(item=>{
        result.push({
          id:item.id,  //电影的id
          image:item.images.small, //电影图片
          average:item.rating.average, //电影评分
          title:item.title,    //电影标题
          original_title: item.original_title, //电影英文标题
          year:item.year,   //电影年份
          directors:item.directors  //电影导演数组
        })
      })
      this.setData({
        list:result
      })
      //设置导航栏标题
      wx.setNavigationBarTitle({
        title: this.data.title,
      })

      //需要停止下拉刷新
      wx.stopPullDownRefresh()
    })
  },
在product组件点击跳转到item详情页面,会报错!原因是因为详情页面需要接受id、collectionName
所以我们需要将这两个字段传递给item
list.wxml
product.js
properties: {
    item:{
      type:Object  //接受外部传入的item,并且是对象类型
    },
    collectionName:{
      type:String
    }
  },

methods: {
    //点击product的时候跳转方法
    clickHandler(){
      wx.navigateTo({
        url: '/pages/item/item?id='+this.properties.item.id+"&collectionName="+this.properties.collectionName,
      })
    }
  }
6-5 实现搜索search页面
search/search.js
import douban from "../../utils/douban.js"
Page({

  /**
   * 页面的初始数据
   */
  data: {
    subtitle:"请输入查询内容",
    search:null,//默认查询内容为空
    list:[],
    start:0,
    count:6,
    loading:false,//默认没有加载
    isLoadMore:false //解决开始的时候显示的没有更多数据问题
  },

  //搜索方法(焦点失去的时候)
  handlerSearch(e){
    if(!e.detail.value.trim()){ //如果用户没有输入内容
      this.setData({
        list:[],
        start:0,
        search:null,
        isLoadMore:false
      })
      return;
    }
    this.setData({
      list:[],//每次搜索新内容的时候,都需要清空列表数组
      start:0,
      isLoadMore:true,
      search:e.detail.value //输入的搜索的值
    })
    this.loadList()
  },

  //加载数据
  async loadList(){
    //修改loading状态
    this.setData({loading:true})
    let res = await douban({
      collectionName: "top250",
      data:{
        start: this.data.start, //0
        count: this.data.count, //6
        q:this.data.search    //相当于从0-20条数据里面取title包含’的’电影
      }
    })
    let result = []
    res.data.map(item => {
      result.push({
        id: item.id,  //电影的id
        image: item.images.small, //电影图片
        average: item.rating.average, //电影评分
        title: item.title,    //电影标题
        original_title: item.original_title, //电影英文标题
        year: item.year,   //电影年份
        directors: item.directors  //电影导演数组
      })
    })
    this.setData({
      list: this.data.list.concat(result),
      loading:false //修改了loading状态
    })
  },

  /**
   * 页面上拉触底事件的处理函数
   */
  onReachBottom: function () {
    this.setData({
      isLoadMore:true,
      start:++this.data.start
    })
    this.loadList()
  },
})
后续封装了load-more组件
{
  "navigationStyle":"custom",
  "navigationBarTitleText": "搜索",
  "usingComponents": {
    "load-more":"/components/load-more/load-more"
  }
}
load-more/load-more组件需要接受外部传入的属性
properties: {
    loading:{
      type:Boolean
    },
    isLoadMore:{
      type:Boolean
    }
},
    玩命加载...


    ————没有更多数据...————
七. 小程序多端框架uniapp
uniapp taro wepy mpvue kbone
uniapp:
vue语法,跨端开发 (H5、小程序、app) 支持打包app(原生app) 如果熟悉vue的话,非常推荐学习uniapp
开发规范:
vue语法规范 + uni内置组件 + uni.api() + uni的一些ui库 + flex等布局
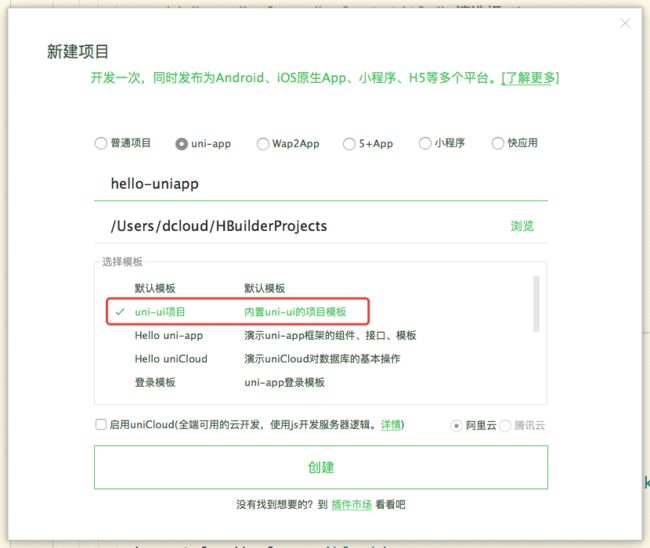
通过 HBuilderX 可视化界面
可视化的方式比较简单,HBuilderX内置相关环境,开箱即用,无需配置nodejs。
开始之前,开发者需先下载安装如下工具:
- HBuilderX:官方IDE下载地址
HBuilderX是通用的前端开发工具,但为uni-app做了特别强化。
下载App开发版,可开箱即用;如下载标准版,在运行或发行uni-app时,会提示安装uni-app插件,插件下载完成后方可使用。
如使用cli方式创建项目,可直接下载标准版,因为uni-app编译插件被安装到项目下了。
uni-app自带的模板有 Hello uni-app ,是官方的组件和API示例。还有一个重要模板是 uni ui项目模板,日常开发推荐使用该模板,已内置大量常用组件。
运行uni-app
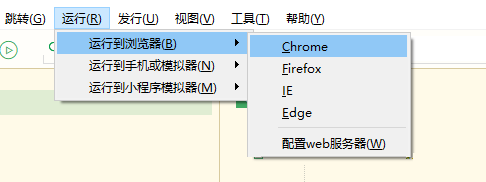
-
浏览器运行:进入hello-uniapp项目,点击工具栏的运行 -> 运行到浏览器 -> 选择浏览器,即可在浏览器里面体验uni-app 的 H5 版。
-
真机运行:连接手机,开启USB调试,进入hello-uniapp项目,点击工具栏的运行 -> 真机运行 -> 选择运行的设备,即可在该设备里面体验uni-app。
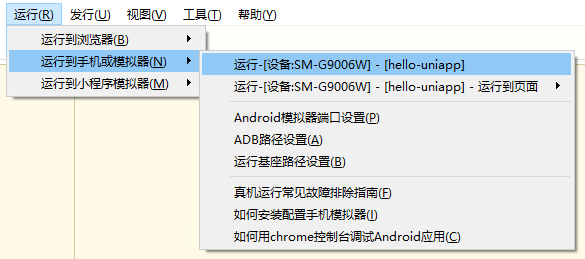
如手机无法识别,请点击菜单运行-运行到手机或模拟器-真机运行常见故障排查指南。 注意目前开发App也需要安装微信开发者工具。
-
在微信开发者工具里运行:进入hello-uniapp项目,点击工具栏的运行 -> 运行到小程序模拟器 -> 微信开发者工具,即可在微信开发者工具里面体验uni-app。
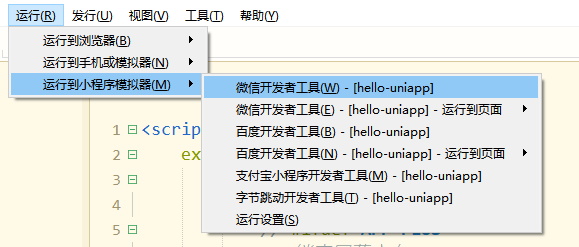
**注意:**如果是第一次使用,需要先配置小程序ide的相关路径,才能运行成功。如下图,需在输入框输入微信开发者工具的安装路径。 若HBuilderX不能正常启动微信开发者工具,需要开发者手动启动,然后将uni-app生成小程序工程的路径拷贝到微信开发者工具里面,在HBuilderX里面开发,在微信开发者工具里面就可看到实时的效果。
uni-app默认把项目编译到根目录的unpackage目录。

注意: 微信开发者工具=》安全设置=》服务端口开启
-
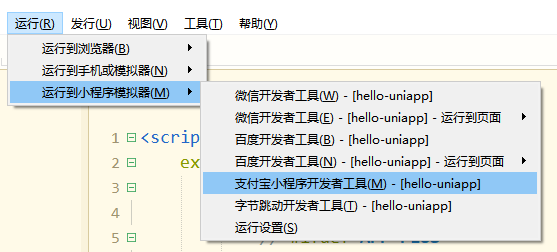
在支付宝小程序开发者工具里运行:进入hello-uniapp项目,点击工具栏的运行 -> 运行到小程序模拟器 -> 支付宝小程序开发者工具,即可在支付宝小程序开发者工具里面体验uni-app。
-
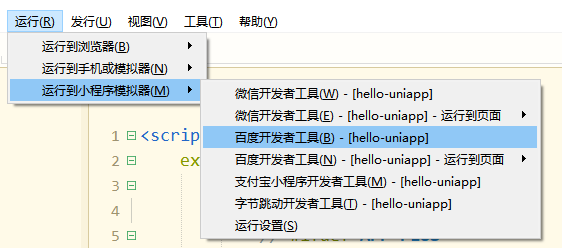
在百度开发者工具里运行:进入hello-uniapp项目,点击工具栏的运行 -> 运行到小程序模拟器 -> 百度开发者工具,即可在百度开发者工具里面体验uni-app。
-
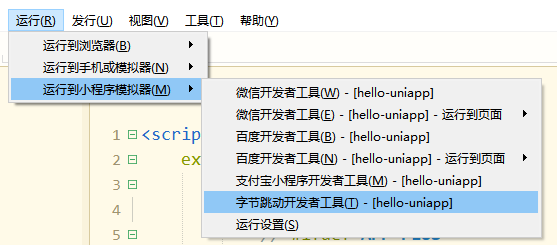
在字节跳动开发者工具里运行:进入hello-uniapp项目,点击工具栏的运行 -> 运行到小程序模拟器 -> 字节跳动开发者工具,即可在字节跳动开发者工具里面体验uni-app。
-
在QQ小程序开发工具里运行:内容同上,不再重复。
manifest.json文件里面配置
基础配置:填入Dcloud AppId 需要登录获取
图标Logo配置 UI 设计 1024*1024 png图片
H5配置: 路由模式选择history /
微信小程序配置: 填入原生AppID
项目打包
发行H5: 选择网站=》H5手机版
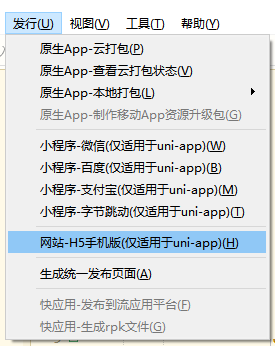
发行小程序:小程序开发者工具=》上传=》提交审核
发行App:保证hbx是最新版 云端打包
打包的时候会生成unpackge目录
dist/build 所有的打包后的资源
H5:打包后的H5的资源
app-plus:打包后的本地资源
项目结构
| uni项目目录或者文件 | 属性 | 对应原生小程序文件 |
|---|---|---|
| App.vue | app.wxss | app.js | |
| manifest.json(打包配置文件) | ||
| pages/index/index.vue | pages/index/index.wxss|wxml|js | |
| static(静态资源 video/images) | ||
| uni.scss(全局样式变量) | ||
| main.js(Vue初始化入口文件) | ||
| pages.json(配置页面路由、导航条、选项卡等页面类信息) | globalStyle | app.json里面的window项 |
| pages.json(配置页面路由、导航条、选项卡等页面类信息) | style | 对应着每个页面page.json文件 |
项目中如果使用vuex的话:
store/index.js
import Vue from 'vue'
import Vuex from 'vuex'
Vue.use(Vuex)
const store = new Vuex.Store({
    state: {},
    mutations: {},
    actions: {}
})
export default store
main.js文件
import Vue from 'vue'
import App from './App'
//引入vuex
import store from './store'
//把vuex定义成全局组件
Vue.prototype.$store = store

Vue.config.productionTip = false
App.mpType = 'app'
const app = new Vue({
    ...App,
	 store
})
app.$mount()
index/index.vue文件
onLoad() {
	console.log(this.$store)
}
后续如果想使用ui库,uni强烈推荐使用 uni-ui组件库,创建项目的时候,就需要勾选ui组件库
uni-ui的链接:https://github.com/dcloudio/uni-ui
本项目已包含uni ui组件,无需import和注册,可直接使用。在代码区键入字母u,即可通过代码助手列出所有可用组件。光标置于组件名称处按F1,即可查看组件文档。
详见:
文本
文本
文本
文本
文本
文本
文本
文本
文本
项目改装
1.静态资源&全局样式
images ==> static
云函数我还是采用小程序的云函数,没用uni自己的云函数,这样运行只能在小程序里面运行是Ok的
app.wxss==>app.vue的style里面
2. 修改pages.json文件
window ===> globalStyle
style =====> 每个页面的page.json
tabbar ===> 注意iconPath or selectedIconPath的图片路径(/static/images/)
3. App.vue文件
export default {
		async onLaunch(){
		  if (!wx.cloud) {
		    console.error('请使用 2.2.3 或以上的基础库以使用云能力')
		  } else {
		    wx.cloud.init({
		      env: 'node-78c4ee',
		      traceUser: true,
		    })
		  }

		  //测试login云函数是否可用
		  // let res = await wx.cloud.callFunction({
		  //   name:"login",
		  // })
		  // console.log("res====》",res)
		  let storage = uni.getStorageSync("douban_welcome")
		  if(storage){
		    uni.switchTab({
		      url: '/pages/board/board',
		    })
		  }
		}
	}
我们还是采用了wx.cloud 没有使用unicloud ? 因为unicloud必须创建uni自己的云开发。
4.更改welcome欢迎页面
5.更改board页面
{
{item.title}}
6. 更改item页面
let app = getApp();
let db = wx.cloud.database()

//根据数据库集合查询数据
//collectionName:集合名字
//id  电影的唯一id
//q   电影的名字
export default ({
  collectionName,id=null,data={start:0,count:20,q:null},method='get',loadingTop,loadingCenter
})=>{
  return new Promise((resolve,reject)=>{
    //显示loading
    if(loadingTop){
      uni.showNavigationBarLoading()
      uni.setNavigationBarTitle({
        title: '加载中...',
      })
    }
    if(loadingCenter){
      uni.showLoading({
        title: '加载中...',
      })
    }

    //查询条件  id  q进行查询
    let where = {}
    let title = {
      $regex:'.*'+data.q, //包含data.q就可以
      $options:'i'        //忽略大小写
    }
    where = id ? {...where,id} : where
    where = data.q ? {...where,title} : where

    //根据集合查询对应的数据
    db.collection(collectionName)
      .where(where)  //查询条件
      .skip(data.start * data.count)
      .limit(data.count)
      .get(
        {
          success(res) {
            resolve(res)
          },
          fail(err){
            reject(err)
          },
          complete(){
            if(loadingTop) uni.hideNavigationBarLoading()
            if(loadingCenter) uni.hideLoading()
          }
        }
      )
  })
}
{
{title}}({
{detail.year}})
评分:{
{detail.rating.average || "暂无评分"}}
导演:{
{item.name}}
主演:{
{item.name}}
摘要:
{
{detail.summary}}
7.更改list页面
1111111
创建product组件 (components/product/product.vue)
{
{item.title}}
{
{item.original_title}} ({
{item.year}})
导演:{
{ite.name}}
{
{item.average}}