bert-for-tf2源码解读1
bert-for-tf2源码解读
- bert-for-tf2读源码
-
- 预处理过程
- 参数调用过程
- 模型的输入以及输出
bert-for-tf2读源码
最近想要阅读一下bert对应的源码,由于电脑环境的限制无法安装tensorflow1,所以不得不选择tf2的源代码作为阅读,对应的项目地址如下:
bert-for-tf2源码地址
这里我们使用examples下面的gpu_movie_reviews.ipynb对应的代码作为测试性代码来进行相应的解读。
预处理过程
from bert.tokenization.bert_tokenization import FullTokenizer
tokenizer = FullTokenizer(vocab_file=os.path.join(bert_ckpt_dir, "vocab.txt"))
这一句为bert当中使用的分词操作,我们打开bert.tokenization对应的文件之中查看具体的源代码的内容,接着我们查看MovieReviewData当中定义的类
data = MovieReviewData(tokenizer,
                       sample_size=10*128*2,#2560,
                       max_seq_len=128)
这一部分是从stanford.edu之中下载相应的数据并作相应的处理的操作,我们查看相应的MovieReviewData对应的类的定义
class MovieReviewData:
DATA_COLUMN = "sentence"
LABEL_COLUMN = "polarity"
def __init__(self, tokenizer: FullTokenizer, sample_size=None, max_seq_len=1024):
print('MovieReviewData __init__')
#这里初始化的时候定义了data=MovieReviewData(tokenizer,sampler_size=2560,
#max_seq_len = 128)
self.tokenizer = tokenizer
self.sample_size = sample_size
self.max_seq_len = 0
train, test = download_and_load_datasets()
#这个下载文件的函数在上面定义的
#这里面train的类型为首先使用
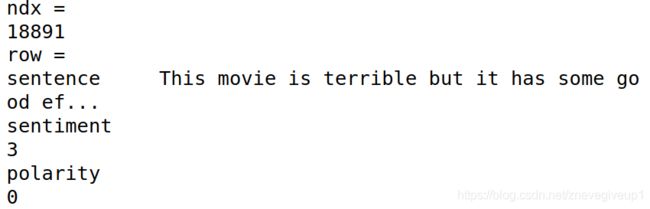
for ndx, row in df.iterrows():
            #使用iterrows()函数对dataframe进行遍历
                print('ndx = ')
                print(ndx)
                print('row = ')
                print(row)
 可以看出每一个句子有两项指标,一个是情感态度sentiment,另外一个是是否两极分化的polarity的内容,
 接下来的语句就是关键的分词语句
tokens = self.tokenizer.tokenize(text)
#调用FullTokenizer.tokenize(text)
tokens = ["[CLS]"] + tokens + ["[SEP]"]
首先我们查看FullTokenizer初始化的内容
    def __init__(self, vocab_file, do_lower_case=True):
        self.vocab = load_vocab(vocab_file)
        print('vocab = ')
        print(self.vocab)
        r"""
        vocab = OrderedDict([('[PAD]',0),('[unused0]',1),('[unused1]',2)
        ...
        ('##?',30520),('##~',30521)这是对应的vocab单词之中的内容
        """
        self.inv_vocab = {
     v: k for k, v in self.vocab.items()}
        r"""
        将上面vocab的内容形成相应的字典
        {0:'[PAD]',1:'[unused0]',2:'[unused1]',...30521:'##~'}
        """
        print('self.inv_vocab = ')
        print(self.inv_vocab)
        self.basic_tokenizer = BasicTokenizer(do_lower_case=do_lower_case)
        #BasicTokenizer的对应类就在下面
        self.wordpiece_tokenizer = WordpieceTokenizer(vocab=self.vocab)
        #WordpieceTokenizer的定义在BasicTokenizer定义的下面
发现这里在初始化了字典之后,需要初始化BasicTokenizer以及WordpieceTokenizer的对应内容,这里我们查看FullTokenizer里面的tokenize对应的函数
    def tokenize(self, text):
        split_tokens = []
        for token in self.basic_tokenizer.tokenize(text):
        #BasicTokenizer.tokenize(text)
            #print('token = ')
            #print(token)
            #第一次切分:将所有的单词一次性地全部切分出来
            for sub_token in self.wordpiece_tokenizer.tokenize(token):
            #在BasicTokenizer结果的基础上进行再一次切分,得到子词语(subword),
            #词汇表就是在此时引入的(中文不存在字词,因为中文切分出来都是一个字)
                #print('sub_token = ')
                #print(sub_token)
                split_tokens.append(sub_token)

        return split_tokens
接下来查看BasicTokenzier里面的定义
class BasicTokenizer(object):
    """Runs basic tokenization (punctuation splitting, lower casing, etc.)."""

    def __init__(self, do_lower_case=True):
        """Constructs a BasicTokenizer.

        Args:
          do_lower_case: Whether to lower case the input.
        """
        print('BasicTokenizer __init__')
        self.do_lower_case = do_lower_case
        results = self._run_split_on_punc('I am a pig!I love you')
        print('results = ')
        print(results)
        #返回的数组为['I am a pig','!','I love you']

    def tokenize(self, text):
        """Tokenizes a piece of text.第一个循环之中的tokenize分词操作"""
        text = convert_to_unicode(text)
        text = self._clean_text(text)

        # This was added on November 1st, 2018 for the multilingual and Chinese
        # models. This is also applied to the English models now, but it doesn't
        # matter since the English models were not trained on any Chinese data
        # and generally don't have any Chinese data in them (there are Chinese
        # characters in the vocabulary because Wikipedia does have some Chinese
        # words in the English Wikipedia.).
        text = self._tokenize_chinese_chars(text)
	# 如果是中文的话,每个中文汉字的左右两边都加上空格,(这里只对汉字进行分字,
	# 不对汉字进行分词),如果是英文的话不需要进行处理,因为英文词与词之间自身
	# 带有相应的空格
        orig_tokens = whitespace_tokenize(text)
        # whitespace_tokenize的定义在FullTokenizer的上面,将对应的句子使用空格进行分割开
        split_tokens = []
        #print('orig_tokens = ')
        #print(orig_tokens)

        for token in orig_tokens:
            if self.do_lower_case:

                token = token.lower()
                token = self._run_strip_accents(token)
                #_run_strip_accents(text)重点内容,将accents内容去掉
            split_tokens.extend(self._run_split_on_punc(token))
            #将对应的标点符号单独的切分出来,比如['I am a pig!I love you']切分成为
            #['I am a pig','!','I love you']
        output_tokens = whitespace_tokenize(" ".join(split_tokens))
        #这一步先用标准空格拼接上一步的处理结果,再执行空格分词(去除连续空格)
        return output_tokens

    def _run_strip_accents(self, text):
        r"""Strips accents from a piece of text.
        _run_strip_accents(text) 方法用于去除 accents,即变音符号,那么什么是变音符号呢?
        像 Keras 作者 François Chollet 名字中些许奇怪的字符 ç、简历的英文 résumé 中的 é 和中文拼音声调 á 等,这些都是变音符号 accents,
        维基百科中描述如下:附加符号或称变音符号(diacritic、diacritical mark、diacritical point、diacritical sign),
        是指添加在字母上面的符号,以更改字母的发音或者以区分拼写相似词语。例如汉语拼音字母“ü”上面的两个小点,或“á”、“à”字母上面的标调符。"""
        #这里面放入英语单词比如'this','movie'等词语的时候
        #在unicodedata之前与unicodedata之后的内容均为this,movie
        #等内容
        text = unicodedata.normalize("NFD", text)
        #核心:unicodedata.normalize和unicodedata.category,前者返回
        #输入字符串text的规范分解形式,后者返回输入字符char的Unicode类别
        #unicodedata将英文字母和accents的内容切分出来
        output = []
        for char in text:
            cat = unicodedata.category(char)
            #unicodedata.category:返回一个字符在unicode里分类的类型
            #Mn:Nonspace
            if cat == "Mn":
            #cat=="Mn"代表当前的内容为重音符号
                continue
            output.append(char)
        return "".join(output)

    def _run_split_on_punc(self, text):
        """Splits punctuation on a piece of text."""
        #print('_run_split_on_punc')
        chars = list(text)
        #输入的字符串为I am a pig!I love you,这里形成相应的数组
        #['I',' ','a','m',' ','a',' ','p','i','g','!','I',' ',
        #'l','o','v','e',' ','y','o','u']
        i = 0
        start_new_word = True
        output = []
        #print('chars = ')
        #print(chars)
        while i < len(chars):
            char = chars[i]
            if _is_punctuation(char):
	  #cp = ord(char)
	  #if ((cp >= 33 and cp <= 47) or (cp >= 58 and cp <= 64) or
	  #    (cp >= 91 and cp <= 96) or (cp >= 123 and cp <= 126)):
	  #  return True
	  #cat = unicodedata.category(char)
	  #if cat.startswith("P"):
	  #带"P"打头的[Pc]:Punctuation,Connector,[Pd]:Punctuation,Dash,
	  #[Pe]:Punctuation,Close...
	  #  return Truereturn False
                output.append([char])
                #当为!的时候,单压入一个[!]的数组'
                start_new_word = True
            else:
                if start_new_word:
                    output.append([])
                    #前面如果单独压入一个[!]的数组之后,需要重新压入一个新的数组
                start_new_word = False
                output[-1].append(char)
                #只要现在压入数组了start_new_word就必须为False,并且在最后一个数组压入char
                #['I',' ','a','m',' ','a',' ','p','i','g','!','I',' ','l'
                #' ','o','v','e',' ','y','o','u']
                #输出的对应的数组为['I am a pig','!','I love you']
            i += 1

        return ["".join(x) for x in output]

    def _tokenize_chinese_chars(self, text):
        """Adds whitespace around any CJK character."""
        output = []
        for char in text:
            cp = ord(char)
            if self._is_chinese_char(cp):
                output.append(" ")
                output.append(char)
                output.append(" ")
            else:
                output.append(char)
        return "".join(output)

    def _is_chinese_char(self, cp):
        """Checks whether CP is the codepoint of a CJK character."""
        # This defines a "chinese character" as anything in the CJK Unicode block:
        #   https://en.wikipedia.org/wiki/CJK_Unified_Ideographs_(Unicode_block)
        #
        # Note that the CJK Unicode block is NOT all Japanese and Korean characters,
        # despite its name. The modern Korean Hangul alphabet is a different block,
        # as is Japanese Hiragana and Katakana. Those alphabets are used to write
        # space-separated words, so they are not treated specially and handled
        # like the all of the other languages.
        if ((cp >= 0x4E00 and cp <= 0x9FFF) or  #
                (cp >= 0x3400 and cp <= 0x4DBF) or  #
                (cp >= 0x20000 and cp <= 0x2A6DF) or  #
                (cp >= 0x2A700 and cp <= 0x2B73F) or  #
                (cp >= 0x2B740 and cp <= 0x2B81F) or  #
                (cp >= 0x2B820 and cp <= 0x2CEAF) or
                (cp >= 0xF900 and cp <= 0xFAFF) or  #
                (cp >= 0x2F800 and cp <= 0x2FA1F)):  #
            return True

        return False

    def _clean_text(self, text):
        """Performs invalid character removal and whitespace cleanup on text."""
        output = []
        for char in text:
            cp = ord(char)
            if cp == 0 or cp == 0xfffd or _is_control(char):
                continue
            if _is_whitespace(char):
                output.append(" ")
            else:
                output.append(char)
        return "".join(output)
BasicTokenizer主要是用于切分句子的,比如输入的是’I am a pig!I love you’切分完之后的内容为[‘I am a pig’,’!’,‘I love you’]
class WordpieceTokenizer(object):
    """Runs WordPiece tokenziation."""

    def __init__(self, vocab, unk_token="[UNK]", max_input_chars_per_word=200):
        #self.wordpiece_tokenizer = WordpieceTokenizer(vocab=self.vocab)
        self.vocab = vocab
        r"""vocab = OrderedDict([('[PAD]',0),('[unused0]',1),('[unused1]',2)
        ...
        ('##?',30520),('##~',30521)这是对应的vocab单词之中的内容
        """
        self.unk_token = unk_token
        #unk_token="[UNK]"
        self.max_input_chars_per_word = max_input_chars_per_word
	#max_input_chars_per_word = 200
        #unaffable
        print('#########################WordpieceTokenizer __init__#########################')
        results = self.tokenize('unaffable')
        print('$$$$$$$$$$$$$$$$$$$$$$$$$results = $$$$$$$$$$$$$$$$$$$$$$$$$')
        print(results)
    def tokenize(self, text):
        """Tokenizes a piece of text into its word pieces.

        This uses a greedy longest-match-first algorithm to perform tokenization
        using the given vocabulary.

        For example:
          input = "unaffable"
          output = ["un", "##aff", "##able"]

        Args:
          text: A single token or whitespace separated tokens. This should have
            already been passed through `BasicTokenizer.

        Returns:
          A list of wordpiece tokens.
        """

        text = convert_to_unicode(text)
        #print('text = ')
        #print(text)
        #text = unaffable
        output_tokens = []
        for token in whitespace_tokenize(text):
            chars = list(token)
            #print('~~~chars = ~~~')
            #print(chars)
            if len(chars) > self.max_input_chars_per_word:
                output_tokens.append(self.unk_token)
                continue
            #单词长度超出200的时候使用["UNK"]标志来代替
            is_bad = False
            start = 0
            sub_tokens = []
            #start为上一次结束的位置,初始化的时候start的值为0
            while start < len(chars):
                end = len(chars)
                #end初始化为字符串最后的位置,这波操作有点类似于双指针操作
                cur_substr = None
                while start < end:
                    substr = "".join(chars[start:end])
                    #注意python中end直接指向结束的位置
                    if start > 0:
                        substr = "##" + substr
                    if substr in self.vocab:
                        cur_substr = substr
                        break
                    end -= 1
                if cur_substr is None:
                    is_bad = True
                    break
                sub_tokens.append(cur_substr)
                start = end

            if is_bad:
                output_tokens.append(self.unk_token)
            #没有找到的时候也标记为["UNK"]
            else:
                output_tokens.extend(sub_tokens)
            #这里使用extend的原因在于一个单词被拆分成为了多个部分,
            #每一个部分都是一个拆分过后的数组,比如unaffable被拆分为了
            #['una','##ffa','##ble'],如果多个unaffable就被拆分为了
            #['una','##ffa','##ble','una','##ffa','##ble']
        return output_tokens
WordpieceTokenizer是对相应的单词进行切割,这里使用的vocab.txt之中的内容对单词进行匹配,比如"unaffable"进行匹配的时候就会拆分会被拆分成为[‘una’,’##ffa’,’##ble’],这里的’una’,’##ffa’,’##ble’都是vocab.txt之中提供的前缀单词。
参数调用过程
首先贴出对应的正式训练的代码
def create_model(max_seq_len, adapter_size=64):
"""Creates a classification model."""
#adapter_size = 64 # see - arXiv:1902.00751
#create_model(data.max_seq_len, adapter_size=adapter_size)
print('max_seq_len = ')
print(max_seq_len)
print('adapter_size = ')
print(adapter_size)
#传入的max_seq_len = 128,adapter_size = None
# create the bert layer
flags = 0
with tf.io.gfile.GFile(bert_config_file, "r") as reader:
"""bert_config.json模型中参数的配置:
!!!注意bert_config.json之中不能随意加注释,否则可能会报错
json报错:Expecting property name enclosed in double quotes:
line 1 column 2 (char 1)
"""
print('flags = %d'%flags)
flags = flags+1
bc = StockBertConfig.from_json_string(reader.read())
#这里的StockBertConfig是继承自Params,所以仍然可以使用
#Params的相关的方法,查看Params的源文件之后发现from_json_string
#的对应的方法
#第一步使用from_json_string:读取对应的参数,bc为一个集成的Params
#里面存放了各种从json之中读取出来的参数
print('bc = ')
print(bc)
print('begin map_to_stock_')
bert_params = map_stock_config_to_params(bc)
#Converts the original BERT or ALBERT config dictionary
#to a 'BertModelLayer.Params' instance,return a 'BertModelLayer
#Params' instance.
bert_params.adapter_size = adapter_size
#传入的adapter_size = None,使用map_stock_config_to_params
#重新添加了一系列新的参数
print('^^^^^^^^^^^^^^^^^^^^^^^^^^^^^^^^^^^^^^^^^^^^^^^^^^')
print('bert_params = ')
print(bert_params)
bert = BertModelLayer.from_params(bert_params, name="bert")
#BertModelLayer在model.py之中,继承自bert.layer之中的方法
#这里面的from_params在params中的with_params.py
#!!!注意BertModelLayer之中有个Params类,里面有BertEmbeddingsLayer和TransformerEncoderLayer
#具体的参数在BertEmbeddingsLayer.Params以及TransformerEncoderLayer.Params之中有定义
#所以在使用BertModelLayer的时候会调用BertEmbeddingLayer还有TransoformerEncoderLayer
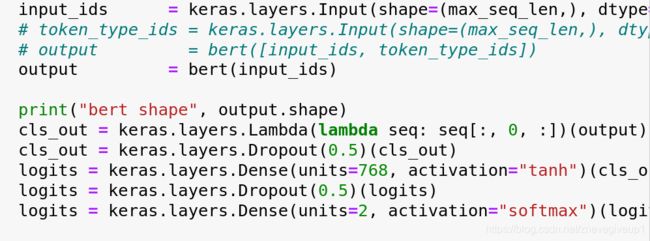
input_ids = keras.layers.Input(shape=(max_seq_len,), dtype='int32', name="input_ids")
# token_type_ids = keras.layers.Input(shape=(max_seq_len,), dtype='int32', name="token_type_ids")
# output = bert([input_ids, token_type_ids])
output = bert(input_ids)
print("bert shape", output.shape)
cls_out = keras.layers.Lambda(lambda seq: seq[:, 0, :])(output)
cls_out = keras.layers.Dropout(0.5)(cls_out)
logits = keras.layers.Dense(units=768, activation="tanh")(cls_out)
logits = keras.layers.Dropout(0.5)(logits)
logits = keras.layers.Dense(units=2, activation="softmax")(logits)
# model = keras.Model(inputs=[input_ids, token_type_ids], outputs=logits)
# model.build(input_shape=[(None, max_seq_len), (None, max_seq_len)])
model = keras.Model(inputs=input_ids, outputs=logits)
model.build(input_shape=(None, max_seq_len))
# load the pre-trained model weights
load_stock_weights(bert, bert_ckpt_file)
# freeze weights if adapter-BERT is used
if adapter_size is not None:
freeze_bert_layers(bert)
model.compile(optimizer=keras.optimizers.Adam(),
loss=keras.losses.SparseCategoricalCrossentropy(from_logits=True),
metrics=[keras.metrics.SparseCategoricalAccuracy(name="acc")])
model.summary()
return model
其中如下的语句:
bert_params = map_stock_config_to_params(bc)
bert_params.adapter_size = adapter_size
定义了当前相应的参数,打开bert_config.json文件查看相应的参数
{
"attention_probs_dropout_prob": 0.1,//乘法attention时,softmax后面dropout的概率
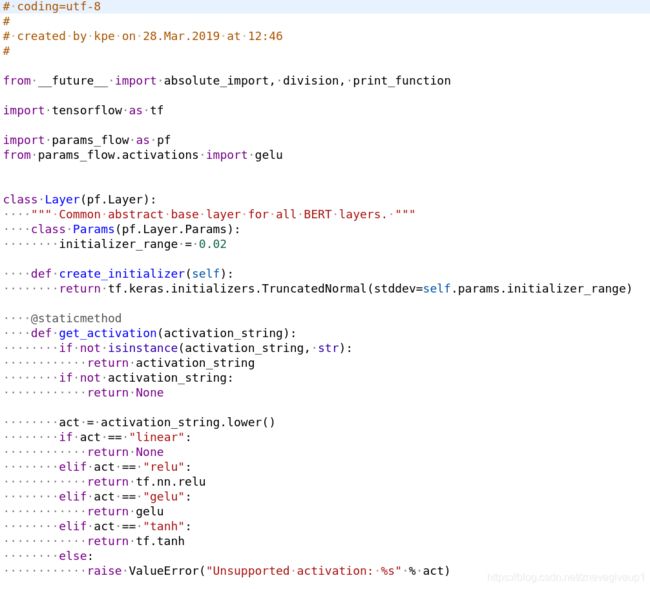
"hidden_act": "gelu",//激活函数,引入随机正则的思想,是一种对于神经元输入概率的描述,直观上更符合自然的认识,同时饰演效果要比Relus与ELUs都要好,GELU(x) = xP(X<=x) = x*哦米达(x),def gelu(input_tensor): cdf = 0.5*(1.0+tf.erf(input_tensor/tf.sqrt(2.0))),return input_tensor*cdf,gelu为一种激活函数
"hidden_dropout_prob": 0.1,//隐藏层dropout的概率
"hidden_size": 768,//隐藏层单元数
"initializer_range": 0.02,//初始化范围
"intermediate_size": 3072,//升维维度
"max_position_embeddings": 512,//一个大于seq_length的参数,用于生成position_embedding
"num_attention_heads": 12,//在encoder层中的注意头个数
"num_hidden_layers": 12,//隐藏层数
"type_vocab_size": 2,//segment_ids类别[0,1]
"vocab_size": 30522//词典中词数
}
我们查看with_params.py文件之中对于from_params函数的定义
@classmethod
#classmethod修饰符对应的函数不需要实例化,不需要self参数,但第一个参数需要是表示自身类
#的cls参数,可以来调用类的属性,类的方法,实例化对象等。
#from_params为对应的类方法,不需要实例化,直接调用,比如WithParams.from_params(...)
def from_params(cls, params: Params, *args, **kwargs):
#print('!!!!!!!!!!!!!!!!!!!!from_params!!!!!!!!!!!!!!!!!!!!')
#print(sys._getframe().f_code.co_name)
#查看当前的函数
#print(sys._getframe().f_back.f_code.co_name)
#print(cls.__class__.__name__)
#print('params = ')
#print(params)
#print('args = ')
#print(args)
#print('kwargs = ')
#print(kwargs)
"""
Creates an instance from the specified parameters (by overriding the params argument with kwargs).
*args将参数打包成tuple给函数体调用,**kwargs将参数打包关键字参数成dict给函数体调用
"""
# split non Params kwargs
kwargs, other_args = cls.Params.from_dict(kwargs, return_unused=True, return_instance=False)
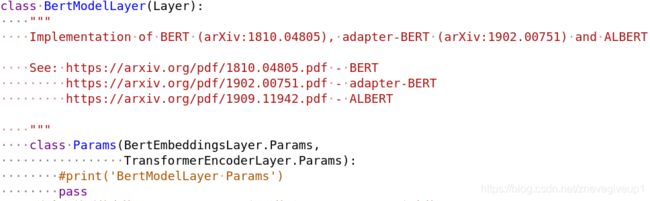
"""这里调用的cls为BertModelLayer的部分,我们在这里查看一下对应的类的定义
class BertModelLayer(Layer):
class Params(BertEmbeddingsLayer.Params,
TransformerEncoderLayer.Params):
pass
调用的本质上是BertModelLayer之中的Params类
"""
#print('kwargs = ')
#print(kwargs)
#print('other_args = ')
#print(other_args)
kwargs = dict(cls.Params.from_dict(
params, return_unused=False).clone(**kwargs)) # override with kwargs
#clone函数在Params之中有相应的定义
kwargs.update(**other_args) # add non Params kwargs back
#同理这里面的cls也是代指BertModelLayer的对应的cls
#这里也是使用嵌套类操作
#print('#############1############')
#print('kwargs = ')
#print(kwargs)
#print('after update')
#print('!!!!!!!!!!!!!!!!!!!!!!!!!!!!!!!!!!!!!!!!!!!!!!!!!!!!!!!!!!!!!!!!!!!!!!!!!!!!!!')
#print('args = ')
#print(args)
#print('kwargs = ')
#print(kwargs)
#print('!!!!!!!!!!!!!!!!!!!!!!!!!!!!!!!!!!!!!!!!!!!!!!!!!!!!!!!!!!!!!!!!!!!!!!!!!!!!!!!')
instance = cls(*args, **kwargs)
#cls这个参数用来表示类自身,所以这里启动的函数为WithParams __init__函数、
#这个类自身并非WithParams,而是使用类去调用的那个类本身,比如BertModelLayer.from_params
#此时调用的cls就是BertModelLayer的部分
#print('&&&&&&&&&&&&&2&&&&&&&&&&&&')
#print('instance = ')
#print(instance)
#不带self._construct()这里就直接运行出来了,只有一层类型数据
return instance
r"""
程序解读:首先运行instance = cls(*args,**kwargs),接着内部调用def __init__(self,*args,**kwargs)
这里面的__init__是对于它自身类的__init__,然后调用self._construct(*args,*other_args),最后调用
相应的super.__init__(),这里我们查看一下BertModel对应的定义
class BertModelLayer(Layer):
class Params(BertEmbeddingsLayer.Params,
TransformerEncoderLayer.Params):
pass
每次嵌套的时候深入的为接下来的继承类,但是接着往下操作的时候调出来的参数为class Params(pp.Params):
对应的嵌套类
"""
整理一下对应的instance的输出内容`
instance =
<bert.embeddings.BertEmbeddingsLayer object at 0x7fa2f0619af0>
instance =
<bert.transformer.TransformerEncoderLayer object at 0x7fa1ebd98ac0>
instance =
<bert.model.BertModelLayer object at 0x7fa1ebc6ec10>
instance =
<bert.embeddings.PositionEmbeddingLayer object at 0x7fa1ebdbce20>
instance =
<bert.transformer.SingleTransformerEncoderLayer object at 0x7fa24c441b80>
instance =
<bert.transformer.SingleTransformerEncoderLayer object at 0x7fa1ebac60a0>
instance =
<bert.transformer.SingleTransformerEncoderLayer object at 0x7fa1ec9f0280>
instance =
<bert.transformer.SingleTransformerEncoderLayer object at 0x7fa1ebac6bb0>
instance =
<bert.transformer.SingleTransformerEncoderLayer object at 0x7fa1ebaa6c40>
instance =
<bert.transformer.SingleTransformerEncoderLayer object at 0x7fa1ec9f0040>
instance =
<bert.transformer.SingleTransformerEncoderLayer object at 0x7fa1ebac6e20>
instance =
<bert.transformer.SingleTransformerEncoderLayer object at 0x7fa1ebaa6af0>
instance =
<bert.transformer.SingleTransformerEncoderLayer object at 0x7fa1ebaa6940>
instance =
<bert.transformer.SingleTransformerEncoderLayer object at 0x7fa1ebacca90>
instance =
<bert.transformer.SingleTransformerEncoderLayer object at 0x7fa1ebbed6d0>
instance =
<bert.transformer.SingleTransformerEncoderLayer object at 0x7fa1ebbedb50>
(这里面总共有12个SingleTransformerEncoderLayer层)
instance =
<bert.transformer.TransformerSelfAttentionLayer object at 0x7fa1eba4e610>
instance =
<bert.transformer.ProjectionLayer object at 0x7fa1eba4e2b0>
instance =
<bert.attention.AttentionLayer object at 0x7fa1ebabb3d0>
instance =
<bert.transformer.ProjectionLayer object at 0x7fa1ebabb550>
instance =
<bert.transformer.TransformerSelfAttentionLayer object at 0x7fa1ebb984f0>
instance =
<bert.transformer.ProjectionLayer object at 0x7fa1ebc75a30>
instance =
<bert.attention.AttentionLayer object at 0x7fa1ebc08280>
instance =
<bert.transformer.ProjectionLayer object at 0x7fa1ebc084c0>
instance =
<bert.transformer.TransformerSelfAttentionLayer object at 0x7fa1eba42670>
instance =
<bert.transformer.ProjectionLayer object at 0x7fa1ebbfce20>
instance =
<bert.attention.AttentionLayer object at 0x7fa1ebcb2c40>
instance =
<bert.transformer.ProjectionLayer object at 0x7fa1ebcb25b0>
instance =
<bert.transformer.TransformerSelfAttentionLayer object at 0x7fa1ebbd6c70>
instance =
<bert.transformer.ProjectionLayer object at 0x7fa1ebc9ff10>
instance =
<bert.attention.AttentionLayer object at 0x7fa1eb9d4f40>
instance =
<bert.transformer.ProjectionLayer object at 0x7fa1eba0e310>
instance =
<bert.transformer.TransformerSelfAttentionLayer object at 0x7fa217f5a880>
instance =
<bert.transformer.ProjectionLayer object at 0x7fa1ebb06a90>
instance =
<bert.attention.AttentionLayer object at 0x7fa1ebbc60d0>
instance =
<bert.transformer.ProjectionLayer object at 0x7fa1ebbc6040>
instance =
<bert.transformer.TransformerSelfAttentionLayer object at 0x7fa1ebc972b0>
instance =
<bert.transformer.ProjectionLayer object at 0x7fa1e8076d30>
instance =
<bert.attention.AttentionLayer object at 0x7fa1e807fb50>
instance =
<bert.transformer.ProjectionLayer object at 0x7fa1e807fee0>
instance =
<bert.transformer.TransformerSelfAttentionLayer object at 0x7fa1ebb966a0>
instance =
<bert.transformer.ProjectionLayer object at 0x7fa1eb92ff40>
instance =
<bert.attention.AttentionLayer object at 0x7fa1eb943280>
instance =
<bert.transformer.ProjectionLayer object at 0x7fa1eb91de20>
instance =
<bert.transformer.TransformerSelfAttentionLayer object at 0x7fa1eb938dc0>
instance =
<bert.transformer.ProjectionLayer object at 0x7fa1d009ee20>
instance =
<bert.attention.AttentionLayer object at 0x7fa1d00b0940>
instance =
<bert.transformer.ProjectionLayer object at 0x7fa1d00b0cd0>
instance =
<bert.transformer.TransformerSelfAttentionLayer object at 0x7fa1d00a7ca0>
instance =
<bert.transformer.ProjectionLayer object at 0x7fa1d0020eb0>
instance =
<bert.attention.AttentionLayer object at 0x7fa1d0028c10>
instance =
<bert.transformer.ProjectionLayer object at 0x7fa1d0028e20>
instance =
<bert.transformer.TransformerSelfAttentionLayer object at 0x7fa1d00a7940>
instance =
<bert.transformer.ProjectionLayer object at 0x7fa16c55d9a0>
instance =
<bert.attention.AttentionLayer object at 0x7fa16c5701c0>
instance =
<bert.transformer.ProjectionLayer object at 0x7fa16c570550>
instance =
<bert.transformer.TransformerSelfAttentionLayer object at 0x7fa16c4d7ee0>
instance =
<bert.transformer.ProjectionLayer object at 0x7fa16c4e06a0>
instance =
<bert.attention.AttentionLayer object at 0x7fa16c4e5790>
instance =
<bert.transformer.ProjectionLayer object at 0x7fa16c4e5a30>
instance =
<bert.transformer.TransformerSelfAttentionLayer object at 0x7fa16c54ed90>
instance =
<bert.transformer.ProjectionLayer object at 0x7fa16c45afa0>
instance =
<bert.attention.AttentionLayer object at 0x7fa16c461d30>
instance =
<bert.transformer.ProjectionLayer object at 0x7fa16c469100>
这里面有12个神经网络层,每个神经网络层由
<TransformerSelfAttentionLayer>,<ProjectionLayer>,<AttentionLayer>,<ProjectionLayer>
组成
分析出原因主要存在于bert所有文件内部的继承类的构建之后,我们将对应的函数调用情况打标注,先查看出函数对应的调用的情况
!!!这个时候发现_construct对应的函数被调用了两次
WithParams __init__
BertModelLayer _construct
_construct


第一次_construct结束时对from_params的调用
调用bert的继承函数BertEmbeddingsLayer
from_params
WithParams __init__
BertEmbeddingsLayer _construct
_construct
先调用BertEmbeddingsLayer _construct!!!
instance =
<bert.embeddings.BertEmbeddingsLayer object at 0x7f8559d35af0>


from_params
WithParams __init__
TransformerEncoderLayer _construct
_construct
instance =
<bert.transformer.TransformerEncoderLayer object at 0x7f8559d35e20>
instance =
<bert.model.BertModelLayer object at 0x7f855a068b80>
!!!这一段调用两次from_params的原因在BertModelLayer之中的_construct有写到
!!!这里调用了两次_construct函数,先调用BertModelLayer之中的_construct,再调用
WithParams之中的_construct函数
这里面我们发现使用
instance = cls(*args,**kwargs)
先调用的是BertEmbeddingsLayer _construct的对应函数,然后才调用WithParams中的_construct函数,我们在with_params.py之中加入一段打印当前类名称的语句
 输出的对应结果如下:
 这里面我们惊奇地发现,WithParams __init__这个初始化函数之中调用的类竟然为BertModelLayer,也就是说使用
instance = cls(*args,**kwargs)
调用的类仍然为BertModelLayer,但是调用的初始化类却为WithParams这个类,使用BertModelLayer去初始化WithParams这个类,感觉这一特殊之处正是@classmethod修饰的不需要实例化函数的特殊用法
这里我们先写一个简单的函数测试一下@classmethod之中初始化类的用法
 发现这里的WithParams2.hello()无法直接调用WithParams1的类,提示没有hello的方法,因为这个时候WithParams2和WithParams1为两个不相干的类
接着我们定义一个相应的继承关系,然后再进行一次调用
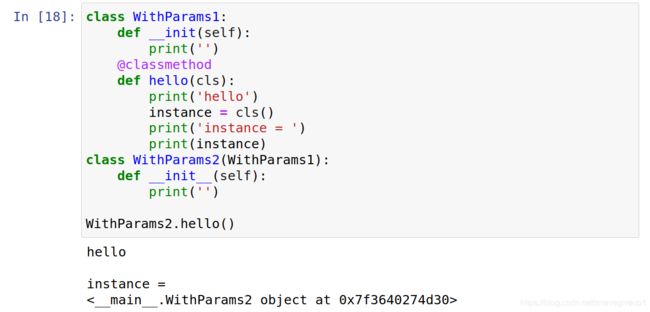 发现此时Withparams可以正常调用了,并且在WithParams1之中的@classmethod调用的类为子类WithParams2的类,
这里我们检查一下,model.py之中的BertModelLayer中并没有定义过from_params的对应函数,所以这里我们大胆地猜想,BertModelLayer与WithParams的类有着某种的联系,才能够从BertModelLayer之中直接调用from_params方法
原文中调用的函数如下:
bert = BertModelLayer.from_params(bert_params, name="bert")
仔细观察BertModelLayer之中的初始化操作(没有__init__函数下面的这波class Params即为初始化操作,嵌套类的定义)
 以及WithParams之中类的定义
 也就是说,这里发生有联系的地方只有可能是刚开始初始化的过程中类嵌套的定义
但是由于定义的from_params这个函数是在WithParams的内部定义的,也就是说如果要BertModel能够直接调用from_params函数的时候,只能是BertModel与WithParams函数发生联系
此时我又一次陷入程序的僵局,不知道接下来该如何处理,接下来我想到使用对程序进行局部注释的方法,进而找寻注释掉哪一部分之后无法调用from_params函数
第一次:注释掉对应的Params类
class Params(pp.Params):
	def create(self,*args,**kwargs):
		return  self.__class__._outer_class_.from_params(self,*args,**kwargs)
发现仍然能够正常的调用
第二次:注释掉对应的__init_subclass__函数
def __init_subclass__(cls, **kwargs):
    print('with_params __init_subclass__')
    cls.Params._outer_class_ = cls
发现仍然不行,除此之外注释掉其他的对应函数都不成立。
当注释掉相应的函数都不能够成立的时候,我们进行相应的转换思路,
由于之前我们测试的内容是子类能够调用父类的函数,所以这里我们转换思路,一层一层去寻找相应的父类
 然后我们转而去寻找Layer父类相应的代码
 可以看出,Layer的子类是由pf.Layer的父类继承的,我们继续去查看pf.Layer的父类
 !!!这里查找之后终于找到我们的目的地pp.WithParams了,也就是说BertModelLayer是经过pp.WithParams经过多次继承之后得到的,所以BertModelLayer这里直接调用WithParams中定义了@classmethod,并且调用之后显示的还是它自己!!!
然后我们再回到WithParams类之中,查看from_params函数的调用过程。
先看刚开始的运行结果
bert_params =
{'initializer_range': 0.02, 'max_position_embeddings': 512, 'hidden_size': 768, 'embedding_size': None, 'project_embeddings_with_bias': True, 'vocab_size': 30522, 'use_token_type': True, 'use_position_embeddings': True, 'token_type_vocab_size': 2, 'hidden_dropout': 0.1, 'extra_tokens_vocab_size': None, 'project_position_embeddings': True, 'mask_zero': False, 'adapter_size': None, 'adapter_activation': 'gelu', 'adapter_init_scale': 0.001, 'num_heads': 12, 'size_per_head': None, 'query_activation': None, 'key_activation': None, 'value_activation': None, 'attention_dropout': 0.1, 'negative_infinity': -10000.0, 'intermediate_size': 3072, 'intermediate_activation': 'gelu', 'num_layers': 12, 'out_layer_ndxs': None, 'shared_layer': False}
from_params
WithParams __init__
BertModelLayer _construct
_construct
(使用super()._construct调用了一下with_params中的_construct函数)
这里面调用BertModelLayer的时候利用_construct调用BertModelLayer中的内容,我们查看一下BertModelLayer之中的_construct函数
    def _construct(self, **kwargs):
        print('BertModelLayer _construct')
        super()._construct(**kwargs)
        self.embeddings_layer = BertEmbeddingsLayer.from_params(
            self.params,
            name="embeddings"
        )
        # create all transformer encoder sub-layers
        self.encoders_layer = TransformerEncoderLayer.from_params(
            self.params,
            name="encoder"
        )
所以上面输出的第一个’BertModelLayer _construct’对应的是BertModelLayer _construct,第二个_construct的输出对应的是super()._construct(**kwargs)继承的_construct函数的输出
然后分别调用的BertEmbeddingsLayer.from_params以及TransformerEncoderLayer.from_params,也就是接下来对应的输出内容
from_params
WithParams __init__
!!!注意这里调用self._construct函数的时候先调用BertEmbeddingsLayer _construct
函数,然后再调用withParams之中的_construct函数,继承关系为BertEmbeddingsLayer
->Layer->pf.Layer->pp.withParams函数
BertEmbeddingsLayer _construct
_construct
instance =


from_params
WithParams __init__
TransformerEncoderLayer _construct
_construct
instance =

instance =

!!!这一段调用两次from_params的原因在BertModelLayer之中的_construct有写到
!!!这里调用了两次_construct函数,先调用BertModelLayer之中的_construct,再调用
WithParams之中的_construct函数
然后我们继续查看输出
 我们惊奇地发现,到这里的时候WithParams函数实际已经调用结束了,开始运行BertModelLayer build函数以及BertModelLayer call函数了,但是WithParams运行完之后好像没有调用BertModelLayer build函数和call函数的痕迹
猜想:调用完之后的Input函数调用相应的build以及call函数
 于是我在输入结束的位置加上finish的操作
 回到之前的调用函数之中进行相应的查看
 发现这里确实是operator finish之后再对BertModelLayer build以及BertModelLayer call函数进行调用的,接下来我们对Input以及output进行相应的解读。
模型的输入以及输出
首先再keras.layers.Input与bert(input_ids)之间进行输入内容,然后我们发现后面的BertModelLayer build以及BertModelLayer call的对应函数都是BertModelLayer进行调用的,这个时候我实在搞不明白王司马output = bert(input_ids)会调用对应的BertModelLayer build以及BertModelLayer call函数,所以我在中间加入了一段代码
output = bert.build(input_ids)
发现此时无法进行运行,因为build函数需要传入的为相应的形状
接下来将处于BertModelLayer之中的build函数相应的注释掉,然后继续进行运行,发现此时程序仍然能够正常的运行,只是少了build函数调用这一块内容,
仔细观察build函数与call函数,发现他们的定义类似
def build(self,input_shape):
def compute_output_shape(self,input_shape):
def call(self,inputs,mask=None,training=None):
发现他们的初始化类似,但是这里面的compute_output_shape没有被调用,而剩余的两个函数却被调用了。
猜想:使用bert(input_ids)会调用所有符合要求的函数
此种方法尝试无果之后,我又想到了另外一种方法,
打印当前函数的上一层函数的内容
打印出来的函数我并没有找到相应的位置,接着我准备找寻到相应的函数运行的范围,于是我在函数快要结束的位置打上finish
 从中可以看出,build finish很快就运行结束了,而call函数运行的范围有点长
 所以build函数可以不被调用,但是call函数必须被调用
但是现在仍然没有找到对应的函数调用的过程,此时我想到了使用pycharm的IDE,在pycharm的IDE之中进行相应的单步调试操作
在
output = bert(input_ids)
语句的周围打上相应的断点,然后进入语句之中查看相应的函数调用情况
发现进入函数之后运行到相应的这个位置
(注意这里查找到的内容为keras/engine/base_layer.py文件)
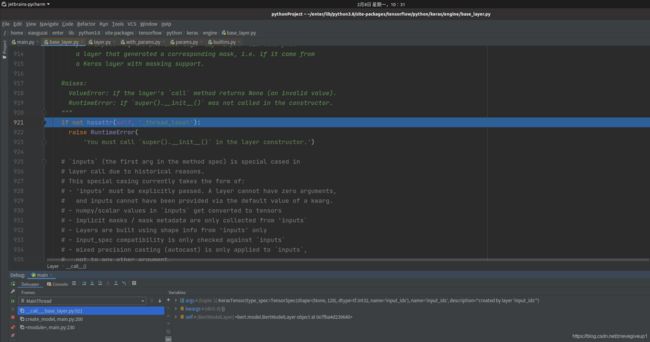 此时我们向上查找相应的函数,惊奇地发现了base_layer.py调用的__call__函数
旁边对应的参数标注点明了传入的对应的函数内容
![]()
args: KerasTensor(type_spec=TensorSpec(shape=(None,128),dtype=tf.int32,name=‘input_ids’),name=‘input_ids’,description=“created by layer ‘input_ids’”) kwargs: {} self:
整个函数对应的源代码内容放置在下面
def __call__(self, *args, **kwargs):
"""Wraps `call`, applying pre- and post-processing steps.
Arguments:
*args: Positional arguments to be passed to `self.call`.
**kwargs: Keyword arguments to be passed to `self.call`.
Returns:
Output tensor(s).
Note:
- The following optional keyword arguments are reserved for specific uses:
* `training`: Boolean scalar tensor of Python boolean indicating
whether the `call` is meant for training or inference.
* `mask`: Boolean input mask.
- If the layer's `call` method takes a `mask` argument (as some Keras
layers do), its default value will be set to the mask generated
for `inputs` by the previous layer (if `input` did come from
a layer that generated a corresponding mask, i.e. if it came from
a Keras layer with masking support.
Raises:
ValueError: if the layer's `call` method returns None (an invalid value).
RuntimeError: if `super().__init__()` was not called in the constructor.
"""
if not hasattr(self, '_thread_local'):
raise RuntimeError(
'You must call `super().__init__()` in the layer constructor.')
# `inputs` (the first arg in the method spec) is special cased in
# layer call due to historical reasons.
# This special casing currently takes the form of:
# - 'inputs' must be explicitly passed. A layer cannot have zero arguments,
# and inputs cannot have been provided via the default value of a kwarg.
# - numpy/scalar values in `inputs` get converted to tensors
# - implicit masks / mask metadata are only collected from 'inputs`
# - Layers are built using shape info from 'inputs' only
# - input_spec compatibility is only checked against `inputs`
# - mixed precision casting (autocast) is only applied to `inputs`,
# not to any other argument.
# - setting the SavedModel saving spec.
inputs, args, kwargs = self._split_out_first_arg(args, kwargs)
input_list = nest.flatten(inputs)
# Functional Model construction mode is invoked when `Layer`s are called on
# symbolic `KerasTensor`s, i.e.:
# >> inputs = tf.keras.Input(10)
# >> outputs = MyLayer()(inputs) # Functional construction mode.
# >> model = tf.keras.Model(inputs, outputs)
if _in_functional_construction_mode(self, inputs, args, kwargs, input_list):
return self._functional_construction_call(inputs, args, kwargs,
input_list)
# Maintains info about the `Layer.call` stack.
call_context = base_layer_utils.call_context()
# Accept NumPy and scalar inputs by converting to Tensors.
if any(isinstance(x, (
np_arrays.ndarray, np.ndarray, float, int)) for x in input_list):
inputs = nest.map_structure(_convert_numpy_or_python_types, inputs)
input_list = nest.flatten(inputs)
# Handle `mask` propagation from previous layer to current layer. Masks can
# be propagated explicitly via the `mask` argument, or implicitly via
# setting the `_keras_mask` attribute on the inputs to a Layer. Masks passed
# explicitly take priority.
input_masks, mask_is_implicit = self._get_input_masks(
inputs, input_list, args, kwargs)
if self._expects_mask_arg and mask_is_implicit:
kwargs['mask'] = input_masks
# Training mode for `Layer.call` is set via (in order of priority):
# (1) The `training` argument passed to this `Layer.call`, if it is not None
# (2) The training mode of an outer `Layer.call`.
# (3) The default mode set by `tf.keras.backend.set_learning_phase` (if set)
# (4) Any non-None default value for `training` specified in the call
# signature
# (5) False (treating the layer as if it's in inference)
args, kwargs, training_mode = self._set_training_mode(
args, kwargs, call_context)
# Losses are cleared for all sublayers on the outermost `Layer.call`.
# Losses are not cleared on inner `Layer.call`s, because sublayers can be
# called multiple times.
if not call_context.in_call:
self._clear_losses()
eager = context.executing_eagerly()
with call_context.enter(
layer=self,
inputs=inputs,
build_graph=not eager,
training=training_mode):
if self._autocast:
inputs = self._maybe_cast_inputs(inputs, input_list)
input_spec.assert_input_compatibility(self.input_spec, inputs, self.name)
if eager:
call_fn = self.call
name_scope = self._name
else:
name_scope = self._name_scope() # Avoid autoincrementing.
call_fn = self._autographed_call()
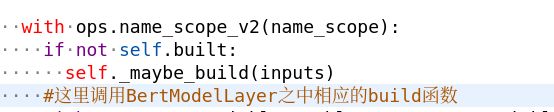
with ops.name_scope_v2(name_scope):
if not self.built:
self._maybe_build(inputs)
with autocast_variable.enable_auto_cast_variables(
self._compute_dtype_object):
outputs = call_fn(inputs, *args, **kwargs)
if self._activity_regularizer:
self._handle_activity_regularization(inputs, outputs)
if self._supports_masking:
self._set_mask_metadata(inputs, outputs, input_masks, not eager)
if self._saved_model_inputs_spec is None:
self._set_save_spec(inputs)
return outputs
仔细看代码之中对应的标注:
"""Wraps `call`, applying pre- and post-processing steps.

    Arguments:
      *args: Positional arguments to be passed to `self.call`.
      **kwargs: Keyword arguments to be passed to `self.call`.

    Returns:
      Output tensor(s).

    Note:
      - The following optional keyword arguments are reserved for specific uses:
        * `training`: Boolean scalar tensor of Python boolean indicating
          whether the `call` is meant for training or inference.
        * `mask`: Boolean input mask.
      - If the layer's `call` method takes a `mask` argument (as some Keras
        layers do), its default value will be set to the mask generated
        for `inputs` by the previous layer (if `input` did come from
        a layer that generated a corresponding mask, i.e. if it came from
        a Keras layer with masking support.

    Raises:
      ValueError: if the layer's `call` method returns None (an invalid value).
      RuntimeError: if `super().__init__()` was not called in the constructor.
    """
也就是说,位置函数和关键字函数都会优先调用self.__call__函数,那么为什么会调用__call__函数呢?
call()是可调用方法,一旦实现该方法,我们的类对象在某些行为上可以表现的和函数一样。可以直接通过类对象object()进行调用。
比如如下的函数运行:

此时这里使用obj = myObject(20)实例化了之后,直接调用obj()实例化对象之后会调用相应的__call__函数
这里我们也可以明白平时为什么可以直接使用例如LSTM(32)(input)这种形式来添加网络层,这种形式的本质是:
output = LSTM(32)(input)
上述代码等价于
mylayer = LSTM(32)
output = mylayer.__call__(input)
回到我们调用的函数之中,
output = bert(input_ids)
是不是就可以进行替换成为
output = bert.__call__(input_ids)
修改之后对应的运行结果如下:
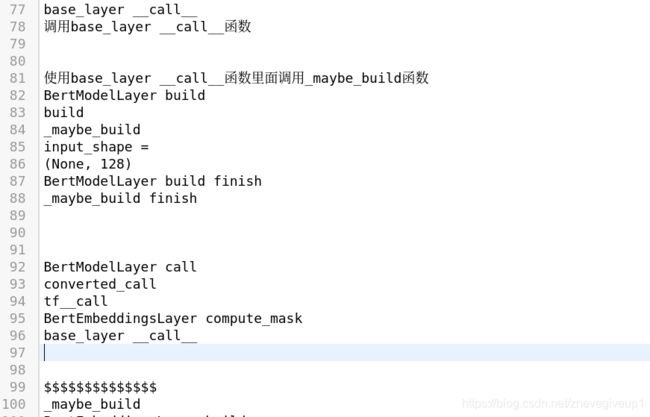
 发现这里先运行的为base_layer __call__函数,然后再调用BertModelLayer build函数,调用完BertModelLayer build函数之后再去调用BertModelLayer call函数,
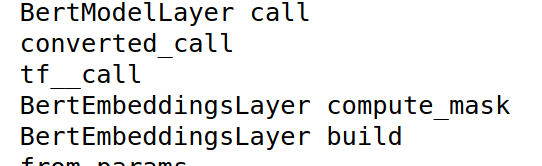
(这中间的_maybe_build函数为调用build的对应的函数,BertModelLayer call之中的converted_call为当前运行的BertModelLayer call函数,tf__call为BertModelLayer call上面的对应函数)
在base_layer.py之中搜索build函数,看能否找到对应的build函数的调用
 发现了这之中_maybe_build函数的调用过程,然后去查看_maybe_build函数,_maybe_build函数也在base_layer.py之中
 继续往下查找,能够查找到build函数的调用过程
 然后我们查看程序调用的过程
 首先调用
首先调用
output = bert.__call__(input_ids)
对应程序语句的时候,查看BertModelLayer对应的py文件,发现里面并没有定义相应的__call__函数,此时会调用父类中的__call__函数,即base_layer __call__函数
这里我写一个例子进行相应的验证
 newObject当中没有common_method函数,此时就会调用父类myObject之中定义的common_method函数
接下来我们进入base_layer.py文件之中的部分,查看调用BertModelLayer build部分的函数
先查看一段程序的输出部分的内容
 可以看出来,这里调用base_layer __call__输出一次内容之后没有等到base_layer call finish就继续调用下一次的base_layer __call的内容了,那么问题来了,第一次base_layer __call__与第二次base_layer __call__函数之间有BertModelLayer build函数的调用,这里究竟是如何发生调用的呢?
我们在__call__函数中间加上相应的断点,从而确定程序的运行顺序
  def __call__(self, *args, **kwargs):
    print('base_layer __call__')
    """Wraps `call`, applying pre- and post-processing steps.

    Arguments:
      *args: Positional arguments to be passed to `self.call`.
      **kwargs: Keyword arguments to be passed to `self.call`.
      *args:位置参数,**kwargs:关键字参数
    Returns:
      Output tensor(s).

    Note:
      - The following optional keyword arguments are reserved for specific uses:
        * `training`: Boolean scalar tensor of Python boolean indicating
          whether the `call` is meant for training or inference.
        training:Python的boolean张量,表示'call'函数是用于训练还是用于推断。
        * `mask`: Boolean input mask.
      - If the layer's `call` method takes a `mask` argument (as some Keras
        layers do), its default value will be set to the mask generated
        for `inputs` by the previous layer
        如果层的调用方法采用'mask'参数(如某些Keras层所做),则其默认值将设置为前一层为'inputs'
        产生出来的mask。
        (if `input` did come from  a layer that generated a corresponding mask, i.e. if it came from
        a Keras layer with masking support.
        如果'input'确实来自layer产生相应的mask,即它来自一个keras层有对应的masking支持。
    Raises:
      ValueError: if the layer's `call` method returns None (an invalid value).
      RuntimeError: if `super().__init__()` was not called in the constructor.
    """
    if not hasattr(self, '_thread_local'):
      raise RuntimeError(
          'You must call `super().__init__()` in the layer constructor.')
    # `inputs` (the first arg in the method spec) is special cased in
    # layer call due to historical reasons.
    # This special casing currently takes the form of:
    # - 'inputs' must be explicitly(明确地) passed. A layer cannot have zero arguments,
    #   and inputs cannot have been provided via the default value of a kwarg.
    # - numpy/scalar values in `inputs` get converted to tensors
    # - implicit masks / mask metadata(元数据) are only collected from 'inputs`
    # - Layers are built using shape info from 'inputs' only
    # - input_spec compatibility is only checked against `inputs`
    # - mixed precision casting (autocast) is only applied to `inputs`,
    #   not to any other argument.
    # - setting the SavedModel saving spec.
    inputs, args, kwargs = self._split_out_first_arg(args, kwargs)
    input_list = nest.flatten(inputs)
    print('situation1')
    # Functional Model construction mode is invoked when `Layer`s are called on
    # symbolic `KerasTensor`s, i.e.:
    # >> inputs = tf.keras.Input(10)
    # >> outputs = MyLayer()(inputs)  # Functional construction mode.
    # >> model = tf.keras.Model(inputs, outputs)
    if _in_functional_construction_mode(self, inputs, args, kwargs, input_list):
      return self._functional_construction_call(inputs, args, kwargs,
                                                input_list)
    print('situation2')
    # Maintains info about the `Layer.call` stack.
    call_context = base_layer_utils.call_context()

    # Accept NumPy and scalar inputs by converting to Tensors.
    if any(isinstance(x, (
        np_arrays.ndarray, np.ndarray, float, int)) for x in input_list):
      inputs = nest.map_structure(_convert_numpy_or_python_types, inputs)
      input_list = nest.flatten(inputs)
    print('situation3')
    # Handle `mask` propagation from previous layer to current layer. Masks can
    # be propagated explicitly via the `mask` argument, or implicitly via
    # setting the `_keras_mask` attribute on the inputs to a Layer. Masks passed
    # explicitly take priority.
    input_masks, mask_is_implicit = self._get_input_masks(
        inputs, input_list, args, kwargs)
    if self._expects_mask_arg and mask_is_implicit:
      kwargs['mask'] = input_masks
    print('situation4')
    # Training mode for `Layer.call` is set via (in order of priority):
    # (1) The `training` argument passed to this `Layer.call`, if it is not None
    # (2) The training mode of an outer `Layer.call`.
    # (3) The default mode set by `tf.keras.backend.set_learning_phase` (if set)
    # (4) Any non-None default value for `training` specified in the call
    #  signature
    # (5) False (treating the layer as if it's in inference)
    args, kwargs, training_mode = self._set_training_mode(
        args, kwargs, call_context)
    print('situation5')
    # Losses are cleared for all sublayers on the outermost `Layer.call`.
    # Losses are not cleared on inner `Layer.call`s, because sublayers can be
    # called multiple times.
    if not call_context.in_call:
      self._clear_losses()
    print('situation6')
    eager = context.executing_eagerly()
    with call_context.enter(
        layer=self,
        inputs=inputs,
        build_graph=not eager,
        training=training_mode):
      if self._autocast:
        inputs = self._maybe_cast_inputs(inputs, input_list)
      print('situation7')
      input_spec.assert_input_compatibility(self.input_spec, inputs, self.name)
      if eager:
        call_fn = self.call
        name_scope = self._name
      else:
        name_scope = self._name_scope()  # Avoid autoincrementing.
        call_fn = self._autographed_call()
      print('$$$$$$$$$$$$$$')
      with ops.name_scope_v2(name_scope):
        if not self.built:
          self._maybe_build(inputs)
        #这里调用BertModelLayer之中相应的build函数
        print('call_fn')
        with autocast_variable.enable_auto_cast_variables(
            self._compute_dtype_object):
          outputs = call_fn(inputs, *args, **kwargs)
        #这里的call_fn只是简单的返回inputs的内容
        if self._activity_regularizer:
          print('_handle_activity_regularizer')
          self._handle_activity_regularization(inputs, outputs)
        if self._supports_masking:
          print('_set_mask_metadata')
          self._set_mask_metadata(inputs, outputs, input_masks, not eager)
        if self._saved_model_inputs_spec is None:
          print('_set_save_spec')
          self._set_save_spec(inputs)
        print('__call__ finish')
        return outputs
再次查看函数当前的输出情况
 此时我们对于输出的内容进行分析:
首先,第一个BertModelLayer之中调用了一次_maybe_build函数,但是由于种种原因未能运行到底,第一个_maybe_build finish的输出应该对应的是上面situation1下面由_functional_construction_call之中调用的_maybe_build之中输出的内容
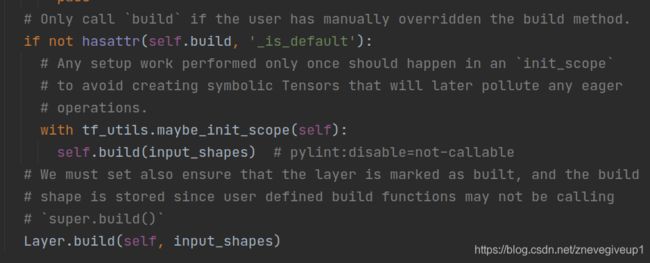
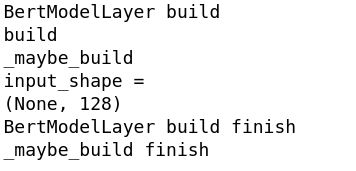
这点可以通过下面model.py之中的build的函数调用来看出,这里附上build的函数的调用过程
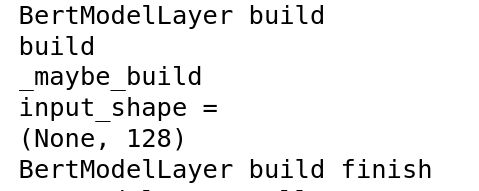
    # noinspection PyAttributeOutsideInit
    def build(self, input_shape):
        print('BertModelLayer build')
        print(sys._getframe().f_code.co_name)
        print(sys._getframe().f_back.f_code.co_name)
        print('input_shape = ')
        print(input_shape)
        if isinstance(input_shape, list):
            assert len(input_shape) == 2
            input_ids_shape, token_type_ids_shape = input_shape
            self.input_spec = [keras.layers.InputSpec(shape=input_ids_shape),
                               keras.layers.InputSpec(shape=token_type_ids_shape)]
        else:
            input_ids_shape = input_shape
            self.input_spec = keras.layers.InputSpec(shape=input_ids_shape)
        super(BertModelLayer, self).build(input_shape)
        print('BertModelLayer build finish')
结合调用过程之中的输出内容
 可以看出来,BertModelLayer build函数之中的
print(sys._getframe().f_code.co_name)
输出的函数内容为build函数,而
print(sys._getframe().f_back.f_code.co_name)
输出的内容为_maybe_build的相应的函数,这里说明了build的上一层函数为_maybe_build函数,而_maybe_build函数去调用的build函数
    def call(self, inputs, mask=None, training=None):
        print('BertModelLayer call')
        print(sys._getframe().f_code.co_name)
        #查看当前的函数
        print(sys._getframe().f_back.f_code.co_name)
        if mask is None:
            mask = self.embeddings_layer.compute_mask(inputs)

        embedding_output = self.embeddings_layer(inputs, mask=mask, training=training)
        output           = self.encoders_layer(embedding_output, mask=mask, training=training)
        print('BertModelLayer call finish')
        return output   # [B, seq_len, hidden_size]
可以看出这里先调用self.embeddings_layer.compute_mask函数,调用完成之后再使用类似的output = bert(input_ids)的两个相应的编程语句
        embedding_output = self.embeddings_layer(inputs, mask=mask, training=training)
        output           = self.encoders_layer(embedding_output, mask=mask, training=training)
接下来回到base_layer之中,进入相应的base_layer底层进行运行。
首先我们分析一下bert需要的结构,该程序中bert的结构由两个部分组成,一个部分为BertEmbeddingLayer层,另外一个部分为TransformerEncoder层,这里我们查看一下bert层相应的结构内容
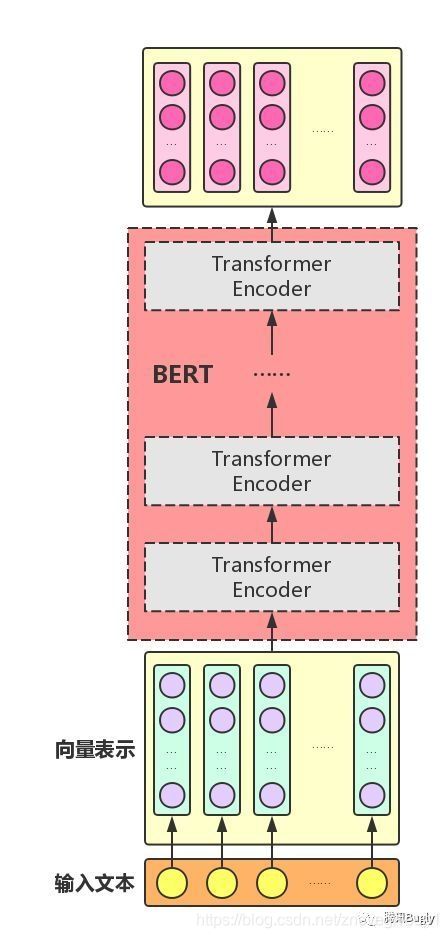 向量表示的部分为BertEmbeddingLayer的对应层,接下来由12个层组成相应的TransformerEncoder层,然后输出最终相应的结果。
然而,一直以来我都有的疑问是:keras是如何通过调用Model()来实现图(graph)的构建的呢?
下面的文章内容转载自https://blog.csdn.net/Flag_ing/article/details/107848319#commentBox
首先我们查看topology.py,topology.py定义了keras构建模型流图(即模型的网络结构)时的拓扑规则。
"""This module is deprecated, but kept around for backwards compatibility.
"""
from .base_layer import Layer, Node, InputSpec
from .input_layer import Input, InputLayer
from .network import Network, get_source_inputs
也就是说,topology.py构成了这样的一种类的继承、调用的关系
 基类Layer()定义了网络结构中所有层的基本属性及方法,除了图中提到的class外,keras的其他所有层类(如全连接层Dense、二维卷积层Conv2D、泛型函数Model等)都是直接或间接继承Layer()类,并通过overwrite有关Methods或增添相应的Properties及Methods而来的。
InputSpec()类用以指定网络中每一个layer的input tensor的维度数(ndim)、数据类型(dtype)、维度(shape)等属性,并在构建有关layer时用以检测该layer输入tensor(s)的兼容性。
InputLayer()类定义了每个模型网络结构的原始输入tensor的有关信息。
Node()类用以在每个layer中创建node节点,使得该layer跟与其前后有关的layers关联起来。具体怎么关联,下面会有详细的介绍。
Container()类通过递归的方式,从模型的最终输出layer(s)层的output tensor(s)开始,根据每个layer的node信息反向递归找出模型的所有网络层信息并构建模型的整体网络图(graph)(有点类似C语言中链表结构的递归查询)。上述提到的泛型函数Model()就是通过继承Container()类而来的。
继承了Layer类的子类一般要实现重写以下的methods
1、init(): Defines custom layer attributes, and creates layer state variables that do not depend on input shapes, using add_weight().
定义自定义层属性,并创建不依赖于输入形状的层状态变量。
2、build(self, input_shape): This method can be used to create weights that depend on the shape(s) of the input(s), using add_weight(). call() will automatically build the layer (if it has not been built yet) by calling build().
用来创建依赖于输入shape的weights,即每层的权重。在layer的创建中,build() methods通过调用add_weight()方法来创建layer的weights。在基类Layer中build() methods为空:
class Layer(object):
  """   代码其余部分省略   """
    def build(self, input_shape):
        """Creates the layer weights.
        Must be implemented on all layers that have weights.
        # Arguments
            input_shape: Keras tensor (future input to layer)
                or list/tuple of Keras tensors to reference
                for weight shape computations.
        """
        self.built = True
因此build() methods需要在在继承了Layer class的子类中实现,以class _Conv(Layer):类为例,其实现build() method的方式为:
    class _Conv(Layer):
    """   代码其余部分省略   """
    def build(self, input_shape):
            if self.data_format == 'channels_first':
                channel_axis = 1
            else:
                channel_axis = -1
            if input_shape[channel_axis] is None:
                raise ValueError('The channel dimension of the inputs '
                                 'should be defined. Found `None`.')
            input_dim = input_shape[channel_axis]
            kernel_shape = self.kernel_size + (input_dim, self.filters)
            self.kernel = self.add_weight(shape=kernel_shape,
                                          initializer=self.kernel_initializer,
                                          name='kernel',
                                          regularizer=self.kernel_regularizer,
                                          constraint=self.kernel_constraint)
            #调用add_weight()方法来创建layer的weights权重
            if self.use_bias:
                self.bias = self.add_weight(shape=(self.filters,),
                                            initializer=self.bias_initializer,
                                            name='bias',
                                            regularizer=self.bias_regularizer,
                                            constraint=self.bias_constraint)
            else:
                self.bias = None
            # Set input spec.
            self.input_spec = InputSpec(ndim=self.rank + 2,
                                        axes={
     channel_axis: input_dim})
            self.built = True
这里我们查看相应的bert之中的build函数的内容
# noinspection PyAttributeOutsideInit
def build(self, input_shape):
    print('BertModelLayer build')
    print(sys._getframe().f_code.co_name)
    print(sys._getframe().f_back.f_code.co_name)
    print('input_shape = ')
    print(input_shape)
    if isinstance(input_shape, list):
        assert len(input_shape) == 2
        input_ids_shape, token_type_ids_shape = input_shape
        self.input_spec = [keras.layers.InputSpec(shape=input_ids_shape),
                           keras.layers.InputSpec(shape=token_type_ids_shape)]
    else:
        input_ids_shape = input_shape
        self.input_spec = keras.layers.InputSpec(shape=input_ids_shape)
    super(BertModelLayer, self).build(input_shape)
    print('BertModelLayer build finish')
这里的build函数并未添加相应的权重,但是加入了InputSpec函数作为输入的self.input_spec,这点与上面的_Conv类是一致的
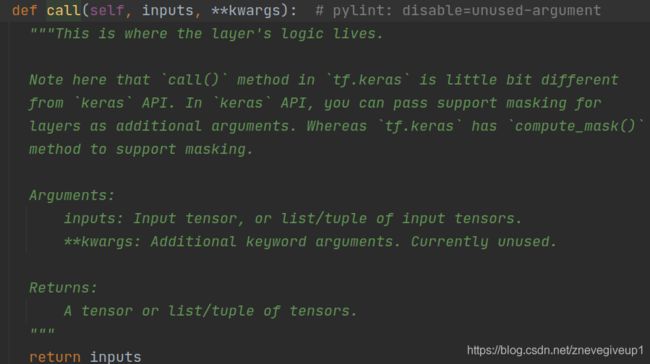
3、call(self, *args, **kwargs): Called in call after making sure build() has been called. call() performs the logic of applying the layer to the input tensors (which should be passed in as argument). Two reserved keyword arguments you can optionally use in call() are: - training (boolean, whether the call is in inference mode or training mode) - mask (boolean tensor encoding masked timesteps in the input, used in RNN layers)
在__call__ method中,build() method被调用之后调用call() method,用以处理该layer的input tensors,并输出相应的output tensors。类似于上述build method的实现原理,在Layer类中,并没有对call method进行具体的实现:
class Layer(object):
"""   代码其余部分省略   """
    def call(self, inputs, **kwargs):
        """This is where the layer's logic lives.
        # Arguments
            inputs: Input tensor, or list/tuple of input tensors.
            **kwargs: Additional keyword arguments.
        # Returns
            A tensor or list/tuple of tensors.
        """
        return inputs
因此需要在Layer的子类中对其进行具体的实现,同样以class _Conv(Layer):类为例,其实现call() method的方式为:
class _Conv(Layer):
"""   省略其余部分代码   """
    def call(self, inputs):
        if self.rank == 1:
        """   省略该部分代码   """
        if self.rank == 2:
            outputs = K.conv2d(
                inputs,
                self.kernel,
                strides=self.strides,
                padding=self.padding,
                data_format=self.data_format,
                dilation_rate=self.dilation_rate)
        if self.rank == 3:
        """   省略该部分代码   """
        if self.use_bias:
            outputs = K.bias_add(
                outputs,
                self.bias,
                data_format=self.data_format)
        if self.activation is not None:
            return self.activation(outputs)
        return outputs
call函数相当于对数据进行处理,由Input的内容转为output的内容进行相应的输出
然后这里我们查看bert之中定义的call的相应的函数
def call(self, inputs, mask=None, training=None):
    print('BertModelLayer call')
    print(sys._getframe().f_code.co_name)
    #查看当前的函数
    print(sys._getframe().f_back.f_code.co_name)
    if mask is None:
        mask = self.embeddings_layer.compute_mask(inputs)

    embedding_output = self.embeddings_layer(inputs, mask=mask, training=training)
    output           = self.encoders_layer(embedding_output, mask=mask, training=training)
    print('BertModelLayer call finish')
    return output   # [B, seq_len, hidden_size]
先使用self.embeddings_layer得到一个中间的输出embedding_output,然后再用embedding_output得到最终的输出output的内容
在这个位置的时候,发现self.embeddings_layer以及self.encoders_layer函数的调用需要使用到之前的_construct函数
# noinspection PyUnusedLocal
def _construct(self, **kwargs):
    print('BertModelLayer _construct')
    super()._construct(**kwargs)
    self.embeddings_layer = BertEmbeddingsLayer.from_params(
        self.params,
        name="embeddings"
    )
    # create all transformer encoder sub-layers
    self.encoders_layer = TransformerEncoderLayer.from_params(
        self.params,
        name="encoder"
    )
#这里通过from_params调用出来相应的参数,感觉这里的from_params类似于add_weights的函数
    self.support_masking  = True
    print('BertModelLayer finish')
4、get_config(self): Returns a dictionary containing the configuration used to initialize this layer. If the keys differ from the arguments in init, then override from_config(self) as well. This method is used when saving the layer or a model that contains this layer.
在开始例子中我们使用到的泛型函数Model()其实就是继承了Container()类而来的,其类原型是Model(Container)。而另外一种序列模型Sequential()就是继承了Model()而来的,其原型是Sequential(Model)。
Node、layer、tensor在网络构建过程中的关系
node、layer、tensor的关系时相辅相成的。在模型的网络流图构建过程中,tensor(s)在每个layer中流动,在流动的过程中,每一个layer都会创建并绑定一个或多个(一般共享层会有多个node)node,node把这些tensor与layer的前后关系联系起来,进而实现tensor、layer、node三者的相互联系。
 图中所示模型的网络流图共有7个网络层Layer A~G,并假设LayerF为连结(concatenate)层而不是共享层,本次不讨论含有共享层的情况。每个layer都绑定有一个Node结点,网络的输入层为Layer A(该输入层就是使用上述的InputLayer()创建的),输出层为Layer G。IN1为LayerA的输入tensor,OUT1为LayerA的输出tensor也即LayerB和LayerC的输入tensor IN2、IN3,其他同理。
1.Node
node并不参与计算,只是用来记录各layer、tensor之间关系的一个桥梁。以Layer F的node6为例说明其Node关联LayerE、LayerD及Layer G的过程,其他的与此相同。
首先,node的常用属性如下图所示:
 这些属性中只有"outbound_layer"是单数形式,其他的都是复数形式。这是由于outbound_layer代表将input tensors转化成output tensors。上图可以看出来,完成IN6到OUT6转换过程的layer正是Layer F本身,而这个层还有且只能有一个,这一点并不难理解。
首先,大家可能注意到这些属性中只有“outbound_layer”是单数形式,其他的都是复数形式。这是由于outbound_layer代表将input tensors转化成output tensors的层,上图可以看出在Layer F中,完成IN6到OUT6转换过程的layer正是Layer F本身,而这个层还只有且只能有一个,这一点不难理解。
inbound_layers表示node6的入站层,可以有多个,图中不难看出,node6的inbound_layers为Layer E和Layer D两个,即inbound_layers[] = [Layer E, Layer D]。
node_indices表示Layer F中node的索引,当一个Layer中有2个或2个以上的node时,一般对应着共享层,此处只讨论非共享层的情况,因此每个Layer只有一个node,因此这种情况下node_indices为0,即一个。
tensor_indices表示Layer F中output_tensors中每个tensor的索引,对应多输出的情况。假设图中的layer全部是单输出layer,所以node6的tensor_indices为0,即只输出一个tensor。
input_tensors与output_tensors分表示该node的输入tensor与输出tensor。从图中可以看出,node6的input_tensors有两个,output_tensors有一个。
input_shapes与output_shapes分表示input_tensors与output_tensors的tensor的shape,这点容易理解。
然后我们插播一些非常重要的注释,作为对于base_layer.py文件相应的解读,来看看当构建一个layer层的时候需要如何构建
  A layer is a callable object that takes as input one or more tensors and
  that outputs one or more tensors. It involves *computation*, defined
  in the `call()` method, (computation在call()函数之中定义)
  and a *state* (weight variables), defined
  either in the constructor `__init__()` or in the `build()` method.
  (weight变量在__init__()或者是在build()函数之中定义)
  Users will just instantiate a layer and then treat it as a callable.

  Arguments(参数):
    trainable: Boolean, whether the layer's variables should be trainable.
    trainable:layer's变量是否需要被训练
    name: String name of the layer.
    dtype: The dtype of the layer's computations and weights (default of
      `None` means use `tf.keras.backend.floatx` in TensorFlow 2, or the type
      of the first input in TensorFlow 1).
    dynamic: Set this to `True` if your layer should only be run eagerly, and
      should not be used to generate a static computation graph.
      静态图是一种声明式(declaretive)的编程模型,eagerly模型的时候计算图将计算的定义和
      执行分隔开,这是一种声明式(declaretive)的编程模型。
      如果为True代表你的层只能运行eagerly的模型
      This would be the case for a Tree-RNN or a recursive network(递归神经网络),
      for example, or generally for any layer that manipulates tensors
      using Python control flow. If `False`, we assume that the layer can
      safely be used to generate a static computation graph.
      如果为False的情况下可以运行静态图模型
  Attributes(属性):
    name: The name of the layer (string).
    dtype: The dtype of the layer's computations and weights. If mixed
      precision is used with a `tf.keras.mixed_precision.experimental.Policy`,
      this is instead just the dtype of the layer's weights, as the computations
      are done in a different dtype.
    trainable_weights: List of variables to be included in backprop.
    non_trainable_weights: List of variables that should not be
      included in backprop.(不训练的权重)
    weights: The concatenation of the lists trainable_weights and
      non_trainable_weights (in this order).
    trainable: Whether the layer should be trained (boolean), i.e. whether
      its potentially-trainable weights should be returned as part of
      `layer.trainable_weights`.
    trainable:the layer应该被训练吗(boolean),即是否它的潜在训练权重应该被作为
    layer.trainable_weights进行返回
    input_spec: Optional (list of) `InputSpec` object(s) specifying the
      constraints on inputs that can be accepted by the layer.
    指明可以被layer接受的输入的限制
    input_spec()

  We recommend that descendants of `Layer` implement the following methods:

  * `__init__()`: Defines custom layer attributes, and creates layer state
    variables that do not depend on input shapes, using `add_weight()`.
  * `build(self, input_shape)`: This method can be used to create weights that
    depend on the shape(s) of the input(s), using `add_weight()`. `__call__()`
    will automatically build the layer (if it has not been built yet) by
    calling `build()`.
  * `call(self, *args, **kwargs)`: Called in `__call__` after making sure
    `build()` has been called. `call()` performs the logic of applying the
    layer to the input tensors (which should be passed in as argument).
    Two reserved keyword arguments you can optionally use in `call()` are:
      - `training` (boolean, whether the call is in
        inference mode or training mode)
      - `mask` (boolean tensor encoding masked timesteps in the input, used
        in RNN layers)
  * `get_config(self)`: Returns a dictionary containing the configuration used
    to initialize this layer. If the keys differ from the arguments
    in `__init__`, then override `from_config(self)` as well.
    This method is used when saving
    the layer or a model that contains this layer.

  Examples:

  Here's a basic example: a layer with two variables, `w` and `b`,
  that returns `y = w . x + b`.
  It shows how to implement `build()` and `call()`.
  Variables set as attributes of a layer are tracked as weights
  of the layers (in `layer.weights`).
介绍完调用的函数以及相应的layer层的定义之后,我们接着回到函数,去查看程序的运行过程,这里附上我改写的base_layer.py对应的函数内容:
  def __call__(self, *args, **kwargs):
    """Wraps `call`, applying pre- and post-processing steps.

    Arguments:
      *args: Positional arguments to be passed to `self.call`.
      **kwargs: Keyword arguments to be passed to `self.call`.

    Returns:
      Output tensor(s).

    Note:
      - The following optional keyword arguments are reserved for specific uses:
        * `training`: Boolean scalar tensor of Python boolean indicating
          whether the `call` is meant for training or inference.
        * `mask`: Boolean input mask.
      - If the layer's `call` method takes a `mask` argument (as some Keras
        layers do), its default value will be set to the mask generated
        for `inputs` by the previous layer (if `input` did come from
        a layer that generated a corresponding mask, i.e. if it came from
        a Keras layer with masking support.

    Raises:
      ValueError: if the layer's `call` method returns None (an invalid value).
      RuntimeError: if `super().__init__()` was not called in the constructor.
    """
    print('base_layer __call__')
    if not hasattr(self, '_thread_local'):
      raise RuntimeError(
          'You must call `super().__init__()` in the layer constructor.')

    # `inputs` (the first arg in the method spec) is special cased in
    # layer call due to historical reasons.
    # This special casing currently takes the form of:
    # - 'inputs' must be explicitly passed. A layer cannot have zero arguments,
    #   and inputs cannot have been provided via the default value of a kwarg.
    # - numpy/scalar values in `inputs` get converted to tensors
    # - implicit masks / mask metadata are only collected from 'inputs`
    # - Layers are built using shape info from 'inputs' only
    # - input_spec compatibility is only checked against `inputs`
    # - mixed precision casting (autocast) is only applied to `inputs`,
    #   not to any other argument.
    # - setting the SavedModel saving spec.
    inputs, args, kwargs = self._split_out_first_arg(args, kwargs)
    input_list = nest.flatten(inputs)
    print('situation1')
    # Functional Model construction mode is invoked when `Layer`s are called on
    # symbolic `KerasTensor`s, i.e.:
    # >> inputs = tf.keras.Input(10)
    # >> outputs = MyLayer()(inputs)  # Functional construction mode.
    # >> model = tf.keras.Model(inputs, outputs)
    if _in_functional_construction_mode(inputs, args, kwargs, input_list):
      return self._functional_construction_call(inputs, args, kwargs,
                                                input_list)
    print('situation2')
    # Maintains info about the `Layer.call` stack.
    call_context = base_layer_utils.call_context()

    # Accept NumPy and scalar inputs by converting to Tensors.
    if any(isinstance(x, (np.ndarray, float, int)) for x in input_list):
      inputs = nest.map_structure(_convert_numpy_or_python_types, inputs)
      input_list = nest.flatten(inputs)
    print('situation3')
    # Handle `mask` propagation from previous layer to current layer. Masks can
    # be propagated explicitly via the `mask` argument, or implicitly via
    # setting the `_keras_mask` attribute on the inputs to a Layer. Masks passed
    # explicitly take priority.
    input_masks, mask_is_implicit = self._get_input_masks(
        inputs, input_list, args, kwargs)
    if self._expects_mask_arg and mask_is_implicit:
      kwargs['mask'] = input_masks
    print('situation4')
    # Training mode for `Layer.call` is set via (in order of priority):
    # (1) The `training` argument passed to this `Layer.call`, if it is not None
    # (2) The training mode of an outer `Layer.call`.
    # (3) The default mode set by `tf.keras.backend.set_learning_phase` (if set)
    # (4) Any non-None default value for `training` specified in the call
    #  signature
    # (5) False (treating the layer as if it's in inference)
    args, kwargs, training_mode = self._set_training_mode(
        args, kwargs, call_context)
    print('situation5')
    # Losses are cleared for all sublayers on the outermost `Layer.call`.
    # Losses are not cleared on inner `Layer.call`s, because sublayers can be
    # called multiple times.
    if not call_context.in_call:
      self._clear_losses()
    print('situation6')
    eager = context.executing_eagerly()
    with call_context.enter(
        layer=self,
        inputs=inputs,
        build_graph=not eager,
        training=training_mode):

      if self._autocast:
        inputs = self._maybe_cast_inputs(inputs, input_list)
      print('situation7')
      if eager:
        call_fn = self.call
        name_scope = self._name
      else:
        input_spec.assert_input_compatibility(self.input_spec, inputs,
                                              self.name)
        name_scope = self._name_scope()  # Avoid autoincrementing.
        call_fn = self._autographed_call()
      print('$$$$$$$$$$$$$$$$$')
      with ops.name_scope_v2(name_scope):
        if not self.built:
          self._maybe_build(inputs)
        print('call_fn')
        with ops.enable_auto_cast_variables(self._compute_dtype_object):
          outputs = call_fn(inputs, *args, **kwargs)

        if self._activity_regularizer:
          print('_handle_activity_regularizer')
          self._handle_activity_regularization(inputs, outputs)
        if self._supports_masking:
          print('_set_mask_metadata')
          self._set_mask_metadata(inputs, outputs, input_masks, not eager)
        if self._saved_model_inputs_spec is None:
          print('_set_save_spec')
          self._set_save_spec(inputs)
        print('__call__ finish')
        return outputs
以及得到的刚开始一段的输出的内容
max_seq_len =
128
adapter_size =
None
flags = 0
bc =
{
'attention_probs_dropout_prob': 0.1, 'hidden_act': 'gelu', 'hidden_dropout_prob': 0.1, 'hidden_size': 768, 'initializer_range': 0.02, 'intermediate_size': 3072, 'max_position_embeddings': 512, 'num_attention_heads': 12, 'num_hidden_layers': 12, 'type_vocab_size': 2, 'vocab_size': 30522, 'ln_type': None, 'embedding_size': None}
begin map_to_stock_
^^^^^^^^^^^^^^^^^^^^^^^^^^^^^^^^^^^^^^^^^^^^^^^^^^
bert_params =
{
'initializer_range': 0.02, 'max_position_embeddings': 512, 'hidden_size': 768, 'embedding_size': None, 'project_embeddings_with_bias': True, 'vocab_size': 30522, 'use_token_type': True, 'use_position_embeddings': True, 'token_type_vocab_size': 2, 'hidden_dropout': 0.1, 'extra_tokens_vocab_size': None, 'project_position_embeddings': True, 'mask_zero': False, 'adapter_size': None, 'adapter_activation': 'gelu', 'adapter_init_scale': 0.001, 'num_heads': 12, 'size_per_head': None, 'query_activation': None, 'key_activation': None, 'value_activation': None, 'attention_dropout': 0.1, 'negative_infinity': -10000.0, 'intermediate_size': 3072, 'intermediate_activation': 'gelu', 'num_layers': 12, 'out_layer_ndxs': None, 'shared_layer': False}
from_params
WithParams __init__
BertModelLayer
BertModelLayer _construct
_construct
from_params
WithParams __init__
BertEmbeddingsLayer
BertEmbeddingsLayer _construct
_construct
instance =
<bert.embeddings.BertEmbeddingsLayer object at 0x7efd70bc6130>
from_params
WithParams __init__
TransformerEncoderLayer
TransformerEncoderLayer _construct
_construct
instance =
<bert.transformer.TransformerEncoderLayer object at 0x7efd70bc68b0>
BertModelLayer finish
instance =
<bert.model.BertModelLayer object at 0x7efd70a00e50>
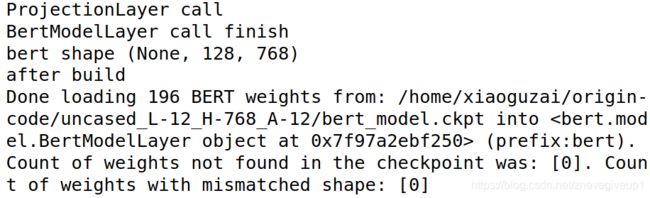
!!!operator finish!!!
input_ids =
Tensor("input_ids:0", shape=(None, 128), dtype=int32)
!!!keras output!!!
bert =
<bert.model.BertModelLayer object at 0x7efd70a00e50>
base_layer __call__
situation1
_functional_construction_call
BertModelLayer build
build
_maybe_build
input_shape =
(None, 128)
BertModelLayer build finish
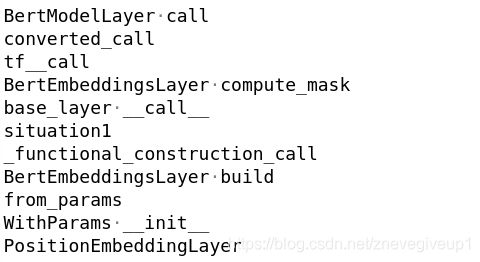
BertModelLayer call
converted_call
tf__call
BertEmbeddingsLayer compute_mask
base_layer __call__
situation1
_functional_construction_call
BertEmbeddingsLayer build
from_params
WithParams __init__
PositionEmbeddingLayer
_construct
instance =
<bert.embeddings.PositionEmbeddingLayer object at 0x7efd701449d0>
WithParams __init__
LayerNormalization
_construct
BertEmbeddingsLayer call
base_layer __call__
situation1
_functional_construction_call
base_layer __call__
situation1
_functional_construction_call
PositionEmbeddingLayer build
PositionEmbeddingLayer call
base_layer __call__
situation1
_functional_construction_call
base_layer __call__
situation1
_functional_construction_call
BertEmbeddingsLayer compute_mask
base_layer __call__
situation1
_functional_construction_call
TransformerEncoderLayer build
from_params
WithParams __init__
SingleTransformerEncoderLayer
SingleTransformerEncoderLayer _construct
_construct
instance =
<bert.transformer.SingleTransformerEncoderLayer object at 0x7efd70d18070>
from_params
WithParams __init__
SingleTransformerEncoderLayer
SingleTransformerEncoderLayer _construct
_construct
instance =
<bert.transformer.SingleTransformerEncoderLayer object at 0x7efd70d18f40>
from_params
WithParams __init__
SingleTransformerEncoderLayer
SingleTransformerEncoderLayer _construct
_construct
instance =
<bert.transformer.SingleTransformerEncoderLayer object at 0x7efd709e85e0>
from_params
WithParams __init__
SingleTransformerEncoderLayer
SingleTransformerEncoderLayer _construct
_construct
instance =
<bert.transformer.SingleTransformerEncoderLayer object at 0x7efd70b85b20>
from_params
WithParams __init__
SingleTransformerEncoderLayer
SingleTransformerEncoderLayer _construct
_construct
instance =
<bert.transformer.SingleTransformerEncoderLayer object at 0x7efd70b85490>
from_params
WithParams __init__
SingleTransformerEncoderLayer
SingleTransformerEncoderLayer _construct
_construct
instance =
<bert.transformer.SingleTransformerEncoderLayer object at 0x7efd70b851c0>
from_params
WithParams __init__
SingleTransformerEncoderLayer
SingleTransformerEncoderLayer _construct
_construct
instance =
<bert.transformer.SingleTransformerEncoderLayer object at 0x7efd70a25b80>
from_params
WithParams __init__
SingleTransformerEncoderLayer
SingleTransformerEncoderLayer _construct
_construct
instance =
<bert.transformer.SingleTransformerEncoderLayer object at 0x7efd70a25c40>
from_params
WithParams __init__
SingleTransformerEncoderLayer
SingleTransformerEncoderLayer _construct
_construct
instance =
<bert.transformer.SingleTransformerEncoderLayer object at 0x7efd70a254f0>
from_params
WithParams __init__
SingleTransformerEncoderLayer
SingleTransformerEncoderLayer _construct
_construct
instance =
<bert.transformer.SingleTransformerEncoderLayer object at 0x7efd70a25340>
from_params
WithParams __init__
SingleTransformerEncoderLayer
SingleTransformerEncoderLayer _construct
_construct
instance =
<bert.transformer.SingleTransformerEncoderLayer object at 0x7efd70b85430>
from_params
WithParams __init__
SingleTransformerEncoderLayer
SingleTransformerEncoderLayer _construct
_construct
instance =
<bert.transformer.SingleTransformerEncoderLayer object at 0x7efd70d187c0>
TransformerEncoderLayer call
base_layer __call__
situation1
_functional_construction_call
SingleTransformerEncoderLayer build
from_params
WithParams __init__
TransformerSelfAttentionLayer
TransformerSelfAttentionLayer _construct
_construct
instance =
<bert.transformer.TransformerSelfAttentionLayer object at 0x7efda2b04760>
from_params
WithParams __init__
ProjectionLayer
ProjectionLayer _construct
_construct
instance =
<bert.transformer.ProjectionLayer object at 0x7efda2b04040>
SingleTransformerEncoderLayer call
base_layer __call__
situation1
_functional_construction_call
TransformerSelfAttentionLayer build
from_params
WithParams __init__
AttentionLayer
通过输出的内容分析函数相应的运行过程:
首先进入base_layer.py之中的__call__函数的调用之中
 可以看出,这里先输出’situation1’,然后调用_in_functional_construction_mode函数对输入和输出操作,这里有一段注释,我们提取出来看
    # Functional Model construction mode is invoked when `Layer`s are called on
    # symbolic `KerasTensor`s, i.e.:
    # >> inputs = tf.keras.Input(10)
    # >> outputs = MyLayer()(inputs)  # Functional construction mode.
    # >> model = tf.keras.Model(inputs, outputs)
即使用上面定义的方式的时候会直接调用self._functional_construction_call函数,而我们查看bert之中定义的内容
	input_ids      = keras.layers.Input(shape=(max_seq_len,), dtype='int32', name="input_ids")
    output         = bert(input_ids)
    cls_out = keras.layers.Lambda(lambda seq: seq[:, 0, :])(output)
    cls_out = keras.layers.Dropout(0.5)(cls_out)
    logits = keras.layers.Dense(units=768, activation="tanh")(cls_out)
    logits = keras.layers.Dropout(0.5)(logits)
    logits = keras.layers.Dense(units=2, activation="softmax")(logits)
    model = keras.Model(inputs=input_ids, outputs=logits)
    model.build(input_shape=(None, max_seq_len))
可以看出这里使用的正是keras定义的第一种方式,所以这里调用self._functional_construction_call函数,然后我们继续查看self._functional_construction_call之中的内容,看到了如下相应的调用语句
 可以看出这里接着调用BertModel之中的build函数,我们查看现在相应的输出内容
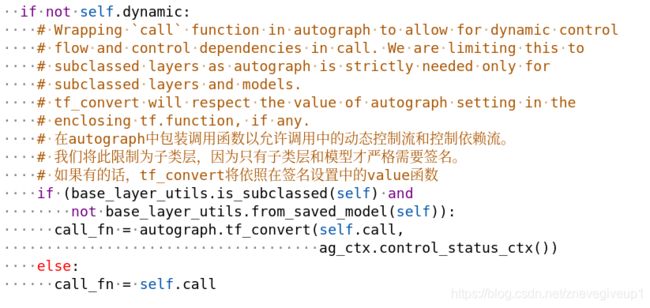
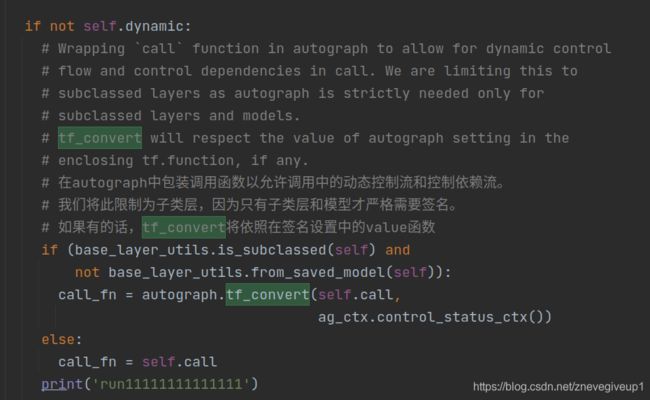
 然后它有一段注释,我简单的翻译了一下相应的内容,
 这里面会将call_fn定义为相应的self.call函数的内容,然后下一句相应的进行调用
 这里我们进入到相应的def call函数之中进行相应的查看
 这里的call函数的内容为空,只是简单的返回一个inputs的内容,等着上层函数进行复写,于是便有了上层函数调用的输出内容
但是到了调用函数之中查看的时候,我发现猜想错误
 BertModel之中的call函数对应内容
    def call(self, inputs, mask=None, training=None):
        print('BertModelLayer call')
        print(sys._getframe().f_code.co_name)
        #查看当前的函数
        print(sys._getframe().f_back.f_code.co_name)
        if mask is None:
            mask = self.embeddings_layer.compute_mask(inputs)

        embedding_output = self.embeddings_layer(inputs, mask=mask, training=training)
        output           = self.encoders_layer(embedding_output, mask=mask, training=training)
        print('BertModelLayer call finish')
        return output   # [B, seq_len, hidden_size]
从中可以看出,是converted_call函数调用了对应的call函数的内容,而converted_call函数上一层的函数为对应的tf__call函数,所以我猜想这里调用的为tf_convert函数
 然而找寻了之后,还是没有看到有调用tf_convert函数或者是self.call函数的部分,此时我们在调用结束之后的部分加上print(‘run111111111111’)的内容,然后运行程序。
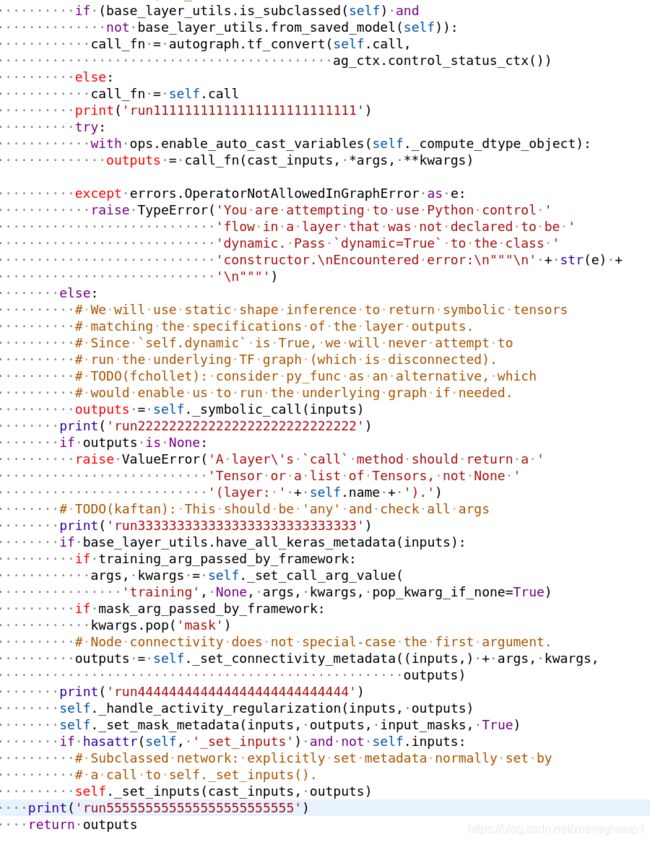
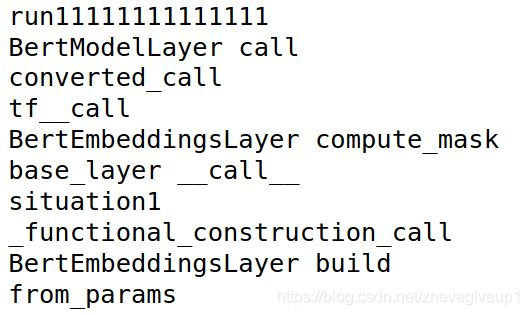 从输出的内容之中可以看出先运行run111111111111的输出操作,然后再调用BertModelLayer call函数,所以这个调用BertModelLayer call函数是在run111111111111下面的内容之中调用的
在中间加上输入输出的调用内容
 发现运行的结果如下:
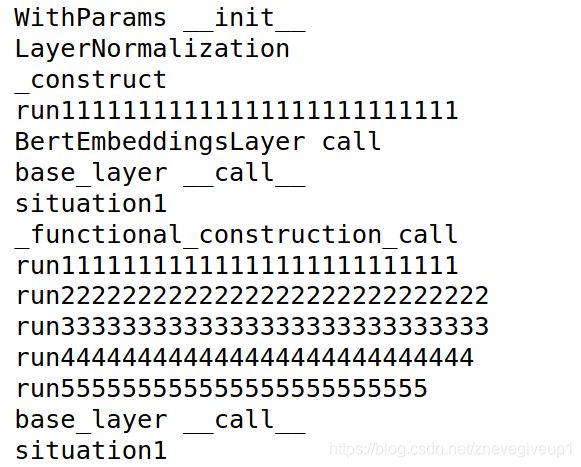 由此可见,调用BertEmbeddingsLayer call函数应该是在run11111111111111111以及run22222222222222222之间进行的,推测应该为中间的call_fn函数,查看对应的call_fn函数的内容,进入了api.py之中的tf_convert函数之中,
call_fn = autograph.tf_convert(self.call,ag_ctx.control_status_ctx())
这里面我们需要到call_fn的函数之中查看相应的
BertModelLayer call
converted_call
tf__call
这样几个对应函数的调用过程,注意这个tf_convert的调用函数在api.py对应的文件之中
查看api.py之中的相应的函数
def tf_convert(f, ctx, convert_by_default=True, user_requested=False):
  """Decorator that applies AutoGraph to a function.

  Use in internal APIs.

  This API is suitable for high order functions internal to the TensorFlow API,
  and more generally any function to which Autograph is not applied.

  Guidance: convert was a decorator meant for use directly by developers, and
  will be soon deprecated in favor of tf.function. tf_convert is to be called
  from high order functions internal to TF.

  Args:
    f: Callable.
    ctx: ag_ctx.ControlStatusCtx, the Autograph context in which `f` is used.
    convert_by_default: bool, whether to use AutoGraph when the context doesn't
      specify.
    user_requested: bool, whether to ignore the conversion whitelist. See
      ConversionOptions.user_requested.

  Returns:
    Either `f or the converted version of `f`.
  """

  if is_autograph_artifact(f):
    return f
  f_wrapper = f
  decorators, f = tf_decorator.unwrap(f)

  # TODO(mdan): Grab features from context.
  # Note: we pass the original context through to convert to properly handle the
  # following scenario, which can be used inside TF implementations:
  #
  #   ctx = ag_ctx.control_status_ctx()
  #   @function(autograph=False)  # Low-level graph code
  #   def inner_fn():
  #     # The context is disabled here, but should be enabled in user user_fn
  #     tf_convert(user_fn, ctx=ctx)
  if ctx.status == ag_ctx.Status.ENABLED:
    wrapper_factory = convert(
        recursive=True, user_requested=user_requested, conversion_ctx=ctx)
  elif ctx.status == ag_ctx.Status.DISABLED:
    wrapper_factory = do_not_convert
  elif ctx.status == ag_ctx.Status.UNSPECIFIED:
    if convert_by_default:
      wrapper_factory = convert(
          recursive=True, user_requested=user_requested, conversion_ctx=ctx)
    else:
      wrapper_factory = call_with_unspecified_conversion_status
  else:
    assert False, 'This switch contains all possible cases!'
  wrapper = wrapper_factory(f)

  if decorators:
    wrapper = tf_decorator.rewrap(f_wrapper, f, wrapper)

  return autograph_artifact(wrapper)
读到这里的时候我感觉自己读的内容有点过于底层了,请教了一下github上面的toolkit4nlp作者的大佬,大佬的意思是复现相应的结构并不需要去深入的读取keras之中的源代码,于是这里我转换思路,继续深入读取作者所写的代码