Python处理Word文件的实用姿势
我从不以强凌弱,欺负他之前,真不晓得他比我弱。
Office套件一直是微软的印钞机,但在2007版本前,它一直是微软的专用格式。
什么是专用格式?就是你只能用微软提供的Office软件打开自己的文档数据。
也就必须向微软付费,而且还不通用。
2002年Sun(后被Oracle收购)等公司组建了OASIS技术委员会,开始定义一种基于XML的开放标准文档格式:ODF标准。
这份标准引发了全球政府的关注,推动了文档标准化的进程。
微软随后也推出了自己的标准文档格式OpenXML,并从Office2007版开始正式支持。
此后,巨头们展开了激烈的文档标准之争。
现在,除了微软Office,我们还可以选择使用WPS,OpenOffice,或者MacOS上的Pages等工具处理文档。
OpenXML的文档基于XML和Zip压缩技术,有什么特殊呢?
首先可以观察到文件扩展名不一样,最后都带一个x,如docx、xlsx、pptx。
对于这类文件,你可以用压缩软件比如7-zip打开它,就可以看到其内部结构了。
一份docx文档解压后的格式
可以看到,文件内的图像等素材,其实都在压缩文件内的某个文件夹下。
pptx和xlsx文件类似,所以之前有朋友问:
“如何批量提取PPT内的图像?”
这就是答案。
剩下的还有一堆XML文档,之前说过都是文本文件,可以直接用文本编辑器打开。
当然,为了更快处理其中的信息,我们可以利用现成的模块。
Python中用于处理微软Office文档的模块对应有3个:
- python-docx,处理标准
docx文档 - python-pptx,处理标准
pptx文档 - openpyxl,处理
xlsx文档
模块安装:
pip install python-docxpip install python-pptxpip install openpyxl
正常情况下,我们不会用编程来写文档,因为软件已经足够成熟,使用起来方便很多。
但是在两个情况下,用编程处理文档更有优势:
- 批量处理数据,如汇总文档中的图表等。
- 自动化生成,如按模板定期生成报告等。
这次,我们重点介绍python-docx处理微软的Word文档。
基本使用:自动生成文档
一个Word文档,主要由下面这些内容元素构成,每个元素都有对应的方法处理:
- 标题:
add_heading() - 段落:
add_paragraph() - 文本:
add_run(),其返回对象支持设置文本属性 - 图片:
add_picture() - 表格:
add_table()、add_row()、add_col()
其中,段落和文本最通用,可以给段落赋予不同的样式,定义出“引用”、“项目符号”等元素。
- 引用:
style='Intense Quote' - 项目符号:
style='List Bullet/Number'
生成文档的过程,其实就是构造Document对象的过程,如添加标题、段落、图像、文字等元素,并为其设置格式,最后通过save()方法保存到磁盘。
import pathlib
from docx import Document
from docx.shared import Inches, Pt
from docx.oxml.ns import qn

path = list(pathlib.Path.cwd().parents)[1].joinpath('data/automate/003word')
out_path = path.joinpath('003word_create.docx')
img_path = path.joinpath('dance.jpg')

document = Document()
document.add_heading('Python1024_自动生成标题', 0)
document.add_heading('基本:文本', level=1)
p = document.add_paragraph('测试文本\n测试内容\n')
p.add_run('粗体部分内容\n').bold = True
p.add_run('斜体部分\n').italic = True
p.add_run('下划线部分\n').underline = True
p.add_run('字体设置\n').font.size = Pt(24)
# 测试第三方字体
x = p.add_run('三方字体测试\n')
x.font.name = 'Source Han Sans CN' # 思源字体
x.element.rPr.rFonts.set(qn('w:eastAsia'), 'Source Han Sans CN')
# 段落和引用
document.add_heading('标题一:段落', level=1)
document.add_paragraph('引用块', style='Intense Quote')
document.add_heading('标题1.1、无序列表', level=2)
opts = ['选项1','选项2', '选项3']
# 无需列表
for opt in opts:
    document.add_paragraph(opt, style='List Bullet')
document.add_heading('标题1.2、有序列表', level=2)
# 有序列表
for opt in opts:
    document.add_paragraph(opt, style='List Number')
document.add_heading('标题二:图片', level=1)
document.add_picture(str(img_path), width=Inches(5))
document.add_page_break()
document.add_heading('标题三:表格', level=1)
records = (
    (1, '电风扇', '无叶风扇'),
    (2, '吹风机', '离子风机'),
    (3, 'Macbook pro', 'Apple macbook pro 15寸')
)
# 表格
table = document.add_table(rows=1, cols=3)
# 表头
hdr_cells = table.rows[0].cells
hdr_cells[0].text = '数量'
hdr_cells[1].text = 'ID'
hdr_cells[2].text = '描述信息'
# 表格数据
for qty, cid, desc in records:
    row_cells = table.add_row().cells
    row_cells[0].text = str(qty)
    row_cells[1].text = cid
    row_cells[2].text = desc
# 保存文档
document.save(out_path)
定义样式
日常处理Word文档时,我们经常会先定义样式,这样就可以在全文档通用。
比如:首行缩进、设置间距、设置标题样式、自定义一些样式等。
import pathlib
from docx import Document
from docx.shared import Inches, Pt, RGBColor, Cm, Length
from docx.oxml.ns import qn
from docx.enum.style import WD_STYLE_TYPE
from docx.enum.text import WD_ALIGN_PARAGRAPH, WD_BREAK

path = list(pathlib.Path.cwd().parents)[1].joinpath('data/automate/003word')
out_path = path.joinpath('003word_style.docx')
img_path = path.joinpath('dance.jpg')
document = Document()
document.add_heading('Python1024_自动生成标题', 0)
document.add_heading('定义正文样式', level=1)
# 设置默认正文样式
normal_style = document.styles['Normal']
normal_style.font.name = '宋体'
normal_style.element.rPr.rFonts.set(qn('w:eastAsia'), '宋体')
p = document.add_paragraph('测试文本\n测试内容\n')
# 首行缩进
para_format = normal_style.paragraph_format
para_format.first_line_indent = Cm(0.74)
# 段落间距
para_format.space_before = Pt(20)
para_format.space_after = Pt(12)
p0 = document.add_paragraph('新的段落新的内容', style='Normal')
p0.add_run('新起一行').add_break()
p0.add_run('新行内容')
document.add_paragraph('新的段落\n新的内容\n新的行', style='Normal')
# 设置标题样式
title = document.add_heading(level=1)
title.alignment = WD_ALIGN_PARAGRAPH.CENTER
title_run = title.add_run('自定义标题样式')
title_run.font.size = Pt(14)
title_run.font.name = '黑体'
title_run.element.rPr.rFonts.set(qn('w:eastAsia'), '黑体')
document.add_heading('自定义样式', level=1)
# 定义一个样式
my_style = document.styles.add_style('my_style', WD_STYLE_TYPE.CHARACTER)
my_style.font.name = '微软雅黑'
document.styles['my_style'].element.rPr.rFonts.set(qn('w:eastAsia'), '微软雅黑')
my_style.font.color.rgb = RGBColor(0xFF, 0x00, 0x00)
p.add_run('自定义样式\n', style='my_style')

document.save(out_path)
处理表格样式时,可以使用内置的样式支持,这样可以省不少功夫。
如何查看已有的样式呢?可以生成一个测试文档,把里面所有样式都用一遍。
from docx import Document
from docx.enum.style import WD_STYLE_TYPE

path = list(pathlib.Path.cwd().parents)[1].joinpath('data/automate/003word')
document = Document()
styles = document.styles
#生成所有表样式
for s in styles:
    if s.type == WD_STYLE_TYPE.TABLE:
        document.add_paragraph("表格样式 :  "+ s.name)
        table = document.add_table(3,3, style = s)
        heading_cells = table.rows[0].cells
        heading_cells[0].text = '第一列内容'
        heading_cells[1].text = '第二列内容'
        heading_cells[2].text = '第三列内容'
        document.add_paragraph('\n')

document.save(path.joinpath('003word_table_template.docx'))
提取文档中的表格数据
普通的表格数据提取相对方便,但是遇到合并单元格,就会麻烦一些。
表格的3个关键概念:cell(单元格)、row(行)、col(列)。
比如:
- 提取单元格内容:
table.cell(i, j).text() - 获取表格行数:
table.rows - 获取表格列数:
table.columns
提取文档内的表格数据
遍历表格有3种方式:按二维矩阵索引、按行、按列:
import pathlib
from docx import Document

path = list(pathlib.Path.cwd().parents)[1].joinpath('data/automate/003word')
in_path = path.joinpath('table.docx')
# 按二维矩阵索引遍历表格
doc = Document(in_path)
tables = doc.tables
table0 = tables[0]
cell_set = set()
print(f'第一个表格: {len(table0.rows)} 行 X {len(table0.columns)}列')
for i in range(len(table0.rows)):
    print(f'第 {i+1} 行有 {len(table0.columns)} 列')
    for j in range(len(table0.columns)):
        cell = table0.cell(i,j)
        if cell not in cell_set:
            cell_set.add(cell)
            cell.text += 'test'
doc.save(path.joinpath('003word_table_cell_ij.docx'))
# 按行遍历表格
doc = Document(in_path)
table0 = doc.tables[0]
cell_set = set()
for i, row in enumerate(table0.rows):
    print(f'第 {i+1} 行有 {len(row.cells)} 列')
    for j, cell in enumerate(row.cells):
        if cell not in cell_set:
            cell.text += 'test'
            cell_set.add(cell)
doc.save(path.joinpath('003word_table_cell_byrow.docx'))
# 按列遍历表格
doc = Document(in_path)
table0 = doc.tables[0]
cell_set = set()
for j, col in enumerate(table0.columns):
    print(f'第 {j+1} 列有 {len(col.cells)} 行')
    for i, cell in enumerate(col.cells):
        if cell not in cell_set:
            cell.text += 'test'
            cell_set.add(cell)
doc.save(path.joinpath('003word_table_cell_bycol.docx'))
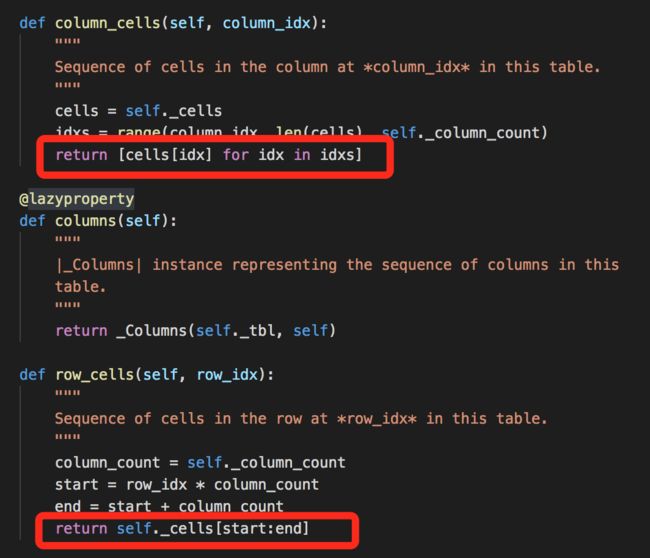
需要注意的是:不同的迭代方式,同一个单元格内存地址会不同。
原因是python-docx内部使用了列表生成器和切片器来返回当前行/列的单元格。
python-docx中table部分源代码
所以,对于单元格合并,不同合并方式(按行/列)在不同迭代中会有不同效果。
- 同一行两个单元格合并,按
row.cells迭代,其内存地址相同; - 同一列两个单元格合并,按
colums.cells迭代,其内存地址相同; - 如果按
table.cell(i, j)迭代,每个单元格内存地址都不同。
提取合并单元格的表格数据
如果我们按常规方式去遍历包含合并单元格的表格,就会获得重复的数据。
想要忽略重复数据,关键是识别重复的单元格。
那我们怎么样判断两个单元格是被合并的呢?
有两个思路:
-
自定义一个二维状态矩阵,标记每个单元格是否在行内/列内被合并过。
-
虽然合并单元格的cell内存地址不同,但其
cell._tc值相同。
第一种方式就是先按行迭代,记下那些相同内存地址的单元格,再按列迭代,记下相同内存的单元格。
最后按二维矩阵方式迭代每个单元格,根据之前记下的标记,判断是否有被合并过。
下面给出第二种方式:
import pathlib
from docx import Document

path = list(pathlib.Path.cwd().parents)[1].joinpath('data/automate/003word')
in_path = path.joinpath('table.docx')
doc = Document(in_path)
tables = doc.tables
table0 = tables[0]
# 打印每个单元格的_tc信息
for i, row in enumerate(table0.rows):
    for j, c in enumerate(row.cells):
        try:
            print(c.text, c._tc.top, c._tc.bottom, c._tc.left, c._tc.right)
        except ValueError:
            pass
# 按行迭代
cell_set = set()
for row in table0.rows:
    for cell in row.cells:
        if cell._tc not in cell_set:
            cell_set.add(cell._tc)
            cell.text += 'data'
doc.save(path.joinpath('003word_table_cell_tc_row.docx'))
# 按列迭代
doc = Document(in_path)
table0 = doc.tables[0]
cell_set.clear()
for col in table0.columns:
    for cell in col.cells:
        if cell._tc not in cell_set:
            cell_set.add(cell._tc)
            cell.text += 'data'
print(len(cell_set))
doc.save(path.joinpath('003word_table_cell_tc_col.docx'))
添加文件头和尾
有些文档,想要在文件头或尾著名作者、来源、版本等信息。
可以这样设置:
import pathlib
import docx

path = list(pathlib.Path.cwd().parents)[1].joinpath('data/automate/003word')
out_path = path.joinpath('003word_header_footer.docx')

doc = Document()
section = doc.sections[0]
header = section.header
footer = section.footer
p_head = header.paragraphs[0]
p_head.text = '上一章\tPython1024\t下一章'
p_foot = footer.paragraphs[0]
p_foot.text = '作者:程一初\t公众号:只差一个程序员了\t时间:2020年7月'

doc.save(out_path)
模块能力之外
python-docx目前的版本是0.8.10,功能也并非能100%与Word等软件看齐。比如对于超链接的处理,它目前无能为力,这时就需要根据OpenXML文件规范来手动处理,可以借助docx.oxml包处理XML原始文档。
添加超链接
import pathlib
import docx
from docx.enum.dml import MSO_THEME_COLOR_INDEX

path = list(pathlib.Path.cwd().parents)[1].joinpath('data/automate/003word')
out_path = path.joinpath('003word_hyperlink.docx')

def add_hyperlink(paragraph, text, url):
       # 生成超链接
       part = paragraph.part
       r_id = part.relate_to(url, docx.opc.constants.RELATIONSHIP_TYPE.HYPERLINK, is_external=True)
       hyperlink = docx.oxml.shared.OxmlElement('w:hyperlink')
       hyperlink.set(docx.oxml.shared.qn('r:id'), r_id, )
       new_run = docx.oxml.shared.OxmlElement('w:r')
       rPr = docx.oxml.shared.OxmlElement('w:rPr')
       new_run.append(rPr)
       new_run.text = text
       hyperlink.append(new_run)
       r = paragraph.add_run ()
       r._r.append (hyperlink)
       r.font.color.theme_color = MSO_THEME_COLOR_INDEX.HYPERLINK
       r.font.underline = True
       return hyperlink

document = docx.Document()
p = document.add_paragraph('我的网站\n')
add_hyperlink(p, '点击进入', "https://www.yuque.com/yichu/")
document.save(out_path)
提取文档内的超链接
import pathlib
import docx
from docx import Document
from docx.opc.constants import RELATIONSHIP_TYPE as RT

path = list(pathlib.Path.cwd().parents)[1].joinpath('data/automate/003word')
in_path = path.joinpath('links.docx')

doc = Document(in_path)
rels = doc.part.rels
for rel in rels:
    if rels[rel].reltype == RT.HYPERLINK:
        print(rels[rel].target_ref)
提取文档内图片
同理,如果你想用Python提取文档内图片,可以用类似的方法。
import pathlib
from docx import Document
from docx.opc.constants import RELATIONSHIP_TYPE as RT

path = list(pathlib.Path.cwd().parents)[1].joinpath('data/automate/003word')
in_path = path.joinpath('input.docx')
out_path = path.joinpath('003word_images')

doc = Document(in_path)
part = doc.part
rels = part.rels
for i, rid in enumerate(rels):
    if rels[rid].reltype == RT.IMAGE:
        img = part.related_parts[rid]
        with open(out_path.joinpath(f'{i}.jpeg'), 'wb') as f:
            f.write(img.blob)
总结
本文主要介绍了docx文档的处理方法,包括生成文档、定义样式、素材和表格数据提取等。
当我们需要的处理功能,超出了python-docx模块的能力范围之外,就只能手动处理OpenXML文档本身,这时候可以边参考OpenXML格式标准边测试。
OpenXML标准官网:http://officeopenxml.com/
但,大部分情况下,模块现有的功能,已足够我们应付日常办公的自动化。
更多内容关注公众号:只差一个程序员了。
有兴趣的可以加入Python1024学习群,前100名免费。
群内分享源代码、Notebook、测试数据等。
![]()

