爬虫小实战——爬取mooc讨论区内容
目录
- 1.前言
- 2.实战介绍
- 3.代码分析(下以爬综合讨论区为例)
-
- 3.1 帖子层面
- 3.2 回复层面
-
- 3.2.1 需求分析
- 3.2.2 基本原理
- 3.2.3 代码实现
- 4.参考文档
1.前言
之前一直都没接触过爬虫,最近刚好因为毕设数据集的需求,就趁此契机赶紧动手学习起来啦(ง •_•)ง
身为初次爬虫的小白,为了完成这一个小小的爬虫实战,中间也经历了不少曲折,断断续续花了三四天才完成。个人觉得这个小项目非常典型,涉及到了许多知识点,可以作为一个入门的好例子,就想写一篇总结与大家分享一下~
2.实战介绍
- 爬取课程:课程网页链接.
- 爬取范围:选定课程的讨论区部分的内容
- 所需数据:
- 帖子层面:帖子id、浏览量、回复量、投票量、帖子主题、帖子内容、发帖者id、发帖时间
- 回复层面:帖子id、回复内容、回复评论量、回复投票量、回复者id、回复时间
- 网页构造分析:
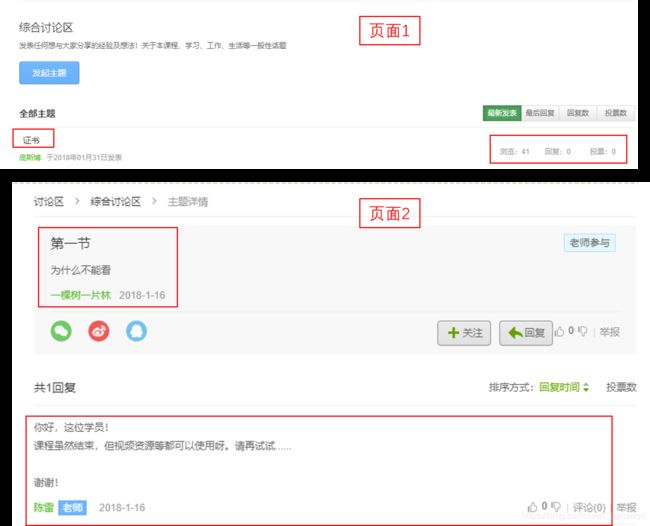
讨论区由3个板块构成,每个板块下含若干帖子,每个帖子又含若干回复

// 上述所需数据主要分布在以下两个页面:

3.代码分析(下以爬综合讨论区为例)
废话不多说,赶紧上代码(ง •_•)ง
3.1 帖子层面
这部分主要调用selenium、BeautifulSoup等包来爬取回复详情,这类爬取方法是 ” 模拟人为操作浏览器的行为“ 进而爬取html标签中的内容。
step1:模拟登陆 (该课程需要登陆才能爬取具体内容)
//注意:
1.请务必要下载与浏览器版本号对应的webdriver
2.最好能先在浏览器开发者选项内判断该页面有无iframe结构,若有则需先定位到iframe,再继续往下定位具体元素
3.不能用动态id来定位元素(如下图所示,即为动态id)

4.反爬行为。在模拟登录的过程中,遇到了能定位到登录按钮元素,却不能在定位像素点部分执行点击操作的情况。后来发现是碰上了网页的反爬行为/(ㄒoㄒ)/ 网页运用了一个弹出的div遮盖住了所有元素。再通过观察,发现只需要滚动滚动条,就可以使其消失啦,那么我们也就只需要在代码中加上模拟人为滚动行为的部分就可以轻松应对这个反爬啦~~
from selenium import webdriver
import time
import pandas as pd

base_url="https://www.icourse163.org/member/login.htm#/webLoginIndex"
driver = webdriver.Chrome(executable_path="你的driver路径")
driver.get(base_url)

#观察慕课网登录页面,默认登录方式是手机验证码,如果需要账号密码登录,则要点击一下“账号密码”按钮
#注意:登陆部分在iframe里,且为动态id,参考https://blog.csdn.net/weixin_44342166/article/details/99635635
#先找到这个按钮
time.sleep(1)
driver.execute_script('window.scrollTo(0, 200)') #遇见了反爬行为,通过滚动页面对抗

iframe = driver.find_elements_by_tag_name("iframe")[0]
driver.switch_to.frame(iframe)
#先找到这个按钮
jump = driver.find_element_by_class_name('tab0')
#然后点击跳转到账号密码登录界面
jump.click()

name_input = driver.find_element_by_xpath('//*[@id="phoneipt"]')  #找到输入账号的框框
pass_input = driver.find_element_by_css_selector("[class='j-inputtext dlemail']")#找到输入密码的框框
login_button = driver.find_element_by_id('submitBtn')# 找到登录按钮

username="你的账号"
password="你的密码"

name_input.clear()
name_input.send_keys(username)
time.sleep(1)
pass_input.clear()
pass_input.send_keys(password)
time.sleep(1)
login_button.click()# 点击登录
time.sleep(1)
step2:进入讨论区,并获取板块对应的a标签
from bs4 import BeautifulSoup
from selenium.webdriver.chrome.options import Options
import requests

url_head = 'https://www.icourse163.org/learn/CAU-23004?tid=1002299017#/learn/forumindex'
driver.get(url_head)
print("成功进入讨论区")

def get_panel_list():
    content = driver.page_source
    soup = BeautifulSoup(content,'html.parser')
    time.sleep(5)
    panel_list=soup.find('div',class_ = 'j-panels').find_all('a',class_='tit')
    return panel_list
panel_list=get_panel_list()
step3:爬取帖子层面所需数据
//注意:
1.同一个页面中,可能会出现许多同名的标签,也可能会出现标签隐藏在很多层级标签下面的情况,这时候我们最好能先定位到它的父级标签,再一层层往上试验(ง •_•)ง
2.在构造爬取函数的时候,一定要先想清楚数据在页面之间的分布情况
#获取该板块下指定页的贴子信息
import re
def get_comment_detail(comment_list):
	#初始化一个dataframe,用于暂存爬取结果
    df = pd.DataFrame(columns = ["pid", "watch_num", "reply_num", "vote_num",
                                 "post_title", "post_content", "post_uid", "post_time"])
    for comment in comment_list:
        comment_href=comment.find('a', class_='j-link').get('href')
        pid=re.search('(\d+)',comment_href).group() #贴子id,str
        watch_num=int(comment.find('p', class_='watch').text[3:]) #贴子的浏览数
        reply_num=int(comment.find('p', class_='reply').text[3:]) #贴子的回复数
        vote_num=int(comment.find('p', class_='vote').text[3:]) #贴子的投票数

        reply_link = url_head.split('#')[0] + comment_href #进入贴子详情界面的连接
        reply_driver = webdriver.Chrome(executable_path='你的driver地址')
        reply_driver.get(reply_link)
        time.sleep(5)
        reply_soup = BeautifulSoup(reply_driver.page_source, 'html.parser')

        # 帖子题目+描述
        post = reply_soup.find('div', class_='j-post')
        post_title = post.find('h3', class_='j-title').text#贴子主题
        post_content = post.find('div', class_='j-content').text #贴子具体内容

		#发帖信息,需要注意有些用户是匿名发表,此处需要进行一个判断
        post_info= post.find('div', class_='j-infoBox')
        if post_info.find('span', class_='userInfo').get('style') is None:
            post_uid=post_info.find('a', class_='f-fcgreen').get('href')
            post_uid=re.search('(\d+)',post_uid).group() #发帖者uid,str
        else:
            post_uid='匿名发表'
        print(post_uid)
        post_time=post_info.find('div', class_='j-time').text #发帖时间

        #把这一个贴子的信息存入df
        df=df.append([{
     "pid":pid, "watch_num":watch_num, "reply_num":reply_num, "vote_num":vote_num,
        "post_title":post_title, "post_content":post_content, "post_uid":post_uid, "post_time":post_time}],ignore_index=True)

        reply_driver.quit() #记得关闭
    return df

#获取该板块下指定页的贴子列表
def get_comment(panel):
    df = pd.DataFrame(columns = ["pid", "watch_num", "reply_num", "vote_num",
                                 "post_title", "post_content", "post_uid", "post_time"])
    page_num=0 #初始化每个板块的页数
    panel_name=panel.text #每个板块的名字
    print('板块名称:'+panel_name)
    panel_url = url_head.split('#')[0] + panel.get('href')
    panel_driver = webdriver.Chrome(executable_path='你的driver地址')
    panel_driver.get(panel_url)
    time.sleep(5)
    panel_soup = BeautifulSoup(panel_driver.page_source, 'html.parser')
    pages = panel_driver.find_elements_by_class_name('zpgi')
    for i in range(0,len(pages)):
        if pages[i].text:
            page_num=pages[i].text
        else:
            break
    print('该板块下的主题页数为:'+page_num)
    for i in range(0,int(page_num)):
        comment_url=panel_url+'&p='+str(i+1)
        panel_driver.get(comment_url)
        time.sleep(5)
        panel_soup = BeautifulSoup(panel_driver.page_source, 'html.parser')
        comment_list=panel_soup.find(class_ = 'j-data-list').find_all('li', class_='u-forumli') #获取贴子列表
        df=df.append(get_comment_detail(comment_list)) #调用上述函数
    panel_driver.quit()
    df=df.reset_index(drop=True)
    return df

df=get_comment(panel_list[2]) #综合讨论区为第3个板块,将爬取结果存在df中
df.to_csv('文件路径', mode='a', header=True)#可按需导出文件
3.2 回复层面
3.2.1 需求分析
现已知一篇帖子的回复详情页中会有1-n页的回复。那么,为了爬取到每一页的内容,必定就要涉及到翻页啦~
- 先观察网页URL是否根据页数而变化;若有,则只需要通过改变URL就能实现翻页。通过观察,可以发现每次点击下一页,网页的URL是不会改变的,浏览器上方的加载按钮也不会旋转(⊙﹏⊙)这就说明回复详情页很可能是由Ajax技术开发,即无需重新加载整个网页的情况下,就能更新部分网页~ 好吧,那这个方法就over了 /(ㄒoㄒ)/
- 尝试定位下一页按钮,执行点击行为进行翻页。但是在操作的过程中,发现很无语的问题:不管是【下一页】按钮还是【页码】按钮,都只能定位到按钮,却无法执行点击操作。针对这个bug,查了好多资料,最后发现是因为这个按钮是利用的 ”js动态翻页“ 实现的,故不能再纯粹用上述3.1部分的driver、bs包来模拟爬取
- 后来查了许多资料,也进行了好多次试验,最终通过 ” request发送请求获取response内容,再从response提取数据 “ 的方式获取页面内容
3.2.2 基本原理
step1:查看请求
- 按下F12,打开开发者选项,点击Network。

- 点击下一页,观察出现的请求文件
我们可以看到这个dwr文件就是我们所需的,其中Headers部分中包含需要发送的头文件和参数部分,而Response中的内容是响应的页面内容。
简单来说,现在我们需要模拟这个发送请求的过程,从而获取页面响应内容,再从响应内容中爬取数据。

step2:分析请求
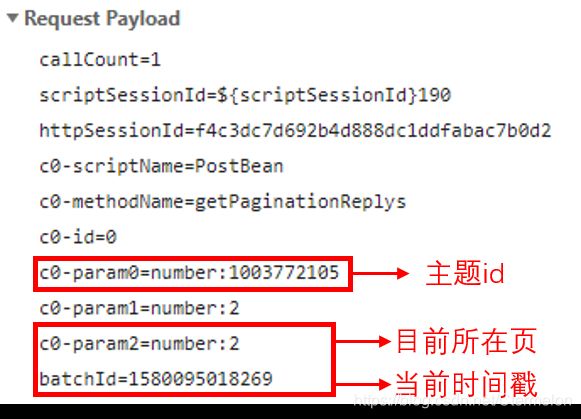
头文件(Request Headers)的部分在此就不详述了,我们主要来分析一下请求参数(Request Payload)的部分,因为一般其中的若干参数会随着页面而有规律的变化。通过观察,结论如下:

step3:分析响应
先来看看返回的响应是什么格式的( ̄▽ ̄)"
这可以在Headders里的Response Headers中找到,比如该网页返回的就是javascript格式的内容。
非常不幸,本人并不会js语言啊(⊙ˍ⊙) 但没(sui)关(bian)系(gao),所有的编程语言规则都是十分相似的(ง •_•)ง 我们可以把一部分返回内容拷贝下来观察一下!
var s2=[];var s3={
     };var s13={
     };var s0={
     };var s14={
     };var s4={
     };var s15={
     };var s5={
     };var s16={
     };var s1={
     };var s17={
     };var s6={
     };var s18={
     };var s19={
     };var s20={
     };var s7={
     };var s21={
     };var s22={
     };var s23={
     };var s8={
     };var s24={
     };var s25={
     };var s26={
     };var s9={
     };var s27={
     };var s28={
     };var s29={
     };var s10={
     };var s30={
     };var s31={
     };var s32={
     };var s11={
     };var s33={
     };var s12={
     };var s34={
     };var s35={
     };var s36={
     };s2[0]=s3;s2[1]=s4;s2[2]=s5;s2[3]=s6;s2[4]=s7;s2[5]=s8;s2[6]=s9;s2[7]=s10;s2[8]=s11;s2[9]=s12;
s3.anonymous=0;
s3.commentPageSize=null;
s3.content="\u65AD\u70B9\u7EED\u4F20\uFF1A\u521D\u671F\u8FD9\u79CD\u65B9\u5F0F\u4E0B\u8F7D\u7684\u4E2D\u9014\u4E00\u65E6\u4E2D\u65AD\uFF0C\u5219\u9700\u8981\u91CD\u65B0\u4E0B\u8F7D\u3002\u4E3A\u4E86\u89E3\u51B3\u8FD9\u4E2A\u95EE\u9898\uFF0C\u6280\u672F\u4E0A\u5B9E\u73B0\u4E86\u65AD\u70B9\u7EED\u4F20\uFF0C\u4E5F\u5C31\u662F\u8BF4\u4E0B\u8F7D\u4E2D\u65AD\u4EE5\u540E\u53EF\u4EE5\u4ECE\u4E2D\u65AD\u7684\u4F4D\u7F6E\u7EE7\u7EED\u4E0B\u8F7D\u3002
";
s3.countComment=0;s3.countVote=0;s3.deleted=0;s3.floorNumber=null;
s3.forumId=1002437017;s3.gmtCreate=1512877516622;s3.gmtModified=1512877516622;s3.hasVoteDown=false;
s3.hasVoteUp=false;s3.id=1018465525;s3.lectorOrAssistFlag=null;s3.postId=1003772105;
s3.replyTime=1512877516622;s3.replyer=s13;s3.replyerId=6527110;s3.tagAgree=0;s3.tagTop=0;s3.tagTopTime=0;s3.type=0;
通过代码片段,我们能很轻易就推断出s2是装载各个回复对象的数组,而s3、s4…是装载回复各类信息的对象。
step4:提取数据
分析出代码内容之后,我们又该怎么从中提取数据呢?毕竟Python和js还是两种不同的语言啊/(ㄒoㄒ)/
针对这个问题,又去查了许多资料,发现可以用js2py包来解决,其中封装的js2py.eval_js()方法能执行js语句!
哈哈,那就OK啦(ง •_•)ง 到此为止,如何爬取的大方向我们就确定好了~~
3.2.3 代码实现
step1:发送请求
import requests
from urllib.parse import urlencode
from pyquery import PyQuery as pq
import time
import datetime
import pandas as pd
import numpy as np
# 读取post数据集,因为回复页面需要用到其中部分数据作为参数
post_df = pd.read_csv('文件名')

base_url = 'https://www.icourse163.org/dwr/call/plaincall/PostBean.getPaginationReplys.dwr' # 这里要换成对应Ajax请求中的链接

#从开发者选项上把request headers把参数拷贝下来
#再按正确格式更改~~
headers = {

    'authority':'www.icourse163.org',
    'method':'POST',
    'path':'/dwr/call/plaincall/PostBean.getPaginationReplys.dwr',
    # ----此处省略下述参数---- #
}

#向页面发送请求
def get_page(pid,current_page):
    t = time.time()
    params = {

        'callCount':1,
        'scriptSessionId':'${scriptSessionId}190',
        'httpSessionId':'f4c3dc7d692b4d888dc1ddfabac7b0d2',
        'c0-scriptName':'PostBean',
        'c0-methodName':'getPaginationReplys',
        'c0-id':0,
        'c0-param0':'number:'+str(pid),
        'c0-param1':'number:2',
        'c0-param2':'number:'+str(current_page),
        'batchId':int(round(t * 1000)) #当前时间毫秒级时间戳
    }
    response = requests.post(base_url,data=params,headers=headers)
    if response.status_code == 200:
        return response #返回格式为javascript
step2:文本预处理(包括转化格式、剔除非法符号等)
import re
import js2py
def filter_tags(htmlstr): #返回文本预处理,去除闲杂信息
    #去除url
    re_curl=re.compile(r'http://[a-zA-Z0-9.?/&=:]*',re.S)
    re_curls=re.compile(r'https://[a-zA-Z0-9.?/&=:]*',re.S)
    # 先过滤CDATA
    re_cdata = re.compile('//]*//\]\]>', re.I)  # 匹配CDATA
    re_script = re.compile('<\s*script[^>]*>[^<]*<\s*/\s*script\s*>', re.I)  # Script
    re_style = re.compile('<\s*style[^>]*>[^<]*<\s*/\s*style\s*>', re.I)  # style
    # re_br = re.compile('')  # 处理换行
    re_h = re.compile(']*>')  # HTML标签
    re_comment = re.compile('')  # HTML注释
    s=re_curl.sub('',htmlstr)#去除url
    s=re_curls.sub('',s)#去除url
    s = re_cdata.sub('', s)  # 去掉CDATA
    s = re_script.sub('', s)  # 去掉SCRIPT
    s = re_style.sub('', s)  # 去掉style
    # s = re_br.sub('\n', s)  # 将br转换为换行
    s = re_h.sub('', s)  # 去掉HTML 标签
    s = re_comment.sub('', s)  # 去掉HTML注释
    return s

def reply_change(text):
    #转换编码,以及去除头尾不必要信息,仅保留javascript内容
    text=text.encode('utf-8').decode("unicode_escape").splitlines()[2:-2]
    for i in range(0,len(text)):
        text[i]=filter_tags(text[i])
    text="".join(text)
    return text
step3:爬取数据(ง •_•)ง
def get_reply_detail(text,index):
    reply_content=js2py.eval_js(text+index+'.content') #回复内容
    comment_cnt=js2py.eval_js(text+index+'.countComment') #回复的评论数
    vote_cnt=js2py.eval_js(text+index+'.countVote') #回复的评论数
    reply_uid=js2py.eval_js(text+index+'.replyerId') #回复者用户id
    timeStamp=js2py.eval_js(text+index+'.replyTime') #回复者用户id
    reply_time=time.strftime("%Y/%m/%d",time.localtime(timeStamp/1000))
    return reply_content,comment_cnt,vote_cnt,reply_uid,reply_time
import math

def get_reply(pid,reply_num): #获取指定贴子下的回复情况
    page_num=math.ceil(reply_num/15)#该帖子的回复页数,每一页最多有15条回复
    tmp = pd.DataFrame(columns = ['pid','reply_content','comment_cnt','vote_cnt','reply_uid','reply_time'])
    for i in range(1,page_num+1):
        reply_info=get_page(pid,i).text #获取该页的回复情况
        text=reply_change(reply_info)
        index=int(text[5:6]) #变量的起始下标
        #这里有一个很无语的bug,如果文本内容中含有双引号的话,会与变量属性外的双引号配对,从而导致异常符号出现,所以在此设置了异常判断
        try:
            user_num=js2py.eval_js(text+'s'+str(index)+'.length') #查看该页面作者个数
            for i in range(1,user_num+1):
                index_name='s'+str(index+i)
                reply_content,comment_cnt,vote_cnt,reply_uid,reply_time=get_reply_detail(text,index_name)
                tmp=tmp.append([{
     'pid':pid,'reply_content':reply_content,'comment_cnt':comment_cnt,
                                 'vote_cnt':vote_cnt,'reply_uid':reply_uid,'reply_time':reply_time}],ignore_index=True)
        except Exception:
            tmp=tmp.append([{
     'pid':pid,'reply_content':'','comment_cnt':'',
                                   'vote_cnt':'','reply_uid':'','reply_time':'' }],ignore_index=True)
            print('贴子:'+str(pid)+'的该页回复爬取失败!')
            pass
        continue

    return tmp

#爬取数据
#初始化一个df,用于存放爬取结果
reply_df = pd.DataFrame(columns = ['pid','reply_content','comment_cnt','vote_cnt','reply_uid','reply_time'])
for i in range(0,post_df.shape[0]):
    if post_df['reply_num'][i]>0:
        pid=post_df['pid'][i]
        reply_num=post_df['reply_num'][i]
        reply_df=reply_df.append(get_reply(pid,reply_num))
    else:
        reply_df=reply_df.append([{
     'pid':post_df['pid'][i],'reply_content':'','comment_cnt':'',
                                   'vote_cnt':'','reply_uid':'','reply_time':'' }],ignore_index=True)
4.参考文档
https://www.cnblogs.com/xsmile/p/11576214.html
https://www.cnblogs.com/zheng1076/p/11133695.html
https://blog.csdn.net/qq_36881881/article/details/101281778