作业二
作业二
文章目录
- 作业二
-
- 一.将示例代码修改为能够批量重命名目标文件、批量删除文件等
- 2.自行实现几个图片基本操作并将改动后的图片保存在同一个文件夹中
- 3.用python画一只猪
一.将示例代码修改为能够批量重命名目标文件、批量删除文件等
path1='d:/summer'
path2='d:/summer/test'
#批量重命名目标文件
def rename(file):
	filelist=os.walk(path1)
	i=0
	for root,dirs,files in filelist:
		for file_name in dirs:#获得该路径下所有子目录的名称
			old=os.path.join(root,file_name)
			f=os.listdir(old)
			for name in f:#获得所有非子目录的名称
				old_name=os.path.join(old,name)
				filetype=os.path.splitext(old_name)[1]
				if(filetype=='.JPG'):
                    new=os.path.join(old,str(i)+filetype)
                    i=i+1
                    os.rename(old_name,new)
#批量删除目标文件
def remove(file):
   filelist = os.listdir(file)#读取文件路径
   for i in filelist:
       file_name=os.path.join(filelist,i)
       os.remove(file_name)

rename(path1)
remove(path2)
-
os.walk(path)返回一个三元组(root,dirs)-**
root 所指的是当前正在遍历的这个文件夹的本身的地址-
dirs 是一个 list ,内容是当前路径下所有子目录
files 也是一个 list , 内容是当前路径下所有非子目录文件
2.自行实现几个图片基本操作并将改动后的图片保存在同一个文件夹中
用open-cv实现几个图片的基本操作:读取图片,保存图片,翻转图片,更换图片的颜色等,代码如下
import cv2
import numpy as np
img1=cv2.imread('d:/summer/test/3.jpg')#读取图片

flipcode1=1#正数左右翻转
flipcode2=0#负数上下翻转

img2=cv2.flip(img1,flipcode1)
img3=cv2.flip(img1,flipcode2)
cv2.imwrite('d:/summer/test/re1.jpg',img2)
cv2.imwrite('d:/summer/test/re2.jpg',img3)#保存图片

img4=cv2.imread('d:/summer/test/2.jpg')
img5=cv2.cvtColor(img4,cv2.COLOR_BGR2GRAY)#读取图片的格式是BGR,转化为灰色
cv2.imwrite('d:/summer/test/re3.jpg',img5)

img5=cv2.imread('d:/summer/test/1.jpg')
img6=np.vstack([img5,img4])#在同一窗口上竖直放两张大小相等的图片
cv2.imwrite('d:/summer/test/re4.jpg',img6)
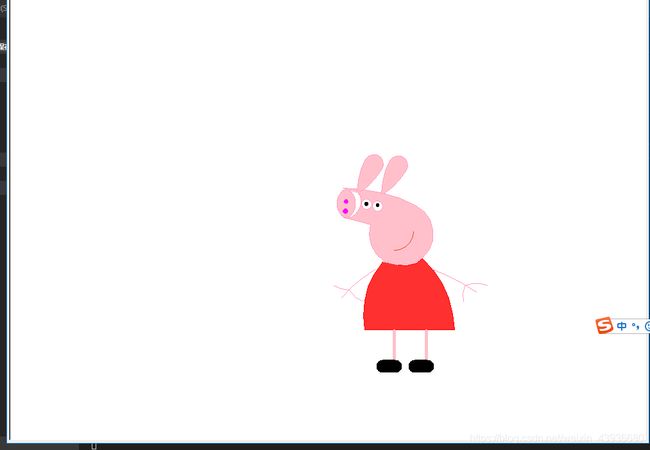
3.用python画一只猪
Turtle库是Python语言中一个绘制图像的函数库,有一支笔,它根据一组函数指令的控制,在一个平面坐标系中移动,从而在它移动路径上绘制图形。
网上有很多关于绘制小猪佩奇的代码,内容大同小异。我参考了别人的代码,修改了一些指令,每个部位的画法都是先将画笔移动到某个点,利用turtle的一些运动命令和控制命令来画出对应的曲线。下面几个代码弄清楚了就不难,过程中比较麻烦的是画笔的落点要在哪里,我是通过不断地尝试运行,才确定那些身体部位的坐标,希望有大佬可以指点找到更好的方法可以直接准确快速地确定坐标值,提高写代码的效率。**
关于Turtle的基本函数操作可以看这篇博客
常用颜色的RGB对照表
几个比较经常使用的函数
| turtle.penup() | 画笔抬起,移动时不会出现痕迹,向当前画笔方向移动distance像素长度 |
|---|---|
| turtle.pendown() | 画笔落下,移动出现痕迹 |
| turtle.circle(r,d) | r表示半径,半径为正时表示圆心在该位置的左侧,为负时表示在该位置的右侧;d表示旋转的弧度,幅度为正表示顺着画笔的方向旋转,弧度为负表示逆着画笔的方向旋转 |
| turtle.goto(x,y) | 将画笔移动到坐标为x,y的位置 |
| turtle.color(color1, color2) | color1为画笔的颜色,color2为填充的颜色(color1和color2可以为String,也可以是RGB) |
| turtle.setheading(angle) | 设置当前朝向为angle角度 |
| turtle.forward(distance) | 向当前画笔方向移动distance像素长度 |
代码:
import turtle as t
import time
t.getscreen().colormode(255)

t.pensize(1)
t.color((255,155,192),"pink")
t.setup(1000,800)#设置画板的大小
# t.hideturtle()
t.speed(5)(0~10}
#画鼻子
t.penup()
t.setheading(180)
t.goto(25,25)#直接将画笔定位到(x,y)坐标,但是在用goto()之前要将画笔抬起,否则移动画笔时也会画线
t.pendown()#画笔要落下,画画时路径才有颜色
t.begin_fill()#准备开始填充颜色
a=0.2
#画一个椭圆
for j in range(2):
  for i in range(60):

    if i<30:
        a+=0.05
    else:
        a-=0.05
    t.left(3)
    t.forward(a)
t.end_fill()#填充完成

#画鼻孔1
t.penup()
t.goto(25,10)
t.pendown()
t.begin_fill()
t.circle(4)
t.color(255,0,255)
t.end_fill()

#画鼻孔2
t.penup()
t.goto(24,-5)
t.pendown()
t.begin_fill()
t.circle(4)
t.end_fill()

#画头
t.color((255,155,192),"pink")#前者是画笔路径的颜色,后者是填充的颜色
t.penup()
t.goto(20,27)
t.pendown()
t.setheading(0)
#t.pencolor(255,155,192)
t.begin_fill()
t.circle(-250,27)
t.circle(-50,260)
t.setheading(160)
t.circle(248,10)
#画头左边的半圆,否则填充后外围是直线
t.setheading(-30)
len=0.2
for i in range(60):
    if i<30:
        len+=0.05
    else:
        len-=0.05
    t.left(3)
    t.forward(len)
#t.pendown()
t.end_fill()

#两只耳朵
t.penup()
t.goto(42,22)
t.pendown()
t.begin_fill()
t.setheading(90)
t.circle(-100,30)
t.circle(-15,180)
t.circle(-100,30)
t.end_fill()

t.penup()
t.goto(80,20)
t.pendown()
t.begin_fill()
t.setheading(90)
t.circle(-100,30)
t.circle(-15,180)
t.circle(-100,30)
t.end_fill()

#眼睛
#白眼眶
t.penup()
t.color((255,155,192),"white")
t.goto(53,9)
t.pendown()
t.begin_fill()
t.circle(8)
t.end_fill()
#黑眼珠
t.penup()
t.color("black","black")
t.goto(55,5)
t.pendown()
t.begin_fill()
t.circle(3)
t.end_fill()

#同上,再画一只眼睛
t.penup()
t.color((255,155,192),"white")
t.goto(70,6)
t.pendown()
t.begin_fill()
t.circle(8)
t.end_fill()

t.penup()
t.color("black","black")
t.goto(73,3)
t.penup()
t.begin_fill()
t.circle(3)
t.end_fill()

#嘴巴
t.penup()
t.color(239,69,19)
t.goto(100,-70)
t.pendown()
t.setheading(0)
t.circle(30,90)

#画身体
#t.color("red",(255,99,71))#红色
t.color("red",(220,20,60))#
t.penup()
t.goto(82,-88)
t.pendown()
t.begin_fill()
t.setheading(-130)

t.circle(130,50)
t.setheading(0)
t.forward(140)
t.setheading(90)

t.circle(150,48)
t.setheading(-135)
t.circle(-40,60)
t.end_fill()

#手1
t.penup()
t.color((255,155,192))
t.goto(70,-100)
t.pendown()
t.setheading(-150)
t.circle(200,20)

t.penup()
t.goto(30,-132)
t.pendown()
t.setheading(180)
t.circle(-50,30)

t.penup()
t.goto(30,-132)
t.pendown()
t.setheading(-60)
t.circle(40,40)

#手2
t.penup()
t.goto(160,-100)
t.pendown()
t.setheading(-20)
t.circle(-300,15)

t.penup()
t.goto(210,-125)
t.pendown()
t.setheading(20)
t.circle(-53,40)

t.penup()
t.goto(210,-125)
t.pendown()
t.setheading(-110)
t.circle(50,30)

#画脚1
t.pensize(5)
t.color("pink")
t.penup()
t.goto(100,-196)
t.pendown()
t.setheading(-90)
t.forward(55)
t.penup()
t.goto(102,-251)
t.pendown()
t.setheading(180)
t.pensize(20)
t.color("black")
t.forward(20)

#画脚2
t.pensize(5)
t.color("pink")
t.penup()
t.goto(150,-196)
t.pendown()
t.setheading(-90)
t.forward(55)
t.penup()
t.goto(152,-251)
t.pendown()
t.setheading(180)
t.pensize(20)
t.color("black")
t.forward(20)
time.sleep(20)
