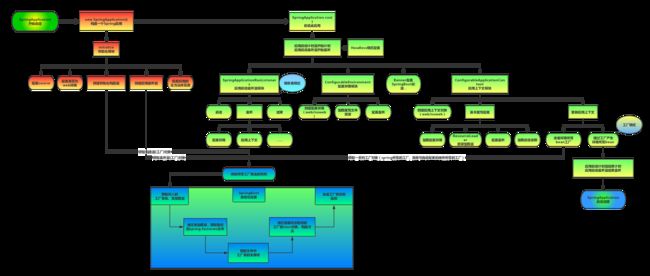
SpringBoot启动原理解析及源码初步认识
SpringBoot启动原理解析及源码初步认识
前言
SpringBoot为我们做的自动配置,确实方便快捷,今天来了解一下它的原理。
一、了解SpringBoot的特色
内嵌Tomcat或Jetty等Servlet容器
用来简化Spring应用的初始搭建以及开发过程
约定优于配置
90%以上的项目呢,配置都是差不多,所以Spring开发团队,就搞出了一个通用配置,以后我们程序员就不需要再去配置这些繁杂的配置文件了。全局配置名称,必须是application。
开箱即用
在pom.xml文件中,每一个starter都是一个功能场景
<dependency>
   <groupId>org.springframework.boot</groupId>
   <artifactId>spring-boot-starter-web</artifactId>
</dependency>
二、入口类
我们开发任何一个Spring Boot项目,都会用到如下的启动类
//表明此类是SpringBoot启动类,服务类
@SpringBootApplication
public class Demo100Application {

    /*
     * main方法 程序的入口
     * @param args
     */
    public static void main(String[] args) {

        /*
         * SpringApplication
         *
         * run
         */
        SpringApplication.run(Demo100Application.class, args);

    }
}
从上面代码可以看出,Annotation定义(@SpringBootApplication)和类定义(SpringApplication.run)最为显眼,所以我们要从这两位开始就可以了。
SpringBootApplication详解
首先要知道SpringApplication初始化时主要做三件事情:
- 1.根据classpath下是否存在(ConfigurableWebApplicationContext)判断是否要启动一个web applicationContext
- 2.SpringFactoriesInstances加载classpath下所有可用的ApplicationContextInitializer
- 3.SpringFactoriesInstances加载classpath下所有可用的ApplicationListener
进入@SpringBootApplication
@Target(ElementType.TYPE)            // 注解的适用范围,其中TYPE用于描述类、接口(包括包注解类型)或enum声明
@Retention(RetentionPolicy.RUNTIME)  // 注解的生命周期,保留到class文件中(三个生命周期)
@Documented                          // 表明这个注解应该被javadoc记录
@Inherited                           // 子类可以继承该注解
@SpringBootConfiguration             // 继承了Configuration,表示当前是注解类
@EnableAutoConfiguration             // 开启springboot的注解功能,springboot的四大神器之一,其借助@import的帮助
@ComponentScan(excludeFilters = {
         // 扫描路径设置(具体使用待确认)
        @Filter(type = FilterType.CUSTOM, classes = TypeExcludeFilter.class),
        @Filter(type = FilterType.CUSTOM, classes = AutoConfigurationExcludeFilter.class) })
public @interface SpringBootApplication {

...
}
虽然定义使用了多个Annotation进行了原信息标注,但实际上重要的只有三个Annotation:
- @Configuration(@SpringBootConfiguration点开查看发现里面还是应用了@Configuration)
- @EnableAutoConfiguration
- @ComponentScan
所以,如果我们使用如下的SpringBoot启动类,整个SpringBoot应用依然可以与之前的启动类功能对等:
@Configuration
@EnableAutoConfiguration
@ComponentScan
public class Demo100Application {

    public static void main(String[] args) {

        SpringApplication.run(Demo100Application .class, args);
    }
}
每次写这3个比较累,所以写一个@SpringBootApplication方便点。接下来分别介绍这3个Annotation。
@Configuration
这里的@Configuration对我们来说不陌生,它就是JavaConfig形式的Spring Ioc容器的配置类使用的那个@Configuration,SpringBoot社区推荐使用基于JavaConfig的配置形式,所以,这里的启动类标注了@Configuration之后,本身其实也是一个IoC容器的配置类。相当于XML跟Config配置方式
<?xml version="1.0" encoding="UTF-8"?>
<beans xmlns="http://www.springframework.org/schema/beans"
       xmlns:xsi="http://www.w3.org/2001/XMLSchema-instance"
       xsi:schemaLocation="http://www.springframework.org/schema/beans http://www.springframework.org/schema/beans/spring-beans-3.0.xsd"
       default-lazy-init="true">
    <!--bean定义-->
</beans>
@Configuration
public class MockConfiguration{

    //bean定义
}
@Configuration的注解类标识这个类可以使用Spring IoC容器作为bean定义的来源。
@Bean注解告诉Spring,一个带有@Bean的注解方法将返回一个对象,该对象应该被注册为在Spring应用程序上下文中的bean。
@ComponentScan
这个注解在Spring中很重要,它扫描我们写的一些组件, 扫描的是启动类所在的包下的所有组件,自动扫描并加载符合条件的组件(比如@Component和@Repository等)或者bean定义,最终将这些bean定义加载到IOC容器中去 。
@EnableAutoConfiguration
这个组件在整个Spring中最为重要,核心!核心!核心!。@EnableAutoConfiguration是借助@Import的帮助,将所有符合自动配置条件的bean定义加载到IoC容器,仅此而已!
相关信息
@Target({
     ElementType.TYPE})
@Retention(RetentionPolicy.RUNTIME)
@Documented
@Inherited
@AutoConfigurationPackage
@Import({
     AutoConfigurationImportSelector.class})
public @interface EnableAutoConfiguration {

	...
}
两个重要的注解:
- @AutoConfigurationPackage:自动配置包
- @Import({AutoConfigurationImportSelector.class}) 核心,导入自动配置的组件
三、探索SpringApplication.run执行流程
调用run()方法执行的过程主要分为以下几步:
- 1.遍历SpringApplication初始化过程中加载的SpringApplicationRunListeners
- 2.调用Starting()监听SpringApplication的启动
- 3.加载SpringBoot配置环境(ConfigurableEnvironment)
- 4.设置banner属性
- 5.创建ConfigurableApplicationContext(应用配置上下文)
- 6.将listeners、environment、applicationArguments、bannner等重要组件与上下文对象关联
- 7.bean的实力化完成
/**
 * Run the Spring application, creating and refreshing a new
 * {@link ApplicationContext}.
 * @param args the application arguments (usually passed from a Java main method)
 * @return a running {@link ApplicationContext}
 */
public ConfigurableApplicationContext run(String... args) {

    StopWatch stopWatch = new StopWatch();
    stopWatch.start();
    ConfigurableApplicationContext context = null;
    Collection<SpringBootExceptionReporter> exceptionReporters = new ArrayList<>();
    configureHeadlessProperty();
    //1.遍历SpringApplication初始化过程中加载的SpringApplicationRunListeners
    SpringApplicationRunListeners listeners = getRunListeners(args);
    //2.调用starting()监听SpringApplication的启动
    listeners.starting();
    try {

        ApplicationArguments applicationArguments = new DefaultApplicationArguments(args);
        //3.加载SpringBoot配置环境
        ConfigurableEnvironment environment = prepareEnvironment(listeners, applicationArguments);
        configureIgnoreBeanInfo(environment);
        //4.设置banner属性
        Banner printedBanner = printBanner(environment);
        //5.创建ConfigurableApplicationContext(应用配置上下文)
        context = createApplicationContext();
        exceptionReporters = getSpringFactoriesInstances(SpringBootExceptionReporter.class,
                new Class[] {
      ConfigurableApplicationContext.class }, context);
        //6.将listeners、environment、applicationArguments、banner等重要组件与上下文对象关联
        prepareContext(context, environment, listeners, applicationArguments, printedBanner);
        //7.实例化bean
        refreshContext(context);
        afterRefresh(context, applicationArguments);
        stopWatch.stop();
        if (this.logStartupInfo) {

            new StartupInfoLogger(this.mainApplicationClass).logStarted(getApplicationLog(), stopWatch);
        }
        listeners.started(context);
        callRunners(context, applicationArguments);
    }
    catch (Throwable ex) {

        handleRunFailure(context, ex, exceptionReporters, listeners);
        throw new IllegalStateException(ex);
    }

    try {

        listeners.running(context);
    }
    catch (Throwable ex) {

        handleRunFailure(context, ex, exceptionReporters, null);
        throw new IllegalStateException(ex);
    }
    return context;
}
1.遍历SpringApplication初始化过程中加载的SpringApplicationRunListeners
private SpringApplicationRunListeners getRunListeners(String[] args) {

    Class<?>[] types = new Class<?>[] {
      SpringApplication.class, String[].class };
    return new SpringApplicationRunListeners(logger,
            getSpringFactoriesInstances(SpringApplicationRunListener.class, types, this, args));
}
2.调用Starting()监听SpringApplication的启动
public void starting() {

    //遍历所有的SpringApplicationRunListener,调用starting()方法监听SpringApplication的启动
    for (SpringApplicationRunListener listener : this.listeners) {

        listener.starting();
    }
}
3.加载SpringBoot配置环境(ConfigurableEnvironment)
加载SpringBoot配置环境(configurableEnvironment),如果是通过web容器发布,会加载StandardEnvironment。将配置文件(Environment)加入到监听器对象中(SpringApplicationRunListeners)
private ConfigurableEnvironment prepareEnvironment(SpringApplicationRunListeners listeners,
        ApplicationArguments applicationArguments) {

    // Create and configure the environment
    //如果environment不为空直接返回 || 如果是web环境则直接实例化StandardServletEnvironment类 || 如果不是web环境则直接实例化StandardEnvironment类
    ConfigurableEnvironment environment = getOrCreateEnvironment();
    //配置环境信息
    configureEnvironment(environment, applicationArguments.getSourceArgs());
    //通知所有的监听者,环境已经准备好了
    listeners.environmentPrepared(environment);
    bindToSpringApplication(environment);
    if (!this.isCustomEnvironment) {

        environment = new EnvironmentConverter(getClassLoader()).convertEnvironmentIfNecessary(environment,
                deduceEnvironmentClass());
    }
    ConfigurationPropertySources.attach(environment);
    return environment;
}
4.设置banner属性
private Banner printBanner(ConfigurableEnvironment environment) {

    //如果未开启banner打印直接返回
    if (this.bannerMode == Banner.Mode.OFF) {

        return null;
    }
    //创建ResourceLoader对象
    ResourceLoader resourceLoader = (this.resourceLoader != null) ? this.resourceLoader
            : new DefaultResourceLoader(getClassLoader());
    //创建SpringApplicationBannerPrinter,该对象用来打印banner
    SpringApplicationBannerPrinter bannerPrinter = new SpringApplicationBannerPrinter(resourceLoader, this.banner);
    //如果bannerMode模式为LOG,则将bannner打印到log文件中
    if (this.bannerMode == Mode.LOG) {

        return bannerPrinter.print(environment, this.mainApplicationClass, logger);
    }
    //打印banner到控制台
    return bannerPrinter.print(environment, this.mainApplicationClass, System.out);
}
5.初始化ConfigurableApplicationContext(应用配置上下文)
在SpringBoot中,应用类型分为三类
public enum WebApplicationType {

    /**
     * The application should not run as a web application and should not start an
     * embedded web server.
     */
    // 应用程序不是web应用,也不应该用web服务器去启动
    NONE,
    /**
     * The application should run as a servlet-based web application and should start an
     * embedded servlet web server.
     */
    //应用程序应作为基于servlet的web应用程序运行,并应启动嵌入式servlet web(tomcat)服务器
    SERVLET,
    /**
     * The application should run as a reactive web application and should start an
     * embedded reactive web server.
     */
    //应用程序应作为 reactive web应用程序运行,并应启动嵌入式 reactive web服务器。
    REACTIVE;
}
根据webEnvironment是否是web环境创建默认的contextClass,AnnotationConfigEnbeddedWebApplicationContext(通过扫描所有注解类来加载bean)和ConfigurableWebApplicationContext),最后通过BeanUtils实例化上下文对象,并返回。
/**
 * Strategy method used to create the {@link ApplicationContext}. By default this
 * method will respect any explicitly set application context or application context
 * class before falling back to a suitable default.
 * @return the application context (not yet refreshed)
 * @see #setApplicationContextClass(Class)
 */
protected ConfigurableApplicationContext createApplicationContext() {

    //根据webEnvironment是否是web环境创建默认的contextClass
    Class<?> contextClass = this.applicationContextClass;
    if (contextClass == null) {

        try {

            switch (this.webApplicationType) {

            case SERVLET:
                //AnnotationConfigServletWebServerApplicationContext
                contextClass = Class.forName(DEFAULT_SERVLET_WEB_CONTEXT_CLASS);
                break;
            case REACTIVE:
                //AnnotationConfigReactiveWebServerApplicationContext
                contextClass = Class.forName(DEFAULT_REACTIVE_WEB_CONTEXT_CLASS);
                break;
            default:
                //AnnotationConfigApplicationContext
                contextClass = Class.forName(DEFAULT_CONTEXT_CLASS);
            }
        }
        catch (ClassNotFoundException ex) {

            throw new IllegalStateException(
                    "Unable create a default ApplicationContext, " + "please specify an ApplicationContextClass",
                    ex);
        }
    }
    //BeanUtils实例化上下文对象
    return (ConfigurableApplicationContext) BeanUtils.instantiateClass(contextClass);
}
6.将listeners、environment、applicationArguments、banner等重要组件与上下文对象关联
private void prepareContext(ConfigurableApplicationContext context, ConfigurableEnvironment environment,
        SpringApplicationRunListeners listeners, ApplicationArguments applicationArguments, Banner printedBanner) {

    //设置上下文的environment
    context.setEnvironment(environment);
    //应用上下文后处理
    postProcessApplicationContext(context);
    //在context refresh之前,对其应用ApplicationContextInitializer
    applyInitializers(context);
    //上下文准备
    listeners.contextPrepared(context);
    //打印启动日志和启动应用的profile
    if (this.logStartupInfo) {

        logStartupInfo(context.getParent() == null);
        logStartupProfileInfo(context);
    }
    // Add boot specific singleton beans
    ConfigurableListableBeanFactory beanFactory = context.getBeanFactory();
    //向beanFactory注册单例bean:命令行参数bean
    beanFactory.registerSingleton("springApplicationArguments", applicationArguments);
    if (printedBanner != null) {

        //向beanFactory注册单例bean:banner bean
        beanFactory.registerSingleton("springBootBanner", printedBanner);
    }
    if (beanFactory instanceof DefaultListableBeanFactory) {

        ((DefaultListableBeanFactory) beanFactory)
                .setAllowBeanDefinitionOverriding(this.allowBeanDefinitionOverriding);
    }
    // Load the sources
    //获取SpringApplication的primarySources属性
    Set<Object> sources = getAllSources();
    Assert.notEmpty(sources, "Sources must not be empty");
    //将bean加载到应用上下文
    load(context, sources.toArray(new Object[0]));
    //向上下文添加ApplicationListener,并广播ApplicationPreparedEvent事件
    listeners.contextLoaded(context);
}
