一、HashMap
在了解HashMap之前,需要了解一下几个知识点:
- 哈希表
- 哈希冲突
哈希表
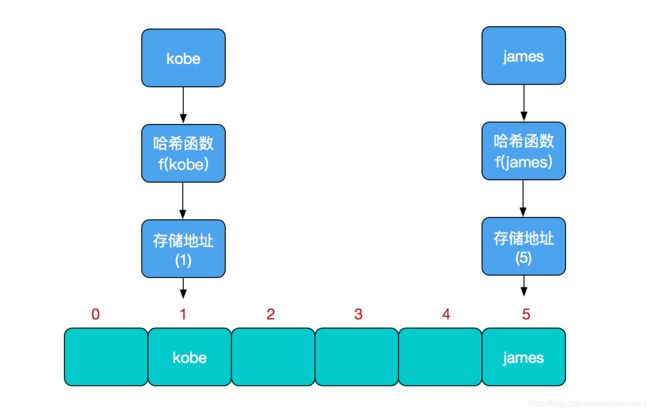
我们知道,数据结构的物理存储结构只有两种:顺序存储结构和链式存储结构(像栈,队列,树,图等是从逻辑结构去抽象的,映射到内存中,也这两种物理组织形式),而在上面我们提到过,在数组中根据下标查找某个元素,一次定位就可以达到,哈希表利用了这种特性,哈希表的主干就是数组。
比如我们要新增或查找某个元素,我们通过把当前元素的关键字通过某个函数映射到数组中的某个位置,通过数组下标一次定位就可完成操作。这个函数可以简单描述为:存储位置 = f(关键字) ,这个函数f一般称为哈希函数,这个函数的设计好坏会直接影响到哈希表的优劣。
哈希冲突
然而万事无完美,如果两个不同的元素,通过哈希函数得出的实际存储地址相同怎么办?也就是说,当我们对某个元素进行哈希运算,得到一个存储地址,然后要进行插入的时候,发现已经被其他元素占用了,其实这就是所谓的哈希冲突,也叫哈希碰撞。
HashMap的数据结构
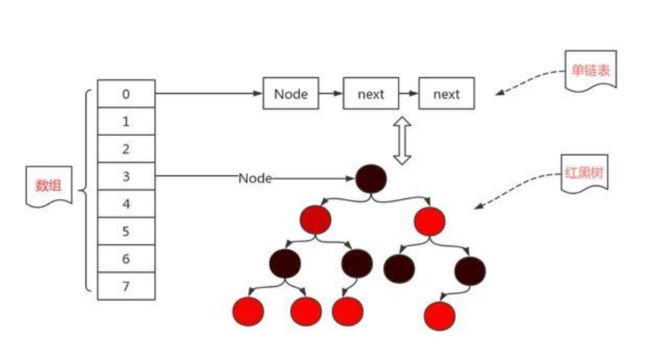
为了解决这个问题,HashMap采用了链地址法,JDK1.7之前是数组+链表的形式,但是这种模式存在一个明显的弊端:假如链表长度很深,不利于元素的快速查找,所以在JDK1.8之后,HashMap的内部解决采用了:数组+链表+红黑树解决这个问题,当链表长度大于8时,则转换为红黑树,缩短元素的搜索时间。
HashMap的put方法流程
首先我们来看HashMap数据结构中Node节点的数据结构,如下代码所示,可以看到Node节点是一个继承了Map.Entry
- hash:key通过hash()计算出的hash值
- key :put方法中对应的key
- value:put方法中对应的value
- next:下一个Node节点
    static class Node implements Map.Entry {
        final int hash;
        final K key;
        V value;
        Node next;

        Node(int hash, K key, V value, Node next) {
            this.hash = hash;
            this.key = key;
            this.value = value;
            this.next = next;
        }

        public final K getKey()        { return key; }
        public final V getValue()      { return value; }
        public final String toString() { return key + "=" + value; }

        public final int hashCode() {
            return Objects.hashCode(key) ^ Objects.hashCode(value);
        }

        public final V setValue(V newValue) {
            V oldValue = value;
            value = newValue;
            return oldValue;
        }

        public final boolean equals(Object o) {
            if (o == this)
                return true;
            if (o instanceof Map.Entry) {
                Map.Entry e = (Map.Entry)o;
                if (Objects.equals(key, e.getKey()) &&
                    Objects.equals(value, e.getValue()))
                    return true;
            }
            return false;
        }
    }
下面是HashMap的put方法的源码:
    public V put(K key, V value) {
        return putVal(hash(key), key, value, false, true);
    }

    /**
     * Implements Map.put and related methods
     *
     * @param hash hash for key
     * @param key the key
     * @param value the value to put
     * @param onlyIfAbsent if true, don't change existing value
     * @param evict if false, the table is in creation mode.
     * @return previous value, or null if none
     */
    final V putVal(int hash, K key, V value, boolean onlyIfAbsent,
                   boolean evict) {
        Node[] tab; Node p; int n, i;
        if ((tab = table) == null || (n = tab.length) == 0)
            n = (tab = resize()).length;
        if ((p = tab[i = (n - 1) & hash]) == null)
            tab[i] = newNode(hash, key, value, null);
        else {
            Node e; K k;
            if (p.hash == hash &&
                ((k = p.key) == key || (key != null && key.equals(k))))
                e = p;
            else if (p instanceof TreeNode)
                e = ((TreeNode)p).putTreeVal(this, tab, hash, key, value);
            else {
                for (int binCount = 0; ; ++binCount) {
                    if ((e = p.next) == null) {
                        p.next = newNode(hash, key, value, null);
                        if (binCount >= TREEIFY_THRESHOLD - 1) // -1 for 1st
                            treeifyBin(tab, hash);
                        break;
                    }
                    if (e.hash == hash &&
                        ((k = e.key) == key || (key != null && key.equals(k))))
                        break;
                    p = e;
                }
            }
            if (e != null) { // existing mapping for key
                V oldValue = e.value;
                if (!onlyIfAbsent || oldValue == null)
                    e.value = value;
                afterNodeAccess(e);
                return oldValue;
            }
        }
        ++modCount;
        if (++size > threshold)
            resize();
        afterNodeInsertion(evict);
        return null;
    }
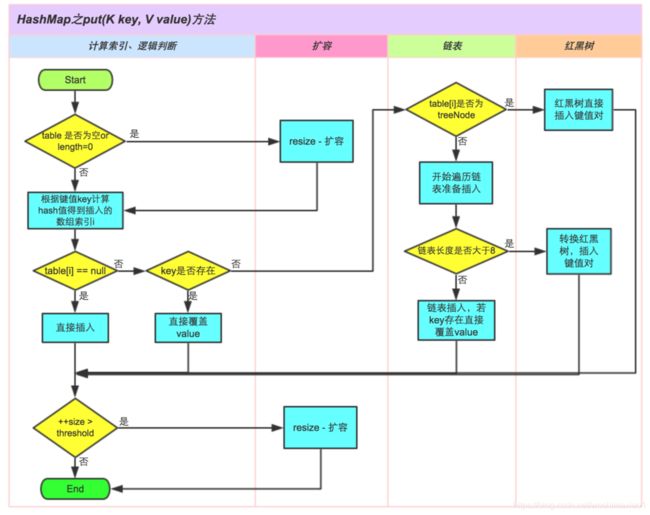
- 首先会判断数组是否为空或者长度为0,如果是则进行一次扩容
- 然后根据key通过hash算法算出插入数组的索引位置
- 如果索引位置没有值,则直接插入
- 如果索引位置有值,首先判断当前put方法的key值在索引位置的Node节点存不存在,存在直接覆盖,不存在则说明之前产生了哈希冲突,索引位置生成了链表或者红黑树,进而判断所在位置是不是红黑树结构,如果是则直接插入键值对。
- 如果不是红黑树结构,则判断当前key是否在链表中有对应的值,有值则覆盖,无值则新增,如果这时插入的链表长度大于8,则转换为红黑树之后继续插入。
-
如果插入值之后,哈希表长度触发了阈值,则进行一次扩容
二、HashSet
首先我们来看HashSet的关键源码:
public class HashSet
    extends AbstractSet
    implements Set, Cloneable, java.io.Serializable
{
    private transient HashMap map;

    // Dummy value to associate with an Object in the backing Map
    private static final Object PRESENT = new Object();

    /**
     * Constructs a new, empty set; the backing HashMap instance has
     * default initial capacity (16) and load factor (0.75).
     */
    public HashSet() {
        map = new HashMap<>();
    }
    /**
     * Adds the specified element to this set if it is not already present.
     * More formally, adds the specified element e to this set if
     * this set contains no element e2 such that
     * (e==null ? e2==null : e.equals(e2)).
     * If this set already contains the element, the call leaves the set
     * unchanged and returns false.
     *
     * @param e element to be added to this set
     * @return true if this set did not already contain the specified
     * element
     */
    public boolean add(E e) {
        return map.put(e, PRESENT)==null;
    }

    /**
     * Removes the specified element from this set if it is present.
     * More formally, removes an element e such that
     * (o==null ? e==null : o.equals(e)),
     * if this set contains such an element.  Returns true if
     * this set contained the element (or equivalently, if this set
     * changed as a result of the call).  (This set will not contain the
     * element once the call returns.)
     *
     * @param o object to be removed from this set, if present
     * @return true if the set contained the specified element
     */
    public boolean remove(Object o) {
        return map.remove(o)==PRESENT;
    }

    /**
     * Removes all of the elements from this set.
     * The set will be empty after this call returns.
     */
    public void clear() {
        map.clear();
    }
}
这里可以看到HashSet的其实内部采用了一个HashMap来保存数据,关于HashMap的知识点第一节有详细介绍,这里就不再赘述!
三、ArrayList
首先我们来看ArrayList的构造函数:
    /**
     * Default initial capacity.
     */
    private static final int DEFAULT_CAPACITY = 10;

    /**
     * Shared empty array instance used for empty instances.
     */
    private static final Object[] EMPTY_ELEMENTDATA = {};

    /**
     * Shared empty array instance used for default sized empty instances. We
     * distinguish this from EMPTY_ELEMENTDATA to know how much to inflate when
     * first element is added.
     */
    private static final Object[] DEFAULTCAPACITY_EMPTY_ELEMENTDATA = {};

    /**
     * The array buffer into which the elements of the ArrayList are stored.
     * The capacity of the ArrayList is the length of this array buffer. Any
     * empty ArrayList with elementData == DEFAULTCAPACITY_EMPTY_ELEMENTDATA
     * will be expanded to DEFAULT_CAPACITY when the first element is added.
     */
    // Android-note: Also accessed from java.util.Collections
    transient Object[] elementData; // non-private to simplify nested class access

    /**
     * The size of the ArrayList (the number of elements it contains).
     *
     * @serial
     */
    private int size;

    /**
     * Constructs an empty list with the specified initial capacity.
     *
     * @param  initialCapacity  the initial capacity of the list
     * @throws IllegalArgumentException if the specified initial capacity
     *         is negative
     */
    public ArrayList(int initialCapacity) {
        if (initialCapacity > 0) {
            this.elementData = new Object[initialCapacity];
        } else if (initialCapacity == 0) {
            this.elementData = EMPTY_ELEMENTDATA;
        } else {
            throw new IllegalArgumentException("Illegal Capacity: "+
                                               initialCapacity);
        }
    }

    /**
     * Constructs an empty list with an initial capacity of ten.
     */
    public ArrayList() {
        this.elementData = DEFAULTCAPACITY_EMPTY_ELEMENTDATA;
    }

    /**
     * Constructs a list containing the elements of the specified
     * collection, in the order they are returned by the collection's
     * iterator.
     *
     * @param c the collection whose elements are to be placed into this list
     * @throws NullPointerException if the specified collection is null
     */
    public ArrayList(Collection c) {
        elementData = c.toArray();
        if ((size = elementData.length) != 0) {
            // c.toArray might (incorrectly) not return Object[] (see 6260652)
            if (elementData.getClass() != Object[].class)
                elementData = Arrays.copyOf(elementData, size, Object[].class);
        } else {
            // replace with empty array.
            this.elementData = EMPTY_ELEMENTDATA;
        }
    }
可以清楚的看到ArrayList的内部实现其实就是一个对象数组,所以对ArrayList的所有操作底层都是基于数组的。
ArrayList的扩容机制
想要了解ArrayList的扩容机制,必须先从add()方法入手,下面我们来看add()的源码
    /**
     * Appends the specified element to the end of this list.
     *
     * @param e element to be appended to this list
     * @return true (as specified by {@link Collection#add})
     */
    public boolean add(E e) {
        ensureCapacityInternal(size + 1);  // Increments modCount!!
        elementData[size++] = e;
        return true;
    }

    private void ensureCapacityInternal(int minCapacity) {
        if (elementData == DEFAULTCAPACITY_EMPTY_ELEMENTDATA) {
            minCapacity = Math.max(DEFAULT_CAPACITY, minCapacity);
        }
        ensureExplicitCapacity(minCapacity);
    }

    private void ensureExplicitCapacity(int minCapacity) {
        modCount++;
        // overflow-conscious code
        if (minCapacity - elementData.length > 0)
            grow(minCapacity);
    }

    /**
     * Increases the capacity to ensure that it can hold at least the
     * number of elements specified by the minimum capacity argument.
     *
     * @param minCapacity the desired minimum capacity
     */
    private void grow(int minCapacity) {
        // overflow-conscious code
        int oldCapacity = elementData.length;
        //新容量为旧容量的1.5倍
        int newCapacity = oldCapacity + (oldCapacity >> 1);
        if (newCapacity - minCapacity < 0)
            newCapacity = minCapacity;
        if (newCapacity - MAX_ARRAY_SIZE > 0)
            newCapacity = hugeCapacity(minCapacity);
        //拷贝内容
        elementData = Arrays.copyOf(elementData, newCapacity);
    }
- 在add()方法中调用ensureCapacityInternal(size + 1)方法来确定集合确保添加元素成功的最小集合容量minCapacity的值。参数为size+1,代表的含义是如果集合添加元素成功后,集合中的实际元素个数。换句话说,集合为了确保添加元素成功,那么集合的最小容量minCapacity应该是size+1。在ensureCapacityInternal方法中,首先判断elementData是否为默认的空数组,如果是,minCapacity为minCapacity与集合默认容量大小中的较大值
- 调用ensureExplicitCapacity(minCapacity)方法来确定集合为了确保添加元素成功是否需要对现有的元素数组进行扩容。首先将结构性修改计数器加一;然后判断minCapacity与当前元素数组的长度的大小,如果minCapacity比当前元素数组的长度的大小大的时候需要扩容,进入第三阶段
- 如果需要对现有的元素数组进行扩容,则调用grow(minCapacity)方法,参数minCapacity表示集合为了确保添加元素成功的最小容量。在扩容的时候,首先将原元素数组的长度增大1.5倍(oldCapacity + (oldCapacity >> 1)),然后对扩容后的容量与minCapacity进行比较:① 新容量小于minCapacity,则将新容量设为minCapacity;②新容量大于minCapacity,则指定新容量。最后将旧数组拷贝到扩容后的新数组中。
ArrayList小结
- 注意其三个不同的构造方法。无参构造方法构造的ArrayList的容量默认为10,带有Collection参数的构造方法,将Collection转化为数组赋给ArrayList的实现数组elementData。
- 当ArrayList每次新增元素时,都要保证有足够的容量,当容量不足时,会自动扩容1.5之后,再新增元素。
- ArrayList的实现中大量地调用了Arrays.copyof()和System.arraycopy()方法。我们有必要对这两个方法的实现做下深入的了解
    @SuppressWarnings("unchecked")
    public static  T[] copyOf(T[] original, int newLength) {
        return (T[]) copyOf(original, newLength, original.getClass());
    }

    public static  T[] copyOf(U[] original, int newLength, Class newType) {
        @SuppressWarnings("unchecked")
        T[] copy = ((Object)newType == (Object)Object[].class)
            ? (T[]) new Object[newLength]
            : (T[]) Array.newInstance(newType.getComponentType(), newLength);
        System.arraycopy(original, 0, copy, 0,
                         Math.min(original.length, newLength));
        return copy;
    }
可以看到,实际上Arrays.copyof()最后还是调用了System.arraycopy(),而System.arraycopy()最后调用了一个native方法。
    @FastNative
    public static native void arraycopy(Object src,  int  srcPos,
                                        Object dest, int destPos,
                                        int length);
这个native方法最后底层调用了C语言的memmove()函数,实现数组的拷贝。因此它可以保证同一个数组内元素的正确复制和移动,比一般的复制方法的实现效率要高很多,很适合用来批量处理数组。
ArrayList基于数组实现,可以通过下标索引直接查找到指定位置的元素,因此查找效率高,但每次插入或删除元素,就要大量地移动元素,插入删除元素的效率低。
在查找给定元素索引值等的方法中,源码都将该元素的值分为null和不为null两种情况处理,ArrayList中允许元素为null。
四、LinkedList
首先我们来看LinkedList的几个关键源码:
public class LinkedList
    extends AbstractSequentialList
    implements List, Deque, Cloneable, java.io.Serializable
{
    transient int size = 0;

    /**
     * Pointer to first node.
     * Invariant: (first == null && last == null) ||
     *            (first.prev == null && first.item != null)
     */
    transient Node first;

    /**
     * Pointer to last node.
     * Invariant: (first == null && last == null) ||
     *            (last.next == null && last.item != null)
     */
    transient Node last;

    /**
     * Constructs an empty list.
     */
    public LinkedList() {
    }

    /**
     * Constructs a list containing the elements of the specified
     * collection, in the order they are returned by the collection's
     * iterator.
     *
     * @param  c the collection whose elements are to be placed into this list
     * @throws NullPointerException if the specified collection is null
     */
    public LinkedList(Collection c) {
        this();
        addAll(c);
    }
    .....
}
从上面代码可以看到LinkedList的继承关系:
- LinkedList 是一个继承于AbstractSequentialList的双向链表。它也可以被当作堆栈、队列或双端队列进行操作。
- LinkedList 实现 List 接口,能对它进行队列操作。
- LinkedList 实现 Deque 接口,即能将LinkedList当作双端队列使用。
- LinkedList 实现了Cloneable接口,即覆盖了函数clone(),能克隆。
- LinkedList 实现java.io.Serializable接口,这意味着LinkedList支持序列化,能通过序列化去传输。
LinkedList 的数据结构
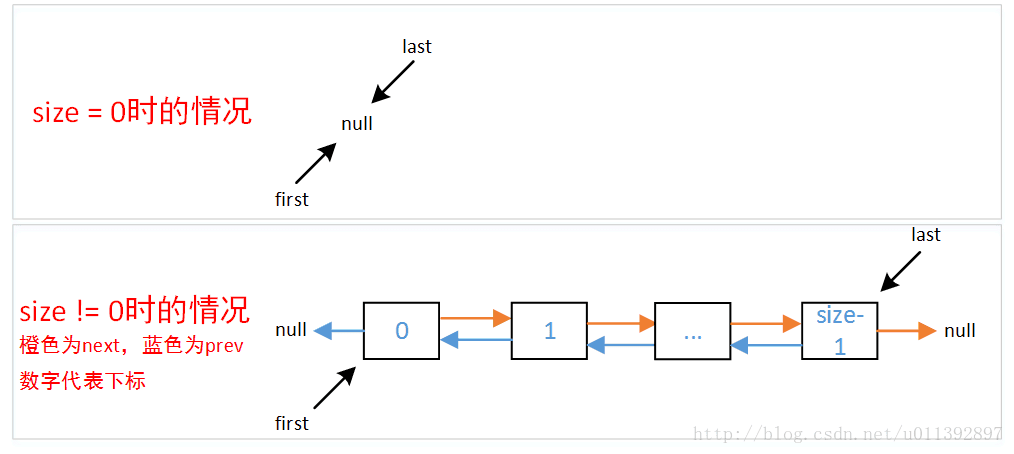
前面已经说了,LinkedList 的实现本质上是一个双向链表,那么这个链表具体实现方式是怎么实现的呢?
通过阅读源码LinkedList 几个方法,add、remove,可以发现LinkedList 都大量的使用了一个内部静态类:
    private static class Node {
        E item;
        Node next;
        Node prev;

        Node(Node prev, E element, Node next) {
            this.item = element;
            this.next = next;
            this.prev = prev;
        }
    }
分析节点代码,可以明显的看出链表的标准节点构造,LinkedList 的数据结构如下图所示:
LinkedList 的几个关键Api
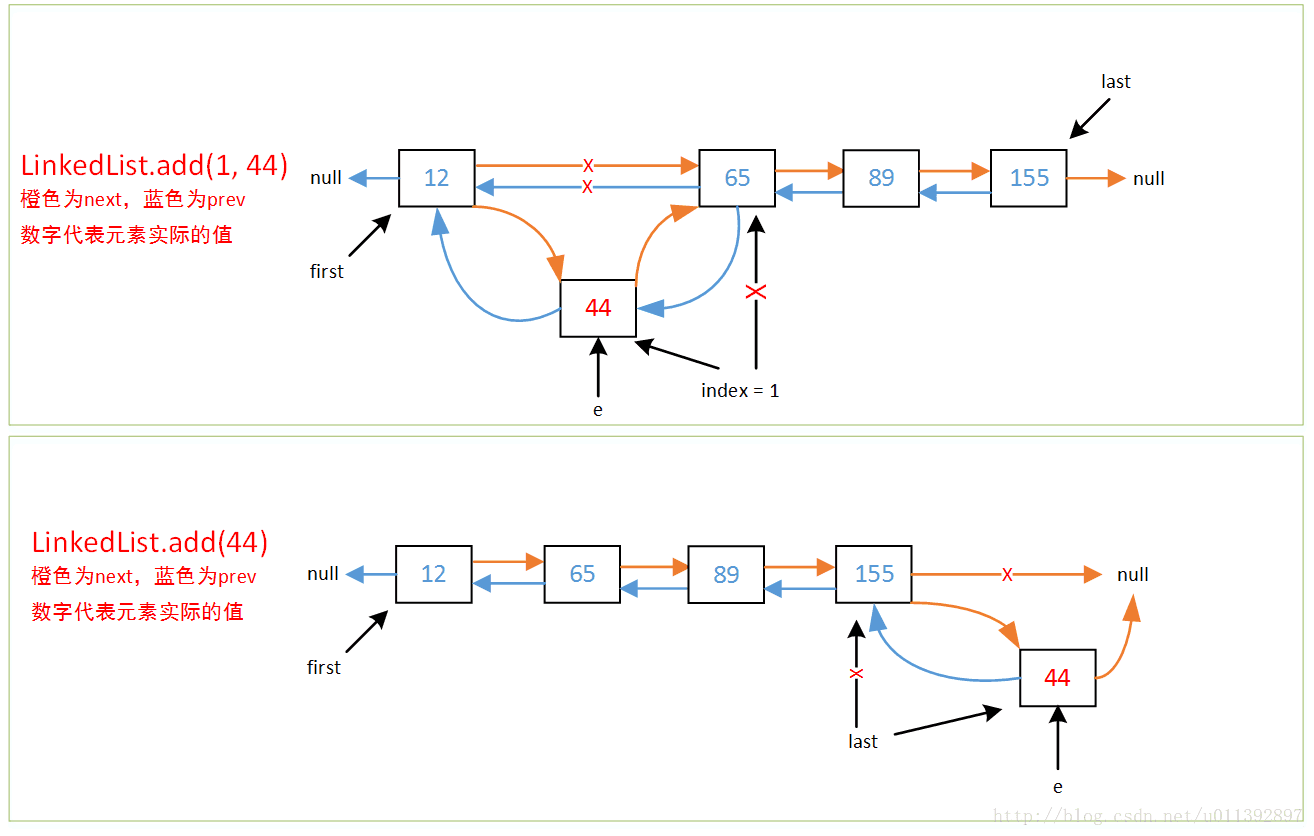
- add
    /**
     * Appends the specified element to the end of this list.
     *
     * This method is equivalent to {@link #addLast}.
     *
     * @param e element to be appended to this list
     * @return {@code true} (as specified by {@link Collection#add})
     */
    public boolean add(E e) {
        linkLast(e);
        return true;
    }

    public void add(int index, E element) {
        checkPositionIndex(index);
        if (index == size)
            linkLast(element);
        else
            linkBefore(element, node(index));
    }

    /**
     * 从最后的位置加入元素
     */
    void linkLast(E e) {
        final Node l = last;
        final Node newNode = new Node<>(l, e, null);
        last = newNode;
        if (l == null)
            first = newNode;
        else
            l.next = newNode;
        size++;
        modCount++;
    }

   /**
    * 在指定位置之前插入元素
    */
    void linkBefore(E e, Node succ) {
        // assert succ != null;
        final Node pred = succ.prev;
        final Node newNode = new Node<>(pred, e, succ);
        succ.prev = newNode;
        if (pred == null)
            first = newNode;
        else
            pred.next = newNode;
        size++;
        modCount++;
    }
- remove
    /**
     * Removes the element at the specified position in this list.  Shifts any
     * subsequent elements to the left (subtracts one from their indices).
     * Returns the element that was removed from the list.
     *
     * @param index the index of the element to be removed
     * @return the element previously at the specified position
     * @throws IndexOutOfBoundsException {@inheritDoc}
     */
    public E remove(int index) {
        checkElementIndex(index);
        return unlink(node(index));
    }

    private void checkElementIndex(int index) {
        if (!isElementIndex(index))
            throw new IndexOutOfBoundsException(outOfBoundsMsg(index));
    }

    private boolean isElementIndex(int index) {
        return index >= 0 && index < size;
    }

    /**
     * Returns the (non-null) Node at the specified element index.
     */
    Node node(int index) {
        if (index < (size >> 1)) {
            Node x = first;
            for (int i = 0; i < index; i++)
                x = x.next;
            return x;
        } else {
            Node x = last;
            for (int i = size - 1; i > index; i--)
                x = x.prev;
            return x;
        }
    }

    E unlink(Node x) {
        // assert x != null;
        final E element = x.item;
        final Node next = x.next;
        final Node prev = x.prev;

        if (prev == null) {
            first = next;
        } else {
            prev.next = next;
            x.prev = null;
        }

        if (next == null) {
            last = prev;
        } else {
            next.prev = prev;
            x.next = null;
        }

        x.item = null;
        size--;
        modCount++;
        return element;
    }
从上面的代码可以分析出remove(index)的大致流程如下:
- 判断索引值是否在链表范围内,不存在则直接抛出异常
- 通过传入index索引值使用2分法定位到要删除的元素
- 通过unlinx()方法改变要删除节点的前一个节点和后一个节点的指针,前一个节点的next直接指向后一个节点,后一个节点的prev直接指向前一个节点。并把要删除节点的next、prev、item都置空,总链表长度整体减一。
LinkedList 小结
- LinkedList 底层数据结构是双向链表,所以在进行查询时效率会比ArrayList的慢,而插入和删除只是对指针进行移动,相对于ArrayList就会快很多
- LinkedList 理论上可以无限新增,没有容量限制,也不需要进行扩容操作
- LinkedList删除元素后集合占用的内存自动缩小,无需像ArrayList一样调用trimToSize()方法
- LinkedList的所有方法没有进行同步,因此它也不是线程安全的,应该避免在多线程环境下使用
