www.myblogs.cn/fastDFS
二,搭建FastDFS文件服务器
1,首先需要安装需要的依赖
yum -y install gcc-c++
yum -y install libevent
2,然后使用xftp把需要的压缩包上传到Linux服务器,在/usr/local文件夹中新建一个fastdfs文件夹。
3,解压libfastcommon
tar -xvf libfastcommonV1.0.7.tar.gz
4,然后进行安装
[root@localhost fastdfs]# ls
fastdfs-nginx-module_v1.16.tar.gz  FastDFS_v5.05.tar.gz  libfastcommon-1.0.7  libfastcommonV1.0.7.tar.gz  nginx-1.8.1.tar.gz
[root@localhost fastdfs]# cd libfastcommon-1.0.7
[root@localhost libfastcommon-1.0.7]# ls
HISTORY  INSTALL  libfastcommon.spec  make.sh  README  src
[root@localhost libfastcommon-1.0.7]# ./make.sh
[root@localhost libfastcommon-1.0.7]# ./make.sh install
libfastcommon安装好之后会自动将库文件拷贝至usr/lib64下,由于FastDFS程序引用/usr/lib目录,所以需要把/usr/lib64下的库文件拷贝至/usr/lib下。
拷贝命令
cd /usr/lib64
cp libfastcommon.so /usr/lib
查看/usr/lib目录下是否存在该文件
[root@localhost lib64]# find /usr/lib -name libfastcommon.so
/usr/lib/libfastcommon.so
5,开始安装FastDFS
进到/usr/local/fastdfs目录中进行解压
tar -xvf FastDFS_v5.05.tar.gz
安装
[root@localhost fastdfs]# ls
FastDFS  fastdfs-nginx-module_v1.16.tar.gz  FastDFS_v5.05.tar.gz  libfastcommon-1.0.7  libfastcommonV1.0.7.tar.gz  nginx-1.8.1.tar.gz
[root@localhost fastdfs]# cd FastDFS
[root@localhost FastDFS]# ls
client  common  conf  COPYING-3_0.txt  fastdfs.spec  HISTORY  init.d  INSTALL  make.sh  php_client  README.md  restart.sh  stop.sh  storage  test  tracker
[root@localhost FastDFS]# ./make.sh
[root@localhost FastDFS]# ./make.sh install
安装成功后将安装目录下的conf下的文件拷贝到/etc/fdfs下。(nginx需要)
conf文件目录在/usr/local/fastdfs/FastDFS/conf,进到这个conf目录
cp * /etc/fdfs/ 拷贝全部文件到fdfs目录下
6,安装tracker服务(跟踪服务)
[root@localhost conf]# cd /usr/local/fastdfs/FastDFS/tracker/
[root@localhost tracker]# pwd
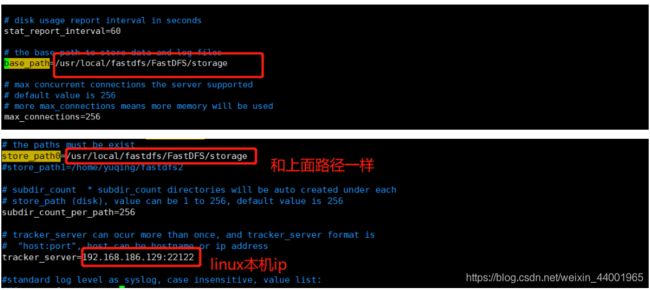
/usr/local/fastdfs/FastDFS/tracker   这个路径设置为base_path路径(下图)
# 编辑tracker.conf配置文件
[root@localhost tracker]# vim /etc/fdfs/tracker.conf
修改base_path路径为
保存退出,然后启动
# 启动
/usr/bin/fdfs_trackerd /etc/fdfs/tracker.conf
# 重启的话是restart
/usr/bin/fdfs_trackerd /etc/fdfs/tracker.conf restart
7,安装storage服务(存储服务)
[root@localhost storage]# pwd
/usr/local/fastdfs/FastDFS/storage  这个路径设置为base_path路径(下图)
[root@localhost storage]# vim /etc/fdfs/storage.conf
修改base_path路径
启动
/usr/bin/fdfs_storaged /etc/fdfs/storage.conf
8,到此为止,两个服务都安装完成了,现在测试是否安装成功。
将/usr/local/fastdfs/FastDFS/client里面的libfdfsclient.so拷贝到/usr/lib下,这一步非常重要。
cd /usr/local/fastdfs/FastDFS/client/
cp libfdfsclient.so /usr/lib
修改配置文件
新建一个在root根目录创建一个html文件,内容为hi,fastdfs!。
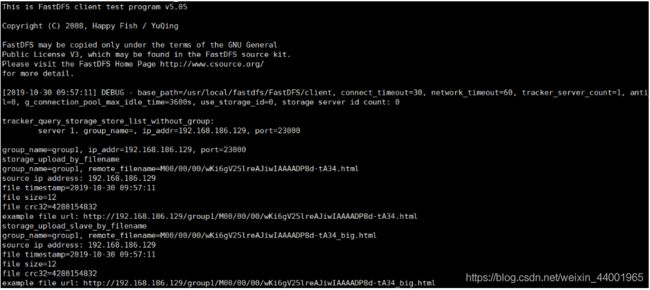
测试上传
/usr/bin/fdfs_test /etc/fdfs/client.conf upload /root/hi.html
出现下面的情况就是安装成功了,并且文件上传成功。
文件存在了哪里呢?这里
[root@localhost 00]# pwd
/usr/local/fastdfs/FastDFS/storage/data/00/00
[root@localhost 00]# ll
total 16
-rw-r--r--. 1 root root 12 Oct 30 09:57 wKi6gV25lreAJiwIAAAADP8d-tA34_big.html
-rw-r--r--. 1 root root 49 Oct 30 09:57 wKi6gV25lreAJiwIAAAADP8d-tA34_big.html-m
-rw-r--r--. 1 root root 12 Oct 30 09:57 wKi6gV25lreAJiwIAAAADP8d-tA34.html
-rw-r--r--. 1 root root 49 Oct 30 09:57 wKi6gV25lreAJiwIAAAADP8d-tA34.html-m
[root@localhost 00]#
其实到这一步,这个上传的文件的路径已经出来了。
http://192.168.186.129/group1/M00/00/00/wKi6gV25lreAJiwIAAAADP8d-tA34_big.html
但是在浏览器中还不能够直接访问文件。
三,安装nginx及插件实现资源的访问
为什么需要nginx呢?
因为FastDFS本身并不具有处理http协议的能力,而客户端正是通过http协议访问的,因此在浏览器中不能够直接访问文件就讲得通了。
如何处理?
说白了,需要nginx服务器作为中间件,因为nginx具有处理http协议的能力,然后安装nginx+fastDFS的插件,目的是建立nginx和FastDFS服务器的联系以供访问。
nginx及
nginx插件
yum install gcc-c++ (前面已经安装过)
yum install -y pcre pcre-devel
yum install -y zlib zlib-devel
yum install -y openssl openssl-devel
2,进到/usr/local/fastdfs目录下,解压nginx-fastDFS插件
tar -zxf fastdfs-nginx-module_v1.16.tar.gz
3,进到/usr/local/fastdfs/fastdfs-nginx-module/src下,修改config配置文件
把路径上的local全部去掉,并保存退出。
4,把/usr/local/fastdfs/fastdfs-nginx-module/src下的mod_fastdfs.conf文件复制到/etc/fdfs目录下,并编辑该文件。
[root@192 src]# cp mod_fastdfs.conf /etc/fdfs/
[root@192 src]# vim /etc/fdfs/mod_fastdfs.conf
5,安装nginx
进到/usr/local/fastdfs压缩包目录,解压nginx压缩包
tar -zxf nginx-1.8.1.tar.gz
关联nginx和nginx的插件
[root@192 fastdfs]# cd nginx-1.8.1/
# 关联操作
[root@192 nginx-1.8.1]# ./configure --add-module=/usr/local/fastdfs/fastdfs-nginx-module/src
[root@192 nginx-1.8.1]# make  编译
[root@192 nginx-1.8.1]# make install  安装
可以看到,nginx被安装到了/usr/local目录下
到/usr/local/nginx/conf目录下,修改nginx的配置文件nginx.conf,保存退出。
启动nginx
[root@192 sbin]# pwd
/usr/local/nginx/sbin
[root@192 sbin]# ./nginx
然后现在就可以在浏览器访问刚才那个文件的路径了。
四,springboot访问FastDFS实现文件上传
1,添加依赖
            com.github.tobato
            fastdfs-client
            1.26.1-RELEASE
2,在启动类上添加注解引入配置文件类
@Import(FdfsClientConfig.class)
3,在application.properties加入FastDFS的相关配置
# 超时时间
fdfs.so-timeout=1500
# 连接的超时时间
fdfs.connect-timeout=600
# 连接池
fdfs.pool.jmx-enabled=false
# 缩略图尺寸
fdfs.thumb-image.height=100
fdfs.thumb-image.width=100
# tracker服务跟踪器的地址
fdfs.tracker-list=192.168.186.129:22122
这里插一句,提前先把linux的防火墙设置为22122端口和23000端口放行,否则后续的测试会因为连不上跟踪器报错。
    @Autowired
    FastFileStorageClient fastFileStorageClient;//直接引入

    @RequestMapping("/fastdfs")
    @ResponseBody
    public String fastdfs() throws FileNotFoundException {
        File file=new File("D://文件笔记//image//1571884758247.png");
        //文件名
        String fileName=file.getName();
        //后缀名
        String extName=fileName.substring(fileName.lastIndexOf(".")+1);
        //创建流
        FileInputStream fileInputStream=new FileInputStream(file);
        //四个参数(输入流,文件大小,后缀名,null),返回一个路径
        StorePath storePath = fastFileStorageClient.uploadFile(fileInputStream, file.length(), extName, null);
        //不同路径
        System.out.println(storePath.getFullPath());
        System.out.println(storePath.getPath());
        System.out.println(storePath.getGroup());
        return "图片上传成功,并调皮的给您返回一个路径";
    }
分别看浏览器和控制台
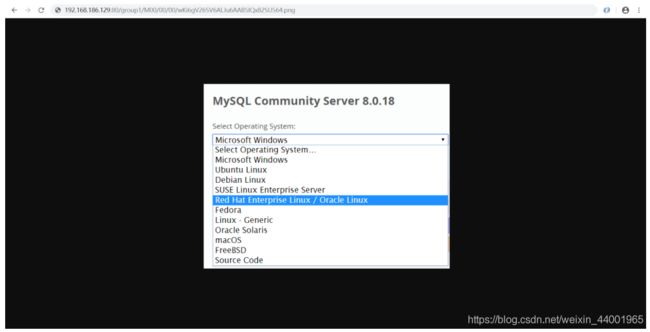
然后在浏览器输入访问路径(nginx的ip地址和端口加上storePath.getFullPath()的路径),例如
http://192.168.186.129:80/group1/M00/00/00/wKi6gV26SV6ALJu6AAB5lQx82SU564.png
然后就可以访问刚才上传的图片了
五,改造成业务代码
html表单项
controller上传业务代码
  @Autowired
    FastFileStorageClient fastFileStorageClient;

    /**
     *fastDFS服务器测试文件上传
     */
    @RequestMapping("/fastdfs")
    @ResponseBody
    public String fastdfs(@RequestParam(value = "test") MultipartFile test) throws IOException {

        //文件名
        String fileName=test.getOriginalFilename();
        //后缀名
        String extName=fileName.substring(fileName.lastIndexOf(".")+1);
        //四个参数(输入流,文件大小,后缀名,null),返回一个路径
        StorePath storePath = fastFileStorageClient.uploadFile(test.getInputStream(),test.getSize(), extName, null);
        //不同路径
        System.out.println(storePath.getFullPath());
        System.out.println(storePath.getPath());
        System.out.println(storePath.getGroup());
        return "图片上传成功,并调皮的给您返回一个路径";
    }
控制台打印
把第一条路径,也就是storePath.getFullPath()这样得到的路径拼接到nginx的ip地址和端口后面,在浏览器进行访问,可以访问到上传的图片。
说明:如果上传的是一个文件,这里比如上传一个docx格式的word文档,那么上传成功之后返回的那个路径,group1/M00/00/00/wKi6gV26VG2AG36RAAeqJLEbOEY03.docx,拼接路径之后http://192.168.186.129/group1/M00/00/00/wKi6gV26VG2AG36RAAeqJLEbOEY03.docx,在浏览器直接访问这个路径的话会直接把这个word文档下载下来,图片的话就只是查看。
原因是什么?是因为浏览器的缘故,如果文件格式可以被浏览器解析的话,浏览器会展示该文件,不会下载,解析不了的文件才可以下载,为什么是这样我也不太清楚。
FastDFS服务器和nginx的部署以及springboot项目上传文件到FastDFS服务器圆满结束!


