有时候,wordcount 的案例的原理还真是好用,当然不过单单是从官网复制的案例远远是不满足我们的平时需求的。那么假如我们如下需求:
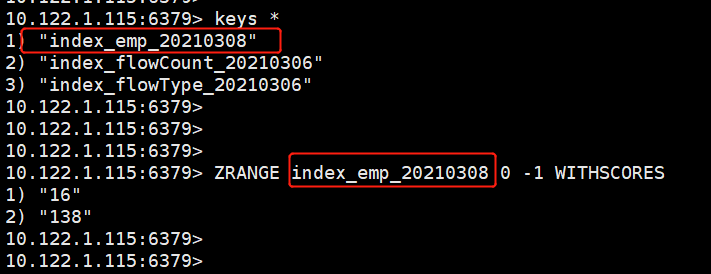
1. 以天为单位,统计各个部门在每小时中销售的商品数量,并以日期为组合键实时的将结果放入 redis 中去。
注意:这个需求有点坑爹,如果我们以普通的滚动和滑动窗口去实现是不会满足要求的,需求人员说至少1s 计算一次。
数据源如下:
{"id":"399","name":"fei niu - 399","sal":283366,"dept":"人事部","ts":1615194501416}
{"id":"398","name":"tang tang - 398","sal":209935,"dept":"烧钱部","ts":1615194501416}
{"id":"395","name":"tang tang - 395","sal":51628,"dept":"帅哥部","ts":1615194501404}
{"id":"400","name":"fei fei - 400","sal":45782,"dept":"烧钱部","ts":1615194501420}
{"id":"401","name":"fei fei - 401","sal":389162,"dept":"帅哥部","ts":1615194501424}
{"id":"402","name":"tang tang - 402","sal":127889,"dept":"人事部","ts":1615194501428}
项目结构
代码实现
一、创建APP主类,主要的逻辑代码如下:
public class App {

    private static RedisUtil2 redisUtil2 = RedisUtil2.getInstance();

    public static void main(String[] args) throws Exception {

        StreamExecutionEnvironment env = GetStreamExecutionEnvironment.getEnv();
        //请求kafka数据
        Properties prop = new Properties();
        prop.setProperty("bootstrap.servers","cdh101:9092");
        prop.setProperty("group.id","cloudera_mirrormaker");
        prop.put("value.serializer","org.apache.kafka.common.serialization.StringSerializer");
        FlinkKafkaConsumer011 myConsumer = new FlinkKafkaConsumer011("luchangyin", new SimpleStringSchema() ,prop);

        //myConsumer.setStartFromGroupOffsets();  // 默认行为,从上次消费的偏移量进行继续消费。
        //myConsumer.setStartFromEarliest(); //Flink从topic中最初的数据开始消费
        myConsumer.setStartFromLatest();  //最近的

        //请求kafka数据
        DataStreamSource dataStream = env.addSource(myConsumer);

        //dataStream.print();   // {"id":"226","name":"tang tang - 226","sal":280751,"dept":"美女部","ts":1615191802523}

        // ------------ 步骤一:json 解析并统计


        // --------------- 步骤二:自定义 redis 的 conditionKey 并将结算结果入 redis 中去


        // ---------- 步骤三:空实现结束流程


        env.execute("wo xi huan ni");
    }

}
步骤一:json 解析并统计
DataStream> result = dataStream.map(new MapFunction() {

            @Override
            public Employees map(String s) throws Exception {
                Employees emp = MyJsonUtils.str2JsonObj(s);
                emp.setEmpStartTime(new Date(emp.getTs()));
                emp.setDt(MyDateUtils.getDate2Hour2(emp.getEmpStartTime()));
                return emp; // Employees(eId=239, eName=tang tang - 239, eSal=286412.0, eDept=人事部, ts=1615191376732, empStartTime=Mon Mar 08 16:16:16 GMT+08:00 2021, dt=2021-03-08 16)
            }
        }).keyBy(new KeySelector>() {
            @Override
            public Tuple2 getKey(Employees key) throws Exception {
                return new Tuple2<>(key.getDt(),key.getEDept());
            }
        }).window(TumblingProcessingTimeWindows.of(Time.days(1), Time.hours(-8)))
            //.window(TumblingProcessingTimeWindows.of(Time.hours(1)))
            .trigger(ContinuousProcessingTimeTrigger.of(Time.seconds(1)))
            .aggregate(new EmpByKeyCountAgg(), new EmpByKeyWindow());

        //result.print(); // (2021-03-08 16,帅哥部,62)
这里我们自定义了 aggregate 里边的两个函数,用于分类统计结果值。
EmpByKeyCountAgg 类:
package com.nfdw.function;

import com.nfdw.entity.Employees;
import org.apache.flink.api.common.functions.AggregateFunction;

/** COUNT 统计的聚合函数实现,每出现一条记录加一
 *       in, acc, out
 * */
public class EmpByKeyCountAgg implements AggregateFunction {

    @Override
    public Long createAccumulator() {
        return 0L;
    }

    @Override
    public Long add(Employees employees, Long aLong) {
        return aLong + 1;
    }

    @Override
    public Long getResult(Long aLong) {
        return aLong;
    }

    @Override
    public Long merge(Long aLong, Long acc1) {
        return aLong + acc1;
    }

}
EmpByKeyWindow 类:
package com.nfdw.function;

import org.apache.flink.api.java.tuple.Tuple2;
import org.apache.flink.streaming.api.functions.windowing.WindowFunction;
import org.apache.flink.streaming.api.windowing.windows.TimeWindow;
import org.apache.flink.util.Collector;
import scala.Tuple3;

/** 用于输出窗口的结果
 *      in, out, key, window
 * */
public class EmpByKeyWindow implements WindowFunction, Tuple2, TimeWindow> {

    /**
     *     窗口的主键,即 itemId
     *     窗口
     *     聚合函数的结果,即 count 值
     *     输出类型为 ItemViewCount
     */
    @Override
    public void apply(Tuple2 strTuple2, TimeWindow timeWindow, Iterable iterable, Collector> collector) throws Exception {
        collector.collect(new Tuple3(strTuple2.f0,strTuple2.f1, iterable.iterator().next().toString()));
    }

}
步骤二:自定义 redis 的 conditionKey 并将结算结果入 redis 中去
DataStream redisSink = result.map(new MapFunction, String>() {
            @Override
            public String map(Tuple3 str) throws Exception {
                //new Tuple2(str.f0.substring(11),str.f2);

                String[] myDate = str._1().split(" ");
                String additionalKey = "index_emp_"+ myDate[0].replaceAll("-","");
                String key = myDate[1];
                double value = Double.valueOf(str._3());
                redisUtil2.zset(additionalKey, key, value);

                return additionalKey +" , "+ key +" , "+ value+ " 成功写入reids...";
            }
        });

        // redisSink.print(); // index_emp_20210308 , 16 , 54.0 成功写入reids...
创建操作redis的工具 RedisUtil2 类:
package com.nfdw.utils;

import redis.clients.jedis.Jedis;
import redis.clients.jedis.JedisPool;
import java.util.Set;

public class RedisUtil2 {
//    private static final Logger log = LoggerFactory.getLogger(RedisUtil.class);

    private static RedisUtil2 instance;

    private static JedisPool jedisPool = RedisPoolUtil2.getPool();

    private RedisUtil2() {
    }

    /**
     * 双重校验锁 保证单例
     *
     * @return
     */
    public static RedisUtil2 getInstance() {
        if (instance == null) {
            synchronized (RedisUtil2.class) {
                if (instance == null) {
                    instance = new RedisUtil2();
                }
            }
        }
        return instance;
    }

    public void zset(String aditionalKey, String key, Double value) {
        Jedis jedis = jedisPool.getResource();
        try {
            jedis.zadd(aditionalKey, value, key);
        } catch (Exception e) {
            e.printStackTrace();
        } finally {
            closeJedis(jedis);
        }

    }

    public Set myZrange(String aditionalKey) {
        Jedis jedis = jedisPool.getResource();
        Set result = null;
        try {
            result = jedis.zrange(aditionalKey, 0, -1);
        } catch (Exception e) {
            e.printStackTrace();
        } finally {
            closeJedis(jedis);
        }
        return result;
    }

    /**
     * 通用方法:释放Jedis
     *
     * @param jedis
     */
    private void closeJedis(Jedis jedis) {
        if (jedis != null) {
            jedis.close();
        }
    }

}
步骤三:空实现结束流程
redisSink.addSink(new MyAddRedisSink());
解析来我们再实现 MyAddRedisSink 类:
package com.nfdw.utils;

import org.apache.flink.streaming.api.functions.sink.RichSinkFunction;

public class MyAddRedisSink extends RichSinkFunction {

    @Override
    public void invoke(String value, Context context) throws Exception {
        super.invoke(value, context);
        System.out.println(" sink :"+value);
    }
}
大致的代码我们已经实现了,当然还有事件操作工具类、json实体解析工具类以及 pom文件。
MyJsonUtils 类:
package com.nfdw.utils;

import com.google.gson.Gson;
import com.google.gson.GsonBuilder;
import com.nfdw.entity.Employees;

public class MyJsonUtils {

    public static Employees str2JsonObj(String str){
        GsonBuilder gsonBuilder = new GsonBuilder();
        gsonBuilder.setPrettyPrinting();
        Gson gson = gsonBuilder.create();
        return gson.fromJson(str, Employees.class);
    }

}
MyDateUtils 类:
package com.nfdw.utils;

import java.text.SimpleDateFormat;
import java.util.Date;

public class MyDateUtils {

//    public static String getDate2Str(){
//        SimpleDateFormat sdf = new SimpleDateFormat("yyyyMMdd");
//        return sdf.format(new Date());
//    }
//
//    public static long getDate2Timestamp(String ds){
//        //创建SimpleDateFormat对象实例并定义好转换格式
//        SimpleDateFormat sdf = new SimpleDateFormat("yyyy-MM-dd HH:mm:ss");
//        Date date = null;
//        try {
//            // 注意格式需要与上面一致,不然会出现异常
//            date = sdf.parse(ds);
//        } catch (ParseException e) {
//            e.printStackTrace();
//        }
//        return date.getTime();
//    }
//
//    public static String getDate2Hour(String ds){
//        SimpleDateFormat sdf = new SimpleDateFormat("yyyy-MM-dd HH:mm:ss");
//        SimpleDateFormat df = new SimpleDateFormat("yyyy-MM-dd HH");
//        Date date = null;
//        String dateStr = null;
//        try {
//            date = sdf.parse(ds);
//            dateStr = df.format(date);
//        } catch (Exception e) {
//            e.printStackTrace();
//        }
//        return dateStr;
//    }

    public static String getDate2Hour2(Date date){
        //SimpleDateFormat sdf = new SimpleDateFormat("yyyy-MM-dd HH:mm:ss");
        SimpleDateFormat df = new SimpleDateFormat("yyyy-MM-dd HH");
        String dateStr = null;
        try {
            // date = sdf.parse(ds);
            dateStr = df.format(date);
        } catch (Exception e) {
            e.printStackTrace();
        }
        return dateStr;
    }

}
Employees 类:
package com.nfdw.entity;

import com.fasterxml.jackson.annotation.JsonFormat;
import com.google.gson.annotations.SerializedName;
import lombok.Data;
import lombok.experimental.Accessors;
import java.util.Date;

@Data
@Accessors(chain = true)
public class Employees {

    // {"id":"619","name":"fei fei - 619","sal":306875,"dept":"人事部","ts":1615187714251}
    @SerializedName(value = "id")
    private String eId = "";
    @SerializedName(value = "name")
    private String eName = "";
    @SerializedName(value = "sal")
    private double eSal = 0;
    @SerializedName(value = "dept")
    private String eDept = "";
    @SerializedName(value = "ts")
    private long ts = 0L;

    @JsonFormat(timezone = "GMT+8", pattern = "yyyy-MM-dd HH:mm:ss")
    private Date empStartTime;

    private String dt = "";

}
pom.xml 文件如下:
        MyFirstBigScreen
        org.example
        1.0-SNAPSHOT

    4.0.0

    TestMyCountDemon


        UTF-8
        1.8
        1.8
        1.10.1
        1.8


            org.projectlombok
            lombok
            1.18.2
            provided


            org.apache.bahir
            flink-connector-redis_2.10
            1.0


            redis.clients
            jedis
            2.9.0


            com.google.code.gson
            gson
            2.8.6


            org.apache.flink
            flink-java
            ${flink.version}


            org.apache.flink
            flink-streaming-java_2.11
            ${flink.version}


                org.apache.maven.plugins
                maven-compiler-plugin
                3.8.0

                    1.8
                    1.8


                maven-assembly-plugin
                3.0.0


                        jar-with-dependencies


                        make-assembly
                        package

                            single


                org.apache.maven.plugins
                maven-shade-plugin
                3.1.1


                        package

                            shade


                                    com.google.code.findbugs:jsr305
                                    org.slf4j:*
                                    log4j:*


                                    *:*

                                        META-INF/*.SF
                                        META-INF/*.DSA
                                        META-INF/*.RSA
好了,案例到此为止,直接复制咱贴就可以用了,希望对你有帮助哦。。。

