Web服务器群集——源码编译安装LAMP和部署wordpress博客系统
源码编译安装LAMP
- Apache简介
- 源码包安装Apache
-
- 1.准备工作
- 2.编译安装httpd服务
- 3.apache各个子目录的功能
- 4.apache的配置
-
- 将编译安装的进程添加进系统服务 (优化)
- 5.httpd.conf配置文件
- 6.构建虚拟主机
-
- 使用hosts文件来实现解析域名
- 使用DNS来实现解析域名
- MySQL的编译安装
-
- 1. 准备工作
- 2. 源码包安装mysql
- 源码包安装php
- 部署wordpress博客
-
- 创建数据库
Apache简介
主要特点
- 开放源代码、跨平台应用
- 支持多种网页编程语言
- 模块化设计 、运行稳定、良好的安全性
软件版本
- 1.X
目前最高版本是1.3,运行稳定
向下兼容性较好,但缺乏一些较新的功能 - 2.X
目前最高版本是2.4
具有更多的功能特性
与1.X相比,配置管理风格存在较大差异
编译安装的优点
- 具有较大的自由度,功能可定制
- 可及时获得最新的软件版本
- 普遍适用于大多数Linux版本,便于移植使用
源码包安装Apache
1.准备工作
配置阿里的yum源
# 配置yum仓库
1. 禁用 yum插件 fastestmirror
1)修改插件的配置文件

[root@lamp ~]# cp /etc/yum/pluginconf.d/fastestmirror.conf /etc/yum/pluginconf.d/fastestmirror.conf.bak		# 备份源文件
[root@lamp ~]# vim /etc/yum/pluginconf.d/fastestmirror.conf	# 修改
enabled = 1         //由1改为0,禁用该插件

2)修改yum的配置文件
[root@lamp ~]# cp /etc/yum.conf /etc/yum.conf.bak
[root@lamp ~]# vim /etc/yum.conf
plugins =1         //改为0,不使用插件

2. 获取阿里云 repo
[root@lamp ~]# cp /etc/yum.repos.d/CentOS-Base.repo /etc/yum.repos.d/CentOS-Base.repo.bak

[root@lamp ~]# wget -O /etc/yum.repos.d/CentOS-Base.repo http://mirrors.aliyun.com/repo/Centos-7.repo

[root@lamp ~]# cp /etc/yum.repos.d/epel.repo /etc/yum.repos.d/epel.repo.bak
[root@lamp ~]# wget -O /etc/yum.repos.d/epel.repo http://mirrors.aliyun.com/repo/epel-7.repo

3.清理原来的缓存,重新缓存
yum clean all

yum makecache

yum repolist

4.关闭防火墙和selinux
[root@lamp htdocs]# systemctl stop firewalld
[root@lamp htdocs]# systemctl disable firewalld
Removed symlink /etc/systemd/system/multi-user.target.wants/firewalld.service.
Removed symlink /etc/systemd/system/dbus-org.fedoraproject.FirewallD1.service.

[root@lamp htdocs]# setenforce 0
[root@lamp htdocs]# sed -ri '/^SELINUX=/cSELINUX=disabled' /etc/selinux/config
[root@lamp htdocs]# getenforce
Permissive
安装apache源码包安装所需要的依赖
# 安装apache源码包安装所需依赖
方法一:本地yum源安装
[root@www ~]# mkdir /media/cdrom
[root@www ~]# mount /dev/sr0 /media/cdrom
[root@www ~]# vim /etc/yum.repos.d/CentOS-Media.repo
enable = 1
然后
rpm -ivh apr-1.4.8-3.el7_4.1.x86_64.rpm
rpm -ivh apr-devel-1.4.8-3.el7_4.1.x86_64.rpm
rpm -ivh cyrus-sasl-2.1.26-23.el7.x86_64.rpm
rpm -ivh cyrus-sasl-devel-2.1.26-23.el7.x86_64.rpm
rpm -ivh expat-devel-2.1.0-10.el7_3.x86_64.rpm
rpm -ivh libdb-devel-5.3.21-24.el7.x86_64.rpm
rpm -ivh openldap-devel-2.4.44-13.el7.x86_64.rpm
rpm -ivh apr-util-devel-1.5.2-6.el7.x86_64.rpm
rpm -ivh apr-util-1.5.2-6.el7.x86_64.rpm
rpm -ivh pcre-devel-8.32-17.el7.x86_64.rpm
rpm -ivh pcre-8.32-17.el7.x86_64.rpm
rpm -ivh zlib-devel-1.2.7-17.el7.x86_64.rpm

方法二:使用之前配置的yum源安装
[root@www ~]# yum install -y apr apr-devel  cyrus-sasl cyrus-sasl-devel expat-devel libdb-devel openldap-devel apr-util-devel apr-util pcre-devel pcre zlib-devel
卸载曾经安装的httpd及相关依赖包
# 查询是否安装
[root@www ~]# rpm -qa |grep httpd
[root@www ~]# yum list installed |grep httpd
# 卸载
[root@www ~]# rpm -e httpd --nodeps
[root@www ~]# yum remove httpd
2.编译安装httpd服务
官网下载源码包之后 将源码包上传进服务器
官网下载连接: 官方下载地址
# 1.解包
[root@lamp ~]# tar xf httpd-2.4.38.tar.gz
[root@lamp ~]# cd httpd-2.4.38
[root@lamp httpd-2.4.38]# ls
...................................
# 2.配置、编译、安装

[root@lamp httpd-2.4.38]# ./configure --prefix=/usr/local/httpd --enable-so --enable-rewrite --enable-charset-lite --enable-cgi

命令:./configure配置
选项:
  --prefix:指定httpd服务程序的安装路径
  --enable-so:启用动态加载模块支持,使httpd具备进一步扩展功能的能力。
  --enable-rewrite:启用网页地址重写功能,用于网站优化及目录迁移维护。
  --enable-charset-lite:启动字符集支持,以便支持使用各种字符集编码的网页。
  --enable-cgi:启用CGI脚本程序支持,便于扩展网站的应用访问能力。

可以执行”./configure --help”命令获取各种配置选项及含义。
[root@lamp httpd-2.4.38]# make && make install
注意:可以使用”&&”来连接make和make install,表示配置、编译、安装这三个配置过程按照顺序自动执行。

# 3.进入安装目录
[root@lamp ~]# cd /usr/local/httpd
[root@lamp httpd]# ls
bin  build  cgi-bin  conf  error  htdocs  icons  include  logs  man  manual  modules

安装成功
3.apache各个子目录的功能
bin:存放httpd服务的各种执行程序文件,包括主程序httpd、服务控制工具apachectl等
cgi-bin:存放CGI网页程序的目录
conf:存放httpd服务的各种配置文件,包括主配置文件httpd.conf、增强配置子目录extra等
error:当请求的数据错误时,显示在浏览器上的错误信息存放的目录
htdocs:默认存放网页文档,包括默认首页文件index.html等
logs:存放httpd服务的日志文件
modules:存放httpd服务的各种模块文件
4.apache的配置
# 开启httpd
# 进入httpd安装路径下的bin目录
# 方法一: ./apachectl start
# 方法二: ./httpd -k start
[root@lamp bin]# ./apachectl start
# 遇到警告
AH00558: httpd: Could not reliably determine the server's fully qualified domain name, using fe80::7e54:43f2:9475:27e9. Set t
he 'ServerName' directive globally to suppress this message
httpd:无法使用fe80::7e54:43f2可靠地确定服务器的完全限定域名:

# 解决
[root@lamp conf]# pwd
  sr/local/httpd/conf
[root@lamp conf]# vim httpd.conf
# 将这一行注释去掉 写成localhost:80
ServerName localhost:80
将编译安装的进程添加进系统服务 (优化)
有两种方法
方法一:Centos6风格
# 先关闭apache
[root@lamp bin]# ./apachectl stop
[root@lamp bin]# netstat -antpl |grep 80
tcp        0     52 192.168.188.188:22      192.168.188.1:56980     ESTABLISHED 1631/sshd: root@pts

# 将apachectl启动脚本复制进/etc/init.d下面 命名为htppd
[root@lamp bin]# cp apachectl /etc/init.d/httpd
[root@lamp bin]# vim /etc/init.d/httpd
编辑文件然后在开头加上

#!/bin/bash
# chkconfig:35 85 21
# descripiton:Startup script for my Apache HTTP Server

[root@lamp bin]# chkconfig --add httpd		# 将httpd服务添加至系统服务
[root@lamp bin]# chkconfig --list httpd		# 查看系统服务里有没有httpd

Note: This output shows SysV services only and does not include native
      systemd services. SysV configuration data might be overridden by native
      systemd configuration.

      If you want to list systemd services use 'systemctl list-unit-files'.
      To see services enabled on particular target use
      'systemctl list-dependencies [target]'.

httpd          	0:off	1:off	2:off	3:on	4:off	5:on	6:off

[root@lamp bin]# systemctl start httpd
使用浏览器验证成功之后关闭服务
systemctl stop httpd
方法二:centos7风格
# 首先先将之前Centos6的启动项备份
[root@lamp bin]# mv /etc/init.d/httpd /etc/init.d/httpd.bak

# 然后在/lib/systemd/system/httpd.service 新建这个文件 添加如下
[root@lamp bin]# vim /lib/systemd/system/httpd.service

[Unit]
Description=The Apache HTTP Server
After=network.target
[Service]
Type=forking
PIDFile=/usr/local/httpd/logs/httpd.pid		### 一定要注意这里的路径要写对
ExecStart=/usr/local/httpd/bin/apachectl $OPTIONS
ExecReload=/bin/kill -HUP $MAINPID
KillMode=process
Restart=on-failure
RetartSec=42s
[Install]
WantedBy=graphical.target

[root@lamp bin]# systemctl daemon-reload	# 重新加载服务的配置文件
[root@lamp bin]# systemctl start httpd
[root@lamp bin]# systemctl enable httpd.service

  eated symlink from /etc/systemd/system/graphical.target.wants/httpd.service to /usr/lib/systemd/system/httpd.service.

[root@lamp bin]# systemctl is-enabled httpd.service
enabled
# 查看httpd状态 Active: active (running) 说明启动正常
[root@lamp bin]# systemctl status httpd
● httpd.service - The Apache HTTP Server
   Loaded: loaded (/usr/lib/systemd/system/httpd.service; enabled; vendor preset: disabled)
   Active: active (running) since Fri 2021-03-12 00:48:12 EST; 25s ago
 Main PID: 1697 (httpd)
   CGroup: /system.slice/httpd.service
           ├─1697 /usr/local/httpd/bin/httpd
           ├─1698 /usr/local/httpd/bin/httpd
           ├─1699 /usr/local/httpd/bin/httpd
           └─1700 /usr/local/httpd/bin/httpd
5.httpd.conf配置文件
常用的全局配置参数
| 配置参数 | 作用 |
|---|---|
| ServerRoot | 服务目录 |
| Listen | 监听的IP地址、端口号 |
| User | 运行服务的用户身份 |
| Group | 运行服务的组身份 |
| ServerAdmin | 管理员邮箱 |
| ServerName | 网站服务器的域名 |
| DocumentRoot | 网页文档的根目录 |
| DirectoryIndex | 默认的索引页文件 |
| ErrorLog | 设置错误日志文件的路径 |
| LogLevel | 记录日志的级别,默认为warn |
| CustomLog | 访问日志文件的位置 |
| PidFile | 保存httpd进程PID号的文件 |
| AddDefaultCharset | 设置站点中的网页默认使用的字符集编码 |
| Timeout | 网络连接超时,默认为300秒 |
| KeepAlive | 是否保持连接,可选On或Off |
| MaxKeepAliveRequests | 每次连接最多请求文件数 |
| KeepAliveTimeout | 保持连接状态时的超时时间 |
| Include | 需要包含进来的其他配置文件 |
区域配置项
使用一对组合标记,限定了配置项的作用范围
    Require all granted
    Require not ip 192.168.188.188
</RequireAll>
6.构建虚拟主机
虚拟Web主机
- 在同一台服务器中运行多个Web站点,其中每一个站点并不独立占用一台真正的计算机
httpd支持的虚拟主机类型
- 基于域名的虚拟主机
基于IP地址的虚拟主机
基于端口的虚拟主机
实验:
- 构建2个虚拟Web站点
www.hs.com,IP地址为 192.168.188.188
www.cy.com,IP地址为 192.168.188.188
在浏览器中访问这两个域名时,分别显示不同的内容
使用hosts文件来实现解析域名
第一步:启用主配置文件对虚拟主机配置文件的支持
[root@lamp conf]# pwd
/usr/local/httpd/conf
[root@lamp conf]# vim httpd.conf
# 将这一行的注释去掉 对虚拟主机配置文件的支持
Include conf/extra/httpd-vhosts.conf
第二步:修改子配置文件的配置
[root@lamp conf]# vim /usr/local/httpd/conf/extra/httpd-vhosts.conf
*:80>
    DocumentRoot "/usr/local/httpd/htdocs/hs"
    ServerName www.hs.com
    ErrorLog "logs/hs.com-error.log"
    CustomLog "logs/hs.com-access_log" common
    "/usr/local/httpd/htdocs/hs">
     Require all granted
    </Directory>
</VirtualHost>

*:80>
    DocumentRoot "/usr/local/httpd/htdocs/cy"
    ServerName www.cy.com
    ErrorLog "logs/cy.com-error_log"
    CustomLog "logs/cy.com-access_log" common
    "/usr/local/httpd/htdocs/cy">
        Require all granted
    </Directory>

</VirtualHost>
注意点:
- DocumentRoot 是网页的根路径
- ServerName 是自己本地设置的域名
- Require all granted 是允许所有访问
第三步:配置hosts文件
[root@lamp conf]# vim /etc/hosts
192.168.188.188 www.hs.com
192.168.188.188 www.cy.com
第四步:修改windowshosts文件
路径:
C:\Windows\System32\drivers\etc
添加
192.168.188.188 www.hs.com
192.168.188.188 www.cy.com
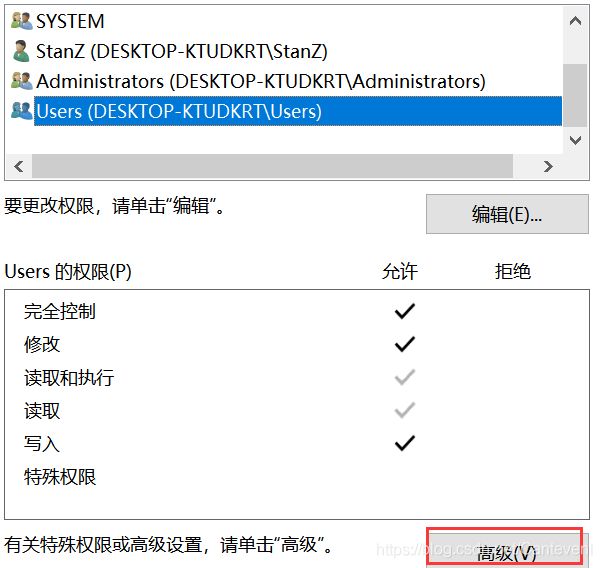
如果不能修改 则需要修改hosts文件权限
右键属性 高级里面修改权限

第五步:启动、重启httpd服务器
[root@lamp extra]# systemctl restart httpd
使用DNS来实现解析域名
第一步:安装DNS服务器
[root@lamp extra]# yum install -y bind
第二步:修改dns配置文件
# 添加any;
[root@lamp conf]# vim /etc/named.conf
options {

        listen-on port 53 {
      127.0.0.1;any; };
        listen-on-v6 port 53 {
      ::1; };
        directory       "/var/named";
        dump-file       "/var/named/data/cache_dump.db";
        statistics-file "/var/named/data/named_stats.txt";
        memstatistics-file "/var/named/data/named_mem_stats.txt";
        recursing-file  "/var/named/data/named.recursing";
        secroots-file   "/var/named/data/named.secroots";
        allow-query     {
      localhost;any; };

# 添加域名
zone "hs.com" IN {

        type master;
        file "hs.com.zone";
};

zone "cy.com" IN {

        type master;
        file "cy.com.zone";
};
第三步:配置正向解析文件
[root@lamp conf]# cd /var/named/
[root@lamp conf]# cp -p named.localhost hs.com.zone
[root@lamp conf]# cp -p named.localhost cy.com.zone
# 编辑两个解析文件
$TTL 1D
@       IN SOA          hs.com.                 mail.hs.com. (
                                                0       ; serial
                                                1D      ; refresh
                                                1H      ; retry
                                                1W      ; expire
                                                3H )    ; minimum
        IN NS           dns.hs.com.
dns     IN A            192.168.188.188
www     IN A            192.168.188.188
@       IN A            192.168.188.188


$TTL 1D
@       IN SOA          cy.com.             mail.cy.com. (
                                                0       ; serial
                                                1D      ; refresh
                                                1H      ; retry
                                                1W      ; expire
                                                3H )    ; minimum
        IN NS           dns.cy.com.
dns     IN A            192.168.188.188
www     IN A            192.168.188.188
@       IN A            192.168.188.188

# 检查是否配置正确
[root@lamp named]# named-checkzone hs.com /var/named/hs.com.zone
zone hs.com/IN: loaded serial 0
OK

[root@lamp named]# named-checkzone cy.com /var/named/cy.com.zone
zone cy.com/IN: loaded serial 0
OK

systemclt restart named

[root@lamp conf]# vim extra/httpd-vhosts.conf
NameVirtualHost 192.168.188.188

systemctl restart httpd
MySQL的编译安装
MySQL 5.X系列版本的使用最为广泛,稳定性、兼容性都不错,此处选用mysql-5.6.36.tar.gz源码包
1. 准备工作
[root@lamp conf]# yum list installed mariadb*
Installed Packages
mariadb-libs.x86_64                                  1:5.5.56-2.el7                                  @anaconda
[root@lamp conf]# yum list installed mysql*
Error: No matching Packages to list
[root@lamp conf]# rpm -qa |grep ^C
[root@lamp conf]# rpm -qa |grep mariadb*
mariadb-libs-5.5.56-2.el7.x86_64
[root@lamp conf]# rpm -qa |grep mysql*

# 将mariadb卸载
[root@lamp conf]# rpm -e --nodeps mariadb-libs-5.5.56-2.el7.x86_64

# 安装cmake依赖
yum install -y ncurses-devel

# 安装cmake
tar xf cmake-2.8.6.tar.gz
./configure
gmake && gmake install

# 创建mysql用户和用户组
groupadd  mysql
useradd -M -s /sbin/nologin mysql -g mysql
2. 源码包安装mysql
# 安装mysql
tar xf mysql-5.6.36.tar.gz

# 进入解压后的目录
cmake
-DCMAKE_INSTALL_PREFIX=/usr/local/mysql 	# 安装基目录
-DSYSCONFDIR=/etc 		# 默认配置文件my.cnf路径
-DDEFAULT_CHARSET=utf8 	# 默认字符集
-DDEFAULT_COLLATION=utf8_general_ci 	# 默认字符集校验规则
-DWITH_EXTRA_CHARSETS=all	# 扩展字符集

# 返回值为0说明成功
echo $?	0

# 这里需要二十多分钟 请耐心等待
make && make install
echo $?	0

# 安装成功之后
# 将mysql安装后的目录的权限改成mysql:mysql
chown -R mysql:mysql mysql/

# 将模板配置文件复制到/etc/my.cnf
cd mysql/support-files/
cp my-default.cnf  /etc/my.cnf

# 初始化数据库
/usr/local/mysql/scripts/mysql_install_db --user=mysql  --basedir=/usr/local/mysql --datadir=/usr/local/mysql/data/

# 将mysql服务添加进系统服务
cd support-files/
cp mysql.server /etc/init.d/mysqld
ls /etc/init.d/mysqld

# 添加mysqld进入系统服务
chkconfig --add mysqld
chkconfig --list mysqld

# 启动mysql
service mysqld start

# 检测mysql是否启动成功
netstat -antpl |grep mysqld
ps -aux |grep mysql

# 添加环境变量
echo "PATH=$PATH:/usr/local/mysql/bin" >> /etc/profile
source /etc/profile

# 设置mysql用户和用户密码
mysqladmin -u root password '123'

# 通过mysql连接mysqld
mysql -uroot -p123

# 进入mysql然后查看库
show databases;
# 成功!! !
给root账户在本地主机授权 让mysql能够通过win10Navicat Premium 连接
mysql> grant all on *.* to 'root'@'%' identified by '123456';

# 刷新授权
mysql> flush privileges;
源码包安装php
# 安装php依赖包 使用本地yum库
rpm -ivh zlib-devel-1.2.7-17.el7.x86_64.rpm xz-devel-5.2.2-1.el7.x86_64.rpm libxml2-devel-2.9.1-6.el7_2.3.x86_64.rpm

# 或使用yum安装
yum install -y zlib-devel xz-devel libxml2-devel

# 配置
./configure --prefix=/usr/local/php5 \		# 安装路径
--with-apxs2=/usr/local/httpd/bin/apxs \	# httpd依赖
--with-mysql=/usr/local/mysql \				# mysql依赖
--with-mysqli=/usr/local/mysql/bin/mysql_config \	# mysql配置文件
--with-config-file-path=/usr/local/php5 \	# 配置文件路径
--enable-mbstring		# 开启mbstring 支持utf8编码

echo $?
0

# 编译安装
make && make install
echo $?
0

# 复制样本文件
cp php.ini-development /usr/local/php5/php.ini

# 修改配置文件
vim php.ini

engine = On
short_open_tag = On
default_charset = "UTF-8"
file_uploads = On
upload_max_filesize = 2M
max_file_uploads = 20
post_max_size = 8M
short_open_tag = On
extension=php_mysqli.dll

# 配置httpd.conf 使httpd服务器支持PHP页面解析功能
vim /usr/local/httpd/conf/httpd.conf

	AddType application/x-compress .Z
    AddType application/x-gzip .gz .tgz
    AddType application/x-httpd-php .php


    DirectoryIndex index.php index.html
</IfModule>

LoadModule php5_module        modules/libphp5.so

# 将之前写的vhost注释
# Include conf/extra/httpd-vhosts.conf

# 将之前虚拟主机的网页文件备份
mv cy hs bak/

# 在/usr/local/httpd/htdocs 编写测试文件
vim index.php
$link=mysqli_connect('localhost','root','123');
if($link) echo "恭喜你,数据库连接成功啦!!";
mysqli_close($link);
?>

# 打开浏览器测试
# 恭喜你,数据库连接成功啦!!
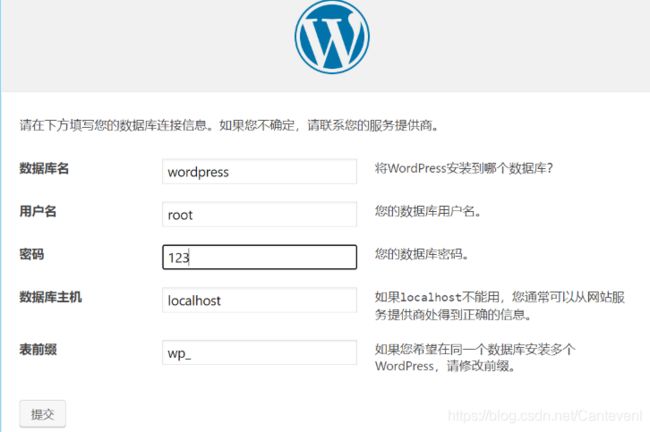
部署wordpress博客
# 将博客文件放入htdocs
tar xf wordpress-4.9.4-zh_CN.tar.gz  -C /usr/local/httpd/htdocs/
# 进入wordpress 将里面的文件全部移动到上一层
mv * ../

[root@lamp htdocs]# ls
bak          wordpress           wp-comments-post.php  wp-includes        wp-mail.php       xmlrpc.php
index.php    wp-activate.php     wp-config-sample.php  wp-links-opml.php  wp-settings.php
license.txt  wp-admin            wp-content            wp-load.php        wp-signup.php
readme.html  wp-blog-header.php  wp-cron.php           wp-login.php       wp-trackback.php
创建数据库
mysql> create database wordpress;	-- 创建数据库
Query OK, 1 row affected (0.01 sec)

mysql> show databases;
+--------------------+
| Database           |
+--------------------+
| information_schema |
| mysql              |
| performance_schema |
| test               |
| wordpress          |
+--------------------+
5 rows in set (0.00 sec)
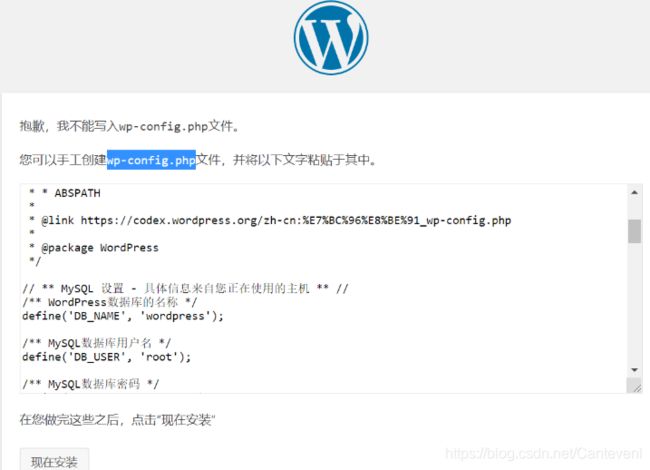
在 /usr/local/httpd/htdocs 下创建 wp-config.php 文件


