win10 VScode配置C/C++环境
title: win10在VScode上配置C/C++环境
date: 2020-03-13 22:09:15
tags: ‘C/C++’
win10 VScode配置C/C++环境
一、下载需要的工具
1.下载VScode
2.安装cpptools工具
打开VScode,按照以下步骤安装

3.安装code runner工具
在VScode中编译文件,结束后并不会像我们经常使用的IDE一样,终端会停留在面前然后告诉你“按任意键继续”,在VScode中,编译运行完成后往往cmd会一闪而过,然后直接:
The program ‘d:\MinGW\Projicts\test\test.exe’ has exited with code 0 (0x00000000).
这个时候我们往往会使用在结束的return语句前加上getchar() 或
system(“pause”)(注意:使用这个的时候需要加上头文件#include
我们可以使用code runner工具来解决这个问题
首先和上面一样 找到这个插件并安装它

然后在如下打开界面中
以及
即可
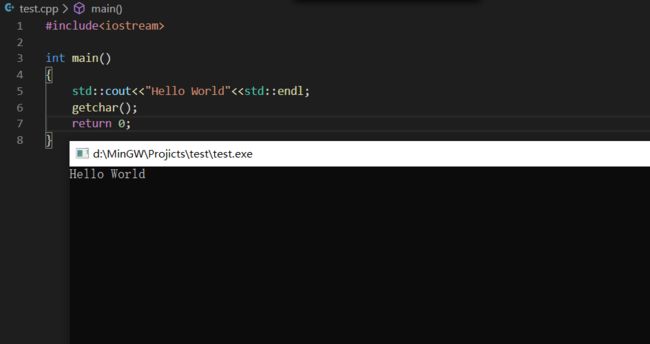
这样我们编译运行的文件使用code runner运行就会如下图

这样就和我们平时使用的IDE一样啦
4.下载MinGW
下载地址:https://sourceforge.net/projects/mingw-w64/files/
下载的文件:进入网站后不要点击 “Download Lasted Version”,往下滑,找到最新版的 “x86_64-posix-seh”。
安装MinGW:下载后是一个7z的压缩包,解压后移动到你想安装的位置即可。
二、配置环境变量
配置环境变量
配置对象:WinGW,所以把你刚刚安装WinGW的路径拷贝一下
右键点击此电脑 → 属性 → 高级系统设置 → 环境变量 → 双击系统变量Path → 新建 → 复制你的MinGW安装路径的bin文件夹
例如我的是:D:\MinGW\mingw64\bin
记得每一步都要点确定
配置完成后我们使用命令行检验一下是否配置成功
win+R 输入cmd后回车打开命令行,输入g++ -v
出现下图界面说明配置成功

三、开始配置C++环境
1.创建一个c/cpp文件
首先随便打开或者新建一个文件夹 然后在文件夹里创建一个c或cpp文件
#include
int main()
{
    std::cout<<"Hello World"<
2.修改launch.json 配置文件
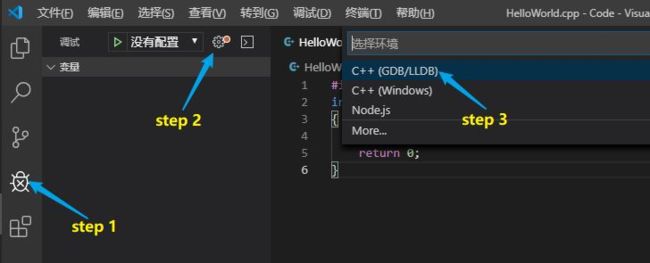
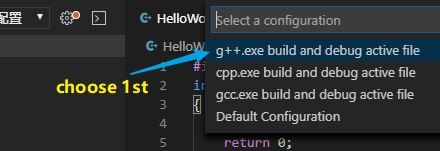
进入调试界面添加配置环境,选择 C++(GDB/LLDB),再选择 g++.exe,之后会自动生成 launch.json 配置文件


编辑 launch.json 配置文件
{
    "version": "0.2.0",
    "configurations": [
      {
        "name": "g++.exe build and debug active file",
        "type": "cppdbg",
        "request": "launch",
        "program": "${fileDirname}\\${fileBasenameNoExtension}.exe",
        "args": [],
        "stopAtEntry": false,
        "cwd": "${workspaceFolder}",
        "environment": [],
        "externalConsole": true,   //修改此项,让其弹出终端
        "MIMode": "gdb",
        "miDebuggerPath": "D:/MinGW/mingw64/bin/gdb.exe",
        "setupCommands": [
          {
            "description": "Enable pretty-printing for gdb",
            "text": "-enable-pretty-printing",
            "ignoreFailures": true
          }
        ],
        "preLaunchTask": "task g++"  //修改此项
      }
    ]
  }
3.修改tasks.json文件
返回.cpp文件,按F5进行调试,会弹出找不到任务"task g++",选择 “配置任务”,会自动生成 tasks.json 文件编辑 tasks.json 文件
{
    "version": "2.0.0",
    "tasks": [
      {
        "type": "shell",
        "label": "task g++",  //修改此项
        "command": "D:/MinGW/mingw64/bin/g++.exe",
        "args": [
          "-g",
          "${file}",
          "-o",
          "${fileDirname}\\${fileBasenameNoExtension}.exe"
        ],
        "options": {
          "cwd": "D:/MinGW/mingw64/bin"
        },
        "problemMatcher": [
          "$gcc"
        ],
        "group": "build"
      }
    ]
  }
4.修改c_cpp_properties.json配置文件
这个时候运行,会报错"includepath"设置问题
我们需要新建一个c_cpp_properties.json配置文件
{
    "configurations": [
        {
            "name": "Win32",
            "includePath": [
                "${workspaceRoot}",
                "D:/MinGW/mingw64/bin/../lib/gcc/x86_64-w64-mingw32/8.1.0/include/c++",
                "D:/MinGW/mingw64/bin/../lib/gcc/x86_64-w64-mingw32/8.1.0/include/c++/x86_64-w64-mingw32",
                "D:/MinGW/mingw64/bin/../lib/gcc/x86_64-w64-mingw32/8.1.0/include/c++/backward",
                "D:/MinGW/mingw64/bin/../lib/gcc/x86_64-w64-mingw32/8.1.0/include",
                "D:/MinGW/mingw64/bin/../lib/gcc/x86_64-w64-mingw32/8.1.0/include-fixed",
                "D:/MinGW/mingw64/bin/../lib/gcc/x86_64-w64-mingw32/8.1.0/../../../../x86_64-w64-mingw32/include"
            ],
            "defines": [
                "_DEBUG",
                "UNICODE",
                "__GNUC__=6",
                "__cdecl=__attribute__((__cdecl__))"
            ],
            "intelliSenseMode": "msvc-x64",
            "browse": {
                "limitSymbolsToIncludedHeaders": true,
                "databaseFilename": "",
                "path": [
                "${workspaceRoot}",
                "D:/MinGW/mingw64/bin/../lib/gcc/x86_64-w64-mingw32/8.1.0/include/c++",
                "D:/MinGW/mingw64/bin/../lib/gcc/x86_64-w64-mingw32/8.1.0/include/c++/x86_64-w64-mingw32",
                "D:/MinGW/mingw64/bin/../lib/gcc/x86_64-w64-mingw32/8.1.0/include/c++/backward",
                "D:/MinGW/mingw64/bin/../lib/gcc/x86_64-w64-mingw32/8.1.0/include",
                "D:/MinGW/mingw64/bin/../lib/gcc/x86_64-w64-mingw32/8.1.0/include-fixed",
                "D:/MinGW/mingw64/bin/../lib/gcc/x86_64-w64-mingw32/8.1.0/../../../../x86_64-w64-mingw32/include"
                ]
            }
        }
    ],
    "version": 4
}
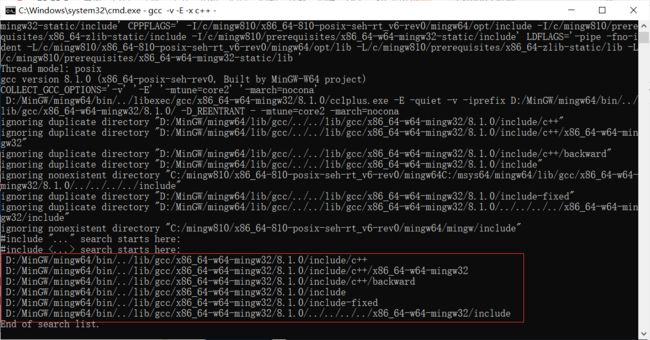
记得把路径修改为你自己的路径
查找自己路径方法为打开cmd 输入:
gcc -v -E -x c++ -

修改后保存即可
5.运行文件
这个时候我们已经配置完成啦
可以开始运行我们刚才创建的测试代码啦
F5:VScode调试
CTRL+ALT+N:code runner调试

![]()
至此,整个配置就完成啦
注:
为什么不直接用VisualStudio?
1.太大啦,只安一个C++环境就要少说1G,完整部件安装差不多10G就没了
2.VS使用的VSC++,很多C++支持的功能VC都不支持,所以我们选择从Linux GCC移植过来的MinGW(建议学习C/C++尽量使用gcc编译器,clang好像也不错,建议不要使用万恶之源:VC++6


