Java上手小项目(一)-太阳系模型笔记
本系列博文介绍一系列的Java上手项目,让初级开发者可以快速的通过项目提升自己的代码水平。本项目的视频教程可以参考尚学堂高琪老师的视频教程。
在本次博客我将带大家梳理项目思路,本项目很简单,可以作为Java初学者的第一个项目。
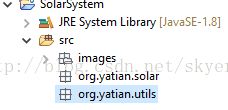
(1).首先打开编译器,eclipse oxygen。建立相应的工程目录。
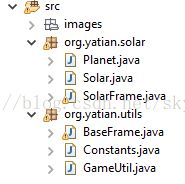
其中images下面是素材照片,solar下面是我们的关键代码。utils是指的工具类,用于开发。下面我们分析项目的主体结构:
这里分为三部分,图片文件夹里面是图片文件,表示里面是素材。 utils 包里分三个部分, Constants 类 代表着常用量,软件需要全局修改的量。
GameUtil 是工具类,是指工程常用的工具方法。 BaseFrame 是指的已经完成初始化的基本界面。下面我们从源码分析工具包。
public class Constants {
	public static final int GAME_WIDTH = 600;
	public static final int GAME_LENGTH = 800;

}
这个第一个类就是定义软件界面的尺寸,这里高为800,宽为600.
public class GameUtil {

	private GameUtil() {}
	/**
	 * Get images from the images folder.
	 * @author Yatian
	 * @param imgPath
	 * @return image of certain planet.
	 */
	public static Image getImage(String imgPath) {
		BufferedImage bImage = null;
		URL url = GameUtil.class.getClassLoader().getResource(imgPath);   //读入资源
		try {
			bImage = javax.imageio.ImageIO.read(url);                 //转换为流
		} catch (IOException e) {
			// TODO Auto-generated catch block
			e.printStackTrace();
		}
		return bImage;

	}
}
这一个工具类的方法是读入路径读出图片流。
public class BaseFrame extends Frame {

	public void launchFrame() {
		setSize(Constants.GAME_LENGTH, Constants.GAME_WIDTH);
		setLocation(100, 100);
		setVisible(true);

		new PaintThread().start();

		addWindowListener(new WindowAdapter() {

			@Override
			public void windowClosing(WindowEvent e) {
				// TODO Auto-generated method stub
				//super.windowClosing(e);
				System.exit(0);
			}

		});
	}


	public class PaintThread extends Thread
	{

		@Override
		public void run() {
			// TODO Auto-generated method stub
			//super.run();
			while (true) {
				repaint();
				try {
					Thread.sleep(400);
				} catch (InterruptedException e) {
					// TODO Auto-generated catch block
					e.printStackTrace();
				}
			}
		}

	}


}
BaseFrame 类中主要实现了两个功能,含有一个方法和一个内部类。 方法的名称就是 launchFrame 用于基本的界面初始化和相关配置。 内部类用于界面的刷新,每0.4秒进行刷新一次。
在有了基本的环境之后我们就可以开始部署界面上的元素,这里有一个自定义界面和两个小精灵。我们先从最简单的精灵开始讲起:
public class Solar {

	public Image image;
	public double x,y;
	public int width,height;

	public void draw(Graphics g){
		g.drawImage(image, (int)x, (int)y, null);
	}

	public Solar() {

	}

	public Solar(Image image) {
		this.image = image;
		this.width = image.getWidth(null);
		this.height = image.getHeight(null);
	}

	public Solar(Image image,double x, double y)
	{
		this(image);
		this.x = (int) x;
		this.y = (int) y;
	}

	public Solar(String imgpath,double x,double y){
		this(GameUtil.getImage(imgpath), x, y);
	}
}
第一个父精灵是太阳精灵solar类, 这里代表太阳系里面的太阳。他的属性有五个,图片,x,y,定位坐标,和长度和宽度。
我们这里有四个构造方法,这四个构造方法要相互调用这一点要注意。这一个类不用移动所以不用移动方法,只需要把贴图放置到指定位置就好。
第二个注意的是构造方法,这里用到四个重载的构造方法。这四个构造方法允许不同信息组合下进行对太阳类的实例化。由于Frame里面使用的是paint方法,所以我们在画精灵的时候就不能再使用这个方法了。我们在这个类里用draw这个方法。
从上面的文本中我们可以看到,太阳是一个静态的加载贴图,不会进行运动,功能比较简单,所以可以用作父类,而其他运动的行星我们就可以在恒星的基础上进行拓展,所以使用子类进行继承。这里我们使用 planet 类。
public class Planet extends Solar {

	double longAxis;
	double shortAxis;
	double speed;
	double degree;
	boolean satellite;
	Solar center;

	public void draw(Graphics g){
		super.draw(g);
		move();
		if(!satellite){
			drawTrace(g);
		}
	}

	public void drawTrace(Graphics g){
		double ovalX,ovalY,ovalWidth,ovalHeight;

		ovalWidth = longAxis*2;
		ovalHeight = shortAxis*2;
		ovalX = (center.x+center.width/2)-longAxis;
		ovalY = (center.y+center.height/2)-shortAxis;

		Color c =g.getColor();
		g.setColor(Color.blue);
		g.drawOval((int)ovalX, (int)ovalY, (int)ovalWidth, (int)ovalHeight);
		g.setColor(c);
	}

	public Planet(Solar center,String imgpath, double longAxis,
			double shortAxis, double speed) {
		super(GameUtil.getImage(imgpath));


		this.center = center;
		this.x = center.x + longAxis;
		this.y = center.y;

		this.longAxis = longAxis;
		this.shortAxis = shortAxis;
		this.speed = speed;

		this.width = image.getWidth(null);
		this.height = image.getHeight(null);

	}

	public Planet(Solar center,String imgpath, double longAxis,
			double shortAxis, double speed,boolean satellite) {
		this(center, imgpath, longAxis, shortAxis, speed);
		this.satellite = satellite;

	}
	public Planet(Image img, double x, double y) {
		super(img, x, y);
	}
	public Planet(String imgpath, double x, double y) {
		super(imgpath, x, y);
	}

	public void move(){

		x = (center.x+center.width/2) + longAxis*Math.cos(degree);
		y = (center.y+center.height/2)+ shortAxis*Math.sin(degree);

		degree += speed;
	}

}
行星没有固定的位置,所以属性和动态信息密切相关,这里有 椭圆长轴,椭圆短轴,运行速度,运行角度,中心太阳,是否是卫星。
使用move方法对实时的刷新的坐标进行刷新。实现坐标的旋转。
public class SolarFrame extends BaseFrame{

	Image bg = GameUtil.getImage("images/bg.jpg");
	Solar sun = new Solar("images/sun.jpg",Constants.GAME_LENGTH/2,Constants.GAME_WIDTH/2);
	Planet jupiter = new Planet(sun, "images/jupiter.jpg", 100, 60, 0.8);
	Planet mercury = new Planet(sun, "images/mercury.jpg", 125, 75, 0.7);
	Planet earth = new Planet(sun, "images/earth.jpg", 150, 100, 0.6);
	Planet moon = new Planet(earth, "images/moon.jpg", 30, 20, 0.3,true);
	Planet mars = new Planet(sun, "images/Mars.jpg", 200, 130, 0.5);
	Planet venus = new Planet(sun, "images/venus.jpg", 250, 200, 0.4);
	Planet saturn = new Planet(sun, "images/Saturn.jpg", 300, 240, 0.3);
	Planet neptune = new Planet(sun, "images/Neptune.jpg", 350, 280, 0.1);

	public void paint(Graphics g) {
		g.drawImage(bg, 0, 0, null);
		sun.draw(g);
		jupiter.draw(g);
		mercury.draw(g);
		earth.draw(g);
        mars.draw(g);
		moon.draw(g);
		venus.draw(g);
		saturn.draw(g);
		neptune.draw(g);
	}

	public static void main(String[] args) {
		// TODO Auto-generated method stub
		new SolarFrame().launchFrame();
	}

}
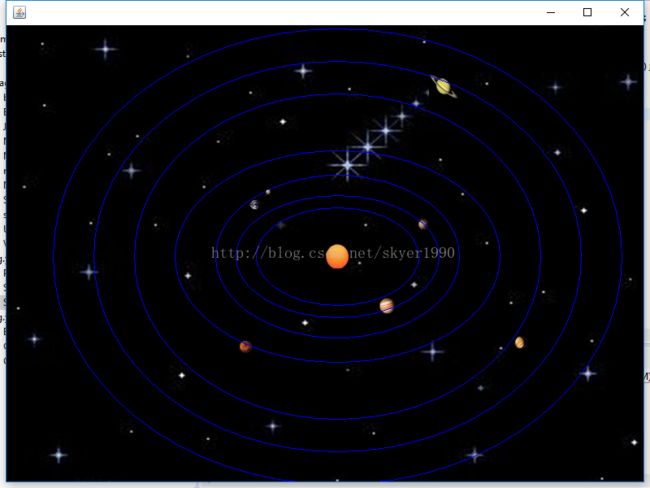
这个类,进行所有对象的调度,完成对所有的对象的移动控制。运行效果图如下:
运行效果如上图所示。这一个项目在属性的调用上进行直接调用和赋值。没有使用 geter和setter方法。在实际开发的时候可以注意改版。


