发布了两年多的文章今天发现被CSDN关了, 理由如下:
现在迁移到看看是否有问题。
一、前言
从年初发表了Spring cloud微服务实战——基于OAUTH2.0统一认证授权的微服务基础架构 这篇博文后就没有更新了,很多评论疑问都没来得及回复,皆因这半年来快忙成狗了。到今天终于感觉轻松了一点。
二、 整合Swagger2
Swagger2大家肯定都用过,为什么我在这里还要提到呢,因为各个微服务都会提供自己的API文档,我们总不能一个地址一个地址去查吧,能不能有个统一的入口呢。这就是这节要讲的。
2.1 Zuul整合Swagger2
其他的都不说直接上代码
@Component
@Primary
public class GatewaySwaggerResourcesProvider implements SwaggerResourcesProvider {
    private final RouteLocator routeLocator;

    public GatewaySwaggerResourcesProvider(RouteLocator routeLocator) {
        this.routeLocator = routeLocator;
    }

    @Override
    public List get() {
        List resources = new ArrayList<>();
        List routes = routeLocator.getRoutes();
        for (Route route:routes) {
            resources.add(swaggerResource(route.getId(), route.getFullPath().replace("**", "v2/api-docs")));
        }
        return resources;
    }
    private SwaggerResource swaggerResource(String name, String location) {
        SwaggerResource swaggerResource = new SwaggerResource();
        swaggerResource.setName(name);
        swaggerResource.setLocation(location);
        swaggerResource.setSwaggerVersion("2.0");
        return swaggerResource;
    }
}
SwaggerResourcesProvider 是资源提供者,我们重写他,把各个微服务的资源路径返回,即:resources.add(swaggerResource(route.getId(), route.getFullPath().replace("**", "v2/api-docs")));
参看InMemorySwaggerResourcesProvider写法,如下,默认是当前应用的/v2/api-docs。
@Autowired
  public InMemorySwaggerResourcesProvider(
      Environment environment,
      DocumentationCache documentationCache) {
    swagger1Url = environment.getProperty("springfox.documentation.swagger.v1.path", "/api-docs");
    swagger2Url = environment.getProperty("springfox.documentation.swagger.v2.path", "/v2/api-docs");
    swagger1Available = classByName("springfox.documentation.swagger1.web.Swagger1Controller").isPresent();
    swagger2Available = classByName("springfox.documentation.swagger2.web.Swagger2Controller").isPresent();
    this.documentationCache = documentationCache;
  }

  @Override
  public List get() {
    List resources = new ArrayList();

    for (Map.Entry entry : documentationCache.all().entrySet()) {
      String swaggerGroup = entry.getKey();
      if (swagger1Available) {
        SwaggerResource swaggerResource = resource(swaggerGroup, swagger1Url);
        swaggerResource.setSwaggerVersion("1.2");
        resources.add(swaggerResource);
      }

      if (swagger2Available) {
        SwaggerResource swaggerResource = resource(swaggerGroup, swagger2Url);
        swaggerResource.setSwaggerVersion("2.0");
        resources.add(swaggerResource);
      }
    }
    Collections.sort(resources);
    return resources;
  }
最后记得配置Swagger
@Configuration
@EnableSwagger2
public class Swagger2Config {
    @Bean
    public Docket createRestApi() {
        return new Docket(DocumentationType.SWAGGER_2)
                .apiInfo(apiInfo());
    }

    private ApiInfo apiInfo() {
        return new ApiInfoBuilder()
                .title("说明文档")
                .description("接口说明文档")
                .termsOfServiceUrl("")
                .contact(new Contact("杨秀峰","[email protected]","[email protected]"))
                .version("1.0")
                .build();
    }
}
到这来就完成了,运行网关,输入:http://10.10.11.15:9030/swagger-ui.html,即可看到如下:
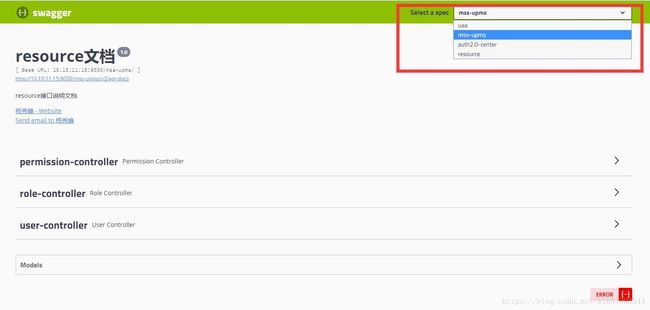
红色部分下拉选择服务切换查看API文档。
三、Zuul权限控制
Spring cloud微服务实战(一)的Zuul只是做为一个路由,并没有做权限限制,具体的权限控制要到各个微服务自己实现,这样一来不免要有很多重复的工作。那么就把权限控制放在网关的进行。
注意: 我这里是基于到URL的细粒度的权限控制
Zuul到这里就充当了资源服务器的角色。
配置资源服务器:
@Configuration
@EnableResourceServer
public class SecurityConfig extends ResourceServerConfigurerAdapter {

    @Autowired
    private OAuth2WebSecurityExpressionHandler expressionHandler;

    private static final String[] AUTH_WHITELIST = {

    };

    @Override
    public void configure(HttpSecurity http) throws Exception {
        http.authorizeRequests().antMatchers("/v2/api-docs","/uaa/**").permitAll();

        ExpressionUrlAuthorizationConfigurer.ExpressionInterceptUrlRegistry registry = http
                .authorizeRequests();
        for (String au:AUTH_WHITELIST
             ) {
            http.authorizeRequests().antMatchers(au).permitAll();
        }
        http.authorizeRequests().anyRequest().authenticated();
        registry.anyRequest()
                .access("@permissionService.hasPermission(request,authentication)");
    }
    @Override
    public void configure(ResourceServerSecurityConfigurer resources) {
        resources.expressionHandler(expressionHandler);
    }
    @Bean
    public OAuth2WebSecurityExpressionHandler oAuth2WebSecurityExpressionHandler(ApplicationContext applicationContext) {
        OAuth2WebSecurityExpressionHandler expressionHandler = new OAuth2WebSecurityExpressionHandler();
        expressionHandler.setApplicationContext(applicationContext);
        return expressionHandler;
    }
}
注意如下这段
registry.anyRequest()
                .access("@permissionService.hasPermission(request,authentication)");
我们自定义表达式决策。最终在WebExpressionVoter的vote方法的ExpressionUtils.evaluateAsBoolean会调用到hasPermission(request,authentication);
PermissionService的代码如下:
@Service("permissionService")
@Slf4j
public class PermissionServiceImpl implements PermissionService {

    /**
     * 可以做URLs匹配,规则如下
     *
     * ?匹配一个字符
     * *匹配0个或多个字符
     * **匹配0个或多个目录
     * 用例如下
     * https://www.cnblogs.com/zhangxiaoguang/p/5855113.html
     */

    private AntPathMatcher antPathMatcher = new AntPathMatcher();

    @Override
    public boolean hasPermission(HttpServletRequest request, Authentication authentication) {
        Object principal = authentication.getPrincipal();
        String requestUrl = request.getRequestURI();
        log.info("requestUrl:{}",requestUrl);
        List grantedAuthorityList = (List) authentication.getAuthorities();
        boolean hasPermission = false;

        if (principal != null){
            if (CollectionUtils.isEmpty(grantedAuthorityList)){
                return hasPermission;
            }
            for (SimpleGrantedAuthority authority:grantedAuthorityList
                 ) {
                if (antPathMatcher.match(authority.getAuthority(),requestUrl)){
                    hasPermission = true;
                    break;
                }
            }
        }

        return hasPermission;
    }
}
我这里只做了简单的URL校验,完善的应该是判断URL、Request Method是否一致等等,大家有更多的发挥空间。
最后记得在application.yml里配置
security:
  basic:
    enabled: false
  oauth2:
    resource:
      user-info-uri:  http://localhost:9060/user
      prefer-token-info: false
更好的做法应该直接从redis获取用户信息,减少一次HTTP请求;后面再完善吧,今儿有点赖了。
结束
今天的内容就这些了。
Github
Github
Github