前言
本博客主要实现利用OpenCV的模板匹配识别图像中的数字,然后把识别出来的数字输出到txt文件中,如果识别失败则输出“读取失败”。
操作环境:
- OpenCV - 4.1.0
- Python 3.8.1
程序目标
单个数字模板:(这些单个模板是我自己直接从图片上截取下来的)
要处理的图片:
终端输出:
文本输出:
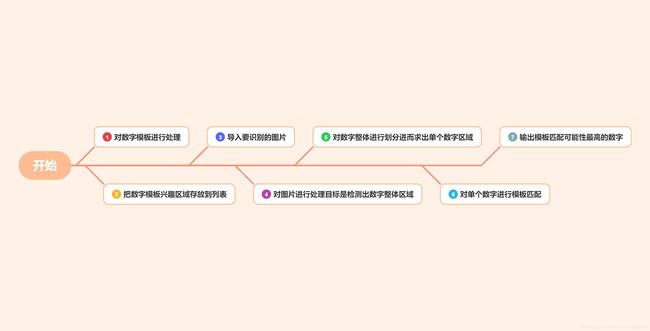
思路讲解
代码讲解
首先定义两个会用到的函数
第一个是显示图片的函数,这样的话在显示图片的时候就比较方便了
def cv_show(name, img):
 cv2.imshow(name, img)
 cv2.waitKey(0)
 cv2.destroyAllWindows()
第二个是图片缩放的函数
def resize(image, width=None, height=None, inter=cv2.INTER_AREA):
 dim = None
 (h, w) = image.shape[:2]
 if width is None and height is None:
  return image
 if width is None:
  r = height / float(h)
  dim = (int(w * r), height)
 else:
  r = width / float(w)
  dim = (width, int(h * r))
 resized = cv2.resize(image, dim, interpolation=inter)
 return resized
先把这个代码贴出来,方便后面单个函数代码的理解。
if __name__ == "__main__":
 # 存放数字模板列表
 digits = []
 # 当前运行目录
 now_dir = os.getcwd()
 print("当前运行目录:" + now_dir)
 numbers_address = now_dir + "\\numbers"
 load_digits()
 times = input("请输入程序运行次数:")
 for i in range(1, int(times) + 1):
  demo(i)
 print("输出成功,请检查本地temp.txt文件")
 while True:
  if input("输入小写‘q'并回车退出") == 'q':
   break
接下来是第一个主要函数,功能是加载数字模板并进行处理。
这个函数使用到了os模块,所以需要在开头import os
def load_digits():
 # 加载数字模板
 path = numbers_address # 这个地方就是获取当前运行目录 获取函数在主函数里面
 filename = os.listdir(path) # 获取文件夹文件
 for file in filename:
  img = cv2.imread(numbers_address + "\\" + file) # 读取图片
  img_gray = cv2.cvtColor(img, cv2.COLOR_BGR2GRAY) # 灰度处理
  # 自动阈值二值化 把图片处理成黑底白字
  img_temp = cv2.threshold(img_gray, 0, 255, cv2.THRESH_BINARY_INV | cv2.THRESH_OTSU)[1]
  # 寻找数字轮廓
  cnt = cv2.findContours(img_temp, cv2.RETR_EXTERNAL, cv2.CHAIN_APPROX_NONE)[0]
  # 获取数字矩形轮廓
  x, y, w, h = cv2.boundingRect(cnt[0])
  # 将单个数字区域进行缩放并存到列表中以备后面使用
  digit_roi = cv2.resize(img_temp[y:y+h, x:x+w], (57, 88))
  digits.append(digit_roi)
最后一个函数是程序的重点,实现功能就是识别出数字并输出。
不过这里把这个大函数分开两部分来讲解。
第一部分是对图片进行处理,最终把图片中的数字区域圈出来。
 # 这两个都是核,参数可以改变
 rectKernel = cv2.getStructuringElement(cv2.MORPH_RECT, (25, 25))
 sqKernel = cv2.getStructuringElement(cv2.MORPH_RECT, (5, 5))
 # 这个就是读取图片的,可以暂时不理解
 target_path = now_dir + "\\" + "demo_" + str(index) + ".png"
 img_origin = cv2.imread(target_path)
 # 对图片进行缩放处理
 img_origin = resize(img_origin, width=300)
 # 灰度图
 img_gray = cv2.cvtColor(img_origin, cv2.COLOR_BGR2GRAY)
 # 高斯滤波 参数可以改变,选择效果最好的就可以
 gaussian = cv2.GaussianBlur(img_gray, (5, 5), 1)、
 # 自动二值化处理,黑底白字
 img_temp = cv2.threshold(
  gaussian, 0, 255, cv2.THRESH_BINARY_INV | cv2.THRESH_OTSU)[1]
 # 顶帽操作
 img_top = cv2.morphologyEx(img_temp, cv2.MORPH_TOPHAT, rectKernel)
 # sobel操作
 img_sobel_x = cv2.Sobel(img_top, cv2.CV_64F, 1, 0, ksize=7)
 img_sobel_x = cv2.convertScaleAbs(img_sobel_x)
 img_sobel_y = cv2.Sobel(img_top, cv2.CV_64F, 0, 1, ksize=7)
 img_sobel_y = cv2.convertScaleAbs(img_sobel_y)
 img_sobel_xy = cv2.addWeighted(img_sobel_x, 1, img_sobel_y, 1, 0)
 # 闭操作
 img_closed = cv2.morphologyEx(img_sobel_xy, cv2.MORPH_CLOSE, rectKernel)
 # 自动二值化
 thresh = cv2.threshold(
  img_closed, 0, 255, cv2.THRESH_BINARY | cv2.THRESH_OTSU)[1]
 # 闭操作
 img_closed = cv2.morphologyEx(thresh, cv2.MORPH_CLOSE, sqKernel)
 # 寻找数字轮廓
 cnts = cv2.findContours(
  img_closed.copy(), cv2.RETR_EXTERNAL, cv2.CHAIN_APPROX_NONE)[0]
 # 轮廓排序
 (cnts, boundingBoxes) = contours.sort_contours(cnts, "top-to-bottom")
 # 存放正确数字序列(包含逗号)的轮廓,即过滤掉不需要的轮廓
 right_loc = []
 # 下面这个循环是对轮廓进行筛选,只有长宽比例大于2的才可以被添加到列表中
 # 这个比例可以根据具体情况来改变。除此之外,还可以通过轮廓周长和轮廓面积等对轮廓进行筛选
 for c in cnts:
  x, y, w, h = cv2.boundingRect(c)
  ar = w/float(h)
  if ar > 2:
   right_loc.append((x, y, w, h))
部分步骤的效果图:
可以看到在进行完最后一次闭操作后,一串数字全部变成白色区域,这样再进行轮廓检测就可以框出每一行数字的大致范围,这样就可以缩小数字处理的范围,可以在这些具体的区域内部对单个数字进行处理。
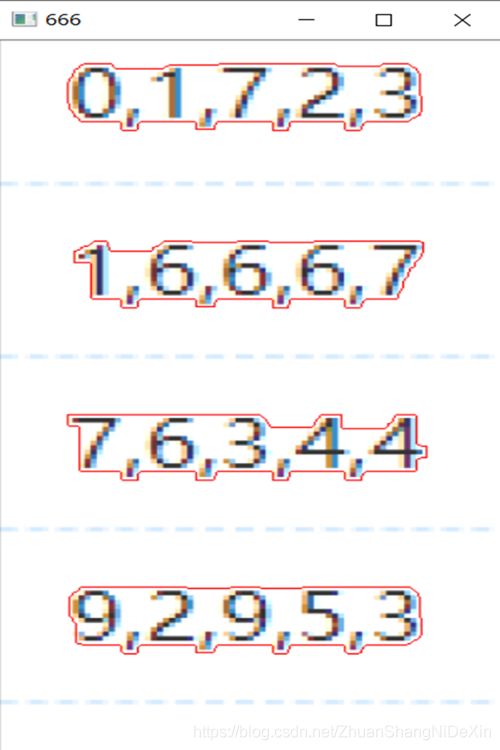
轮廓效果:
在这样进行以上步骤之后,就可以确定一行数字的范围了,下面就进行轮廓筛选把符合条件的轮廓存入列表。
注意:在代码中使用了(cnts, boundingBoxes) = contours.sort_contours(cnts, "top-to-bottom")
这个函数的使用需要导入imutils,这个模块具体使用方法可以浏览我的另一篇博客OpenCV学习笔记
函数的最后一部分就是对每个数字轮廓进行分割,取出单个数字的区域然后进行模板匹配。
for (gx, gy, gw, gh) in right_loc:
  # 用于存放识别到的数字
  digit_out = []
  # 下面两个判断主要是防止出现越界的情况发生,如果发生的话图片读取会出错
  if (gy-10 < 0):
   now_gy = gy
  else:
   now_gy = gy-10
  if (gx - 10 < 0):
   now_gx = gx
  else:
   now_gx = gx-10
  # 选择图片兴趣区域
  img_digit = gaussian[now_gy:gy+gh+10, now_gx:gx+gw+10]
  # 二值化处理
  img_thresh = cv2.threshold(
   img_digit, 0, 255, cv2.THRESH_BINARY_INV | cv2.THRESH_OTSU)[1]
  # 寻找所有轮廓 找出每个数字的轮廓(包含逗号) 正确的话应该有9个轮廓
  digitCnts = cv2.findContours(
   img_thresh, cv2.RETR_EXTERNAL, cv2.CHAIN_APPROX_NONE)[0]
  # 从左到右排列轮廓
  # 这样排列的好处是,正常情况下可以确定逗号的位置方便后面删除逗号
  (cnts, boundingBoxes) = contours.sort_contours(digitCnts, "left-to-right")
  # cnts是元组,需要先转换成列表,因为后面会对元素进行删除处理
  cnts = list(cnts)
  flag = 0
  # 判断轮廓数量是否有9个
  if len(cnts) == 9:
   # 删除逗号位置
   del cnts[1]
   del cnts[2]
   del cnts[3]
   del cnts[4]
   # 可以在转成元组
   cnts = tuple(cnts)
   # 存放单个数字的矩形区域
   num_roi = []
   for c in cnts:
    x, y, w, h = cv2.boundingRect(c)
    num_roi.append((x, y, w, h))
   # 对数字区域进行处理,把尺寸缩放到与数字模板相同
   # 对其进行简单处理,方便与模板匹配,增加匹配率
   for (rx, ry, rw, rh) in num_roi:
    roi = img_digit[ry:ry+rh, rx:rx+rw]
    roi = cv2.resize(roi, (57, 88))
    # 高斯滤波
    roi = cv2.GaussianBlur(roi, (5, 5), 1)
    # 二值化
    roi = cv2.threshold(
     roi, 0, 255, cv2.THRESH_BINARY_INV | cv2.THRESH_OTSU)[1]
    # 用于存放匹配率
    source = []
    # 遍历数字模板
    for digitROI in digits:
     # 进行模板匹配
     res = cv2.matchTemplate(
      roi, digitROI, cv2.TM_CCOEFF_NORMED)
     max_val = cv2.minMaxLoc(res)[1]
     source.append(max_val)
    # 这个需要仔细理解 这个就是把0-9数字中匹配度最高的数字存放到列表中
    digit_out.append(str(source.index(max(source))))
   # 打印最终输出值
   print(digit_out)
  else:
   print("读取失败")
   flag = 1
  # 将数字输出到txt文本中
  t = ''
  with open(now_dir + "\\temp.txt", 'a+') as q:
   if flag == 0:
    for content in digit_out:
     t = t + str(content) + " "
    q.write(t.strip(" "))
    q.write('\n')
    t = ''
   else:
    q.write("读取失败")
    q.write('\n')
注意理解:digit_out.append(str(source.index(max(source))))
这个是很重要的,列表source存放模板匹配的每个数字的匹配率,求出其中最大值的索引值,因为数字模板是按照0-9排列的,索引source的匹配率也是按照0-9排列的,所以每个元素的索引值就与相匹配的数字相同。这样的话,取得最大值的索引值就相当于取到了匹配率最高的数字。
完整代码
from imutils import contours
import cv2
import os


def cv_show(name, img):
 cv2.imshow(name, img)
 cv2.waitKey(0)
 cv2.destroyAllWindows()


def resize(image, width=None, height=None, inter=cv2.INTER_AREA):
 dim = None
 (h, w) = image.shape[:2]
 if width is None and height is None:
  return image
 if width is None:
  r = height / float(h)
  dim = (int(w * r), height)
 else:
  r = width / float(w)
  dim = (width, int(h * r))
 resized = cv2.resize(image, dim, interpolation=inter)
 return resized


def load_digits():
 # 加载数字模板
 path = numbers_address
 filename = os.listdir(path)
 for file in filename:
  # print(file)
  img = cv2.imread(
   numbers_address + "\\" + file)
  img_gray = cv2.cvtColor(img, cv2.COLOR_BGR2GRAY)
  img_temp = cv2.threshold(
   img_gray, 0, 255, cv2.THRESH_BINARY_INV | cv2.THRESH_OTSU)[1]
  cnt = cv2.findContours(img_temp, cv2.RETR_EXTERNAL,
        cv2.CHAIN_APPROX_NONE)[0]
  x, y, w, h = cv2.boundingRect(cnt[0])
  digit_roi = cv2.resize(img_temp[y:y+h, x:x+w], (57, 88))
  # 将数字模板存到列表中
  digits.append(digit_roi)


def demo(index):
 rectKernel = cv2.getStructuringElement(cv2.MORPH_RECT, (25, 25))
 sqKernel = cv2.getStructuringElement(cv2.MORPH_RECT, (5, 5))
 target_path = now_dir + "\\" + "demo_" + str(index) + ".png"
 img_origin = cv2.imread(target_path)
 img_origin = resize(img_origin, width=300)
 img_gray = cv2.cvtColor(img_origin, cv2.COLOR_BGR2GRAY)
 gaussian = cv2.GaussianBlur(img_gray, (5, 5), 1)
 img_temp = cv2.threshold(
  gaussian, 0, 255, cv2.THRESH_BINARY_INV | cv2.THRESH_OTSU)[1]
 img_top = cv2.morphologyEx(img_temp, cv2.MORPH_TOPHAT, rectKernel)
 img_sobel_x = cv2.Sobel(img_top, cv2.CV_64F, 1, 0, ksize=7)
 img_sobel_x = cv2.convertScaleAbs(img_sobel_x)
 img_sobel_y = cv2.Sobel(img_top, cv2.CV_64F, 0, 1, ksize=7)
 img_sobel_y = cv2.convertScaleAbs(img_sobel_y)
 img_sobel_xy = cv2.addWeighted(img_sobel_x, 1, img_sobel_y, 1, 0)
 img_closed = cv2.morphologyEx(img_sobel_xy, cv2.MORPH_CLOSE, rectKernel)
 thresh = cv2.threshold(
  img_closed, 0, 255, cv2.THRESH_BINARY | cv2.THRESH_OTSU)[1]
 img_closed = cv2.morphologyEx(thresh, cv2.MORPH_CLOSE, sqKernel)
 cnts = cv2.findContours(
  img_closed.copy(), cv2.RETR_EXTERNAL, cv2.CHAIN_APPROX_NONE)[0]
 (cnts, boundingBoxes) = contours.sort_contours(cnts, "top-to-bottom")
 draw_img = img_origin.copy()
 draw_img = cv2.drawContours(draw_img, cnts, -1, (0, 0, 255), 1)
 cv_show("666", draw_img)

 # 存放正确数字序列(包含逗号)的轮廓,即过滤掉不需要的轮廓
 right_loc = []
 for c in cnts:
  x, y, w, h = cv2.boundingRect(c)
  ar = w/float(h)
  if ar > 2:
   right_loc.append((x, y, w, h))
 for (gx, gy, gw, gh) in right_loc:
  # 用于存放识别到的数字
  digit_out = []
  if (gy-10 < 0):
   now_gy = gy
  else:
   now_gy = gy-10
  if (gx - 10 < 0):
   now_gx = gx
  else:
   now_gx = gx-10
  img_digit = gaussian[now_gy:gy+gh+10, now_gx:gx+gw+10]
  # 二值化处理
  img_thresh = cv2.threshold(
   img_digit, 0, 255, cv2.THRESH_BINARY_INV | cv2.THRESH_OTSU)[1]
  # 寻找轮廓 找出每个数字的轮廓(包含逗号) 正确的话应该有9个轮廓
  digitCnts = cv2.findContours(
   img_thresh, cv2.RETR_EXTERNAL, cv2.CHAIN_APPROX_NONE)[0]
  # 从左到右排列
  (cnts, boundingBoxes) = contours.sort_contours(digitCnts, "left-to-right")
  cnts = list(cnts)
  flag = 0
  if len(cnts) == 9:
   del cnts[1]
   del cnts[2]
   del cnts[3]
   del cnts[4]
   cnts = tuple(cnts)
   num_roi = []
   for c in cnts:
    x, y, w, h = cv2.boundingRect(c)
    num_roi.append((x, y, w, h))
   for (rx, ry, rw, rh) in num_roi:
    roi = img_digit[ry:ry+rh, rx:rx+rw]
    roi = cv2.resize(roi, (57, 88))
    roi = cv2.GaussianBlur(roi, (5, 5), 1)
    roi = cv2.threshold(
     roi, 0, 255, cv2.THRESH_BINARY_INV | cv2.THRESH_OTSU)[1]
    source = []
    for digitROI in digits:
     res = cv2.matchTemplate(
      roi, digitROI, cv2.TM_CCOEFF_NORMED)
     max_val = cv2.minMaxLoc(res)[1]
     source.append(max_val)
    digit_out.append(str(source.index(max(source))))
   cv2.rectangle(img_origin, (gx-5, gy-5),
       (gx+gw+5, gy+gh+5), (0, 0, 255), 1)
   print(digit_out)
  else:
   print("读取失败")
   flag = 1
  t = ''
  with open(now_dir + "\\temp.txt", 'a+') as q:
   if flag == 0:
    for content in digit_out:
     t = t + str(content) + " "
    q.write(t.strip(" "))
    q.write('\n')
    t = ''
   else:
    q.write("读取失败")
    q.write('\n')


if __name__ == "__main__":
 # 存放数字模板列表
 digits = []
 # 当前运行目录
 now_dir = os.getcwd()
 print("当前运行目录:" + now_dir)
 numbers_address = now_dir + "\\numbers"
 load_digits()
 times = input("请输入程序运行次数:")
 for i in range(1, int(times) + 1):
  demo(i)
 print("输出成功,请检查本地temp.txt文件")
 cv2.waitKey(0)
 cv2.destroyAllWindows()
 while True:
  if input("输入小写‘q'并回车退出") == 'q':
   break
整个文件下载地址:https://wwe.lanzous.com/iLSDunf850b
注意:如果想同时识别多个图片话,需要将图片统一改名为“demo_ + 数字序号.png” 例如:demo_1.png demo_2.png 同时在运行代码时输入图片个数即可。
总结
这个程序代码相对来说不算复杂,主要是对图像的一些基础处理需要注意。因为不同的图像想要识别成功需要进行不同程度的基础处理,所以在做的时候可以多输出几张图片检查一下那一步效果不太好并及时进行修改调整,这样才能达到最终比较好的效果。
以上就是python基于OpenCV模板匹配识别图片中的数字的详细内容,更多关于python 识别图片中的数字的资料请关注脚本之家其它相关文章!


