py获取《灵笼》第一集的弹幕———绘制词云图
获取哔哩哔哩弹幕
-
- 访问弹幕的接口
- heart中的cid参数查找
- 点击查看历史弹幕oid的查找
- 正则提取字幕写入txt
- jieba分词wordcloud生成词云图
访问弹幕的接口
前人栽树,后人乘凉。使用已经分析过的url链接进行get请求即可
需要:
- 视频cid
- 视频的oid
1.https://comment.bilibili.com/视频cid参数.xml
2.https://api.bilibili.com/x/v1/dm/list.so?oid=视频iod
heart中的cid参数查找
《灵笼》的第一集的url:https://www.bilibili.com/bangumi/play/ss22088/?from=search&seid=17394404948182677638
打开弹幕,查看network不断清除刷新,发现heartbeat随着弹幕的出现而不断出现

heartbeat的headers和post form数据
requestUrl:https://api.bilibili.com/x/click-interface/web/heartbeat

使用aid的参数:129528808,访问xml链接即可得到灵笼第一集的弹幕
url:https://comment.bilibili.com/129528808.xml

ok,进行get请求和正则提取出字幕
import requests,re

def compile_font(text):
    c=re.compile(r'p="(.*?)">(.*?)<',re.S)
    result=re.findall(c,text)
    print(result)

def request_post(url):
    headers = {

        "User-Agent": "Mozilla/5.0 (Windows NT 10.0; Win64; x64) AppleWebKit/537.36 (KHTML, like Gecko) Chrome/87.0.4280.88 Safari/537.36",
        "origin": "https: // www.bilibili.com",
        "referer": "https://www.bilibili.com/bangumi/play/ss22088/?from=search&seid=17394404948182677638"
    }
    resp=requests.get(url,headers=headers)
    print(resp)
    text=resp.content.decode('utf-8')
    compile_font(text)


if __name__=='__main__':
    url="https://comment.bilibili.com/129528808.xml"
    request_post(url)
对弹幕和其发起者的id信息进行提取
点击查看历史弹幕oid的查找
点击查看历史弹幕
发现index相关的数据中和heartbeat的response有共同点
区别是这里多了时间的信息
heartbeat
{
     "code":0,
"message":"0",
"ttl":1
}
查看历史弹幕index
{

  "code": 0,
  "message": "0",
  "ttl": 1,
  "data": [
    "2021-04-01",
    "2021-04-02",
    "2021-04-03",
    "2021-04-04",
    "2021-04-05",
    "2021-04-06",
    "2021-04-07",
    "2021-04-08",
    "2021-04-09",
    "2021-04-10",
    "2021-04-11",
    "2021-04-12",
    "2021-04-13"
  ]
}

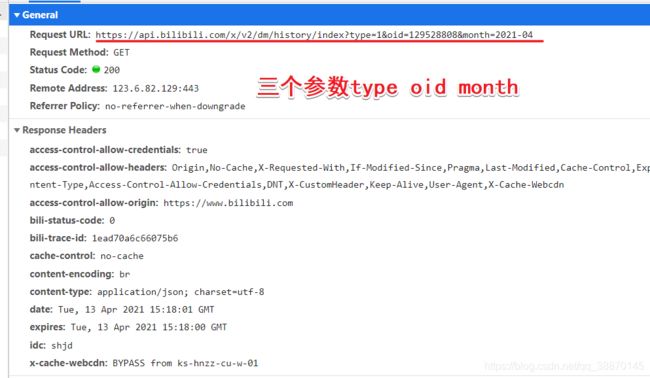
requeurl:https://api.bilibili.com/x/v2/dm/history/index
三个参数:
import requests,re

def compile_font(text):
    c=re.compile(r'p="(.*?)">(.*?)<',re.S)
    result=re.findall(c,text)
    print(result)

def request_post(url):
    headers = {

        "User-Agent": "Mozilla/5.0 (Windows NT 10.0; Win64; x64) AppleWebKit/537.36 (KHTML, like Gecko) Chrome/87.0.4280.88 Safari/537.36",
        "origin": "https: // www.bilibili.com",
        "referer": "https://www.bilibili.com/bangumi/play/ss22088/?from=search&seid=17394404948182677638"
    }
    resp=requests.get(url,headers=headers)
    print(resp)
    text=resp.content.decode('utf-8')
    compile_font(text)


if __name__=='__main__':
    url="https://api.bilibili.com/x/v1/dm/list.so?oid=129528808"
    request_post(url)
对弹幕和其发起者的id信息进行提取
正则提取字幕写入txt
a+的参数是再txt文档追加
import requests,re

def compile_font(text):
    c=re.compile(r'p="(.*?)">(.*?)<',re.S)
    result=re.findall(c,text)
    for i in result:
        value=i[1]
        with open('words.txt','a+',encoding='utf-8') as f:
            f.write(value)

def request_post(url):
    headers = {

        "User-Agent": "Mozilla/5.0 (Windows NT 10.0; Win64; x64) AppleWebKit/537.36 (KHTML, like Gecko) Chrome/87.0.4280.88 Safari/537.36",
        "origin": "https: // www.bilibili.com",
        "referer": "https://www.bilibili.com/bangumi/play/ss22088/?from=search&seid=17394404948182677638"
    }
    resp=requests.get(url,headers=headers)
    print(resp)
    text=resp.content.decode('utf-8')
    compile_font(text)


if __name__=='__main__':
    url="https://api.bilibili.com/x/v1/dm/list.so?oid=129528808"
    request_post(url)
jieba分词wordcloud生成词云图
准备遮罩图为灵笼logo(其中白色部分不会被写入)

需要导入字体的路径,在C:\Windows\Fonts\挑选

import jieba
from wordcloud import WordCloud, ImageColorGenerator
from matplotlib import pyplot as plt
from PIL import Image
import numpy as np

with open('words.txt', 'r', encoding="UTF-8") as file1:
    content = "".join(file1.readlines())

# 分词 \n
content_after = "\n".join(jieba.cut(content, cut_all=True))
##添加的代码,把刚刚你保存好的图片用Image方法打开,
##然后用numpy转换了一下
images = Image.open("灵笼logo.png")
maskImages = np.array(images)
wc = WordCloud(font_path="C:\Windows\Fonts\simsun.ttc",#字体路径
               background_color="black",#一下是图片背景颜色字体大小及尺寸大小
               max_words=5000,
               max_font_size=50,
               width=600,
               height=600,
               mask=maskImages#遮罩图片 类比ps的剪切蒙版
              ).generate(content)
plt.imshow(wc)
wc.to_file('灵笼第一集的字幕.png')


