前言:本文章第一时间出现在一个程序猿的秘密基地专题中,如果您喜欢类似的文章,请您点击一个程序猿的秘密基地进行关注,在以后的日子里与小编共同成长!
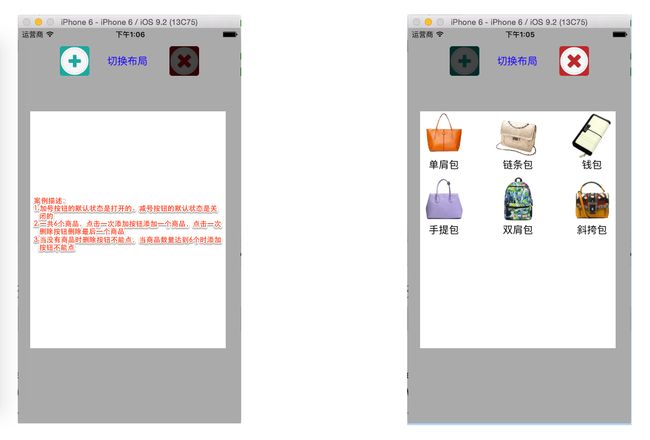
本案例阐述了以下几点:
1.封装(低耦合思想)
2.九宫格的计算思路
3.使用plist文件承载数据
4.懒加载模式
5.MVC模式(虽然不是纯正的MVC,不过也MVC的条件,也算是个简单的MVC)
//本案例是一套简单的MVC,不是纯正的MVC。
#define SCREEN [[UIScreen mainScreen] bounds].size
#define COUNT self.myWhiteView.subviews.count
#import "ViewController.h"
#import "shops.h"
#import "ZLShopView.h"
@interface ViewController ()
@property(strong,nonatomic)UIView *myWhiteView;
@property(strong,nonatomic)NSArray *commodiyArray;
@property(strong,nonatomic)UIButton *deleteButton;
@property(strong,nonatomic)UIButton *addButton;
@property(strong,nonatomic)UILabel *HUD;
@end

@implementation ViewController
/** 重写commodiyArray的Get方法,实现懒加载plist文件*/
-(NSArray *)commodiyArray{
    //重写Get方法时,下面️和️处不能使用self打点调用,会造成死循环。(因为用self打点调用的就是此方法)
    if (!_commodiyArray) {//️
        NSArray *dictArray=[NSArray arrayWithContentsOfFile:[[NSBundle mainBundle] pathForResource:@"Commodiy" ofType:@"plist"]];
        NSMutableArray *mutableArray=[[NSMutableArray alloc]init];
        for (NSDictionary *dict in dictArray) {
            shops *shop=[shops shopsWithDict:dict];
            [mutableArray addObject:shop];
        }
        _commodiyArray=mutableArray;
    }
    return _commodiyArray;//️
}
- (void)viewDidLoad {
    self.view.backgroundColor=[UIColor lightGrayColor];
    self.addButton=[self addButtonWithFrame:CGRectMake(70, 30, 50, 50) NormalImageNamed:@"add" HighlightedImageNamed:@"add_highlighted" DisabledImageNamed:@"add_disabled" action:@selector(buttonClick:) Tag:1];
    [self addLabel];
    self.deleteButton=[self addButtonWithFrame:CGRectMake(255, 30, 50, 50) NormalImageNamed:@"remove" HighlightedImageNamed:@"remove_highlighted" DisabledImageNamed:@"remove_disabled" action:@selector(buttonClick:) Tag:2];
    self.deleteButton.enabled=NO;
    [self addWhiteView];
}
#pragma mark- 添加商品
-(void)addCommodiyView{
    //此处会去调用shopView;
    ZLShopView *myCommodiyView=[ZLShopView shopView];
    NSUInteger index=COUNT;
    CGFloat myWhiteViewWidth=80;
    CGFloat myWhiteViewHeight=100;
    int columnNumber=3;
    CGFloat LineSpacing=10;
    CGFloat columnSpacing=(self.myWhiteView.frame.size.width-myWhiteViewWidth*columnNumber)/(columnNumber-1);
    NSUInteger i=index%columnNumber;
    CGFloat myWhiteViewX=(myWhiteViewWidth+columnSpacing)*i;
    NSUInteger j=index/columnNumber;
    CGFloat myWhiteViewY=(myWhiteViewHeight+LineSpacing)*j;
    //此处会触发ZLShopView的layoutSubviews方法
    myCommodiyView.frame=CGRectMake(myWhiteViewX, myWhiteViewY, myWhiteViewWidth, myWhiteViewHeight);
    [self.myWhiteView addSubview:myCommodiyView];
    //此处在给ZLShopView里的模型属性赋值
    myCommodiyView.shop=self.commodiyArray[index];
}
#pragma mark- 添加白色容纳商品的view
-(void)addWhiteView{
    self.myWhiteView=[[UIView alloc]initWithFrame:CGRectMake(20, 140, 330, 400)];
    self.myWhiteView.backgroundColor=[UIColor whiteColor];
    [self.view addSubview:self.myWhiteView];
}
#pragma mark- 添加切换布局label
-(void)addLabel{
    UILabel *myLabel=[[UILabel alloc]initWithFrame:CGRectMake(150, 45, 70, 20)];
    myLabel.text=@"切换布局";
    myLabel.textColor=[UIColor blueColor];
    [self.view addSubview:myLabel];
}
#pragma mark- 封装创建Button的方法
-(UIButton *)addButtonWithFrame:(CGRect)frame NormalImageNamed:(NSString *)normalString HighlightedImageNamed:(NSString *)highlightedString DisabledImageNamed:(NSString *)disabledString action:(nonnull SEL)action Tag:(NSInteger)tag{
    UIButton *myButton=[[UIButton alloc]initWithFrame:frame];
    [myButton setImage:[UIImage imageNamed:normalString] forState:UIControlStateNormal];
    [myButton setImage:[UIImage imageNamed:highlightedString] forState:UIControlStateHighlighted];
    [myButton setImage:[UIImage imageNamed:disabledString] forState:UIControlStateDisabled];
    myButton.tag=tag;
    [myButton addTarget:self action:action forControlEvents:UIControlEventTouchUpInside];
    [self.view addSubview:myButton];
    return myButton;
}
#pragma mark- "添加"和"删除"按钮的点击事件
-(void)buttonClick:(UIButton *)sender{
    if (sender.tag==1) {
        [self addCommodiyView];
        [self detectionButtonState:sender];
        return;
    }
    [[self.myWhiteView.subviews lastObject] removeFromSuperview];
    [self detectionButtonState:sender];
}
/** 检查按钮状态*/
-(void)detectionButtonState:(UIButton *)sender{
    self.deleteButton.enabled=COUNT!=0?YES:NO;
    self.addButton.enabled=COUNT==self.commodiyArray.count?NO:YES;
    if (self.deleteButton.enabled==NO||self.addButton.enabled==NO) {
        [self addHUD];
        self.HUD.text=(self.deleteButton.enabled==NO)?@"商品已经清空":@"商品已经爆满";
    }
    dispatch_after(dispatch_time(DISPATCH_TIME_NOW, (int64_t)(4.0 * NSEC_PER_SEC)), dispatch_get_main_queue(), ^{
        [self.HUD removeFromSuperview];
    });
}
-(void)addHUD{
    self.HUD=[[UILabel alloc]init];
    self.HUD.center=self.myWhiteView.center;
    self.HUD.bounds=CGRectMake(0, 0, 105, 20);
    self.HUD.backgroundColor=[UIColor lightGrayColor];
    [self.view addSubview:self.HUD];
}
//HUD是专业术语,又称:蒙版、遮盖、指示器。是为了让用户体验更好,起到提示效果
@end
shops.h
#import

@interface shops : NSObject
/** 图片名*/
@property(copy,nonatomic)NSString *imageName;
/** 商品名字*/
@property(copy,nonatomic)NSString *name;
//字典转模型方法
-(instancetype)initWithDict:(NSDictionary *)dict;
//此为便利构造方法
+(instancetype)shopsWithDict:(NSDictionary *)dict;
@end
shops.m
#import "shops.h"

@implementation shops
-(id)initWithDict:(NSDictionary*)dict{
    if (self=[super init]) {
        self.name=dict[@"imageName"];
        self.imageName=dict[@"image"];
    }
    return self;
}
+(id)shopsWithDict:(NSDictionary *)dict{
    return [[self alloc]initWithDict:dict];
}
@end
ZLShopView.h
//view的封装思想:如果一个View的内部的子控件比较多,一般会考虑自定义一个view,把它内部的子控件屏蔽起来,不让外界关心
//外界可以传入对应的模型数据给View,view拿到模型数据后给内部的子控件设置对应的数据
#import
@class shops;
//此是每件商品的创建类,在这个类中就应该设置商品的图片以及商品的名字,更重要的是商品的信息应该是设置在内部,而不是把商品的信息暴露在外部,也就是说一个商品的创建应该是它自己的事,至于它叫什么长什么样也应该是它自己的事,外界的ViewController不应该知道。所以关于商品的属性应该是写在.m
@interface ZLShopView : UIView
/** 模型对象*/
@property(strong,nonatomic)shops *shop;
//此为便利构造方法
+(instancetype)shopView;
@end
/*
 封装控件的基本步骤:
 1.在initWithFrame:方法中添加子控件,提供便利构造的方法
 2.在layoutSubviews方法中设置子控件的frame(一定要调用父类的layoutSubviews)
 3.增加模型属性,在模型属性set方法中设置数据到子控件上
 */
ZLShopView.m
#import "ZLShopView.h"
#import "shops.h"
//此处是类扩展。类扩展用的是(),里面不要写东西,写了东西就是类别
@interface ZLShopView()
/** 图片视图*/
@property(weak,nonatomic)UIImageView *myImageView;
/** 文字视图*/
@property(weak,nonatomic)UILabel *myLabel;
@end

@implementation ZLShopView
#pragma mark- 加载子控件第一种是重写init方法,在view被创建时加载子控件
/*
 //重写一个控件的初始化方法,就重写initWithFrame,init方法内部会自动调用initWithFrame方法。
 -(instancetype)initWithFrame:(CGRect)frame{
 //虽然这里frame已经有了,但是不建议用这个frame,因为不能排除传进来的frame是空的。还是应该去重写layoutSubviews,因为只要本类有了尺寸或尺寸在后面进行了修改,它都会来调用layoutSubviews这个方法,所以在layoutSubviews方法内设置子控件的尺寸才是最准确的。
 if (self=[super initWithFrame:frame]) {
 UIImageView *myImageView=[[UIImageView alloc]init];
 [self addSubview:myImageView];
 _myImageView=myImageView;
 UILabel *myLabel=[[UILabel alloc]init];
 myLabel.textAlignment=NSTextAlignmentCenter;
 [self addSubview:myLabel];
 _myLabel=myLabel;
 }
 return self;
 }
*/
#pragma mark- 加载子控件第二种是懒加载,当系统访问控件的get方法时在来创建子控件
//懒加载imageView子控件
-(UIImageView *)myImageView{
    if (!_myImageView) {
        UIImageView *myImageView=[[UIImageView alloc]init];
        [self addSubview:myImageView];
        _myImageView=myImageView;
    }
    return _myImageView;
}
-(UILabel *)myLabel{
    if (!_myLabel) {
        UILabel *myLabel=[[UILabel alloc]init];
        myLabel.textAlignment=NSTextAlignmentCenter;
        [self addSubview:myLabel];
        _myLabel=myLabel;
    }
    return _myLabel;
}
//便利构造方法的实现
+(instancetype)shopView{
    return [[self alloc]init];
}
/*
 这个方法专门用来布局子控件,一般在这里设置子控件的frame;
 当控件本身的尺寸发生改变的时候,系统会自动调用此方法。
 本案例中是因为ViewController里的
   myCommodiyView.frame=CGRectMake(myWhiteViewX, myWhiteViewY, myWhiteViewWidth, myWhiteViewHeight);
 这个方法触发了这个方法。
 */
-(void)layoutSubviews{
    //一定要调用父类的layoutSubviews;
    [super layoutSubviews];
    CGFloat myWhiteViewWidth=self.frame.size.width;
    CGFloat myWhiteViewHeight=self.frame.size.height;
    self.myImageView.frame=CGRectMake(0, 0, myWhiteViewWidth, myWhiteViewWidth);
    self.myLabel.frame=CGRectMake(0, myWhiteViewWidth, myWhiteViewWidth, myWhiteViewHeight-myWhiteViewWidth);
}
//重写模型的set方法,拿到模型,赋值给子控件
-(void)setShop:(shops *)shop{
    _shop=shop;
    self.myImageView.image=[UIImage imageNamed:shop.imageName];
    self.myLabel.text=shop.name;
}
@end

