所有代码来自python核心编程
参考python核心编程一书,学习多线程工作模式,多线程实现主要模块thread,threading,Queue等。
首先实现单线程一段代码:
from time import sleep,ctime

def loop0():
    print 'start loop 0 at:', ctime()
    sleep(4)
    print 'loop 0 done at:', ctime()

def loop1():
    print 'start loop 1 at:', ctime()
    sleep(2)
    print 'loop 1 done at:', ctime()

def main():
    print 'starting at:', ctime()
    loop0()
    loop1()
    print 'all done at:', ctime()

if __name__ == '__main__':
    main()
运行结果如下:能看到两个函数按顺序在6秒内完成
starting at: Thu Jun 08 16:42:00 2017
start loop 0 at: Thu Jun 08 16:42:00 2017
loop 0 done at: Thu Jun 08 16:42:04 2017
start loop 1 at: Thu Jun 08 16:42:04 2017
loop 1 done at: Thu Jun 08 16:42:06 2017
all done at: Thu Jun 08 16:42:06 2017
我们将首先利用thread修改代码,来看看效果
import thread
from time import sleep,ctime

def loop0():
    print 'start loop 0 at:', ctime()
    sleep(4)
    print 'loop 0 done at:', ctime()

def loop1():
    print 'start loop 1 at:', ctime()
    sleep(2)
    print 'loop 1 done at:', ctime()

def main():
    print 'starting at:', ctime()
    a=thread.start_new_thread(loop0,())
    b=thread.start_new_thread(loop1,())
    sleep(6)
    print 'all done at:', ctime()

if __name__ == '__main__':
    main()
运行结果如下:我们能看到loop0和loop1是并发执行的
starting at: Thu Jun 08 16:44:44 2017
start loop 1 at: Thu Jun 08 16:44:44 2017
start loop 0 at: Thu Jun 08 16:44:44 2017
loop 1 done at: Thu Jun 08 16:44:46 2017
loop 0 done at: Thu Jun 08 16:44:48 2017
all done at: Thu Jun 08 16:44:50 2017
我们添加了sleep(6)来实现子线程与主线程的同步,我们可以尝试把sleep(6)改为sleep(2)来看看效果:
starting at: Thu Jun 08 16:47:52 2017
start loop 0 at: Thu Jun 08 16:47:52 2017
start loop 1 at: Thu Jun 08 16:47:52 2017
all done at: Thu Jun 08 16:47:54 2017
Unhandled exception in thread started by
sys.excepthook is missing
lost sys.stderr
直接导致子线程未结束时候主线程已经退出
下面的例子我们再利用thread的锁机制来保证线程的同步
import thread
from time import sleep,ctime

loops = [4,2]

def loop(nloop,nsec,lock):
    print 'start loop',nloop, 'at:', ctime()
    sleep(nsec)
    print 'loop', nloop, 'done at:', ctime()
    lock.release()

def main():
    print 'starting at:', ctime()
    locks = []
    nloops = range(len(loops))

    for i in nloops:
        lock = thread.allocate_lock()
        lock.acquire()
        locks.append(lock)

    for i in nloops:
        thread.start_new_thread(loop,(i,loops[i],locks[i]))
        #sleep(1)

    for i in nloops:
        while locks[i].locked():
            pass

    print 'all done at:', ctime()

if __name__ == '__main__':
    main()
运行效果:
starting at: Thu Jun 08 17:05:59 2017
start loop 0 at: Thu Jun 08 17:05:59 2017start loop
 1 at: Thu Jun 08 17:05:59 2017
loop 1 done at: Thu Jun 08 17:06:01 2017
loop 0 done at: Thu Jun 08 17:06:03 2017
all done at: Thu Jun 08 17:06:03 2017
我们能看到两个线程是并发的,并且主线程等子线程结束后才结束的。但是与书上不一致的是启动线程中的输出是乱掉了,不清楚为何和书上为何不一致。
根据作者的解释建议我们尽量不要使用thread模块,而使用更高级的threading模块。
下面我们先看下threading模块的对象:
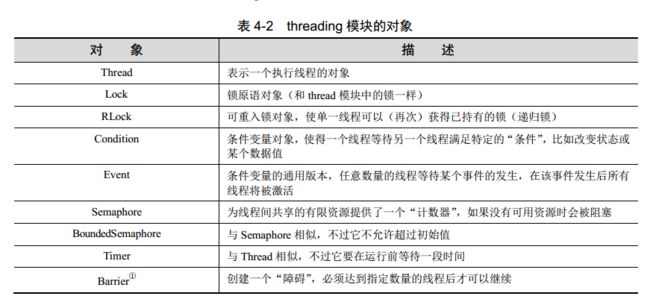
利用threading模块的thread类有三种方法:
• 创建Thread 的实例,传给它一个函数。
• 创建Thread 的实例,传给它一个可调用的类实例。
• 派生Thread 的子类,并创建子类的实例。
首先利用第一种方法来修改上面的例子:
• 创建Thread 的实例,传给它一个函数。
import threading
from time import sleep, ctime

loops = [4, 2]


def loop(nloop, nsec):
    print 'start loop', nloop, 'at:', ctime()
    sleep(nsec)
    print 'loop', nloop, 'at:', ctime()


def main():
    print 'starting at:', ctime()
    threads = []
    nloops = range(len(loops))
    for i in nloops:
        t = threading.Thread(target=loop, args=(i, loops[i]))
        threads.append(t)
    for i in nloops:
        threads[i].start()
    for i in nloops:
        threads[i].join()
    print 'all done at:', ctime()


if __name__ == '__main__':
    main()
运行效果:跟之前的代码对比,我们用一组thread对象代替了之前实现的锁,并且代码不会立即执行,只在你希望它执行的时候执行;另外使用join()方法比等待锁释放的无限循环更清晰。
starting at: Fri Jun 09 10:21:45 2017
start loop 0 at: Fri Jun 09 10:21:45 2017
start loop 1 at: Fri Jun 09 10:21:45 2017
loop 1 at: Fri Jun 09 10:21:47 2017
loop 0 at: Fri Jun 09 10:21:49 2017
all done at: Fri Jun 09 10:21:49 2017
接着我们使用第二种方法来修改代码
• 创建Thread 的实例,传给它一个可调用的类实例。
import threading
from time import sleep, ctime

loops = [4, 2]


class ThreadFunc(object):
    def __init__(self, func, args, name=''):
        self.name = name
        self.func = func
        self.args = args

    def __call__(self):
        self.func(*self.args)

def loop(nloop, nsec):
    print 'start loop', nloop, 'at:', ctime()
    sleep(nsec)
    print 'loop', nloop, 'at:', ctime()

def main():
    print 'starting at:', ctime()
    threads = []
    nloops = range(len(loops))
    for i in nloops:
        t = threading.Thread(target=ThreadFunc(loop,(i,loops[i]),loop.__name__))
        threads.append(t)
    for i in nloops:
        threads[i].start()
    for i in nloops:
        threads[i].join()
    print 'all done at:', ctime()


if __name__ == '__main__':
    main()
运行结果:在上个代码中添加一个新类ThreadFunc即得到这个代码,比起一个函数有更好的灵活性,而不仅仅是单个函数
starting at: Fri Jun 09 10:31:34 2017
start loop 0 at: Fri Jun 09 10:31:34 2017
start loop 1 at: Fri Jun 09 10:31:34 2017
loop 1 at: Fri Jun 09 10:31:36 2017
loop 0 at: Fri Jun 09 10:31:38 2017
all done at: Fri Jun 09 10:31:38 2017
我们再看看第三种方式的代码:
• 派生Thread 的子类,并创建子类的实例。
import threading
from time import sleep, ctime

loops = [4, 2]


class MyThread(threading.Thread):
    def __init__(self, func, args, name=''):
        threading.Thread.__init__(self)
        self.name = name
        self.func = func
        self.args = args

    def run(self):
        self.func(*self.args)

def loop(nloop, nsec):
    print 'start loop', nloop, 'at:', ctime()
    sleep(nsec)
    print 'loop', nloop, 'at:', ctime()

def main():
    print 'starting at:', ctime()
    threads = []
    nloops = range(len(loops))
    for i in nloops:
        t = MyThread(loop,(i,loops[i]),loop.__name__)
        threads.append(t)
    for i in nloops:
        threads[i].start()
    for i in nloops:
        threads[i].join()
    print 'all done at:', ctime()


if __name__ == '__main__':
    main()
本例直接对Thread子类化,使我们具有更多的灵活性。
使用这种模式必须首先先调用基类的构造函数,即
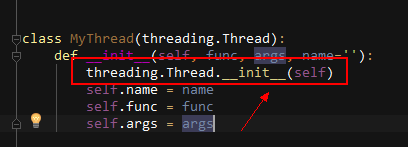
还有之前的 call()特殊方法必须写为run()。
下面是运行结果:
starting at: Fri Jun 09 12:10:54 2017
start loop 0 at: Fri Jun 09 12:10:54 2017
start loop 1 at: Fri Jun 09 12:10:54 2017
loop 1 at: Fri Jun 09 12:10:56 2017
loop 0 at: Fri Jun 09 12:10:58 2017
all done at: Fri Jun 09 12:10:58 2017
如果我们要获取子线程返回的结果怎么处理呢,下篇文章我们在讨论。