AspectJ 在 Android 中的使用
在介绍 AspectJ 之前,我们先看看常见的几种编程架构思想。
- 面向对象编程 Object Oriented Programming
- 面向过程编程 Procedure Oriented Programming
- 面向切面编程 Aspect Oriented Programming
面向对象、面向过程、面向切面, 这三种是我们常见的三种编程架构思想,在日常的编程中, OOP 是 Android 开发中最常见的,其他的两种比较少见。
一、AOP
AOP 是面向切面编程,它在我们的日志系统、权限管理方面有着比较好的应用。
在项目中,我们的很多功能都是分散到各个模块,例如日志打印,AOP 的目标就是要把这些功能集中起来,放到一个统一的地方来控制和管理。
二、AspectJ
AOP 是一种编程的思想,在具体的编程中需要实际的工具去实现这套思想。 AspectJ 就是这样的一个工具。使用 AspectJ 有两种方式
-
- 完全使用 AspectJ 的语言开发;
-
- 使用 AspectJ 注解,完全的使用纯 Java 开发
我们后续讲的,基本上都是以 AspectJ 注解的方法,同时在最后也会附上 AspectJ 和 AspectJ 注解的等价。
1.AspectJ 语法
这里只是介绍简单的一些概念,如果想要去了解深入的用法,可参考文后的链接,去官网查看。
1. JoinPoint
JoinPoint: A particular point in a program that might be the target of code injection.
JoinPoint 简单一点说就是程序运行时要执行一些动作的点。
AspectJ 中可以选择的 JoinPoint
| JoinPoint | 说明 | 示例 |
|---|---|---|
| method call | 函数调用 | 例如调用 Log.e( ) |
| method execution | 函数执行 | 例如 Log.e( ) 的执行内部。 method call 是调用某个函数的地方 execution 是某个函数执行的内部 |
| constructor call | 构造函数调用 | 和 method call 类似 |
| constructor execution | 构造函数执行 | 和 method execution 类似 |
| field get | 获取某个变量 | 例如读取 MainActivity.mTest 成员 |
| field set | 设置某个变量 | 例如设置 MainActivity.mTest 成员 |
| pre-initialization | Object 在构造函数中做的一些工作 | |
| initialization | Object 在构造函数中做的工作 | |
| static initialization | 类初始化 | 例如类的 static{} |
| handler | 异常处理 | 例如 try catch(xxx) 中,对应 catch 内的执行 |
| advice execution | AspectJ 的内容 |
JoinPoint 的选择要结合下面的 Pointcuts 表达式来看
2. Pointcut
Pointcut: An expression which tell a code injection tool where to inject a particular piece of code
Pointcut 简单的说就是从一堆的 JoinPoint 中挑选感兴趣的 JoinPoint 的表达式。
例如
pointcut anyCall(): call(* *.println(..)) && !within(TestAspect);
在 AspectJ 的语言中定义一个 Pointcout 需要用关键词 pointcut .
上面的这里是
- pointcut: 是定一个 Pointcut 的关键词
- anyCall(): 是 Pointcut 的名称
- call : 表示 JoinPoint 的类型为 call
- 第一个 '*' 号是返回值, ‘*’ 代表是任意返回值; 第二个 ‘*’ 号代表是包名,‘*’ 代表是任意包名,这边表明我们是选择任意包名下的 println 函数;在 (..) 中指定参数类型,‘..’ 通配符表示任意类型;
- &&! 表示组合条件,有 &&, || 以及 !
- within(TestAspect): within 是 JoinPoint 间接选择过滤的一个方法,后面会讲到。 !within(TestAspect) 表示调用者的类型不是 TestAspect.
3. JointPoint 的选择
JointPoint 的选择有分成直接选择和间接选择两种方式
- JointPoint 的直接选择就是通过和 Pointcut 的语法一一对应关系中选择;
- JointPoint 的间接选择就是通过一些通配符进行筛选过滤的选择,上面例子中的 within 就是间接选择的一种。
1.JointPoint 直接选择
JoinPoint 的选择策略和 Pointcut 的语法对应关系
| JoinPoint Category | Pointcut Syntax |
|---|---|
| Method execution | execution(MethodSignature) |
| Method call | call(MethodSignature) |
| Constructor execution | execution(ConstructorSignature) |
| Constructor call | call(ConstructorSignature) |
| Class initialization | staticinitialization(TypeSignature) |
| Field read access | get(FieldSignature) |
| Field write access | set(FieldSignature) |
| Exception handler execution | handler(TypeSignature) |
| Object initialization | initialization(ConstructorSignature) |
| Object pre-initialization | preinitialization(ConstructorSignature) |
| Advice execution | adviceexecution() |
JoinPoint 的策略的选择对应着不同 Pointcut,特别是 Pointcut 里面有着不同的 Signature。
以下有详细的说明:
Method Signature 表达式
语法
@注解 访问权限 返回值的类型 包名.函数名(参数)
例子:
@before("execution(* android.app.Activity.on**(..))");
注解: 是可选项; 这里是 @before,关于注解的在后面 Adivce 中有更详细的说明
访问权限: 可选项; 有 public, private, protected 类型;例子没有设置
返回值的类型: 与普通函数的返回值类型是一样的,如果不限定类型,用通配符 * 表示。例子中是 *
-
包名.函数名:用于查找匹配的函数,可以使用通配符
通配符的类型- ' * '表示用于匹配处 . 号之外的任意字符;
- ' .. ' 表示任意子 package
- ' + '号表示子类
例子:- java.*.Data: 可以表示 java.sql.Data ,也可以表示 java.util.Date;
- Test* : 表示Test开头的函数,可以表示 TestBase, 也可以表示 TestDervied
- java..* : 表示 java 任意子类
- java..*Model+: 表示 Java 任意 package 中名字以 Model 结尾的子类,比如 TabelModel, TreeModel 等
-
函数参数
参数有不同的型式- (int, char): 表示参数只有两个, 并且第一个参数是 int, 第二个参数是 char;
- (String, ..): 表示参数至少有一个。并且第一个参数是 String, 后面参数类型不限。在参数匹配中, .. 代表任意参数个数和类型;
- (Oject ...): 表示不定个数的参数,并且类型都是 Object, 这里的 ... 不是通配符,而是 java 中不定参数的意思;
Constructor Signature 表达式
和 Method Signature 类似
不同点:
构造函数没有返回值,并且函数名必须叫 new
例子:
public *..TestDeived.new(..)
- public: 表示选择 public 访问权限的
- *.. : 代表任意包名
- TestDeived.new: 代表 TestDerived 的构造函数
- (..): 代表参数个数和类型都是任意的
Field Signature表达式
语法
@注解 访问权限 类型 类名.成员变量名
- @注解和访问权限是可选的
- 类型:成员变量类型, * 表示任意类型
- 类名.成员变量名: 成员变量名可以是*, 代表任意成员变量
例子, 用 AspectJ 打印成员变量赋值前后的值
// TraceAspect.java set field 的切面
private static final String POINTCUT_FILEED =
        "set(int org.android10.viewgroupperformance.activity.MainActivity.mTest) && args(newValue) && target(t)";

@Before(POINTCUT_FILEED)
public void onFiled(JoinPoint joinPoint, Object newValue, Object t) throws IllegalAccessException {
    Object object = joinPoint.getThis();

    FieldSignature fieldSignature = (FieldSignature) joinPoint.getSignature();
    String fileName = fieldSignature.getName();
    Field field = fieldSignature.getField();
    field.setAccessible(true);
    Class clazz = fieldSignature.getFieldType();
    String clazzName = clazz.getSimpleName();

    Object oldValue = field.get(t);

    Log.i("MainActivity", "\nonFiled value = " + newValue.toString() + "\n fieldSignature =" + fieldSignature.toString()
                + "\nfield = " + field.toString() + " +  \nFileName = " + fileName
                + "\nclazzName = " + clazzName + " \noldValue = " + oldValue.toString() );
}

// 在 MainActivity.java 中
@Override
protected void onResume() {
        super.onResume();
        mTest = 100;
}
打印结果
onFiled value = 100
fieldSignature =int org.android10.viewgroupperformance.activity.MainActivity.mTest
field = private int org.android10.viewgroupperformance.activity.MainActivity.mTest +
FileName = mTest
clazzName = int
oldValue = -1
TypeSignature表达式
例子:
staticinitlization(test..TestBase): 表示 TestBase 类的 static block
handler(NullPointException): 表示 catch 到 NullPointerException 的 JPoin
2.JointPoint 间接选择
JointPoint 的直接选择是通过 Signature 信息匹配的,除此之外还有其他的方式,这些方式都可以归类到间接选择
| 关键词 | 说明 | 实例 |
|---|---|---|
| within(TypePattern) | TypePattern 表示 package 或者类 TypePattern 可以使用通配符 |
表示某个 Package 或者类中的 Point within(Test): Test 类中(包括内部类)所有的 JointPoint |
| withcode(Constructor Signature|Method Signature) | 表示某个构造函数或其他函数执行过程涉及到的 JointPoint | withinCode(* Test.testMethod(..)) 表示 testMethod 涉及的 JointPoint withinCode(*.Test.new(..)) 表示 Test 的构造函数涉及的 JointPoint |
| cflow(pointcuts) | cflow 表示 call flow cflow 的条件是一个 pointcut |
cflow(call Test.testMethod) 表示调用 Test.testMethod 函数是所包含的 JointPoint,包含 testMethod 的 call 这个 JointPoint 本身 |
| cflowbelow(pointcuts) | cflowbelow 表示不包含自身的 cflow | cflowbelow(call Test.testMethod) 表示调用 Test.testMethod 函数是所包含的 JointPoint, 不包含 testMethod 的 call 这个 JointPoint 本身 |
| this(Type) | JointPoint 的 this 对象是 Type 类型 | JPoint是代码段(不论是函数,异常处理,static block),从语法上说,它都属于一个类。如果这个类的类型是Type标示的类型,则和它相关的JPoint将全部被选中。 |
| target(Type) | JoinPoint 的 target 对象是 Type 类型 | 和this相对的是target。不过target一般用在call的情况。call一个函数,这个函数可能定义在其他类。比如testMethod是TestDerived类定义的。那么target(TestDerived)就会搜索到调用testMethod的地方。但是不包括testMethod的execution JointPoint |
| args(TypeSignature) | 用来对 JointPoint 的参数进行条件搜索 | 例如 arg(int, ..) 表示第一个参数是 int, 后面参数个数和类型不限的 JointPoint |
3.call 与 execution 区别
当 call 捕获 joinPoint 时,捕获的签名方法的调用点;execution 捕获 joinPoint 时,捕获的则是执行点。
两个的区别在于一个是 ”调用点“, 一个是 ”执行点“
对于 call 来讲
call(Before)
Pointcut {
    Pointcut Method
}
call(After)
对于 execution 来说
Pointcut {
   Execution(Before)
   Pointcut Method
   Execution(After)
}
3.AspectJ 注解的等价
AspectJ 提供了相应的注解,注解的方式和 AspectJ 语言编写是等效的。我们在 Android 中一般也是采用注解的方式
Aspect
public aspect Foo{}
等效
@Aspect
public class Foo{}
call
@Pointcut("call(* .(..))")
void anyCall(){}
等效
pointcut anyCall(): call(* .(..))
要绑定参数的时候,只需要将参数作为备注解的方法的参数即可
@Pointcut("call(* .(int)) && arg(i) && target(callee)")
void anyCall(int i, Fool callee){}
等效
pointcut anyCall(int i, Foo callee): call(* .(int)) && arg(i) && target(callee){};
说明要先定义参数 int i, Foo callee
before
@Before("call(* org.android10.viewgroupperformance.activity..(..)) && this(foo)")
public void callFromFoo(Foo foo){}
等效
before(Foo foo): call( org.android10.viewgroupperformance.activity..*(..)) && this(foo){}
returning
@AfterReturning(pointcut="call(Foo+.new(..))", returning="f")
public void itsAFoo(foo f){}
等效
after returning(Foo f): call(Foo+.new(..)){}
其他的表达式也是类似的
4. Advice
Advice: Advice defines pieces of aspect implementation that execute at well-defined points in the execution of the program.
通过前面的 Pointcuts 找到了相应的 JointPoint, 需要对这些 JointPoint 最一些事情,相当于对 JointPoint 进行 hook, 这就是 advice 要做的事。
advice 的分类
| 关键词 | 说明 | 示例 |
|---|---|---|
| before() | before advice | 表示在 JointPoint 执行之前要干 的事 |
| after() | after advice | 表示在 JointPoint 执行之后要干的事 |
| after(): returning(返回值类型) after():throwing(异常类型) |
returning 和 throwing 后面都可以指定具体的类型,如果不指定则匹配类型不限制 | 假设 JointPoint 是一个函数调用 那么函数调用执行完有两种方式退出 一个是正常的 return, 另一个是抛异常 after() 默认包括 returing 和 throwing 两种情况 |
| 返回值类型 around() |
around 替代原来的 JointPoint | around 替代了原来的 JointPoint,如果要执行原 JointPoint 的话,需要调用 procced |
例子:
我们需要在 Activity 中的 onResume 方法调用前后输出
// MainActivity.java
@Override
protected void onResume() {
    super.onResume();
    Log.i(TAG, "--- onResume---");
}

// TraceAspect.java
private static final String POINTCUT_ONMETHOD =
        "execution(* android.app.Activity.on**(..))";

@Before(POINTCUT_ONMETHOD)
public void beforeOnMethod(JoinPoint joinPoint) {
    MethodSignature methodSignature = (MethodSignature) joinPoint.getSignature();
    String className = methodSignature.getDeclaringType().getSimpleName();
    String methodName = methodSignature.getName();
    Log.i(className, "before " + methodName + " log");

}

@After(POINTCUT_ONMETHOD)
public void onMethLog(JoinPoint joinPoint){
    MethodSignature methodSignature = (MethodSignature) joinPoint.getSignature();
    String className = methodSignature.getDeclaringType().getSimpleName();
    String methodName = methodSignature.getName();
    Log.i(className, "after " + methodName + " log");
}
查看输出
改成 Around 的方式
// TraceAspect.java
private static final String POINTCUT_ONMETHOD =
        "execution(* android.app.Activity.on**(..))";
@Pointcut(POINTCUT_ONMETHOD)
public void annotationOnMethodTrace(){

}

@Around("annotationOnMethodTrace()")
public Object weaveOnMethodJoinPoint(ProceedingJoinPoint joinPoint) throws Throwable {

  MethodSignature methodSignature = (MethodSignature) joinPoint.getSignature();
  String className = methodSignature.getDeclaringType().getSimpleName();
  String methodName = methodSignature.getName();

  Log.i("MainActivity", "before joinPoint proceed className = " + className + " methodName = " + methodName);

  Object result  = joinPoint.proceed();
  Log.i("MainActivity", "after joinPoint proceed className = " + className + " methodName = " + methodName);

  return result;
}
输出
从上面例子的输出我们可以看到 around 等价于 before + after, 另外 JointPoint#proceed 是原来的 JointPoint,在这里是 onResume 方法, 输出中的 “--- onResume---” 就是在 onResume 中打印的。
5. 参数传递和 JointPoint 信息
经过前面的几个步骤,我们已经拿到了 JointPoint,但是我们经常需要对一些 advice 传入参数,然后进行处理的。例如如果传入的参数不合法,就不用调 JointPoint#proceed 方法处理了。
参数传递
advice 参数的方法由 this, target(), args()
- this(Type or Id): 捕获当前对象(被绑定 this)实例执行的连接点 -- 实例由 Type 或者 Id 描述
- target(Type or Id): 捕获目标对象(被应用与对象上的调用和属性操作)实例的连接点 -- 实例由 Type 和 Id 描述(必须绑定和封装后放入通知或者切点定义)。它不匹配任何静态的调用、应用和设置成员。
- args(Type or Id): 捕获具有适当类型样式的实例连接点
下面是例子说明
我们在 MainActivity 定义一个成员变量 mTest, 初始值为 -1,在 OnResume() 方法对它进行赋值,用 target 和 args 对 mTest 赋值前后的值进行监听
// MainActivity.java
private int mTest = -1;
@Override
protected void onResume() {
    super.onResume();
    Log.i(TAG, "--- onResume---");
    mTest = 100;
}

// TraceAspect.java
// set field 的切面
private static final String POINTCUT_FILEED =
        "set(int org.android10.viewgroupperformance.activity.MainActivity.mTest) && args(newValue) && target(t)";

@Before(POINTCUT_FILEED)
public void onFiled(JoinPoint joinPoint, Object newValue, Object t) throws IllegalAccessException {

    FieldSignature fieldSignature = (FieldSignature) joinPoint.getSignature();
    String fileName = fieldSignature.getName();
    Field field = fieldSignature.getField();
    field.setAccessible(true);
    Class clazz = fieldSignature.getFieldType();
    String clazzName = clazz.getSimpleName();

    Object oldValue = field.get(t);

    Log.i("MainActivity",
               "\nonFiled value = " + newValue.toString()
                    + "\ntarget = " + t.toString()
                    + "\n fieldSignature =" + fieldSignature.toString()
                    + "\nfield = " + field.toString()
                    + "\nFileName = " + fileName
                    + "\nclazzName = " + clazzName
                    + " \noldValue = " + oldValue.toString() );
}
我们看看输出
定义切面表达式使用 args(newValue) && target(t) 它们的参数值 newValue, t,必须要和方法中的定义的对的上
public void onFiled(JoinPoint joinPoint, Object newValue, Object t)
JointPoint 信息
在 advice 中我们可以拿到 JointPoint 的信息,一般包含
- JointPoint 对象信息:例如参数、前面之类的
JoinPoint.getSignature() 包含有
- MethodSignature 方法的签名
- FieldSignature 成员变量的签名
- ConstructorSignature 构造函数的签名
- InitializerSignature 初始化的签名
不同的签名对应不同的场景
- JointPoint 源代码部分的信息,例如类型、所处的位置
- JointPoint 静态部分信息
例子:
@Around("methodAnnotatedWithDebugTrace() || constructorAnnotatedDebugTrace()")
public Object weaveJoinPoint(ProceedingJoinPoint joinPoint) throws Throwable {
    // joint 对象信息
    MethodSignature methodSignature = (MethodSignature) joinPoint.getSignature();
    String className = methodSignature.getDeclaringType().getSimpleName();
    String methodName = methodSignature.getName();

    // 源代码部分信息
    SourceLocation sourceLocation = joinPoint.getSourceLocation();
    String fileName = sourceLocation.getFileName();
    int line = sourceLocation.getLine();
    String soucreClassName = sourceLocation.getWithinType().getName();
    DebugLog.log(className, "\nfileName = " + fileName + "\nline = " + line + "\nsoucreClassName = " + soucreClassName);

    // 静态部分
    JoinPoint.StaticPart staticPart = joinPoint.getStaticPart();

return result;
}
更详细的信息参考文档
https://www.eclipse.org/aspectj/doc/released/runtime-api/index.html
总结一下,使用 AspectJ 的步骤:
- 设置 Pointcut 的表达式
- 选择相应的 advice
- 对 JointPoint 或参数进行相应的处理
三、AspectJ 集成在 Android studio 中
前面已经介绍完了 AspectJ, 那接下来看看在 Android 中的实际使用;
实例代码是在这个例子上进行修改的Android-AOPExample。
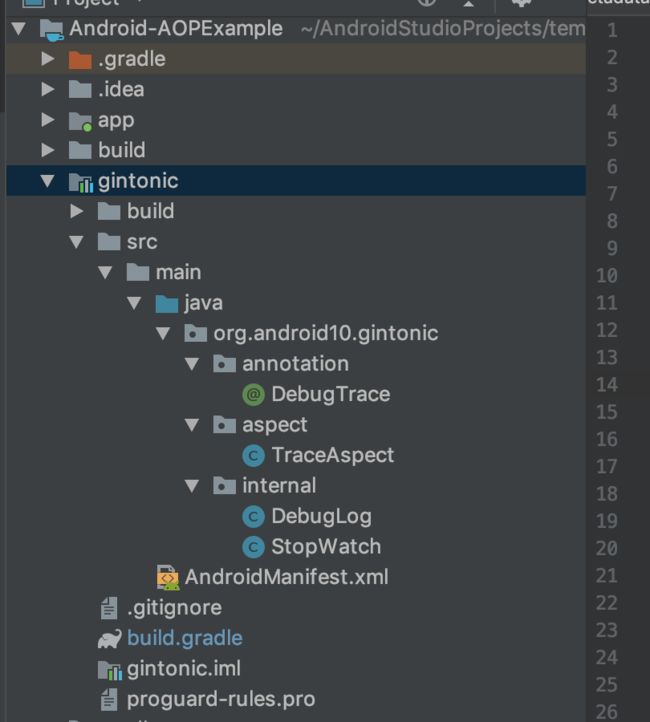
1. Library 库依赖方式使用
项目的结构如下
在 library 项目 gintoinc 的 build.gradle 文件要添加 aspectj 的依赖
buildscript {
  repositories {
    mavenCentral()
  }
  dependencies {
    classpath 'com.android.tools.build:gradle:2.1.0'
    classpath 'org.aspectj:aspectjtools:1.8.1'  // aspectjtools
  }
}

apply plugin: 'com.android.library'

repositories {
  mavenCentral()
}

dependencies {
  compile 'org.aspectj:aspectjrt:1.8.1'  // aspectjrt
}

android {
  compileSdkVersion 21
  buildToolsVersion '21.1.2'

  lintOptions {
    abortOnError false
  }
}

// -showWeaveInfo,输出编织过程信息
// -1.5 设置规范1.5,匹配java1.5
// -inpath class文件目录或者jar包, 源字节码,需要处理的类
// -aspectpath  定义的切面类
// -d 存放编辑产生的class文件
// -classpath ,所有class文件,源class,java包,编织时需要用到的一些处理类
android.libraryVariants.all { variant ->
  LibraryPlugin plugin = project.plugins.getPlugin(LibraryPlugin)
  JavaCompile javaCompile = variant.javaCompile
  javaCompile.doLast {
    String[] args = ["-showWeaveInfo",
                     "-1.5",
                     "-inpath", javaCompile.destinationDir.toString(),
                     "-aspectpath", javaCompile.classpath.asPath,
                     "-d", javaCompile.destinationDir.toString(),
                     "-classpath", javaCompile.classpath.asPath,
                     "-bootclasspath", plugin.project.android.bootClasspath.join(File.pathSeparator)]

    MessageHandler handler = new MessageHandler(true);
    new Main().run(args, handler)

    def log = project.logger
    for (IMessage message : handler.getMessages(null, true)) {
      switch (message.getKind()) {
        case IMessage.ABORT:
        case IMessage.ERROR:
        case IMessage.FAIL:
          log.error message.message, message.thrown
          break;
        case IMessage.WARNING:
        case IMessage.INFO:
          log.info message.message, message.thrown
          break;
        case IMessage.DEBUG:
          log.debug message.message, message.thrown
          break;
      }
    }
  }
}
在引用库工程的工程 build.gradle 也要进行相应的配置
import org.aspectj.bridge.IMessage
import org.aspectj.bridge.MessageHandler
import org.aspectj.tools.ajc.Main

buildscript {
  repositories {
    mavenCentral()
  }
  dependencies {
    classpath 'org.aspectj:aspectjtools:1.8.1'
  }
}

apply plugin: 'com.android.application'

repositories {
  mavenCentral()
}

dependencies {
  compile project(':gintonic')
  compile 'org.aspectj:aspectjrt:1.8.1'
}

android {
  compileSdkVersion 21
  buildToolsVersion '21.1.2'

  defaultConfig {
    applicationId 'android10.org.viewgroupperformance'
    minSdkVersion 15
    targetSdkVersion 21
  }

  lintOptions {
    abortOnError true
  }
}

final def log = project.logger
final def variants = project.android.applicationVariants

variants.all { variant ->
  if (!variant.buildType.isDebuggable()) {
    log.debug("Skipping non-debuggable build type '${variant.buildType.name}'.")
    return;
  }

  JavaCompile javaCompile = variant.javaCompile
  javaCompile.doLast {
    String[] args = ["-showWeaveInfo",
                     "-1.5",
                     "-inpath", javaCompile.destinationDir.toString(),
                     "-aspectpath", javaCompile.classpath.asPath,
                     "-d", javaCompile.destinationDir.toString(),
                     "-classpath", javaCompile.classpath.asPath,
                     "-bootclasspath", project.android.bootClasspath.join(File.pathSeparator)]
    log.debug "ajc args: " + Arrays.toString(args)

    MessageHandler handler = new MessageHandler(true);
    new Main().run(args, handler);
    for (IMessage message : handler.getMessages(null, true)) {
      switch (message.getKind()) {
        case IMessage.ABORT:
        case IMessage.ERROR:
        case IMessage.FAIL:
          log.error message.message, message.thrown
          break;
        case IMessage.WARNING:
          log.warn message.message, message.thrown
          break;
        case IMessage.INFO:
          log.info message.message, message.thrown
          break;
        case IMessage.DEBUG:
          log.debug message.message, message.thrown
          break;
      }
    }
  }
}
文章Aspect Oriented Programming in Android 是通过注解去查看方法执行的时间,我们在这个基础上进行修改,去监听一个成员变量赋值变化的监听。
我们需要监听 MainActivity 中 mTest
private int mTest = -1;
@Override
protected void onResume() {
    super.onResume();
    Log.i(TAG, "--- onResume---");
    mTest = 100;
}
第一步. 设置 Pointcut 的表达式
在 TraceAspect.java中
 // set field 的切面
    private static final String POINTCUT_FILEED =
            "set(int org.android10.viewgroupperformance.activity.MainActivity.mTest) && args(newValue) && target(t)";
根据 JoinPoint 的选择策略和 Pointcut 的语法对应关系,成员变量选择的 set, 参数传递的监听使用 args(newValue) && target(t)
第二步. 选择相应的 advice
@Before(POINTCUT_FILEED)
public void onFiled(JoinPoint joinPoint, Object newValue, Object t) throws IllegalAccessException {

    ...

}
这里我们选择的是 Before, 注意在第一步 args(newValue) && target(t) 中的 newValue 和 t 是要在 advice 函数中定义的 Object newValue, Object t.
第三步. 对 JointPoint 或参数进行相应的处理
@Before(POINTCUT_FILEED)
public void onFiled(JoinPoint joinPoint, Object newValue, Object t) throws IllegalAccessException {

    FieldSignature fieldSignature = (FieldSignature) joinPoint.getSignature();
    String fileName = fieldSignature.getName();
    Field field = fieldSignature.getField();
    field.setAccessible(true);
    Class clazz = fieldSignature.getFieldType();
    String clazzName = clazz.getSimpleName();

    // 获取旧的值
    Object oldValue = field.get(t);

    Log.i("MainActivity",
               "\nonFiled value = " + newValue.toString()
                    + "\ntarget = " + t.toString()
                    + "\n fieldSignature =" + fieldSignature.toString()
                    + "\nfield = " + field.toString()
                    + "\nFileName = " + fileName
                    + "\nclazzName = " + clazzName
                    + " \noldValue = " + oldValue.toString() );

}
通过 JoinPoint 获取相应的信息。
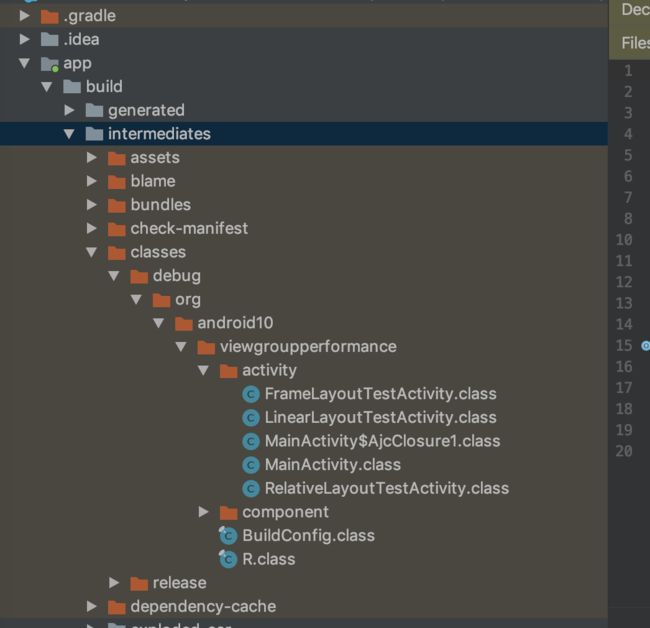
在 build 之后,在 app/intermediates/classes/debug 目录下的
MainActivity.class 文件中
protected void onResume() {
    super.onResume();
    Log.i("MainActivity", "--- onResume---");
    byte var1 = 100;
    JoinPoint var3 = Factory.makeJP(ajc$tjp_2, this, this, Conversions.intObject(var1));
    TraceAspect.aspectOf().onFiled(var3, Conversions.intObject(var1), this);
    this.mTest = var1;
}
我们发现上面生成了一下代码,这些生成的代码就是 AspectJ 根据我们前面设置的 Pointcut 和 adive 生成的。
输出
在 build 之后,在 app/intermediates/classes/debug 目录下的

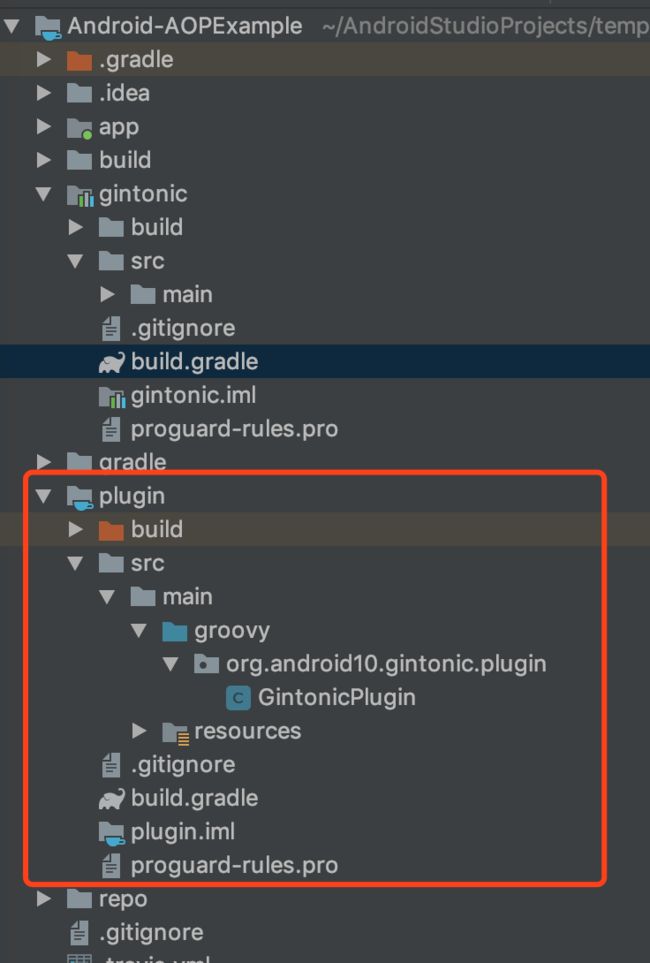
2. Plugin 插件方式使用
如果是多个 Module 都依赖 AspectJ, 可以写成 plugin 插件的型式
关于如果使用 Android studio 的 Plugin 插件,可以去查看相关资料
项目的 build.gradle
buildscript {
    repositories {
        mavenCentral()
        // 本地仓库
        maven {
            url uri('repo')
        }
    }
    dependencies {
        classpath 'com.android.tools.build:gradle:2.1.0'
        // 引入插件
        classpath 'com.yxhuang:autotrack.android:1.0.1'
    }
}

allprojects {
  repositories {
    mavenCentral()
      maven {
          url 'https://maven.google.com/'
          name 'Google'
      }
  }
}

//task wrapper(type: Wrapper) {
//  gradleVersion = '2.12'
//}
task clean(type: Delete) {
    delete rootProject.buildDir
}
gintonic 的 build.gradle 文件
buildscript {
  repositories {
    mavenCentral()
    // 本地代码仓
    maven{
      url uri('../repo')
    }
  }
  dependencies {
    classpath 'com.android.tools.build:gradle:2.1.0'
    classpath 'com.yxhuang:autotrack.android:1.0.1' // 引用插件
  }
}

apply plugin: 'com.android.library'
apply plugin: 'com.yxhuang.android' // 引用插件

repositories {
  mavenCentral()
}

dependencies {
}

android {
  compileSdkVersion 21
  buildToolsVersion '21.1.2'

  lintOptions {
    abortOnError false
  }
}
app module 的 build.gradle 文件
apply plugin: 'com.android.application'
apply plugin: 'com.yxhuang.android'  //引入插件

buildscript {
  repositories {
    mavenCentral()

    // 本地代码仓
    maven{
      url uri('../repo')
    }
  }
  dependencies {
    classpath 'com.yxhuang:autotrack.android:1.0.1' //引入插件
  }
}

repositories {
  mavenCentral()
}

dependencies {
  compile project(':gintonic')
}

android {
  compileSdkVersion 21
  buildToolsVersion '21.1.2'

  defaultConfig {
    applicationId 'android10.org.viewgroupperformance'
    minSdkVersion 15
    targetSdkVersion 21
  }

  lintOptions {
    abortOnError true
  }
}
具体的代码可以去 github AndroidAopDemo 选择 tag v2 即可。
四、参考
- 1.深入理解Android之AOP
- 2.Aspect Oriented Programming in Android
- 3.《Android 全埋点解决方案》第 8 章,AppClick 全埋点方案5:AspectJ
- 4.极客时间专栏《Android 开发高手课》第 27 讲, 编译插桩的三种方法: AspectJ, ASM, ReDex
- 5.AspectJ 官方手册


