JUC并发编程小总结
JUC是Java编发编程中使用的工具类,全称为java.util.concurrent。近期在大厂面试中屡屡被问到关于JUC的相关知识点问题,其重要性不言而喻,学好用好JUC可以说是每一个Java程序开发工作者不能不研究和不能不解决的问题,因此,在自己屡屡碰壁后决定对JUC的相关知识点进行一次系统的梳理,并通过博客分享的方式进行一个大概的总结,所记如下。
一、与JUC相关概念回顾
JUC是Java并发编程中使用的核心工具类,主要包括:
(1)锁机制类Locks:Lock, Condition, ReadWriteLock等。
(2)原子操作类:Atomic:AtomicInteger, AtomicLong等。
(2)并发集合类:CopOnWriteArrayList, ConcurrentHashMap等。
(3)信号量三组工具类:CountDownLatch, CyclicBarrier, Semaphore。
(4)线程池相关类:Feture, Callable, Executor等。
在说JUC工具类之前我们首先回顾一下在并发编程中经常会混淆的几个概念,线程和进程的区别是什么?并发和并行的区别是什么?阻塞和非阻塞的区别是什么?同步和异步的区别是什么?我觉得这几个概念可以用生活中的例子进行类比,记起来更加方便。
进程: 打开QQ,开了一个进程;打开微信,开了一个进程;打开王者荣耀,又开了一个进程。
线程: 使用微信时,一边与A好友进行文字聊天是一个线程,同时与B好友进行语音通话是一个线程,同时正在给C好友传输文件又是一个线程。
(单进程单线程:一个人在一张桌子吃饭;单进程多线程:多个人在同一张桌子上一起吃饭)
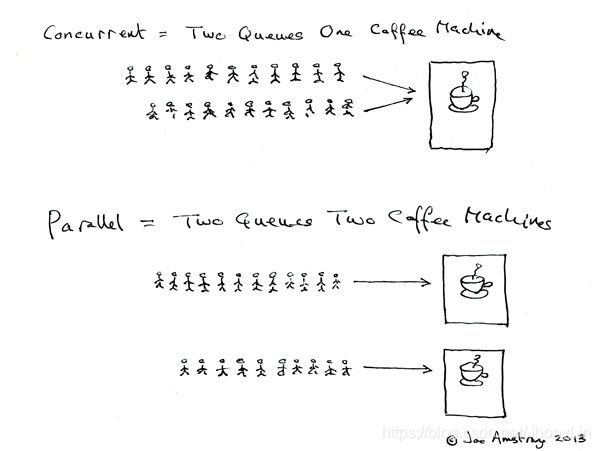
并发: 两个队列交替使用一台咖啡机。
并行: 两个队列使用两台咖啡机。
Erlang 之父 Joe Armstrong 用一张5岁小孩都能看懂的图解释了并发与并行的区别,如下:
阻塞: 排队打饭,什么都不做等着轮到自己打饭为止。
非阻塞: 奶茶店买奶茶,当奶茶还做好前,先找个位置打两盘王者,等奶茶做好后再去拿。
同步: 去肯德基买全家桶,等全家桶做好后通知我,我自己去前台拿。
异步: 去酒店吃饭,等菜做好后端到我的桌面上。
(数据就绪后,需要自己去读就是同步,数据就绪直接读好再回调给程序就是异步,可以理解为菜做好后如果是自己去拿就是同步,一手包办送到我桌面就是异步)
二、锁机制类
1、synchronized同步锁回顾
在讲JUC中的锁机制前先回顾一下synchronized同步锁。
使用口诀:线程操作资源类
题目:三个售票员卖出30张票。使用synchronized的代码如下:
//资源类
public class Ticket0 {

    private int count = 30;
    public synchronized void sale() {

        if(count > 0) {

            System.out.println(Thread.currentThread().getName() + "卖出第" + (count--) +"张票,还剩" + count + "张票");
        }
    }
}
//线程
public class TicketDemo02 {

    public static void main(String[] args) {

        Ticket0 ticket = new Ticket0();
        //售票员1
        new Thread(()-> {

            for (int i = 0; i < 40; i++) {

                ticket.sale();
            }
        }, "AAA").start();
		//售票员2
        new Thread(()-> {

            for (int i = 0; i < 40; i++) {

                ticket.sale();
            }
        }, "BBB").start();
		//售票员3
        new Thread(()-> {

            for (int i = 0; i < 40; i++) {

                ticket.sale();
            }
        }, "CCC").start();
    }
}
2、使用JUC的Lock
同样的解决三个售票员卖出30张票的问题。使用Lock的代码如下:
//资源类
public class Ticket {

    private int count = 30;
    private ReentrantLock lock = new ReentrantLock();
    public void sale() {

        lock.lock();
        try {

            if(count > 0) {

                System.out.println(Thread.currentThread().getName() + "卖出第" + (count--) +"张票,还剩" + count + "张票");
            }
        } catch (Exception e) {

            e.printStackTrace();
        } finally {

            lock.unlock();
        }
    }
}
//线程
public class TicketDemo02 {

    public static void main(String[] args) {

        Ticket ticket = new Ticket();
        new Thread(()-> {

            for (int i = 0; i < 40; i++) {

                ticket.sale();
            }
        }, "AAA").start();

        new Thread(()-> {

            for (int i = 0; i < 40; i++) {

                ticket.sale();
            }
        }, "BBB").start();

        new Thread(()-> {

            for (int i = 0; i < 40; i++) {

                ticket.sale();
            }
        }, "CCC").start();
    }
}
单从卖票这个问题上来看,synchronized和Lock的效果一样,那么他们的区别在哪里呢?
(1)synchronized是一个关键字,在jvm层面;而Lock是一个Java类,在API层面。
(2)synchronized无法判断是否已获取锁的状态,而Lock可以通过tryLock方法判断获取锁的状态
(3)synchronized自动释放锁,Lock需要手动释放锁,一般会在finally中使用unlock方法释放,否则容易导致死锁。
(4)synchronized是同步阻塞,而Lock是同步非阻塞
(5)synchronized适合代码少量同步的同步问题,Lock适合代码大量同步的同步问题。
3、线程间的通信
线程间的通信间的通信比较典型的就是生产者消费者模式,我们可以把现场间的通信归纳为以下口诀:
(1)线程操作资源类
(2)判断、干活、通知
(3)多线程交互中,必须要防止虚假唤醒(在资源类做判断等待时,必须使用while,禁止使用if)
题目:两个线程,可以操作初始值为0的一个变量实现一个线程对该变量加1,一个线程对该变量减1实现交替10轮,变量最后初始值为0。
先回顾以往使用synchronized+wait/notify的实现方式,代码如下:
//资源类
public class AirConditionor {

    private int num = 0;
    public synchronized void increament() throws InterruptedException {

    	//这里必须使用while,否则会产生虚假唤醒现象
        while (num != 0) {

            this.wait();
        }
        num++;
        System.out.println(Thread.currentThread().getName() + ":" + num);
        this.notifyAll();
    }
    public synchronized void decreament() throws InterruptedException {

    	//这里必须使用while,否则会产生虚假唤醒现象
        while (num == 0) {

            this.wait();
        }
        num--;
        System.out.println(Thread.currentThread().getName() + ":" + num);
        this.notifyAll();
    }
}
//线程
public class ThreadWaitNotifyDemo02 {

    public static void main(String[] args) {

        AirConditionor airConditionor = new AirConditionor();
        new Thread(() -> {

            for (int i = 0; i < 20; i++) {

                try {

                    airConditionor.increament();
                } catch (InterruptedException e) {

                    e.printStackTrace();
                }
            }
        }, "AAA").start();

        new Thread(() -> {

            for (int i = 0; i < 20; i++) {

                try {

                    airConditionor.decreament();
                } catch (InterruptedException e) {

                    e.printStackTrace();
                }
            }
        }, "BBB").start();


        new Thread(() -> {

            for (int i = 0; i < 20; i++) {

                try {

                    airConditionor.increament();
                } catch (InterruptedException e) {

                    e.printStackTrace();
                }
            }
        }, "CCC").start();

        new Thread(() -> {

            for (int i = 0; i < 20; i++) {

                try {

                    airConditionor.decreament();
                } catch (InterruptedException e) {

                    e.printStackTrace();
                }
            }
        }, "DDD").start();

    }
}
使用Lock进行线程间的通信,通过Condition接口来实现,相同的问题,代码如下:
//资源类
public class AirConditionor2 {

    private int num = 0;
    private ReentrantLock lock = new ReentrantLock();
    Condition condition = lock.newCondition();
    public void  increament() {

        lock.lock();
        try {

            while (num != 0) {

                condition.await();
            }
            num++;
            System.out.println(Thread.currentThread().getName() + ":" + num);
            condition.signalAll();
        } catch (InterruptedException e) {

            e.printStackTrace();
        } finally {

            lock.unlock();
        }

    }
    public void  decreament()   {

        lock.lock();
        try {

            while (num == 0) {

                condition.await();
            }
            num--;
            System.out.println(Thread.currentThread().getName() + ":" + num);
            condition.signalAll();
        } catch (InterruptedException e) {

            e.printStackTrace();
        } finally {

            lock.unlock();
        }

    }
}
//线程
public class ThreadWaitNotifyDemo03 {

    public static void main(String[] args) {

        AirConditionor airConditionor2 = new AirConditionor();
        new Thread(() -> {

            for (int i = 0; i < 20; i++) {

                try {

                    airConditionor2.increament();
                } catch (InterruptedException e) {

                    e.printStackTrace();
                }
            }
        }, "AAA").start();

        new Thread(() -> {

            for (int i = 0; i < 20; i++) {

                try {

                    airConditionor2.decreament();
                } catch (InterruptedException e) {

                    e.printStackTrace();
                }
            }
        }, "BBB").start();
        new Thread(() -> {

            for (int i = 0; i < 20; i++) {

                try {

                    airConditionor2.increament();
                } catch (InterruptedException e) {

                    e.printStackTrace();
                }
            }
        }, "CCC").start();

        new Thread(() -> {

            for (int i = 0; i < 20; i++) {

                try {

                    airConditionor2.decreament();
                } catch (InterruptedException e) {

                    e.printStackTrace();
                }
            }
        }, "DDD").start();
    }
}
直接这样看以上问题的例子好像没什么区别,那么synchronized+wait/notify和lock+await/signal的主要区别在哪里呢?主要体现在线程间定制化调用通信中。可以理解为前者是使用炮弹轰炸,后者是使用导弹精准打击。题目例子如下:三个线程启动,AAA打印5次,BBB打印10次,CCC打印15次,如此返回打印10轮。
可以通过Lock实现Condition接口创建多个,每一个功能对应一个Condition,通过相应的等待唤醒方法来实现精准控制。代码如下:
//资源类
public class MyThread {

    /**
     * 0代表打印5次,1代表打印10次,2代表打印15次
     */
    private int num = 0;
    Lock lock = new ReentrantLock();
    Condition condition0 = lock.newCondition();
    Condition condition1 = lock.newCondition();
    Condition condition2 = lock.newCondition();
    public void print5()  {

        lock.lock();
        try {

            while (num != 0) {

                condition0.await();
            }
            for (int i = 1; i <= 5; i++) {

                System.out.println(Thread.currentThread().getName() + ":" + i);
            }
            num = 1;
            condition1.signal();
        } catch (InterruptedException e) {

            e.printStackTrace();
        } finally {

            lock.unlock();
        }
    }
    public void print10()  {

        lock.lock();
        try {

            while (num != 1) {

                condition1.await();
            }
            for (int i = 1; i <= 10; i++) {

                System.out.println(Thread.currentThread().getName() + ":" + i);
            }
            num = 2;
            condition2.signal();
        } catch (InterruptedException e) {

            e.printStackTrace();
        } finally {

            lock.unlock();
        }
    }
    public void print15()  {

        lock.lock();
        try {

            while (num != 2) {

                condition2.await();
            }
            for (int i = 1; i <= 15; i++) {

                System.out.println(Thread.currentThread().getName() + ":" + i);
            }
            num = 0;
            condition0.signal();
        } catch (InterruptedException e) {

            e.printStackTrace();
        } finally {

            lock.unlock();
        }
    }
}
//线程
public class ThreadOrderAccessDemo04 {

    public static void main(String[] args) {

        MyThread myThread = new MyThread();
        new Thread(()->{

            for (int i = 0; i < 10; i++) {

               myThread.print5();
            }
        }, "AAA").start();

        new Thread(()->{

            for (int i = 0; i < 10; i++) {

                myThread.print10();
            }
        }, "BBB").start();

        new Thread(()->{

            for (int i = 0; i < 10; i++) {

                myThread.print15();
            }
        }, "CCC").start();
    }
}
4、锁的8个问题
对于资源类方法的静态和静态,加锁和不加锁,衍生出令人混淆的8个关于锁的问题:
以一个含有sendEmail()和sendMs()及sayHello()的方法的Phone类为例子,问题如下:
(1)标准访问,先打印邮件
public class Phone {

    public  synchronized void sendEmail() throws Exception {

        System.out.println("*****sendEmail");
    }
    public  synchronized void sendMs() throws Exception {

        System.out.println("*****sendMs");
    }
}
public class Lock8 {

    public static void main(String[] args) {

        Phone phone = new Phone();

        new Thread(() -> {

            try {

                phone.sendEmail();
            } catch (Exception e) {

                e.printStackTrace();
            }
        }, "A").start();
		Thread.sleep(100); //目的是先使线程A先访问到资源
        new Thread(() -> {

            try {

                phone.sendMs();
                //phone.sayHello();
            } catch (Exception e) {

                e.printStackTrace();
            }
        }, "B").start();
    }
}
(2)邮件设置暂停4秒方法,先打印邮件
public class Phone {

    public  synchronized void sendEmail() throws Exception {

        TimeUnit.SECONDS.sleep(4);
        System.out.println("*****sendEmail");
    }
    public  synchronized void sendMs() throws Exception {

        System.out.println("*****sendMs");
    }
}
public class Lock8 {

    public static void main(String[] args) {

        Phone phone = new Phone();
        new Thread(() -> {

            try {

                phone.sendEmail();
            } catch (Exception e) {

                e.printStackTrace();
            }
        }, "A").start();
		Thread.sleep(100); //目的是先使线程A先访问到资源
        new Thread(() -> {

            try {

                phone.sendMs();
                //phone.sayHello();
            } catch (Exception e) {

                e.printStackTrace();
            }
        }, "B").start();
    }
}
(3)新增sayHello方法,先打印sayHello
public class Phone {

    public  synchronized void sendEmail() throws Exception {

        TimeUnit.SECONDS.sleep(4);
        System.out.println("*****sendEmail");
    }
    public  synchronized void sendMs() throws Exception {

        System.out.println("*****sendMs");
    }
    public void sayHello() throws InterruptedException {

        System.out.println("*****sayHello");
    }
}
public class Lock8 {

    public static void main(String[] args) {

        Phone phone = new Phone();

        new Thread(() -> {

            try {

                phone.sendEmail();
            } catch (Exception e) {

                e.printStackTrace();
            }
        }, "A").start();

        new Thread(() -> {

            try {

//                phone.sendMs();
                phone.sayHello();
            } catch (Exception e) {

                e.printStackTrace();
            }
        }, "B").start();
    }
}
(4)两部手机,先打印短信
public class Phone {

    public  synchronized void sendEmail() throws Exception {

        TimeUnit.SECONDS.sleep(4);
        System.out.println("*****sendEmail");
    }

    public  synchronized void sendMs() throws Exception {

        System.out.println("*****sendMs");
    }

    public void sayHello() throws InterruptedException {

        System.out.println("*****sayHello");
    }
}
public class Lock8 {

    public static void main(String[] args) {

        Phone phone1 = new Phone();
        Phone phone2 = new Phone();
        new Thread(() -> {

            try {

                phone1.sendEmail();
            } catch (Exception e) {

                e.printStackTrace();
            }
        }, "A").start();

        new Thread(() -> {

            try {

                phone2.sendMs();
                //phone2.sayHello();
            } catch (Exception e) {

                e.printStackTrace();
            }
        }, "B").start();
    }
}
(5)两个静态同步方法,同一部手机,先打印邮件
public class Phone {

    public static synchronized void sendEmail() throws Exception {

        TimeUnit.SECONDS.sleep(4);
        System.out.println("*****sendEmail");
    }

    public static synchronized void sendMs() throws Exception {

        System.out.println("*****sendMs");
    }

    public void sayHello() throws InterruptedException {

        System.out.println("*****sayHello");
    }
}
public class Lock8 {

    public static void main(String[] args) {

        //Phone phone1 = new Phone();
        //Phone phone2 = new Phone();
        new Thread(() -> {

            try {

                Phone.sendEmail();
            } catch (Exception e) {

                e.printStackTrace();
            }
        }, "A").start();

        new Thread(() -> {

            try {

                Phone.sendMs();
                //phone2.sayHello();
            } catch (Exception e) {

                e.printStackTrace();
            }
        }, "B").start();
    }
}
(6)两个静态同步方法,同两部手机,先打印邮件,锁的同一个字节码对象
public class Phone {

    public static synchronized void sendEmail() throws Exception {

        TimeUnit.SECONDS.sleep(4);
        System.out.println("*****sendEmail");
    }
    public static synchronized void sendMs() throws Exception {

        System.out.println("*****sendMs");
    }
    public void sayHello() throws InterruptedException {

        System.out.println("*****sayHello");
    }
}
public class Lock8 {

    public static void main(String[] args) {

        Phone phone1 = new Phone();
        Phone phone2 = new Phone();
        new Thread(() -> {

            try {

                Phone.sendEmail();
            } catch (Exception e) {

                e.printStackTrace();
            }
        }, "A").start();

        new Thread(() -> {

            try {

                Phone.sendMs();
                //phone2.sayHello();
            } catch (Exception e) {

                e.printStackTrace();
            }
        }, "B").start();
    }
}
(7)一个静态同步方法,一个普通同步方法,同一部手机,先打印短信
public class Phone {

    public static synchronized void sendEmail() throws Exception {

        TimeUnit.SECONDS.sleep(4);
        System.out.println("*****sendEmail");
    }
    public  synchronized void sendMs() throws Exception {

        System.out.println("*****sendMs");
    }
    public void sayHello() throws InterruptedException {

        System.out.println("*****sayHello");
    }
}
public class Lock8 {

    public static void main(String[] args) {

        Phone phone1 = new Phone();
        //Phone phone2 = new Phone();
        new Thread(() -> {

            try {

                phone1.sendEmail();
            } catch (Exception e) {

                e.printStackTrace();
            }
        }, "A").start();
        new Thread(() -> {

            try {

                //phone2.sendMs();
                phone1.sendMs();
            } catch (Exception e) {

                e.printStackTrace();
            }
        }, "B").start();
    }
}
(8)一个静态同步方法,一个普通同步方法,同二部手机,先打印短信
public class Phone {

    public static synchronized void sendEmail() throws Exception {

        TimeUnit.SECONDS.sleep(4);
        System.out.println("*****sendEmail");
    }
    public  synchronized void sendMs() throws Exception {

        System.out.println("*****sendMs");
    }

    public void sayHello() throws InterruptedException {

        System.out.println("*****sayHello");
    }
}
public class Lock8 {

    public static void main(String[] args) {

        Phone phone1 = new Phone();
        Phone phone2 = new Phone();
        new Thread(() -> {

            try {

                phone1.sendEmail();
            } catch (Exception e) {

                e.printStackTrace();
            }
        }, "A").start();

        new Thread(() -> {

            try {

                //phone2.sendMs();
                phone2.sendMs();
            } catch (Exception e) {

                e.printStackTrace();
            }
        }, "B").start();
    }
}
总结分析:
(1)普通同步方法,锁的是当前实例对象;静态同步方法锁的是当前类的Class对象。
(2)普通同步方法、静态同步方法及普通方法相互之前不会有竞态条件。
5、ReadWriteLock读写锁
ReadWriteLock的原理可以总结为:写的时候独占,读的时候共享。读-读能共存、读-写不能共存、写-写不能共存。代码例子如下:
public class MyCache {

    private volatile Map<String, Object> map = new HashMap<>();
    private ReadWriteLock readWriteLock = new ReentrantReadWriteLock();
    public void put(String key, Object value) {

        readWriteLock.writeLock().lock();
        try {

            System.out.println(Thread.currentThread().getName() + "---写入数据" + value);
            TimeUnit.SECONDS.sleep(3);
            map.put(key, value);
            System.out.println(Thread.currentThread().getName() + "---写入完成");
        } catch (Exception e) {

            e.printStackTrace();
        }finally {

            readWriteLock.writeLock().unlock();
        }
    }
    public void get(String key) {

        readWriteLock.readLock().lock();
        try {

            System.out.println(Thread.currentThread().getName() + "读取数据");
            //TimeUnit.SECONDS.sleep(3);
            Object result = map.get(key);
            System.out.println(Thread.currentThread().getName() + "读取完成" + result);
        } catch (Exception e) {

            e.printStackTrace();
        } finally {

            readWriteLock.readLock().unlock();
        }
    }
}
========
输出:
5---写入数据5
5---写入完成
4---写入数据4
4---写入完成
1---写入数据1
1---写入完成
2---写入数据2
2---写入完成
3---写入数据3
3---写入完成
1读取数据
1读取完成1
2读取数据
3读取数据
4读取数据
2读取完成2
4读取完成4
3读取完成3
5读取数据
5读取完成5
三、并发集合类
在多线程环境下,使用ArrayList、HasSet及HashMap集合类时,会产生线程安全问题,报java.util.ConcurrentModificationException异常。那么为什么会导致产生这样的异常呢?
我们可以类比成一个上课签到的场景,签到表相当于集合容器,多个学生相当于多个线程,由于缺乏纪律规则提示,大家都争抢着往这个签到表中签名,导致一个学生还没签到完,就被另个学生把签到表抢去,导致产生了混乱,甚至产生踩踏事件。
1、ArrayList线程不安全问题解决方案
(1)使用uitil包下的Vector类
(2)Collections.synchronizedList(new ArrayList<>())
(3)java.util.concurrent 包下的new CopyOnWriteArrayList<>()
public class NoSafeDemo {

    public static void main(String[] args) {

        List<String> list1 = new Vector<>();
        List<String> list2 = Collections.synchronizedList(new ArrayList<>());
        List<String> list3 = new CopyOnWriteArrayList<>();
        for (int i = 0; i < 50; i++) {

            new Thread(()-> {

                list1.add(UUID.randomUUID().toString().substring(0, 8));
                System.out.println(list1);
                list2.add(UUID.randomUUID().toString().substring(0, 8));
                System.out.println(list2);
                list3.add(UUID.randomUUID().toString().substring(0, 8));
                System.out.println(list3);
            }, String.valueOf(i)).start();
        }
    }
}
方法(1)和(2)底层都是使用了synchronized实现,而CopyOnWrite容器底层使用了写时复制,读写分离的思想实现。
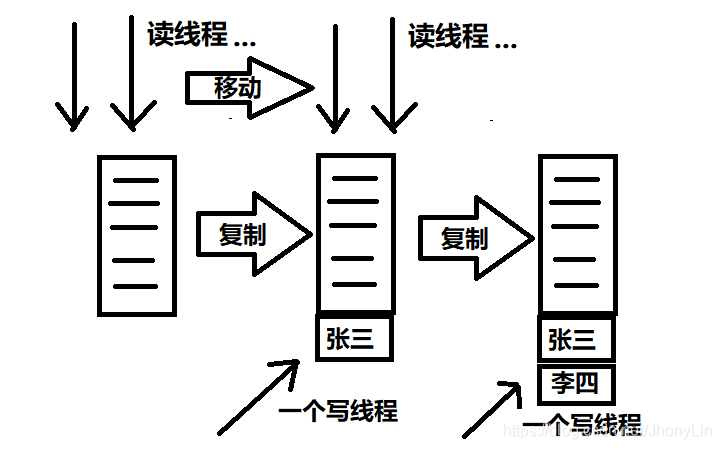
核心源码如下:
    public boolean add(E e) {

        synchronized (lock) {

            Object[] elements = getArray();
            int len = elements.length;
            Object[] newElements = Arrays.copyOf(elements, len + 1);
            newElements[len] = e;
            setArray(newElements);
            return true;
        }
    }
实现原理:当往一个容器中添加元素时,不直接往Object[]添加,而是现将当前元素进行Copy并把数组的长度+1,复制出新的数组Object[] newElements,然后向新的容器添加元素,最后把原容器的引用指向新的容器 setArray(newElements);这种设计思想的好处是并发读的时候不需要锁,因为当前容器不会添加任何元素,提高了效率。
2、HashSet线程不安全问题解决方案
HashSet的线程不安全问题解决方案和ArrayList相似。
(1)使用Collections.synchronizedSet(new HashSet<>())
(2)java.util.concurrent 包下的CopyOnWriteArraySet
3、HashMap线程不安全问题解决方案
(1)使用Collections.synchronizedMap(new HashMap<>())
(2)java.util.concurrent 包下的ConcurrentHashMap
public class NoSafeDemo03 {

    public static void main(String[] args) {

        ConcurrentHashMap<String, String> map = new ConcurrentHashMap<>();
        for (int i = 0; i < 30; i++) {

            new Thread(()-> {

                map.put(UUID.randomUUID().toString().substring(0, 7), "aaa");
                System.out.println(map);
            },String.valueOf(i)).start();
        }
    }
}
原理分析:ConcurrentHashMap使用分段锁的思想,容器中有多把锁,每一把锁锁一段数据,这样在多线程访问时,不同段的数据不存在锁的竞争,这样就可以有效的提高并发效率。
4、BlockingQueue阻塞队列
在多线程的阻塞,是在某种情况下会挂起线程,一旦条件满足,挂起的线程又会自动唤醒。使用BlockingQueue的好处是我们不需要关心什么时候需要阻塞线程,什么时候需要唤醒线程,BlockingQueue都给一手包办。
(1)当队列是空的,从队列中获取元素的操作将会被阻塞
(2)当队列是满的,从队列中添加元素的操作将会被阻塞
public class BlockingQueueDemo  {

    public static void main(String[] args) throws InterruptedException {

        BlockingQueue<String> blockingQueue = new ArrayBlockingQueue<>(3);
		//由于添加元素超过队列大小,会产生阻塞
        blockingQueue.put("aaa");
        blockingQueue.put("aaa");
        blockingQueue.put("aaa");
        blockingQueue.put("aaa");

    }
}
四、线程池
1、线程的获取方法及Callable接口
获得线程的方法一般情况下有一下三种:
(1)继承Thread类并重写run方法。
(2)实现Runnable接口并重写run方法。
(3)实现java.util.concurrent包下的Callable接口并重写call方法。
使用Callable创建线程的方法代码如下:
//资源类
public class MyThread implements Callable<Integer> {

    @Override
    public Integer call() throws Exception {

        //更加细粒度化的精确控制
        System.out.println(Thread.currentThread().getName() +"come in here");
        TimeUnit.SECONDS.sleep(4);
        return 1024;
    }
}
//线程
public class CallableDemo {

    public static void main(String[] args) throws ExecutionException, InterruptedException {

        //MyThread myThread = new MyThread();
        FutureTask futureTask = new FutureTask(new MyThread());
        new Thread(futureTask, "AAA").start();
        new Thread(futureTask, "BBB").start();

        System.out.println(Thread.currentThread().getName() + "计算完成!");
        System.out.println(futureTask.get());
    }
}
因为Thread(Runnable target) 的输入变量为Runnable , 实现Callable接口的MyThread 不能输入到Thread中,那么FutureTask(Callable callable) 相当于一个中间人,目的是通过FutureTask使Runnable和Callable产生联系。
优点: 使用FutureTask的好处是对于主线程来说是同步非阻塞的。例子:老师上着课,口渴了,去买水不合适,讲课线程继续,我可以单起个线程找班长帮忙买水,水买回来了放桌上,我需要的时候再去get。(注意:get方法而获取结果只有在计算完成时获取,否则会一直阻塞直到任务转入完成状态)
Callable接口和Runnable接口的区别?
(1)前者有返回值,后者没有返回值
(2)前者可以抛出异常,后者不可抛出异常
(3)前者的实现方法为call(),后者的实现方法为run()
2、为什么时候线程池?
线程池做的工作主要是控制运行的线程数量,处理过程中将任务放进队列,然后在线程创建后启动这些任务,如果线程数量超过了核心线程的最大数量,超出数量的线程排队等候,等其他线程执行完毕,再从队列中取出任务来执行。
主要特点为: 线程的复用;控制最大的并发数;管理线程
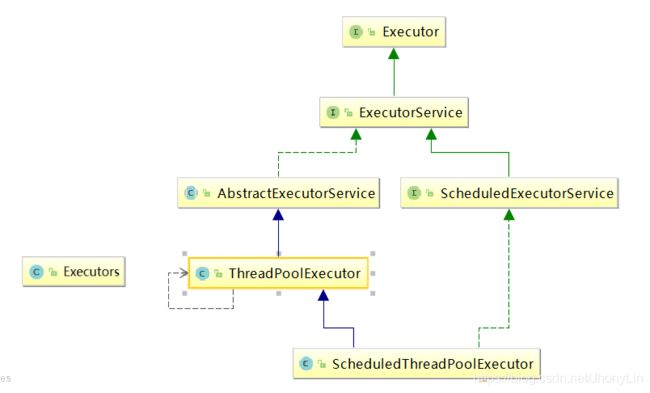
3、使用Excutors创建线程池的3种方式
(1)newFixedThreadPool(int nThreads) 方法创建,创建的线程池corePoolSize和maxinumPoolSize值是相等的,它使用的是LinkedBlockingQueue
//创建固定线程池
ExecutorService threadPool = newFixedThreadPool(5);
(2)newSingleThreadExecutor()方法创建,创建的线程池corePoolSize和maximumPoolSize值都是1,它使用的是LinkedBlockingQueue
//一个池子一个工作线程
ExecutorService threadPool = newSingleThreadExecutor();
(3)newCachedThreadPool()方法创建,创建的线程池corePoolSize为0,maximumPoolSize值都是Integer.MAX_VALUE,使用的SynchronousQueue,也就是说来了任务就创建线程运行,当线程空闲超过60秒,就销毁线程。
//一池N线程。有N个受理窗口,创建多少个由实际情况而定,扩拓展的
ExecutorService threadPool2 = newCachedThreadPool();
以上三种创建线程池的底层都是通过ThreadPoolExecutor创建,底层到吗如下:
public static ExecutorService newFixedThreadPool(int nThreads, ThreadFactory threadFactory) {

    return new ThreadPoolExecutor(nThreads, nThreads,
                                  0L, TimeUnit.MILLISECONDS,
                                  new LinkedBlockingQueue<Runnable>(),
                                  threadFactory);
}
public static ExecutorService newSingleThreadExecutor(ThreadFactory threadFactory) {

 return new FinalizableDelegatedExecutorService
     (new ThreadPoolExecutor(1, 1,
                             0L, TimeUnit.MILLISECONDS,
                             new LinkedBlockingQueue<Runnable>(),
                             threadFactory));
}
public static ExecutorService newCachedThreadPool(ThreadFactory threadFactory) {

    return new ThreadPoolExecutor(0, Integer.MAX_VALUE,
                                 60L, TimeUnit.SECONDS,
                                 new SynchronousQueue<Runnable>(),
                                 threadFactory);
}
阿里巴巴开发手册关于线程池不允许使用Executors创建,而是通过ThreadPoolExecutor的方式创建,这样的处理方式能让编写代码的工程师更加明确线程池的运行规则,避免资源耗尽的风险。弊端如下:
(1)使用FixedThreadPool和SingleThreadPool允许请求的队列长度为Integer.MAX_VALUE,可能会堆积大量请求,导致OOM。
(2)CachedThreadPool允许创建最大的线程数为Integer.MAX_VALUE,创建大量的线程,导致OOM
4、线程池ThreadPoolExecutor的7大参数
    public ThreadPoolExecutor(int corePoolSize,
                              int maximumPoolSize,
                              long keepAliveTime,
                              TimeUnit unit,
                              BlockingQueue<Runnable> workQueue,
                              ThreadFactory threadFactory,
                              RejectedExecutionHandler handler) {
     ......}
(1)corePoolSize:线程池中的常驻核心线程数
(2)maximumPoolSize:线程池中能容纳的最大线程数
(3)keepAliveTime:多余空闲线程的存货时间,当前线程数量超过corePoolSize且空闲时间达到keepAlive时,多余线程会被自动销毁,使线程池中的线程数量保存为corePoolSize
(4)unit:keepAliveTime的时间单位
(5)workQueue:任务队列,被提交但是未被执行的任务
(6)threadFactory:生成线程池中工作线程的线程工厂,用于创建线程
(7)handler:拒接策略,当队列满了的时候,并且工作线程大于或等于线程池的最大线程数时,如何拒绝请求执行的runnable的策略
5、线程池的底层工作原理
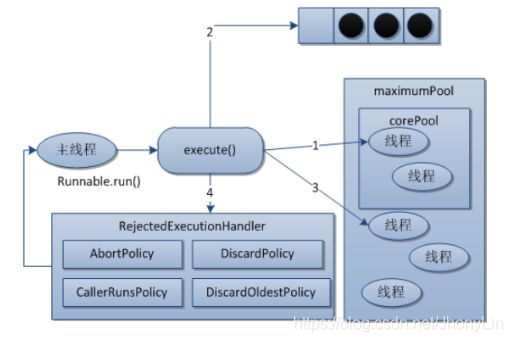
(1)创建了线程后,开始等待请求
(2)当调用一个Excuror()方法添加一个请求任务时,线程池会作出以下判断:
- 如果正在运行的线程数小于corePoolSize,那么马上创建这个线程运行这个任务
- 如果正在运行的大于corePoolSize,那么将这个任务放入队列
- 如果队列满了,但是运行线程数小于maximumPoolSize,那么创建非核心线程来运行这个任务
- 如果队列满了且运行的线程数大于maximumPoolSize,那么线程会启动拒绝策略来执行
(3)当一个线程完成任务时,他会从一个队列中取下一个任务执行。
(4)当一个线程无事可做,且超过keepAliveTime时,线程会判断:
- 如果当前运行的线程数大于corePoolSize,那么这个线程将会被停掉
- 所以线程池的所有任务完成后,它最终会收缩到corePoolSize的大小
可以把整个过程看成是银行网点办理业务,假设一共有5个窗口(maximumPoolSize),候客区有3个座位(workQueue的大小),今天开放的只有2个窗口(corePoolSize)。存在以下情况:
(1)当来的客户不大于2个人时,直接办理
(2)当来的客户大于2个人不大于5个人时,剩余的顾客在候客区等待
(3)当来的客户大于5个人不大于8个人时,扩展不大于3的窗口数给候客区的客户办理业务
(4)当来的客户大于8个人时,银行坐不下了,告诉坐不下的客户去其他地方或者迟点再来
6、ThreadPoolExecutor的拒绝策略
(1)AbortPolicy(默认):直接抛出RejectedExecutionExeception
public class MyThreadPoolDemo02 {

    public static void main(String[] args) throws InterruptedException {

        //CPU最大核数->CPU密集型
        System.out.println(Runtime.getRuntime().availableProcessors());
        //IO密集型,
        ThreadPoolExecutor threadPoolExecutor = new ThreadPoolExecutor(
                2,3,2L,
                TimeUnit.SECONDS,
                new LinkedBlockingDeque<>(3),
                Executors.defaultThreadFactory(),
                new ThreadPoolExecutor.AbortPolicy()
        );
        for (int i = 0; i < 5; i++) {

            //TimeUnit.SECONDS.sleep(1);
            threadPoolExecutor.execute(()-> {

                System.out.println(Thread.currentThread().getName() + "办理业务");
            });
        }
    }
}
======================
输出:
Exception in thread "main" java.util.concurrent.RejectedExecutionException: Task com.john.demo01.MyThreadPoolDemo02$$Lambda$1/901506536@7c75222b rejected from java.util.concurrent.ThreadPoolExecutor@4c203ea1[Running, pool size = 3, active threads = 1, queued tasks = 2, completed tasks = 1]
	at java.base/java.util.concurrent.ThreadPoolExecutor$AbortPolicy.rejectedExecution(ThreadPoolExecutor.java:2104)
	at java.base/java.util.concurrent.ThreadPoolExecutor.reject(ThreadPoolExecutor.java:848)
	at java.base/java.util.concurrent.ThreadPoolExecutor.execute(ThreadPoolExecutor.java:1397)
	at com.john.demo01.MyThreadPoolDemo02.main(MyThreadPoolDemo02.java:26)
pool-1-thread-1办理业务
pool-1-thread-2办理业务
pool-1-thread-1办理业务
pool-1-thread-3办理业务
pool-1-thread-1办理业务
pool-1-thread-2办理业务
(2)CallerRunsPolicy:将某些任务退回给调用者,从而降低新任务的流量。
public class MyThreadPoolDemo02 {

    public static void main(String[] args) throws InterruptedException {

        ThreadPoolExecutor threadPoolExecutor = new ThreadPoolExecutor(
                ......
                new ThreadPoolExecutor.CallerRunsPolicy()
        );
        ......
}
===============
输出:
pool-1-thread-1办理业务
pool-1-thread-1办理业务
pool-1-thread-1办理业务
main办理业务
pool-1-thread-1办理业务
pool-1-thread-1办理业务
pool-1-thread-1办理业务
pool-1-thread-2办理业务
pool-1-thread-1办理业务
pool-1-thread-3办理业务
(3)DiscardOldestPolicy:抛弃队列中最久的任务,把新任务添加到队列中
public class MyThreadPoolDemo02 {

    public static void main(String[] args) throws InterruptedException {

        ThreadPoolExecutor threadPoolExecutor = new ThreadPoolExecutor(
                ......
                new ThreadPoolExecutor.DiscardOldestPolicy()
        );
        for (int i = 0; i < 10; i++) {

            //TimeUnit.SECONDS.sleep(1);
            threadPoolExecutor.execute(()-> {

                System.out.println(Thread.currentThread().getName() + "办理业务");
            });
        }
}
===========
输出:
pool-1-thread-1办理业务
pool-1-thread-3办理业务
pool-1-thread-2办理业务
pool-1-thread-3办理业务
pool-1-thread-1办理业务
pool-1-thread-2办理业务
(4)DiscardPolicy:丢弃无法处理的任务,不予任何处理,也不抛出异常,如允许任务失败,这是一种最好的策略。
public class MyThreadPoolDemo02 {

    public static void main(String[] args) throws InterruptedException {

        ThreadPoolExecutor threadPoolExecutor = new ThreadPoolExecutor(
                ......
                new ThreadPoolExecutor.DiscardPolicy()
        );
        ......
}
===========
输出:
pool-1-thread-1办理业务
pool-1-thread-2办理业务
pool-1-thread-1办理业务
pool-1-thread-2办理业务
pool-1-thread-1办理业务
pool-1-thread-3办理业务
(Runtime.getRuntime().availableProcessors()获取CPU的最大核数,CPU密集型最大线程数一般最大核数+1)
五、信号量工具类
1、CountDownLatch 减少计数
CountDownLatch主要方法,当一个或多个线程调用await方法,这些线程会阻塞。其他线程调用countDown方法会将计数器减1,当计数器减为0时,因await方法阻塞的线程会被唤醒,继续执行。
例子:6个同学陆续离开教室后值班同学才可以关门。代码如下:
public class CountDownLatchDemo {

    public static void main(String[] args) throws InterruptedException {


        CountDownLatch countDownLatch = new CountDownLatch(6);
        for (int i = 1; i <= 6; i++) {

            new Thread(() -> {

                System.out.println(Thread.currentThread().getName() + "  离开教室");
                countDownLatch.countDown();
            }, String.valueOf(i)).start();

        }
        countDownLatch.await();
        System.out.println(Thread.currentThread().getName() + "班长关门走人");
    }
}
2、CycliBarrier循环栅栏
CycliBarrier要做的事情是让一组线程达到一个屏障时被阻塞,之后最后一个线程达到屏障,屏障才会开门,所有线程才会继续干活。线程进入屏障通过CycliBarrier的await方法。
例子:集齐7颗龙珠就可以召唤神龙
public class CyclicBarrierDemo {

    public static void main(String[] args)  {

        CyclicBarrier cyclicBarrier = new CyclicBarrier(7, ()->{

            System.out.println("召唤神龙");
        });
        for (int i = 1; i <= 7; i++) {

            final int tmp = i;
            new Thread(() -> {

                try {

                    System.out.println("拿到第" + tmp + "颗龙龙珠");
                    cyclicBarrier.await();

                } catch (InterruptedException e) {

                    e.printStackTrace();
                } catch (BrokenBarrierException e) {

                    e.printStackTrace();
                }
            }, String.valueOf(i)).start();
        }
    }
}
3、Semaphore信号灯
Semaphore一般用于多个共享资源的互斥和并发线程数的控制。通过acquire获取信号量(信号量减1),要么一直等待下去,直到有线程release释放信号量(信号量+1),唤醒等待的线程。
例子:抢车位,6辆车,只有3个车位。使用Semaphore进行流量控制的代码如下:
public class SemaphoreDemo {

    public static void main(String[] args) {

        Semaphore semaphore = new Semaphore(3);
        for (int i = 1; i <= 6; i++) {

            new Thread(() -> {

                try {

                    semaphore.acquire();
                    System.out.println(Thread.currentThread().getName() + "抢到了车位");
                    TimeUnit.SECONDS.sleep(3);
                    System.out.println(Thread.currentThread().getName() + "离开了车位");

                } catch (InterruptedException e) {

                    e.printStackTrace();
                } finally {

                    semaphore.release();
                }
            }, String.valueOf(i)).start();
        }
    }
}
六、异步回调
异步回调使用的CompletableFuture类,它的用法与JS前端开发的异步调用箭头函数有点相似,其方法参数大多为函数式接口,因此我们需先线了解一下阿函数式接口的使用。Java内置有四大函数式接口:
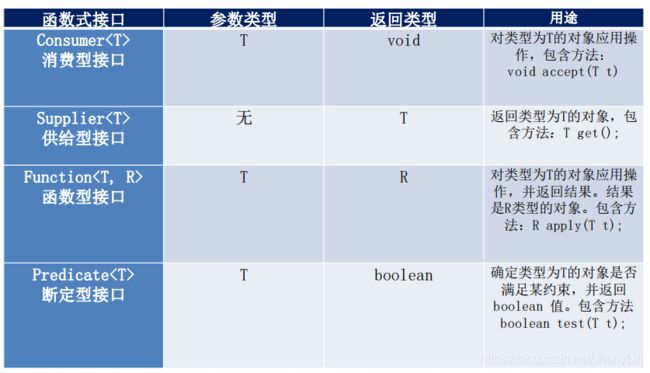
使用CompletableFuture完成异步回调,代码如下:
public class CompletableFutureDemo {

    public static void main(String[] args) throws ExecutionException, InterruptedException {

        //异步回调
        CompletableFuture<Integer> completableFuture2 = CompletableFuture.supplyAsync(() -> {

            System.out.println("有返回值,insert mysql ok");
            //int a = 1 / 0;
            return 1024;
        });
        Integer result = completableFuture2.whenComplete((t, u) -> {

            System.out.println("******t  " + t);
            System.out.println("******u  " + u);

        }).exceptionally(f -> {

            System.out.println(f.getMessage());
            return 444;
        }).get();
        System.out.println(result);
    }
}
============
输出:
有返回值,insert mysql ok
******t  1024
******u  null
1024
如果在异步回调过程中产出异常,执行exceptionally中的方法:
public class CompletableFutureDemo {

    public static void main(String[] args) throws ExecutionException, InterruptedException
        //异步回调
        CompletableFuture<Integer> completableFuture2 = CompletableFuture.supplyAsync(() -> {

            System.out.println("有返回值,insert mysql ok");
            int a = 1 / 0;  //人为加入异常操作
            return 1024;
        });

        //
        Integer result = completableFuture2.whenComplete((t, u) -> {

            System.out.println("******t  " + t);
            System.out.println("******u  " + u);

        }).exceptionally(f -> {

            System.out.println(f.getMessage());
            return 444;
        }).get();
        System.out.println(result);

    }
}
==========
输出:
有返回值,insert mysql ok
******t  null
******u  java.util.concurrent.CompletionException: java.lang.ArithmeticException: / by zero
java.lang.ArithmeticException: / by zero
444
综上,对于JUC并发编程的总结完毕。学而时习之,不亦说乎?通过这种理论,实践,小总结的方式加深了对JUC的理解。
参考资料:
(1)尚硅谷周阳老师的JUC课程
(2)阿里巴巴Java开发手册