SpringBoot学习笔记(开始、日志框架、Web)
视频链接:https://www.bilibili.com/video/BV1Et411Y7tQ
这篇笔记是边看视频边敲的,半年前的库存了,学到P32后就没时间一直学下去
如有什么不对的地方也欢迎各位大佬前来指正!
Spring Boot
Hello World
-
在idea里新建一个maven项目
-
打开pom.xml,首先在
project标签里面加入下面的内容<parent> <groupId>org.springframework.bootgroupId> <artifactId>spring-boot-starter-parentartifactId> <version>2.3.5.RELEASEversion> <relativePath/> parent> -
然后导入依赖
<dependency> <groupId>org.springframework.bootgroupId> <artifactId>spring-boot-starterartifactId> dependency> <dependency> <groupId>org.springframework.bootgroupId> <artifactId>spring-boot-starter-testartifactId> <scope>testscope> <exclusions> <exclusion> <groupId>org.junit.vintagegroupId> <artifactId>junit-vintage-engineartifactId> exclusion> exclusions> dependency> <dependency> <groupId>org.springframework.bootgroupId> <artifactId>spring-boot-starter-webartifactId> dependency> -
编写主类,此为SpringBoot执行程序的入口
package com.prince; import org.springframework.boot.SpringApplication; import org.springframework.boot.autoconfigure.SpringBootApplication; @SpringBootApplication public class Demo { public static void main(String[] args) { SpringApplication.run(Demo.class,args); } }@SpringBootApplication: Spring Boot应用标注在某个类上说明这个类是SpringBoot的主配置类,SpringBoot就应该运行这个类的main方法来启动SpringBoot应用;
-
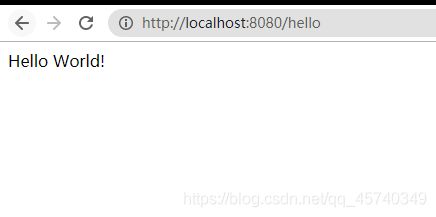
编写控制器
package com.prince.controller;


import org.springframework.stereotype.Controller;
import org.springframework.web.bind.annotation.RequestMapping;
import org.springframework.web.bind.annotation.ResponseBody;

@Controller
public class DemoController {

    @ResponseBody
    @RequestMapping("/hello")
    public String hello(){

        return "Hello World!";
    }
}
spring-boot插件
pom.xml里加入
<plugin>
    <groupId>org.springframework.bootgroupId>
    <artifactId>spring-boot-maven-pluginartifactId>
plugin>
执行命令mvnw jar:jar可以快速导出jar包,执行mvnw spring-boot:run可以运行项目
使用 Spring Initializer快速创建项目
在线网站:https://start.spring.io/
IDE都支持使用Spring的项目创建向导快速创建一个Spring Boot项目;
选择我们需要的模块;向导会联网创建Spring Boot项目;
默认生成的Spring Boot项目;
- 主程序已经生成好了,我们只需要我们自己的逻辑
- resources文件夹中目录结构
- static:保存所有的静态资源; js css images;
- templates:保存所有的模板页面;(Spring Boot默认jar包使用嵌入式的Tomcat,默认不支持JSP页面);可以使用模板引擎(freemarker、thymeleaf);
- application.properties:Spring Boot应用的配置文件;可以修改一些默认设置;
配置文件
SpringBoot会默认使用以下文件来当做全局的配置文件:
- application.properties
- application.yml
配置文件放在src/main/resources目录或者类路径/config下
例子:
server:
    port: 8081
    path:/hello
YAML
yml是YAML( YAML Ain’t Markup Language)语言的文件,以数据为中心,比json、 xml等更适合做配置文件
• http://www.yaml.org/ 参考语法规范
- YAML基本语法
- 基本格式:
k: v,注意:和v之间有空格! - 使用缩进表示层级关系
- 缩进时不允许使用Tab键,只允许使用空格。
- 缩进的空格数目不重要,只要相同层级的元素左侧对齐即可
- 大小写敏感
- YAML 支持的三种数据结构
- 字面量: 普通的值(数字、字符串、布尔)
字符串默认不需要加引号,如果加引号的话,单引号和双引号有区别:
单引号:会转义特殊字符
双引号:不会转义特殊字符
-
对象:键值对的集合,需要在下一行来写数据的key和value之间的关系,需要注意缩进!如:
people:
	name: zhangsan
	age: 18
行内写法:
people: { name: zhangsan,age: 18} -
数组:一组按次序排列的值
用- 值表示数组中的一个元素
pets:
 - cat
 - dog
 - pig
行内写法
pets: [cat,dog,pig]
读取全局配置文件,自动注入JavaBean
如果我们有一个类Person
public class Person {

    public String name;
    public int age;
    public Date birthday;
    public Map<String,String> map;
    public List<String> list;

    //getter和setter和toString()略
}
在resources文件夹下用applications.yml
person:
  name: zhangsan
  age: 20
  birthday: 2020/11/1
  map:
    k1: v1
    k2: v2
  list:
    - aaa
    - bbb
    - ccc
现在我们要做的就是:读取这个yml文件的信息,并注入到Person类里,并打印出来。
- 先在pom.xml里导入一个依赖(这一步好像不是必须的)
<dependency>
    <groupId>org.springframework.bootgroupId>
    <artifactId>spring-boot-configuration-processorartifactId>
dependency>
- 给Person类加上以下注解:
@Component
@ConfigurationProperties(prefix = "person")
其中perfix参数需要和配置文件里的那个key值匹配,@Component的作用是将这个对象加入到Spring的IOC容器中。
- 测试
在测试类中(src的test文件夹下),创建一个Person对象,并用@AutoWired注入,然后打印结果。
@SpringBootTest
class DemoApplicationTests {

    @Autowired
    Person person;
    @Test
    void contextLoads() {

        System.out.println(person);
    }
}
- 输出结果,打印出以下内容表示注入成功!
Person{name='zhangsan', age=20, birthday=Sun Nov 01 00:00:00 CST 2020, map={k1=v1, k2=v2}, list=[aaa, bbb, ccc]}
注意:如果使用Properties,一样可以!
@Value获取值和@ConfigurationProperties获取值比较
| @ConfigurationProperties | @Value | |
|---|---|---|
| 功能 | 批量注入配置文件中的属性 | 一个个指定 |
| 松散绑定(松散语法) | 支持 | 不支持 |
| SpEL | 不支持 | 支持 |
| JSR303数据校验 | 支持 | 不支持 |
| 复杂类型封装 | 支持 | 不支持 |
配置文件yml还是properties他们都能获取到值;
如果说,我们只是在某个业务逻辑中需要获取一下配置文件中的某项值,使用@Value;
如果说,我们专门编写了一个javaBean来和配置文件进行映射,我们就直接使用@ConfigurationProperties;
@PropertyResource
上面使用@ConfigurationProperties来注入JavaBean,默认会读取全局配置文件(application.properties、application.yml)中的数据,可以指定读取哪个配置文件,只需要在类上加上注解@PropertyResource
比如加上下面的注解就表示读取类路径下的person.properties配置文件,而不再是全局配置文件了。
@PropertyResource("classpath:person.properties")
注意:这个注解只能加载properties类型,而不是yaml。
@ImportResource
该注解的作用是导入Spring中的配置文件,让配置文件中的内容生效。
@ImportResource(locations = {
     "classpath:beans.xml"})
下面是例子:
我先在resources文件夹下创建一个beans.xml
<?xml version="1.0" encoding="UTF-8"?>
<beans xmlns="http://www.springframework.org/schema/beans"
       xmlns:xsi="http://www.w3.org/2001/XMLSchema-instance"
       xmlns:context="http://www.springframework.org/schema/context"
       xmlns:aop="http://www.springframework.org/schema/aop"
       xsi:schemaLocation="http://www.springframework.org/schema/beans
        http://www.springframework.org/schema/beans/spring-beans.xsd
        http://www.springframework.org/schema/context
        http://www.springframework.org/schema/context/spring-context.xsd
        http://www.springframework.org/schema/aop
        http://www.springframework.org/schema/aop/spring-aop.xsd">

    <bean id="person" class="com.prince.bean.Person">
        <property name="age" value="18" />
        <property name="name" value="zhangsan" />
        <property name="birthday" value="2002/02/02" />
    </bean>

</beans>
然后我想使用这个配置文件,就在主类里加上注解:
@ImportResource("classpath:beans.xml")
@SpringBootApplication
public class Demo {

    public static void main(String[] args) {

        SpringApplication.run(Demo.class,args);
    }
}
然后测试类
@RunWith(SpringRunner.class)
@SpringBootTest
public class SpringTest {

    @Autowired
    ApplicationContext ioc;

    @Test
    public void test(){

        System.out.println(ioc.containsBean("person")); //输出true,代表IOC容器中存在这个ID,也就说明了配置文件已生效
    }
}
@Bean
上面@ImportResource的是给容器添加组件的一种方式,但是Spring推荐的是全注解的方式,也就是使用配置类。
下面就是我的配置类
import com.prince.bean.Person;
import org.springframework.context.annotation.Bean;
import org.springframework.context.annotation.Configuration;

@Configuration  //加上这个注解,表示这个类是配置类
public class SpringConfig {

    @Bean  //将返回值加入IOC容器,id值是方法名
    public Person person(){

        Person p = new Person();
        p.setName("zhangsan");
        p.setAge(18);
        return p;
    }
}
运行测试类,输出true
配置文件占位符
取随机数
${random.value}、${random.int}、 ${random.long}、${random.int(10)}、 ${random.int[1024,65536]}
比如
person.name=zhangsan
person.age=${random.int}
属性配置占位符
可以在配置文件中引用前面配置过的属性。
person.name=zhangsan
person.age=${random.int}
person.hello=Hello, I'm ${person.name}
${person.name}表示引用前面的person.name的值,如果这个值不存在,将会原样显示。
当然也可以设定默认值,${person.name:zhangsan}就表示如果前面没有person.name属性的话就使用默认值zhangsan
Profile
Profile是Spring对不同环境提供不同配置功能的支持,可以通过激活、指定参数等方式快速切换环境
文件格式:application-{profile}.properties/yml
比如在开发环境下,配置文件名可以是application-dev.properties/yml,在生产环境下,文件名是application-prod.properties/yml
默认情况下,我们使用的是application.properties配置文件,如果需要激活指定的profile,可以采用下面的方法
激活指定的Profile
在application.properties中指定spring.profiles.active属性值(当然yaml也可以)
# 使用开发环境下的配置文件
spring.profiles.active=dev
yaml的特殊方法
yaml有一个特殊的方法是文档分块,也就是用---就可以将一个yaml分成独立的两部分
server:
  port: 8080


spring:
  profiles:
    active: dev
---

server:
  port: 8081

spring:
  profiles: dev

---

server:
  port: 8082

spring:
  profiles: prod
激活Profile的其他方法
命令行
在导出jar包后,以命令行的方式运行jar包,只需要后面跟上--spring.profiles.active=dev就可以了,比如:
java -jar xxxxx.jar --spring.profiles.active=dev # 使用dev环境运行
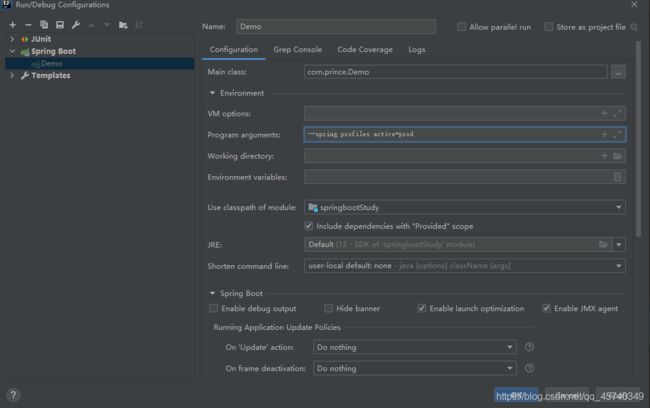
当然在idea里调试的时候也可以加上这些参数,方法就是编辑Edit Configuration里的Program arguments(注意也要加上--)
虚拟机参数
编辑Edit Configuration里的VM options 值为 -Dspring.profiles.active=prod
配置文件加载位置
spring boot 启动会扫描以下位置的application.properties或者application.yml文件作为Spring boot的默认配置文件
- file:./config/
- file:./
- classpath:/config/
- classpath:/
以上是按照优先级从高到低的顺序,所有位置的文件都会被加载, 高优先级配置内容会覆盖低优先级配置内容。(并不是说高优先级的位置存在配置文件之后低优先级的就不看了)
比如如果我们在项目路径下和类路径下都存在application.properties 配置文件,那么他会优先加载项目路径下的。(file:./的优先级高于classpath:/)
我们也可以通过配置spring.config.location来改变默认配置,但是要用命令行参数的方式来指定。
外部配置加载顺序
Spring Boot 支持多种外部配置方式
这些方式优先级如下:
https://docs.spring.io/spring-boot/docs/currentSNAPSHOT/reference/htmlsingle/#boot-features-external-config
- 命令行参数
- 来自java:comp/env的JNDI属性
- Java系统属性( System.getProperties())
- 操作系统环境变量
- RandomValuePropertySource配置的random.*属性值
- jar包外部的application-{profile}.properties或application.yml(带spring.profile)配置文件
- jar包内部的application-{profile}.properties或application.yml(带spring.profile)配置文件
- jar包外部的application.properties或application.yml(不带spring.profile)配置文件
- jar包内部的application.properties或application.yml(不带spring.profile)配置文件
- @Configuration注解类上的@PropertySource
- 通过SpringApplication.setDefaultProperties指定的默认属性
springboot自动配置原理
https://blog.csdn.net/qq_45740349/article/details/109546800
@Conditional派生注解(Spring注解版原生的@Conditional作用)
作用:必须是@Conditional指定的条件成立,才给容器中添加组件,配置配里面的所有内容才生效;
| @Conditional扩展注解 | 作用(判断是否满足当前指定条件) |
|---|---|
| @ConditionalOnJava | 系统的java版本是否符合要求 |
| @ConditionalOnBean | 容器中存在指定Bean; |
| @ConditionalOnMissingBean | 容器中不存在指定Bean; |
| @ConditionalOnExpression | 满足SpEL表达式指定 |
| @ConditionalOnClass | 系统中有指定的类 |
| @ConditionalOnMissingClass | 系统中没有指定的类 |
| @ConditionalOnSingleCandidate | 容器中只有一个指定的Bean,或者这个Bean是首选Bean |
| @ConditionalOnProperty | 系统中指定的属性是否有指定的值 |
| @ConditionalOnResource | 类路径下是否存在指定资源文件 |
| @ConditionalOnWebApplication | 当前是web环境 |
| @ConditionalOnNotWebApplication | 当前不是web环境 |
| @ConditionalOnJndi | JNDI存在指定项 |
自动配置类必须在一定的条件下才能生效;
我们怎么知道哪些自动配置类生效;
我们可以通过启用 debug=true属性;来让控制台打印自动配置报告,这样我们就可以很方便的知道哪些自动配置类生效;
日志
市面上的日志框架;
JUL、JCL、Jboss-logging、logback、log4j、log4j2、slf4j…
| 日志门面 (日志的抽象层) | 日志实现 |
|---|---|
| JCL(Jakarta Commons Logging) SLF4j(Simple Logging Facade for Java) jboss-logging | Log4j JUL(java.util.logging) Log4j2 Logback |
SpringBoot:底层是Spring框架,Spring框架默认是用JCL,SpringBoot选用 SLF4j和logback;
SLF4j
初步使用
import org.junit.Test;
import org.slf4j.Logger;
import org.slf4j.LoggerFactory;

public class CommonTest {


    @Test
    public void test(){

        Logger logger = LoggerFactory.getLogger(CommonTest.class);
        logger.info("Hello World");
    }
}
输出:
17:16:42.021 [main] INFO com.prince.CommonTest - Hello World
其他日志框架转换为SLF4j
如何让系统中所有的日志都统一到slf4j:
- 将系统中其他日志框架先排除出去
- 用中间包来替换原有的日志框架
- 我们导入slf4j其他的实现
SpringBoot日志关系
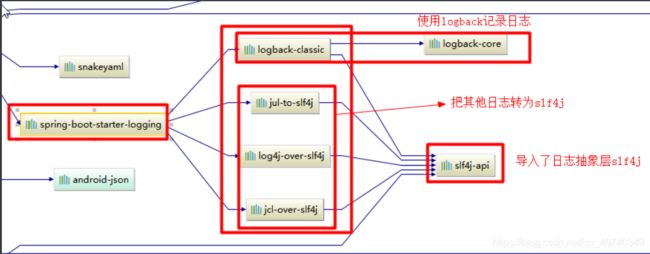
我们在springboot的pom.xml中导入的starter依赖,其实内部已经是导入很多依赖的了。
我们在idea鼠标右键,Diagrams->Show dependencies可以看得到所有的依赖关系:
其中:
总结:
- SpringBoot底层采用的日志框架是slf4j-api + logback
- 他底层也配备了其他日志框架转slf4j的转换器
jul-to-slf4j…
SpringBoot能自动适配所有的日志,而且底层使用slf4j+logback的方式记录日志,引入其他框架的时候,不需要导入依赖包(因为内部已经有了)
日志的使用
springboot他默认为我们配置好了日志。
使用:
    @Test
    public void loggerTest(){

        Logger logger = LoggerFactory.getLogger(SpringTest.class);
        //日志的级别;
        //由低到高   trace < debug < info < warn < error
        //可以调整输出的日志级别;日志就只会在这个级别以以后的高级别生效
        logger.trace("这是trace日志...");
        logger.debug("这是debug日志...");
        logger.info("这是info日志...");
        logger.warn("这是warn日志...");
        logger.error("这是error日志...");
    }
输出:
2020-11-07 19:45:53.156  INFO 15028 --- [           main] com.prince.SpringTest                    : 这是info日志...
2020-11-07 19:45:53.156  WARN 15028 --- [           main] com.prince.SpringTest                    : 这是warn日志...
2020-11-07 19:45:53.156 ERROR 15028 --- [           main] com.prince.SpringTest                    : 这是error日志...
他只打印后面3条,前面3条没有打印。说明:SpringBoot默认给我们使用的是info级别的(root级别),只有打印的级别大于info才会显示!
可以在配置文件中修改:
# 修改日志级别为trace
# 语法是logging.level.包名=级别
logging.level.com.prince=trace
更多:
官方文档
# 输出日志到文件
logging.file.name=myapp.log
# 设置控制台输出的格式
logging.pattern.console=%d{yyyy-MM-dd HH:mm:ss.SSS} [%thread] %-5level %logger{50} - %msg%n
# 设置文件输出的格式
logging.pattern.file=%d{yyyy-MM-dd HH:mm:ss.SSS} [%thread] %-5level %logger{50} - %msg%n
输出格式:
%d表示日期时间
%thread表示线程名
%-5level:级别从左显示5个字符宽度
%logger{50}表示logger名字最长50个字符,否则按照句点分割
%msg:日志消息
%n是换行符
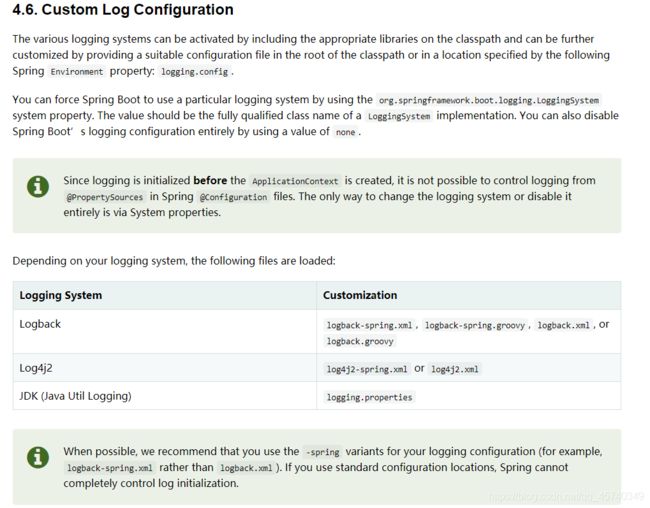
SpringBoot对这些日志的默认的配置文件都在spring-boot-2.3.5.RELEASE.jar包下的org.springframework.boot.logging里。
如果想使用自己的配置文件,直接在类路径下(resources文件夹)丢指定名称的配置文件即可。
官方文档
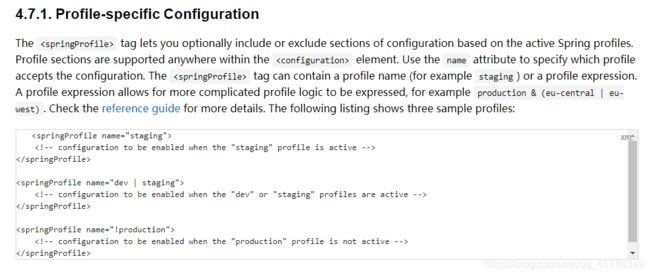
可以看到,spring官方建议我们丢配置文件的时候,配置文件名后面最好带上-spring,原因:
-
如果使用
logback.xml,那么这个配置文件就默认会被logback加载从而绕过spring框架,从而spring不能对他进行控制。 -
后面带上
-spring就可以使用一个高级特性——指定Profile环境下生效某些配置文件的功能:官方文档
切换日志框架
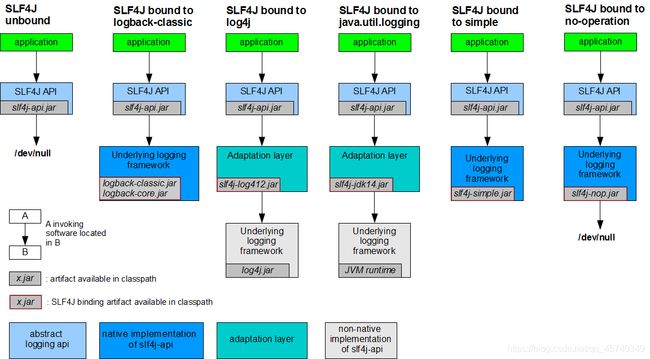
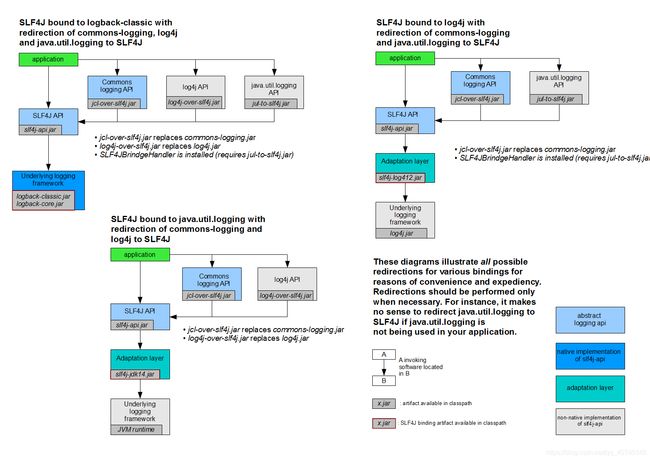
根据这张图导入相应的依赖
切换到log4j
如上图的右图所示,如果要和log4j绑定,需要jcl-over-slf4j.jar等jar包。
(其实这里有一些jar包是已经在starter里包含的了,我懒得找哪些是哪些不是,所以全部导入了,反正重复导入包也不碍事)
<dependency>
    <groupId>org.slf4jgroupId>
    <artifactId>slf4j-apiartifactId>
dependency>

<dependency>
    <groupId>org.slf4jgroupId>
    <artifactId>slf4j-log4j12artifactId>
dependency>

<dependency>
    <groupId>org.slf4jgroupId>
    <artifactId>jcl-over-slf4jartifactId>
dependency>

<dependency>
    <groupId>org.slf4jgroupId>
    <artifactId>jul-to-slf4jartifactId>
dependency>
还有因为springboot默认是使用logback,所以我们要把logback的jar包给排除掉。
<dependency>
    <groupId>org.springframework.bootgroupId>
    <artifactId>spring-boot-starterartifactId>
    <exclusions>
        <exclusion>
            <groupId>ch.qos.logbackgroupId>
            <artifactId>logback-classicartifactId>
        exclusion>
    exclusions>
dependency>
再次运行,就是使用log4j了
切换到log4j2
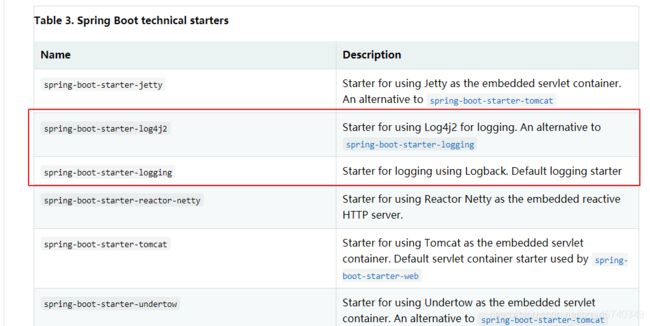
从spring的官方文档可以看出,如果使用log4j,只需将spring-boot-starter-logging包替换为spring-boot-starter-log4j2即可。
因为spring-boot-starter是默认包含logging的,所以我们只需手动排除掉他,并手动导入log4j2
<dependency>
    <groupId>org.springframework.bootgroupId>
    <artifactId>spring-boot-starterartifactId>
    <exclusions>
        <exclusion>
            <groupId>org.springframework.bootgroupId>
            <artifactId>spring-boot-starter-loggingartifactId>
        exclusion>
    exclusions>
dependency>

<dependency>
    <groupId>org.springframework.bootgroupId>
    <artifactId>spring-boot-starter-log4j2artifactId>
dependency>
效果:
Web开发
SpringBoot对静态资源的映射规则
都在**WebMvcAutoConfiguration**类里自动配置。
- 所有访问路径是
webjar/**的,都去classpath:/META-INF/resources/webjars/找资源。
源码如下:
public void addResourceHandlers(ResourceHandlerRegistry registry) {

    if (!this.resourceProperties.isAddMappings()) {

        logger.debug("Default resource handling disabled");
    } else {

        Duration cachePeriod = this.resourceProperties.getCache().getPeriod();
        CacheControl cacheControl = this.resourceProperties.getCache().getCachecontrol().toHttpCacheControl();
        if (!registry.hasMappingForPattern("/webjars/**")) {

            this.customizeResourceHandlerRegistration(registry.addResourceHandler(new String[]{
     "/webjars/**"}).addResourceLocations(new String[]{
     "classpath:/META-INF/resources/webjars/"}).setCachePeriod(this.getSeconds(cachePeriod)).setCacheControl(cacheControl));
        }

        String staticPathPattern = this.mvcProperties.getStaticPathPattern();
        if (!registry.hasMappingForPattern(staticPathPattern)) {

            this.customizeResourceHandlerRegistration(registry.addResourceHandler(new String[]{
     staticPathPattern}).addResourceLocations(WebMvcAutoConfiguration.getResourceLocations(this.resourceProperties.getStaticLocations())).setCachePeriod(this.getSeconds(cachePeriod)).setCacheControl(cacheControl));
        }

    }
}
所谓webjar,其实就是一些静态资源打包成jar包(比如框架),下面以jquery举例:
先在pom.xml中导入jar包
<dependency>
    <groupId>org.webjarsgroupId>
    <artifactId>jqueryartifactId>
    <version>3.1.1version>
dependency>
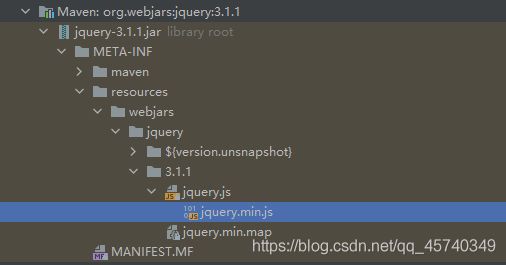
看这个jar包里面的目录结构,其实也只是将js文件打包成jar包而已:
运行项目,在浏览器访问http://localhost:8080/webjars/jquery/3.1.1/jquery.min.js,可以访问:
- 所有访问路径是
/**的,都去分别在以下地方找资源。
"classpath:/META-INF/resources/",
"classpath:/resources/",
"classpath:/static/",
"classpath:/public/"
"/"(当前项目的根路径)
源码:
public void addResourceHandlers(ResourceHandlerRegistry registry) {

    //.............
    String staticPathPattern = this.mvcProperties.getStaticPathPattern();
    if (!registry.hasMappingForPattern(staticPathPattern)) {

        this.customizeResourceHandlerRegistration(registry.addResourceHandler(new String[]{
     staticPathPattern}).addResourceLocations(WebMvcAutoConfiguration.getResourceLocations(this.resourceProperties.getStaticLocations())).setCachePeriod(this.getSeconds(cachePeriod)).setCacheControl(cacheControl));
    }
}
其中 this.resourceProperties.getStaticLocations()是在ResourceProperties类中获取值:
@ConfigurationProperties(
    prefix = "spring.resources",
    ignoreUnknownFields = false
)
public class ResourceProperties {

    private static final String[] CLASSPATH_RESOURCE_LOCATIONS = new String[]{
     "classpath:/META-INF/resources/", "classpath:/resources/", "classpath:/static/", "classpath:/public/"};
    private String[] staticLocations;  //★
    private boolean addMappings;
    private final ResourceProperties.Chain chain;
    private final ResourceProperties.Cache cache;
    public ResourceProperties() {

        this.staticLocations = CLASSPATH_RESOURCE_LOCATIONS;  //★
        this.addMappings = true;
        this.chain = new ResourceProperties.Chain();
        this.cache = new ResourceProperties.Cache();
    }
	//........
而staticPathPattern是从WebMvcProperties中获取:
@ConfigurationProperties(
    prefix = "spring.mvc"
)
public class WebMvcProperties {

	//......................
    private String staticPathPattern;
	//......................

    public WebMvcProperties() {

		//....
        this.staticPathPattern = "/**";
        //.....
    }
   //.....
所以,如果我们要修改访问路径和静态资源存放的地址,只需在配置文件中指定spring.mvc.staticPathPattern和spring.resources.staticLocations
- 欢迎页:所有目录下的
index.html,被/**映射。
源码如下:
@Bean
public WelcomePageHandlerMapping welcomePageHandlerMapping(ApplicationContext applicationContext, FormattingConversionService mvcConversionService, ResourceUrlProvider mvcResourceUrlProvider) {

    WelcomePageHandlerMapping welcomePageHandlerMapping = new WelcomePageHandlerMapping(new TemplateAvailabilityProviders(applicationContext), applicationContext, this.getWelcomePage(), this.mvcProperties.getStaticPathPattern());
    welcomePageHandlerMapping.setInterceptors(this.getInterceptors(mvcConversionService, mvcResourceUrlProvider));
    welcomePageHandlerMapping.setCorsConfigurations(this.getCorsConfigurations());
    return welcomePageHandlerMapping;
}

private Optional<Resource> getWelcomePage() {

    String[] locations = WebMvcAutoConfiguration.getResourceLocations(this.resourceProperties.getStaticLocations());
    return Arrays.stream(locations).map(this::getIndexHtml).filter(this::isReadable).findFirst();
}

private Resource getIndexHtml(String location) {

    return this.resourceLoader.getResource(location + "index.html");
}
配置网站的图标:在静态资源文件夹里放(新版本已弃用)favicon.ico
<link rel="shortcut icon" href="./favicon1.ico">
直接在html页面上加上上面的话(注意不要用favicon.ico,要不然不起作用)。
视图解析器
可以直接指定spring.mvc.view.prefix等属性配置视图解析器
@ConfigurationProperties(
    prefix = "spring.mvc"
)
public class WebMvcProperties {

	//***********
    private final WebMvcProperties.View view;
	//************
    public static class View {

        private String prefix;
        private String suffix;

		//.............
    }
    //.....
spring.mvc.view.prefix=/pages/
# 不要写成classpath:/pages/
spring.mvc.view.suffix=.html
然后把success.html丢在下面任意路径的/pages/文件夹里,下面这4个文件夹其实就是SpringBoot对静态资源的映射规则里的第2点
"classpath:/META-INF/resources/",
"classpath:/resources/",
"classpath:/static/",
"classpath:/public/"
<html lang="ch-CN">
<head>
    <meta charset="UTF-8">
    <title>Titletitle>
    <link rel="shortcut icon" href="" type="image/x-icon">
head>
<body>
    <h1>访问成功!h1>
body>
html>
控制器:
@RequestMapping("/success")
public String success(){

    return "success";
}
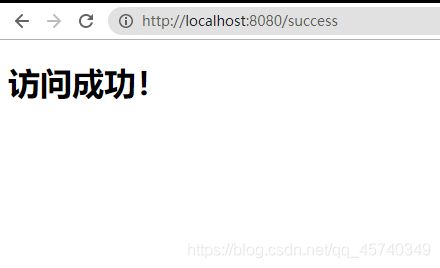
访问:
踩坑:
-
spring.mvc.view.prefix=classpath:/pages/,然后把success.html丢在classpath:/pages/目录下,虽然能够被idea解析,但是实际上访问会报404错误!!!!!不能这样做!!!虽然我也搞不懂是为什么
经过测试,下面的Thymeleaf的视图解析器是可以直接在classpath的 -
按照上面的方法,虽然不能被idea解析,但是实际访问还是能访问到的!
模板引擎
JSP、Velocity、Freemarker、Thymeleaf
SpringBoot推荐的Thymeleaf:语法更简单,功能更强大(SpringBoot是不支持JSP的)
Thymeleaf中的视图解析器
org.springframework.boot.autoconfigure.thymeleaf.ThymeleafProperties:
@ConfigurationProperties(
    prefix = "spring.thymeleaf"
)
public class ThymeleafProperties {

    private static final Charset DEFAULT_ENCODING;
    public static final String DEFAULT_PREFIX = "classpath:/templates/";
    public static final String DEFAULT_SUFFIX = ".html";
    private boolean checkTemplate = true;
    private boolean checkTemplateLocation = true;
    private String prefix = "classpath:/templates/";
    private String suffix = ".html";
    private String mode = "HTML";
    private Charset encoding;
    private boolean cache;
    private Integer templateResolverOrder;
    private String[] viewNames;
    private String[] excludedViewNames;
    private boolean enableSpringElCompiler;
    private boolean renderHiddenMarkersBeforeCheckboxes;
    private boolean enabled;
    private final ThymeleafProperties.Servlet servlet;
    private final ThymeleafProperties.Reactive reactive;
可以发现,他这里也有prefix、suffix,说明他默认也为我们配置了视图解析器,在classpath:/templates/目录。
同时, 只要我们把HTML页面放在classpath:/templates/,thymeleaf就能自动渲染
测试:
- 首先导入依赖
<dependency>
    <groupId>org.springframework.bootgroupId>
    <artifactId>spring-boot-starter-thymeleafartifactId>
dependency>
疑惑:为啥Thymeleaf默认的视图路径是在classpath都可以,而之前的却不行???
更改配置文件:
spring.thymeleaf.prefix=classpath:/pages/
spring.thymeleaf.suffix=.html
把success.html丢在classpath:/pages/,经过测试,访问成功。
继续更改,
spring.thymeleaf.prefix=/pages/
spring.thymeleaf.suffix=.html
把success.html丢在classpath:/public/pages/,经过测试,访问不成功。同时打印出下面的日志:
2020-11-08 15:03:35.370 ERROR 5304 --- [nio-8080-exec-1] org.thymeleaf.TemplateEngine : [THYMELEAF][http-nio-8080-exec-1] Exception processing template "success": Error resolving template [success], template might not exist or might not be accessible by any of the configured Template Resolvers
总结:两种配置视图解析器
spring.mvc.view.prefix |
spring.thymeleaf.prefix |
|
|---|---|---|
值为classpath:/pages/,并把html文件丢在classpath:/pages/ |
虽然IDEA能够识别,但是无法访问 | 能够访问 |
值为/pages/,并把html文件丢在classpath:/public/pages/ |
虽然IDEA不识别,但是能够访问 | 无法访问,同时控制台打印错误 |
而且经过实验发现,一旦引入thymeleaf,视图解析器就必须按照thymeleaf的了,之前spring.mvc.view.prefix无效(应该是被覆盖掉了)
Thymeleaf语法
使用Thymeleaf的html文件都要放在视图解析器中。
- 先在html标签中引入(也可以不引入,只是引入就可以有语法支持)
<html lang="ch-CN" xmlns:th="http://www.thymeleaf.org">
@RequestMapping("/success")
public String success(Map<String,String> map){

    map.put("msg","hello");
    return "success";
}
<html lang="ch-CN" xmlns:th="http://www.thymeleaf.org">
<head>
    <meta charset="UTF-8">
    <title>Titletitle>
    <link rel="shortcut icon" href="" type="image/x-icon">
head>
<body>
    <h1>访问成功!h1>
    <div th:text="${msg}">div>
body>
html>
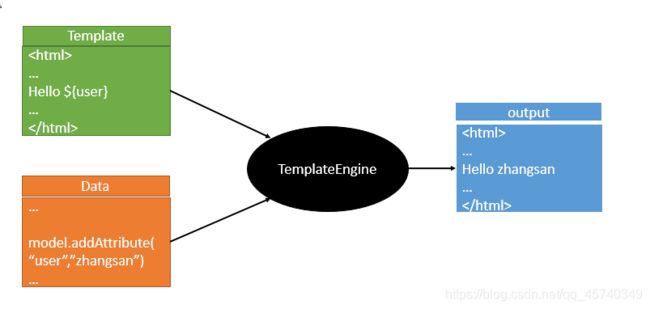
如果是JSP,取出域对象的数据,可以直接在页面里输入${msg},而thymeleaf就直接加th:text属性即可,效果:

官方文档:所有的标签属性 表达式语法
SpringMVC的自动配置
https://docs.spring.io/spring-boot/docs/current/reference/html/spring-boot-features.html#boot-features-spring-mvc-auto-configuration
扩展SpringMVC
在springmvc的xml配置中,可以通过下面的配置来配置视图解析器和拦截器
    <mvc:view-controller path="/hello" view-name="index">mvc:view-controller>
    <mvc:interceptors>
        <mvc:interceptor>
            <mvc:mapping path="/hello"/>
            <bean>bean>
        mvc:interceptor>
    mvc:interceptors>
如果不写配置文件,也可以,SpringMVC的自动配置里的官方文档就说明了:
If you want to keep those Spring Boot MVC customizations and make more MVC customizations (interceptors, formatters, view controllers, and other features), you can add your own
@Configurationclass of typeWebMvcConfigurerbut without@EnableWebMvc.If you want to provide custom instances of
RequestMappingHandlerMapping,RequestMappingHandlerAdapter, orExceptionHandlerExceptionResolver, and still keep the Spring Boot MVC customizations, you can declare a bean of typeWebMvcRegistrationsand use it to provide custom instances of those components.If you want to take complete control of Spring MVC, you can add your own
@Configurationannotated with@EnableWebMvc, or alternatively add your own@Configuration-annotatedDelegatingWebMvcConfigurationas described in the Javadoc of@EnableWebMvc.
看第一点,他的意思是,新建一个配置类(标上@Configuration注解),并继承WebMvcConfigurer 接口,但是不能标上@EnableWebMvc注解。
下面看一看WebMVCConfigurer接口
public interface WebMvcConfigurer {

    default void configurePathMatch(PathMatchConfigurer configurer) {

    }

    default void configureContentNegotiation(ContentNegotiationConfigurer configurer) {

    }

    default void configureAsyncSupport(AsyncSupportConfigurer configurer) {

    }

    default void configureDefaultServletHandling(DefaultServletHandlerConfigurer configurer) {

    }

    default void addFormatters(FormatterRegistry registry) {

    }

    default void addInterceptors(InterceptorRegistry registry) {

    }

    default void addResourceHandlers(ResourceHandlerRegistry registry) {

    }

    default void addCorsMappings(CorsRegistry registry) {

    }

    default void addViewControllers(ViewControllerRegistry registry) {

    }

    default void configureViewResolvers(ViewResolverRegistry registry) {

    }

    default void addArgumentResolvers(List<HandlerMethodArgumentResolver> resolvers) {

    }

    default void addReturnValueHandlers(List<HandlerMethodReturnValueHandler> handlers) {

    }

    default void configureMessageConverters(List<HttpMessageConverter<?>> converters) {

    }

    default void extendMessageConverters(List<HttpMessageConverter<?>> converters) {

    }

    default void configureHandlerExceptionResolvers(List<HandlerExceptionResolver> resolvers) {

    }

    default void extendHandlerExceptionResolvers(List<HandlerExceptionResolver> resolvers) {

    }

    @Nullable
    default Validator getValidator() {

        return null;
    }

    @Nullable
    default MessageCodesResolver getMessageCodesResolver() {

        return null;
    }
}
可以看到,他这里那么多的方法,需要配置哪个,就重写哪一个就行了。
比如我要添加一个视图映射(对应xml里的addViewControllers()即可。
@Configuration
public class MyMvcConfig implements WebMvcConfigurer {

    @Override
    public void addViewControllers(ViewControllerRegistry registry) {

        //实现效果:浏览器访问/haha,跳转到success页面
        registry.addViewController("/haha").setViewName("success");
    }
}
既能保留Springboot的自动配置,也能扩展我们的配置。
全面接管SpringMVC
不要SpringBoot为我们的自动配置,全部都由我们自己配,只需要加入@EnableWebMvc注解。(不建议)
