这是***【总结回顾】iOS Apprentice Tutorial 2:Checklists ***系列的第三篇文章,前两篇文章请见【总结回顾】iOS Apprentice Tutorial 2:Checklists(一) 、总结回顾】iOS Apprentice Tutorial 2:Checklists(二)。
本篇文章总结本书的第四、五章(Adding new items to the checklist 和 The Add Item screen)中的重点内容。总结到了第 96 页。
25. navigation controller
在Storyboard中嵌入navigation controller的方法:
Editor → Embed In →Navigation Controller.
26. 创建 Outlet 和 Action 连接的三种方法
方法一:
在.swift文件中写好@IBAction或者@IBOutlet代码:
@IBAction func addItem() {

}
然后到storyboard中,点击Button然后按住Ctrl拖拽到sidebar中建立连接:
然后弹出:
点击 Sent Action 下的 addItem 即可。
方法二:
在.swift文件中写好@IBAction或者@IBOutlet代码:
@IBAction func addItem() {

}
然后到storyboard中,点击Button然后按住Ctrl拖拽到顶部黄色圆圈中建立连接:
然后弹出:
点击 Sent Action 下的 addItem 即可。
方法三:
点击打开 Assistant Editor;
然后 Ctrl拖拽法:选中控件,然后按住Control键,拖拽到 Assistant Editor 中的代码里;
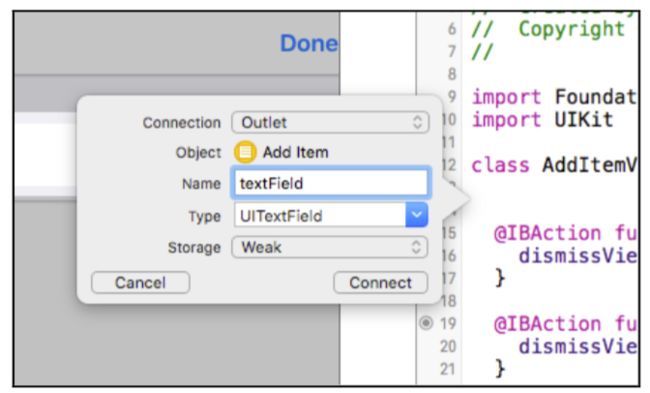
松开鼠标,弹出弹出框,填写内容即可;
方法四:
方法一和方法二都是事先先写代码,然后连接,一个拖拽到sidebar一个是黄色圈里,其实,如果事先写好了代码的话,拖拽的地方比较多的,只要是当前的 scene 就可以了,比如可以拖拽到当前 scene 的状态栏那里,就是有电池量时间图标的那地方。
27.在 tableview 中 增加 一行需要做的事情
//利用数组下标从零开始特点,数组中的元素总数和最后一个下标数正好差1,总数正好是新元素的下标。先读取总数,再添加新的元素。
let newRowIndex = items.count

//创建新的元素,然后添加到数组中
let item = ChecklistItem()
item.text = "I am a new row"
item.checked = false
items.append(item)

//将新创建的元素显示到tableview中
let indexPath = NSIndexPath(forRow: newRowIndex, inSection: 0)
let indexPaths = [indexPath] //表示这是一个数组
tableView.insertRowsAtIndexPaths(indexPaths,withRowAnimation: .Automatic)
最后三行代码也可写成:
let indexPath = NSIndexPath(forRow: newRowIndex, inSection: 0)
tableView.insertRowsAtIndexPaths([indexPaths],withRowAnimation: .Automatic)
也就是说,该方法可以一次同时添加多行rows到tableview中。
总结一下上述三个步骤:
- 创建一个新的 ChecklistItem 对象;
- 把刚刚创建的这个对象添加到 data model 中;
- 在table view 中插入新的一行以显示刚刚新增加创建的 ChecklistItem 对象。
我们在创建新的rows时,需要同时添加到 data model 和 table view中,MV要同步一致。如果MV不一致,程序就会崩溃。
28.在tableview 中 删除 一行需要做的事情
override func tableView(tableView: UITableView,commitEditingStyle editingStyle: UITableViewCellEditingStyle,forRowAtIndexPath indexPath: NSIndexPath) {
    // 1
    items.removeAtIndex(indexPath.row)
    // 2
    let indexPaths = [indexPath]
    //3
    tableView.deleteRowsAtIndexPaths(indexPaths,withRowAnimation: .Automatic)
}
非常简单:
- 从 data model 中删除这条数据;
- 从 table view 中删除对应的行。
29. Action Segue
show:用于 navigation controller
modal:
使用 show ,则会自动出现返回上一层的返回键,当前界面是上一个界面的下级,在navigation controller层级体系之下
使用 present modally,则不会有返回键,是和上一个界面平行的界面,不存在上下级关系。需要用代码返回,比如 dismissViewControllerAnimated():。
dismissViewControllerAnimated(true, completion: nil)
作用:告诉应用关闭当前的这个界面,且有动画效果。
官方解释如下:
Dismisses the view controller that was presented modally by the view controller.
The presenting view controller is responsible for dismissing the view controller it presented. If you call this method on the presented view controller itself, UIKit asks the presenting view controller to handle the dismissal.
If you present several view controllers in succession, thus building a stack of presented view controllers, calling this method on a view controller lower in the stack dismisses its immediate child view controller and all view controllers above that child on the stack. When this happens, only the top-most view is dismissed in an animated fashion; any intermediate view controllers are simply removed from the stack. The top-most view is dismissed using its modal transition style, which may differ from the styles used by other view controllers lower in the stack.
If you want to retain a reference to the view controller'��s presented view controller, get the value in the
presentedViewControllerproperty before calling this method.
The completion handler is called after the
viewDidDisappear:method is called on the presented view controller.
当用户点击了 Cancel 按钮,调用 dismissViewControllerAnimated():方法后,带 Cancel 按钮的这个界面(也就是 AddItemViewController 这个对象object)发生了什么事情?看起来好像消失了对吗?是的,该对象被销毁了,内存也由系统回收了。
所以每次用户打开 Add Item 这个界面时,应用都会创建AddItemViewController 这个对象的实例。也就是说,view controller 这个 object,只有在用户与之交互的时候才会存活,如果用户跳转到另外一个界面了,原来的 view controller 也没有必要继续存在了。
30. Bar Button Items
在使用 Bar Button Item 控件时,可以选择 System Item,预订了集中 Bar Button 的样式,不过要注意,在使用这些样式时,功能必须与苹果规定的一模一样,不然在提交应用市场审核时,是会被拒的。比如你使用了系统自带的这个相机图案的 Bar Button,但是用户点击后竟然是新建表单,那么就会被拒绝。
使用系统自带的 Bar Button Item 有一个好处,比如 Cancel 和 Done 这样的按钮后,当你的程序被其他语言的iPhone打开后,会自动变成用户所使用的语言,无需你的翻译。
31. view controller 容器
一般情况下:一个 view controller 代表 一个 screen
有时候:两个 view controller 代表 一个 screen。最常见的例子就是:一个 Navigation Controller 里 嵌套 一个 Table View Controller。
实际上就是 Navigation Controller 里装着另外一个 controller ,就是说,Navigation Controller 就是一个容器。另外,Tab Bar Controller 也一样。在 iPad 上还有 split-view。
32.什么情况下使用 static table cells
你已经这个table view有多少个 section 多少个 row 且数量一直不变。在这种情况下,就可以使用静态的cell。静态cell的好处就是你可以在storyboard中设计编辑外观,不需要提供data source。
33.去掉选中状态
在使用 table view 时,默认点击一行后会出现选中状态,这一行的背景会变成灰色。如果不想要这个效果,那么需要两步。
第一步,代码:(注意是 willSelect,方法名 will开头)
  override func tableView(tableView: UITableView, willSelectRowAtIndexPath indexPath: NSIndexPath) -> NSIndexPath? {
    return nil
  }
第二步,Storyboard设置:
在 Storyboard 中选中这行 cell,然后到 Attribute Inspector,把 Selection 属性设置为 None。
两步搞定~
34.Return to sender
返回值的类型是要一致的,规定 Int 类型,只能返回 Int 类型的值。
如果 -> NSIndexPaht?有个问号,说明该方法可以返回 nil(空值)。没有问号?(或者叹号)的方法不可以返回nil。nil表示什么含义,需要看一下文档,有可能表示什么也没有找到、不做任何事情、不被选中等等。
没有 -> 箭头的方法则没有返回值,如果在这样的方法中使用 Return,则表示退出当前的方法不再执行该方法。
甚至可以不指定返回值类型,->() 或者 -> Void 表示返回空的元组。
还有 @IBAction 方法永远没有返回值。
35. viewWillAppear():
view controller 在可见之前会收到 viewWillAppear() 发出的message(消息)。
36. textField 控件弹出键盘
激活键盘,弹出键盘
textField.becomeFirstResponder()
37. Text Fields 控件的 Return/Done 按键
点击键盘上的 Done 或者 Return 按钮后,能够收起键盘的同时完成 @IBAction 方法。方法如下。
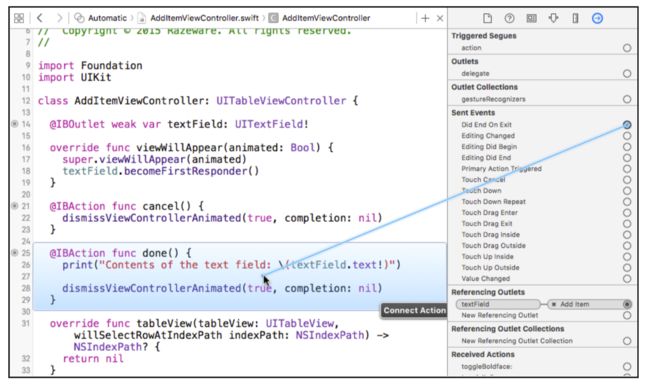
选中 text fields 控件,打开Assistant Editor,打开 Connection Inspector,从 Did End on Exit 拖拽到代码中 @IBAction 方法上即可。注意:这个方法中,参数的类型可以是AnyObject,也可以没有参数,参数的类型不能是 UIButton,不然无法创建链接。如下图:
这里做个小的对比,如果我想让点击 Done/Return 按键后,只是收起键盘,这个效果该如何实现呢?
首先引入UITextFieldDelegate:类的开头输入+拖拽到小黄圈建立delegate连接,然后加入下列代码:
func textFieldShouldReturn(textField: UITextField!) -> Bool {
    某某UITextField.resignFirstResponder()
    return true
}
再来一个对比,如果我想让用户点击屏幕其他地方空白处时,也能将键盘收起来,这个效果如何实现呢?
我们已经引入了UITextFieldDelegate的话,那么只需下列代码了:
override func touchesBegan(touches:NSSet, withEvent event: UIEvent){
    self.view.endEditing(true)
}
38.引入UITextFieldDelegate
两步。
第一步,在类的开头输入:
第二步,在 Storyboard 中拖拽创建 delegate 连接:
OK,2布搞定~~
**make the view controller a delegate for the text field **
让 view controller 成为 text field 的 delegate 的意义:可以监听 text field 里的变化,不光是用户敲击键盘带来的变化,还包括用户复制粘贴到输入框中的变化。
text field 会把 events (事件)发送给 delegate,让 delegate 知道 text field 这里发生了什么,有哪些变化。而 delegate( view controller )可以针对不同的events做出相对应的回应。
一个 view controller可以成为多个对象的 delegate,比如成为 UITableView 的 delegate 的同时还是 UITextField 的 delegate。
39. 解决 Text Fields 控件不输入内容引起程序崩溃的问题
用户不输入内容,就按了 保存,这样可不好,最好能够在用户啥都不输入的时候,不让用户点击 Done 按钮。不过这里我们需要照顾两个 Done 按钮,一个是键盘上的,一个是导航栏上的,毕竟 #37 实现了键盘上 Done 按钮的功能。
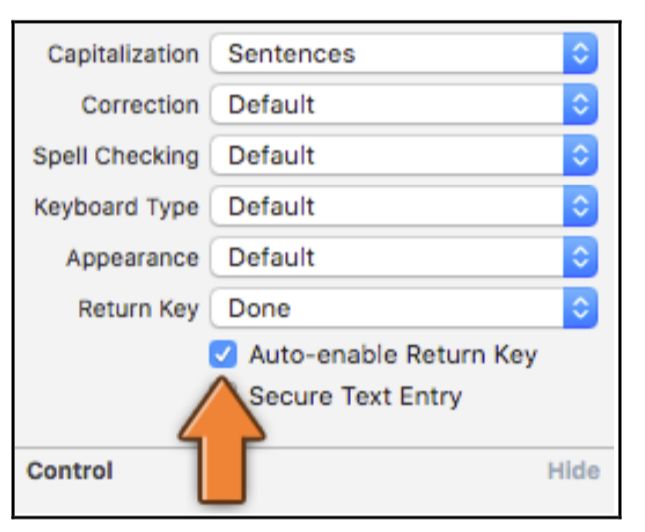
第一步,勾选 Auto-enable Return Key:
第二步,代码:
  @IBOutlet weak var doneBarButton: UIBarButtonItem!

  func textField(textField: UITextField, shouldChangeCharactersInRange range: NSRange, replacementString string: String) -> Bool {
      let oldText: NSString = textField.text!
      let newText: NSString = oldText.stringByReplacingCharactersInRange(range, withString: string)

      doneBarButton.enabled = (newText.length > 0)
      return true
  }
多说一句,用print()打印参数 string和range以及变量newText。就能明白let newText: NSString = oldText.stringByReplacingCharactersInRange(range, withString: string)的作用了。
第三步,不勾选DoneBarButton Item 的 Enabled 选项 :
40. 成为 delegate 的三个步骤
1)宣布自己能够成为 delegate。
view controller 类的开头写上具体哪个delegate。
2)让对方知道你想成为它的 delegate。
拖拽小黄圈。
3)执行 delegate 规定的方法。
delegate 的方法有些是必须要有的,有些是可选择的,不必执行所有的方法。
41. NSString 与 String 的异同
String 是 Swift 语言的类型,NSString 是 Objective-C 里的类型。
至于两个类型什么时候能合二为一,我也不知道,也不知道 Swift 3.0 会是什么情况。
42. doneBarButton.enabled = (newText.length > 0)
doneBarButton.enabled是布尔类型,结果只有 true 或者 false 两种可能性。(newText.length > 0的结果也是布尔值,>是比较运算符,结果只有true或false,所以可以这样写。
Swift 的比较运算符有:
> 大于
< 小于
>= 大于等于
<= 小于等于
== 等于(两者数值相等)
!= 不等于(两者数值不相等)
记住一个小窍门,当你看到这样的代码时:
if some condition {
    something = true
} else {
    something = false
}
可以直接简化写成:
something = (some condition)
比较运算符的结果只有true和false!!!


