Python中GUI设计之tkinter控件的使用(窗体和Label)
1. 认识GUI和tkinter
GUI是Graphics User Interface的简称,就是图形用户接口。
tkinter是一个开放源码的图形接口开发工具,选择tkinter的主要原因是,tkinter是支持Window、Linux、Mac OS的,有了这个GUI工具,我们就可以使用Python创建属于自己的窗体程序了。
首先引入模块并查询tkinter版本
# 导入模块
from tkinter import *

# 查询tkinter版本
import tkinter
print(tkinter.TkVersion)
2. 创建窗口
from tkinter import *

# create form
root =Tk()
root.title("MyWindow")
# get screen w,h
screenWidth=root.winfo_screenwidth()
screenHeight=root.winfo_screenheight()
w=300
h=260
x=(screenWidth-w)/2
y=(screenHeight-h)/2
# set position and size(width x height + x + y)
root.geometry("%dx%d+%d+%d"%(w,h,x,y))
# set background color
root.configure(bg="yellow")
# wait processing form event
root.mainloop()
3. Label 控件
from tkinter import *

# create form
root =Tk()
root.title("MyWindow")

label=Label(root,
            text="I am Peter.Wu",
            fg="blue",
            bg="yellow",
            height=5, # 背景色高度
            width=15,
            anchor="n", # 指定字符在背景色上的位置:东e 南s 西w 北n 东南se...
            font="Helvetic 20 bold",
            relief="raised") # 背景色边框样式:“flat”,"groove","raised","solid","sunken"
label.pack()
root.mainloop()
4. Widget的共同方法:
使用共同方法config() 方法实现一个简单的计数器
from tkinter import *

counter=0
# 计数方法,传入一个Label控件
def run_counter(digit):
    def counting(): # 更新数字
        global counter
        counter+=1
        digit.config(text=str(counter)) # 通过config()方法改变Label的Text
        digit.after(1000,counting) # 1s以后调用counting()
    counting() # 持续调用

root=Tk()
root.title("Counter")
digit=Label(root,bg="yellow",fg="blue",
            height=5,width=10,
            font="Helvetic 20 bold")
digit.pack()
run_counter(digit) # 调用run_counter(),传入Label

root.mainloop()
运行结果:

使用共同方法pack() 将Label显示在窗体的不同位置
from tkinter import *

root=Tk()
root.title("Pack method")
lbl1=Label(root,text="this is demo one",bg="red").pack(side=LEFT,padx=10)
lbl2=Label(root,text="this is demo two",bg="green").pack(side=LEFT,padx=10)
lbl3=Label(root,text="this is demo three",bg="blue").pack(side=LEFT,padx=10)

root.mainloop()
运行结果:

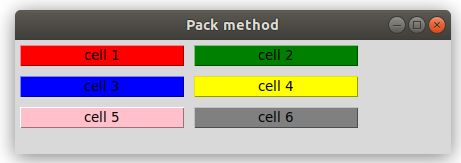
使用共同方法grid() 将Label均匀分布在不同位置
from tkinter import *

root=Tk()
root.title("Pack method")
lbl1=Label(root,text="cell 1",bg="red",width=20,relief="raised").grid(row=0,column=0,padx=5,pady=5)
lbl2=Label(root,text="cell 2",bg="green",width=20,relief="raised").grid(row=0,column=1,padx=5,pady=5)
lbl3=Label(root,text="cell 3",bg="blue",width=20,relief="raised").grid(row=1,column=0,padx=5,pady=5)
lbl4=Label(root,text="cell 4",bg="yellow",width=20,relief="raised").grid(row=1,column=1,padx=5,pady=5)
lbl5=Label(root,text="cell 5",bg="pink",width=20,relief="raised").grid(row=2,column=0,padx=5,pady=5)
lbl6=Label(root,text="cell 6",bg="grey",width=20,relief="raised").grid(row=2,column=1,padx=5,pady=5)

root.mainloop()
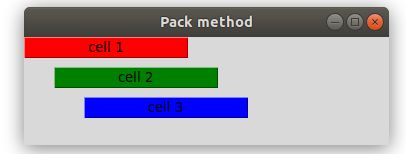
from tkinter import *

root=Tk()
root.title("Pack method")
lbl1=Label(root,text="cell 1",bg="red",width=20,relief="raised").place(x=0,y=0)
lbl2=Label(root,text="cell 2",bg="green",width=20,relief="raised").place(x=30,y=30)
lbl3=Label(root,text="cell 3",bg="blue",width=20,relief="raised").place(x=60,y=60)
root.mainloop()


