Anchor-Free模型总结
文章目录
- Anchor-Free综述
-
- 一. CornerNet
-
- 1.1 概述
- 1.2 模块介绍
-
- 1.2.1 Heatmap
- 1.2.2 Offset
- 1.2.3 Grouping Corners
- 1.2.4 Corner Pooling
- 1.3 总结
- 二. CenterNet
-
- 2.1 概述
- 2.2 Center-Regression
- 三. FCOS
-
- 3.1. 概述
- 3.2. 模块介绍
-
- 3.2.1 论文思路简介
- 3.3.2 回归形式
- 3.3 参考文献
- 四 ATSS
- 五.GFLV1
-
- 5.1. 论文简介
- 5.2. 模块详解
-
- 5.2.1 谈谈分布
- 5.2.2 分类Loss
- 5.2.3 回归Loss
- 5.3. 参考文献
- 六. GFLV2
-
- 6.1 概述
Anchor-Free综述
一. CornerNet
论文国内地址
1.1 概述
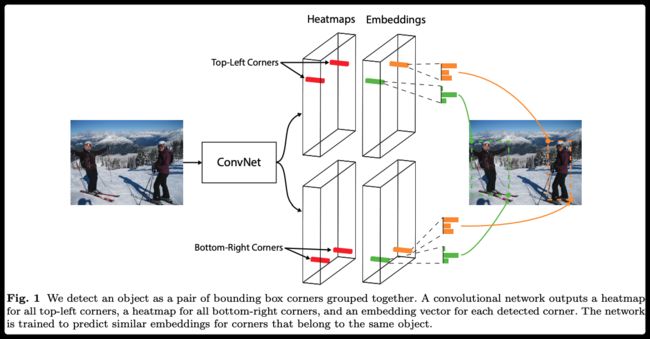
这是第一篇将anchor-free的mAP值刷入COCO榜单的论文,主要贡献是将keypoints的估计方式引入目标检测之中。
主要创新点:
- 使用
Heatmap表示目标的坐标left-top、right-bottom - 增加
Offset使得定位更加精确 - 使用
Embeddings使得两个关键点匹配 - 使用
left、right、top、bottom pooling层增加目标边缘的定位准确度

1.2 模块介绍
1.2.1 Heatmap
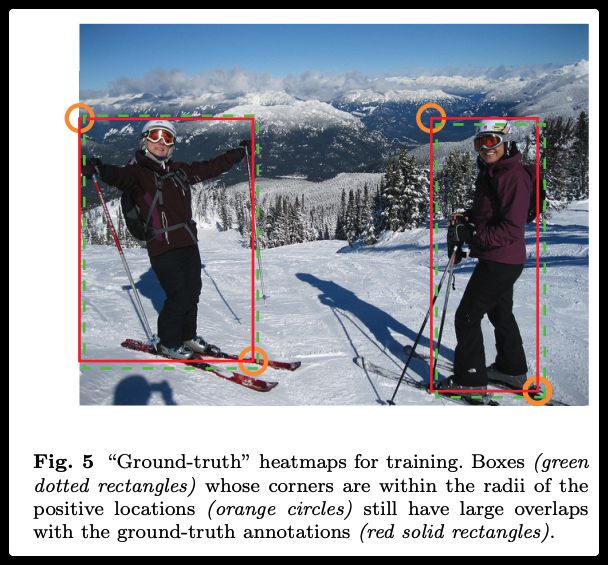
使用两个Heatmaps表示一个目标的左上角和右下角点,例如: L e f t _ t o p = B × C × W × H Left\_top=B \times C \times W \times H Left_top=B×C×W×H ,其中 C C C 表示目标类别,同理右下角点完全相同。对于每一个像素,这是一个分类问题,使用focal-loss去除类别不均衡问题。对于focal-loss而言,类别非0即1,然后Heatmap是使用Gaussian-map生成的,周围的点都是 v a l u e ∈ [ 0 − 1 ] value \in [0-1] value∈[0−1]。下图展示了,label周围的点实际也是较好的定位点,不应该直接归结为背景,而且给予一定的权重,基于此得重新设计loss函数

其中 y c i j = 1 y_{cij}=1 ycij=1 的时候和focal-loss相同, y c i j < 1 y_{cij}<1 ycij<1 的时候使用 1 − y c i j 1-y_{cij} 1−ycij 作为减少惩罚,如下公式(1)所示
KaTeX parse error: No such environment: equation at position 8: \begin{̲e̲q̲u̲a̲t̲i̲o̲n̲}̲L_{d e t}=\frac…
1.2.2 Offset
当前的网络都会进行Downsample or Upsample的操作,使用heatmap最明显的两个缺点:1)计算量比较大,2)精度不准确。对于前者,这里不讨论,可以参考人体关键点期望分布进行解决。后者是这里解决的方案,直接学习一个offset参数去解决
o k = ( x k n − ⌊ x k n ⌋ , y k n − ⌊ y k n ⌋ ) \boldsymbol{o}_{k}=\left(\frac{x_{k}}{n}-\left\lfloor\frac{x_{k}}{n}\right\rfloor, \frac{y_{k}}{n}-\left\lfloor\frac{y_{k}}{n}\right\rfloor\right) ok=(nxk−⌊nxk⌋,nyk−⌊nyk⌋)
这里比较简单,不再赘述直接使用SmoothL1-Loss计算即可
KaTeX parse error: No such environment: equation at position 8: \begin{̲e̲q̲u̲a̲t̲i̲o̲n̲}̲L_{o f f}=\frac…
1.2.3 Grouping Corners
此处方法参考论文:Associative Embedding
已经学习到多组两个角点的位置,如何将其对应?和Offset处理方式类似,直接使用一个参数(一组参数)去编码当前关键点的组ID信息
比如:Left-top点的heatmap维度为 B × C × W × H B\times C \times W \times H B×C×W×H,Embedding的维度为 B × W × H × N B\times W \times H \times N B×W×H×N ,其中 C C C为种类信息, N N N为维度信息,这样就为每个目标设定了一个长度为 N N N的vector信息。当然可以使用 N × M × K . . . N\times M \times K... N×M×K... 等多维度信息去表示。
KaTeX parse error: No such environment: equation at position 8: \begin{̲e̲q̲u̲a̲t̲i̲o̲n̲}̲L_{\text {pull …
KaTeX parse error: No such environment: equation at position 8: \begin{̲e̲q̲u̲a̲t̲i̲o̲n̲}̲L_{p u s h}=\fr…
#https://github.com/zzzxxxttt/pytorch_simple_CornerNet/blob/767bf0af3229d9ffc1679aebdbf5eb05671bbc75/utils/losses.py#L34
def _ae_loss(embd0s, embd1s, mask):
  num = mask.sum(dim=1, keepdim=True).float()  # [B, 1]

  pull, push = 0, 0
  for embd0, embd1 in zip(embd0s, embd1s):
    embd0 = embd0.squeeze()  # [B, num_obj]
    embd1 = embd1.squeeze()  # [B, num_obj]

    embd_mean = (embd0 + embd1) / 2

    embd0 = torch.pow(embd0 - embd_mean, 2) / (num + 1e-4)
    embd0 = embd0[mask].sum()
    embd1 = torch.pow(embd1 - embd_mean, 2) / (num + 1e-4)
    embd1 = embd1[mask].sum()
    pull += embd0 + embd1

    push_mask = (mask[:, None, :] + mask[:, :, None]) == 2  # [B, num_obj, num_obj]
    dist = F.relu(1 - (embd_mean[:, None, :] - embd_mean[:, :, None]).abs(), inplace=True)
    dist = dist - 1 / (num[:, :, None] + 1e-4)  # substract diagonal elements
    dist = dist / ((num - 1) * num + 1e-4)[:, :, None]  # total num element is n*n-n
    push += dist[push_mask].sum()
  return pull / len(embd0s), push / len(embd0s)
1.2.4 Corner Pooling
由于两个角点光靠局部位置很难确定,对比mask和bbox的区别。这里使用创新的pooling层去解决这个问题。**其实按照现在流行的做法,使用Non-local、SE模块去处理可能会更好。**做法非常简单,但需要自己写cuda层实现。
 

KaTeX parse error: No such environment: equation at position 8: \begin{̲e̲q̲u̲a̲t̲i̲o̲n̲}̲t_{i j}=\left\{…
KaTeX parse error: No such environment: equation at position 8: \begin{̲e̲q̲u̲a̲t̲i̲o̲n̲}̲l_{i j}=\left\{…
1.3 总结
此论文是开创性的,位置毋庸置疑。
缺点也是一目了然–>>
二. CenterNet
2.1 概述
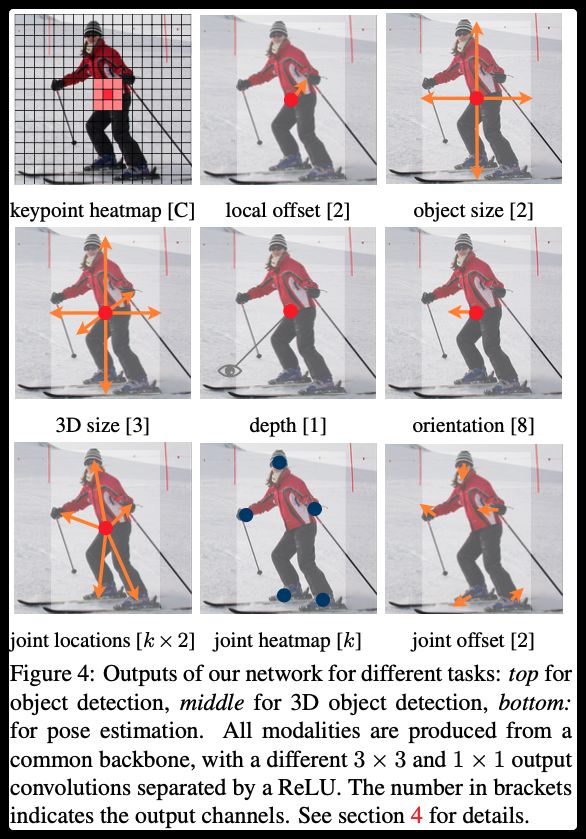
基于CornerNet的改进版本,主要贡献是速度快精度准,当时是用在移动端利器
主要创新点:
- 使用中心点代替角点,直接回归长宽
- 使用Offset(
CornerNet已经存在) - 使得增加属性非常容易,比如
depth、direction…
2.2 Center-Regression
对于CornerNet来说,回归两个角点+回归Offset+回归分组信息+NMS,显得特别繁琐,而且计算很慢!这里对其进行如下改进:
- 使用中心点和 W 、 H W、H W、H 代替两个角点
- 依然回归
Offset对位置精度弥补 - 去除分组对齐
- 去除NMS

由于其核心是使用目标的中心点进行的操作,所以添加其它属性非常方便,如上图中的方向、关键点、深度…
三. FCOS
3.1. 概述
主要做的贡献如下(可能之前有人已提出):
- FPN分阶段回归
- Center-ness Loss
3.2. 模块介绍
3.2.1 论文思路简介
论文整体比较简单,直接从头读到尾没有什么障碍,好像Anchor-free的文章都比较简单。下面直接以模块介绍。
文章中 l ∗ 、 b ∗ 、 r ∗ 、 t ∗ l^*、b^*、r^*、t^* l∗、b∗、r∗、t∗ 表示label, l 、 b 、 r 、 t l、b、r、t l、b、r、t 表示predict

3.3.2 回归形式
文章直接回归 l 、 r 、 b 、 t 、 c l、r、b、t、c l、r、b、t、c 其中 c c c 表示种类,前面四个在上图中有表示。
回归采用正负样本形式:
- f e a t u r e m a p feature map featuremap 表示回归的特征图(以 M M M 表示)
- M i , j M_{i,j} Mi,j 表示 ( i , j ) (i,j) (i,j) 个点的特征值
- 将 M i , j M_{i,j} Mi,j 映射到原图,假设当前特征图的总步长是 S S S (和原图比例),则原图点 P i , j = ( S 2 + M i ∗ S , S 2 + M j ∗ S ) P_{i,j} =(\frac{S}{2}+M{i}*S,\frac{S}{2}+M{j}*S) Pi,j=(2S+Mi∗S,2S+Mj∗S)
- P i , j P_{i,j} Pi,j 落入哪个label区域,就负责回归哪个label,算作正样本。落到外部则算作负样本。
- 如果落在重复区域,按照上图的形式(哪个面积小,就负责哪个label)
文章采用FPN结构,用于提高召回率和精确度。参考Anchor-based(不同尺度的Anchor负责不同大小的目标),文章对不同的层进行限制目标大小:其中 M 1 、 M 2 、 . . . M 6 = 0 、 64 、 128 、 256 、 512 M_{1}、M_{2}、...M_{6} = 0、64、128、256、 512 M1、M2、...M6=0、64、128、256、512,按照 M i < ( l ∗ 、 b ∗ 、 r ∗ 、 t ∗ ) < M i − 1 M_{i}<(l^*、b^*、r^*、t^*)

最后文章发现一个问题,NMS时候出现很多和最终目标接近的框,我们希望的是:负样本和正样本区分明显,而不是很多接近正样本的框(比如分类,虽然可以正确分类,但是出现很多 c o n f = 0.45 conf=0.45 conf=0.45 的目标,我们希望出现 c o n f p o s = 0.99 , c o n f n e g = 0.11 conf_{pos}=0.99,conf_{neg}=0.11 confpos=0.99,confneg=0.11)。
文章通过设置 c e n t e r center center 进行控制,对于那些中心偏离的目标进行抑制。我们不仅仅要IOU好,也要center好。文章通过新建一个新的分支进行center-ness进行回归。
KaTeX parse error: No such environment: equation at position 8: \begin{̲e̲q̲u̲a̲t̲i̲o̲n̲}̲enterness $^{*}…
3.3 参考文献
- 原始论文
- FCOS改进
四 ATSS
此论文对比anchor-free和anchor-base的区别,从而在anchor-base上提出一套自动计算anchor的工具。使用较少,这里略过。
五.GFLV1
5.1. 论文简介
将目标检测Loss和评价指标统一,提升检测精度。这是一篇挺好的论文,下面会将其拓展到其它领域。
主要做的贡献如下(可能之前有人已提出):
- 分类Loss+评价指标
- Regression分布推广到一般性
5.2. 模块详解
5.2.1 谈谈分布
- 什么是分布?表示一个数发生的概率,设 f = P ( x ) f=P(x) f=P(x) 表示分布函数, f f f 表示发生的概率, x x x 可能存在的数。1)显而易见, ∫ − ∞ + ∞ P ( x ) d x = 1 \int_{-\infty}^{+\infty}P(x)dx=1 ∫−∞+∞P(x)dx=1,所有的数存在概率总和为1。 2) y = ∫ − ∞ + ∞ P ( x ) ∗ x d x y=\int_{-\infty}^{+\infty}P(x)*xdx y=∫−∞+∞P(x)∗xdx ,它的整体期望(平均值)肯定是等于目标值的。
- 什么是 D i r a c Dirac Dirac 分布? reference , f = δ ( x − μ ) f=\delta(x-\mu) f=δ(x−μ) , 当 x = μ x=\mu x=μ 概率为1,其它都是0。这是什么意思?此分布简称为绝对分布,只要是直接求目标的,都属于此分布。比如:1)直接计算 o n e − h o t one-hot one−hot 交叉熵 l a b e l = [ 0 , 0 , 0 , 1 ] , p r e d = [ 0.2 , 0.1 , 0.1 , 0.6 ] label=[0,0,0,1],pred=[0.2,0.1,0.1,0.6] label=[0,0,0,1],pred=[0.2,0.1,0.1,0.6],我们的目的就是两者相等,其它的值都是不存在的。你问我按照 D e l t a Delta Delta 分布应该其他值为0才对啊,那loss=0(实际loss为什么不是0)怎么回传呢?记住Loss和分布不是一个概念,Loss是我们用一种方式使得结果达到理想分布,分布是一种理想的状态,简单点说 L o s s → S a m p l e Loss \to Sample Loss→Sample。2)那么直接进行BBox回归也是一种 D e l t a Delta Delta 分布,因为都是预测一个值,然后直接和Label进行smoothL1计算Loss。
- 什么是 G a u s s i a n Gaussian Gaussian 分布,这个不多说大家都知道。 G a u s s i a n − Y O L O Gaussian-YOLO Gaussian−YOLO 和 H e a t m a p Heatmap Heatmap 都是属于此分布。举个例子:刚开始做关键点(当前小模型人脸也是这样做的)直接使用坐标 ( x , y ) (x,y) (x,y) 进行回归,显然这是属于 D e l t a Delta Delta 分布的,后面人们将其改进为 H e a t m a p Heatmap Heatmap,这就是将分布改为 G a u s s i a n Gaussian Gaussian,所以称为 G a u s s i a n − H e a t m a p Gaussian-Heatmap Gaussian−Heatmap .
- 什么是任意分布?只满足分布的两个条件,没有具体的公式。直接使用期望和Label进行计算Loss即可。
- 进一步理解Loss和分布的关系,期望和Label计算Loss(前向推导使用期望做结果),中间概率和期望计算Loss(使得输出按照一定分布进行,容易收敛提高精度)。

5.2.2 分类Loss
- 具体由来见:论文作者知乎回答
笔者给出简短说明:
- 先去看一下FCOS论文,其中使用 c e n t e r − n e s s center-ness center−ness 计算预测框质量,两个作用:1)训练时抑制质量较差的框。2)前向计算时用于NMS操作指标。
- 问题来了。。。训练阶段、前向计算、评价指标没有统一?
- 论文魔改一下Focal-Loss、center-ness统一为一个Loss

-
此部分比较简单,基本和FCOS类似
# 代码出自mmdetection
@weighted_loss
def quality_focal_loss(pred, target, beta=2.0):
    """Quality Focal Loss (QFL) is from
    Generalized Focal Loss: Learning Qualified and Distributed Bounding Boxes
    for Dense Object Detection
    https://arxiv.org/abs/2006.04388

    Args:
        pred (torch.Tensor): Predicted joint representation of classification
            and quality (IoU) estimation with shape (N, C), C is the number of
            classes.
        target (tuple([torch.Tensor])): Target category label with shape (N,)
            and target quality label with shape (N,).
        beta (float): The beta parameter for calculating the modulating factor.
            Defaults to 2.0.

    Return:
        torch.Tensor: Loss tensor with shape (N,).
    """
    assert len(target) == 2, """target for QFL must be a tuple of two elements,
        including category label and quality label, respectively"""
    # label denotes the category id, score denotes the quality score
    label, score = target

    # negatives are supervised by 0 quality score
    pred_sigmoid = pred.sigmoid()
    scale_factor = pred_sigmoid
    zerolabel = scale_factor.new_zeros(pred.shape)
    loss = F.binary_cross_entropy_with_logits(
        pred, zerolabel, reduction='none') * scale_factor.pow(beta)

    # FG cat_id: [0, num_classes -1], BG cat_id: num_classes
    bg_class_ind = pred.size(1)
    pos = ((label >= 0) & (label < bg_class_ind)).nonzero().squeeze(1)
    pos_label = label[pos].long()
    # positives are supervised by bbox quality (IoU) score
    scale_factor = score[pos] - pred_sigmoid[pos, pos_label]
    loss[pos, pos_label] = F.binary_cross_entropy_with_logits(
        pred[pos, pos_label], score[pos],
        reduction='none') * scale_factor.abs().pow(beta)

    loss = loss.sum(dim=1, keepdim=False)
    return loss
5.2.3 回归Loss
主要包括两个部分:
-
D e l t a Delta Delta 分布推广到任意分布
- 论文公式(3)是 D e l t a Delta Delta 分布的期望,公式(4)和(5)是任意分布的期望
- 直接预测多个(论文设置为16)值,求期望得到最佳值
- TIPS: 效果肯定比 D e l t a Delta Delta 分布好,但是计算量会增加。小模型一般不适用,大模型使用较多。
-
限制任意分布
- 任意分布会过于离散,实际真实的值距离label都不会太远
- 限制分布范围,论文公式(6)
- TIPS: 按照公式推导应该效果好(正在推广到关键点检测),使用任意分布的都可以加上试试。
# 代码出自mmdetection
@weighted_loss
def distribution_focal_loss(pred, label):
    """Distribution Focal Loss (DFL) is from
    Generalized Focal Loss: Learning Qualified and Distributed Bounding Boxes
    for Dense Object Detection
    https://arxiv.org/abs/2006.04388

    Args:
        pred (torch.Tensor): Predicted general distribution of bounding boxes
            (before softmax) with shape (N, n+1), n is the max value of the
            integral set `{0, ..., n}` in paper.
        label (torch.Tensor): Target distance label for bounding boxes with
            shape (N,).

    Return:
        torch.Tensor: Loss tensor with shape (N,).
    """
    # 完全按照论文公式(6)所示,label是真实值(目标框和anchor之间的偏差,参考FCOS)
    # pred的shape(偏差*分布),如果没有后面的分布,那就变成delta分布
    dis_left = label.long() # label范围[0,正无穷],感觉这里应该-1然后限制一下范围最好。作者说long()向下取整,但是这解决不了对称问题。
    dis_right = dis_left + 1
    weight_left = dis_right.float() - label
    weight_right = label - dis_left.float()
    loss = F.cross_entropy(pred, dis_left, reduction='none') * weight_left \
        + F.cross_entropy(pred, dis_right, reduction='none') * weight_right
    return loss
5.3. 参考文献
- 原始论文
- 分布参考一
- 分布参考二
- 论文原理理解参考
- 论文代码理解参考
六. GFLV2
6.1 概述
这篇论文非常非常的简单,类似加入了一个全局信息的SENet模块、或者说Non-Local模块,读懂GFLV1之后,马上解决V2的问题。
此方法在小模型上不适合,在大模型上涨点明显。可以进一步推广,此方案用在大模型non-share Head中,而小模型都是共享Head的。
