微信小程序|入门篇
微信小程序|入门篇
- 前言
- 1. 小程序背景知识
-
- 1.1 小程序特点
- 1.2 小程序的配置文件
- ⚠️1.3 git管理小程序
-
- 1.3.1 创建本地仓库并用git管理
- 1.3.2 与github仓库关联并创建分支
- 1.3.3 查看git有哪些提交并切换
- 1.4 小程序MVVM架构(是一种思想)
- ⚠️1.5 小程序的双线程模型
- 1.6 小程序的启动流程
- 1.7 注册App时做什么?
-
- 1.7.1 App使用场景
- 1.7.2 增加按钮以获取授权
- 1.8 Page实例生命周期
- 1.9 小程序this再谈,箭头函数
- 1.10 wxs
-
- 1.10.1 wxs定义
- 1.10.2 wxs为什么存在?
- 1.10.3 特点和局限
- 1.10.4 写法
- 2 小程序登录流程
- 3 组件
-
- 3.1 组件共同属性
- 3.2 内置组件
- 3.3 组件化开发
- ⚠️3.4 组件和页面通信
-
- 3.4.1 页面=>组件之properties
- 3.4.2 页面=>组件之传递样式
- 3.4.3 组件=>页面-传递自定义事件
- 3.4.4 页面=>组件-修改数据/调用组件方法
- 3.5 template模板
- 3.6 block标签
-
- 3.6.1 元素
- 3.6.2 优点
- 3.7 slot插槽
-
- 3.7.1 单插槽
- 3.7.2 多插槽
- 3.8 Component总览
- 4 事件
-
- 4.1 常见事件类型
- 4.2 事件的冒泡与捕获
- ⚠️4.3 监听事件
-
- 4.3.1 监听事件之data-params传参
- 4.3.2 自定义数据data-params
- ⚠️4.4 异步处理方案
-
- 4.4.1 ⚠️2021/3/15---尝试Promise返回同步结果:败北!
- 4.4.1 Promise本质与用法
-
- 4.4.1.1 回调函数进行封装的http.js
- 4.4.1.2 Promise改写之后的http-p.js
- Promise重要解释
- 5 其他补充
-
- 5.1 微信小程序支持的选择器:
- 5.2 选择器之间的权重:
- 5.3 Mustache语法
-
- 5.3.1 Mustache语法绑定value
- 5.3.2 Mustache语法绑定style属性
- 5.4 列表渲染 - wx:for遍历
- 5.4 全局变量
- 5.5 组件的隐藏/显示
- 5.6 wx.页面跳转
- 5.7 文件导入
-
- 5.7.1 WXML导入
-
- 5.7.1.1 import
- 5.7.1.2 include
- 5.7.2 JS文件导入
- 5.7.3 WXSS文件导入
前言
入门篇内容参考:
1、Fanxiaomeng92博主
2、2019年7月最新小程序开发教程:https://www.bilibili.com/video/BV1Kt411V7rg
3、ssc在路上博主
1. 小程序背景知识
1.1 小程序特点
- 类似于Web开发模式,入门的门槛低:基本上是类似html+css+js;
- 可以直接云端更新:微信审核,无需经过App Store等平台;
- 提升用户体验:通过提供基础能力、原生组件结合等方式,提升用户体验。
- 平台管控能力:小程序提供云端更新,通过代码上传、审核等方式,增强对开发者的管控能力;
- 双线程模型:逻辑层和渲染层分开加载,提供了管控型和安全性(沙盒环境运行JS代码,不允许执行任何浏览器相关的接口,比如跳转页面、操作DOM等);
1.2 小程序的配置文件
⚠️1.3 git管理小程序
1.3.1 创建本地仓库并用git管理
git init // 创建本地仓库
git add . // 将本地目录文件添加进仓库
git commit -m '初始化项目' // 提交创建新的节点
1.3.2 与github仓库关联并创建分支
git remote add origin https://github.com/xxx
git push -u origin master // 将master分支push到github上

git checkout -b newBranch // 创建新的分支,并到新的分支上
git status // 查看有无做新的修改
git commit -m 'xxx' // 有modified需要进行提交
1.3.3 查看git有哪些提交并切换
git add . // 提交修改到暂存区
git commit -m '卡片组件修改颜色为黄绿' // 修改代码后提交,加上-a表示新增
// git commit -amend 撤销写错的注释
// git reset --soft HEAD^ 撤销上次commit

git log // 查看提交
git reset +一部分版本号 // 版本回退到版本号
git reset --hard +一部分版本号 // 强制回退
参考:https://www.cnblogs.com/lfxiao/p/9378763.html
1.4 小程序MVVM架构(是一种思想)

M: Model
V: View
VM: View Model
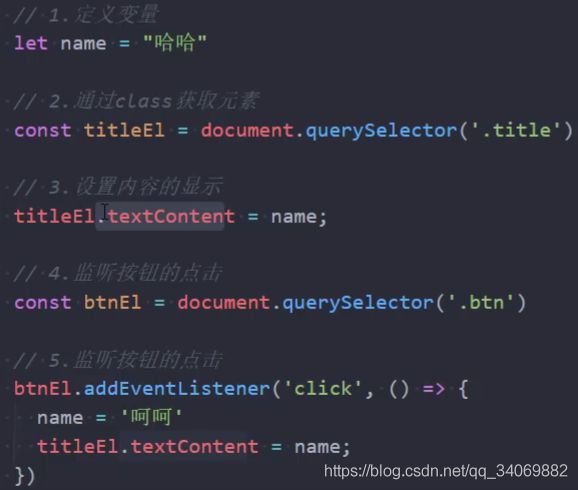
(1)vue和小程序MINA框架都是使用Mustache语法({ {data}})做了DataBinding。
(2)在视图层发生变更时,进行对Model层的修改。
MVVM架构的好处就是将命令式编程—>声明式编程
⚠️1.5 小程序的双线程模型
小程序的宿主环境—微信客户端,为了执行小程序各种文件:wxml、wxss、js提供了双线程模型。
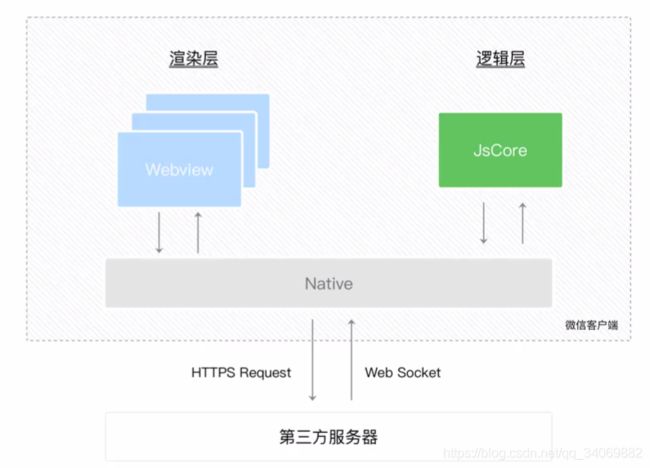
(1)WXML模版和WXSS样式运行与渲染层,使用多个WebView线程渲染;JS脚本运行与逻辑层,使用JsCore运行。
(2)两个线程经由微信客户端(Native)进行中转交互。
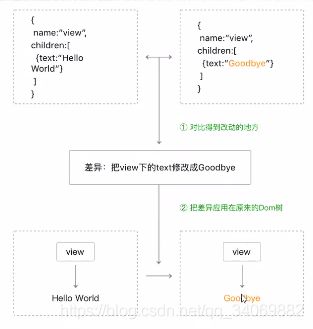
⚡页面渲染过程:
1、初始化渲染—将WXML先转成JS对象,再渲染出DOM树。

2、数据发生变化—运用diff算法,比较新旧JS对象。(之后局部刷新)
⭕diff算法设计思路:
- diff前先将数据路径写法数据转换成格式化成JSON
- 使用深度优先遍历策略
- 只对同层节点进行对比
- 使用数据路径方式实现局部更新
- 减少不必要的diff对比
通过setData把msg数据从“Hello World”变成“Goodbye”

1.6 小程序的启动流程
1.7 注册App时做什么?
1.7.1 App使用场景
- 判断小程序的进入场景。
- 监听生命周期函数,在生命周期中执行对应的业务逻辑,比如在某个生命周期函数中获取用户信息。
- 因为App()实例只有一个,并且是全局共享的(单例对象),所以可存放共享数据。
1.7.2 增加按钮以获取授权
<button size='mini' open-type='getUserInfo' bindgetuserinfo='handleGetUserInfo'>获取授权</button>
open-data组件显示用户信息(文档-开放能力中)
<open-data type="userNickName"></open-data>
<open-data type="userAvatarUrl"></open-data>
1.8 Page实例生命周期
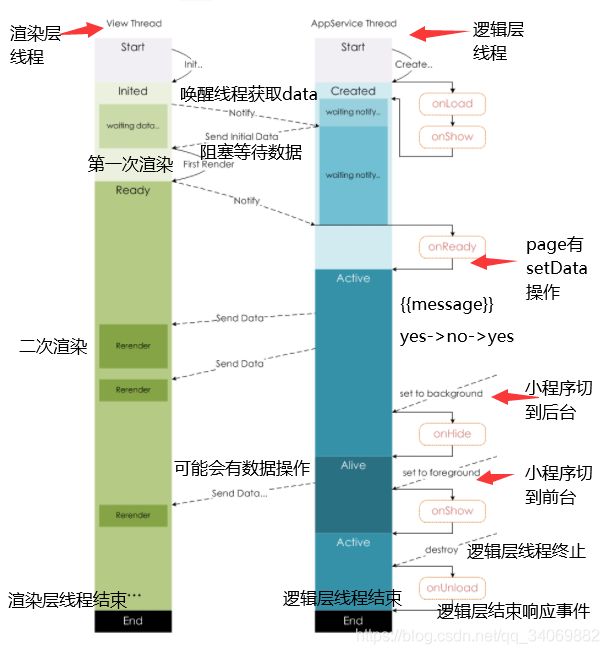
page生命周期主要是描述了渲染层线程线程(View Thread)和逻辑层线程(AppService Thread)的双线程模型的互相配合。还是很容易理解的。
onLoad() //页面加载时调用
onShow() //页面显示时
onReady() //页面初次渲染完成时
onHide()//页面隐藏时
onUnload() //页面跳转时
1.9 小程序this再谈,箭头函数
ES6语法中,this会从箭头函数一层一层向上寻找。
success:(res) => {

	const data = res.data.data.list;
	this.setData({

		list: data
	}); //这个this是有效的
}

success: function(res){

	const data = res.data.data.list;
	this.setData({

		list: data
	}); // 这个this就是undefined的
}
1.10 wxs
1.10.1 wxs定义
wxs是小程序的一套脚本语言,结合wxml,可以构建页面。
和JavaScript基本一致
1.10.2 wxs为什么存在?
1.10.3 特点和局限
- wxs的运行环境和其他JavaScript代码是隔离的,wxs中不能调用javascript中的函数,也不能使用小程序的API;
- wxs函数不能作为组件的事件回调;(导入js代码就可以,算作组件自己的函数)
- wxs在iOS上比JavaScript快2-20倍,在android上无差异;
1.10.4 写法
// 定义wxs内部方法
function init() {
     ...},
function wxSearchInput() {
     ...},
function wxSearchKeyTap() {
     ...},
function wxSearchDeleteAll() {
     ...},
function wxSearchConfirm() {
     ...},
function wxSearchClear() {
     ...}

// 导出接口
module.exports = {

  init: init, //初始化函数
  wxSearchInput: wxSearchInput,// 输入变化时的操作
  wxSearchKeyTap: wxSearchKeyTap, // 点击提示或者关键字、历史记录时的操作
  wxSearchDeleteAll: wxSearchDeleteAll, // 删除所有的历史记录
  wxSearchConfirm: wxSearchConfirm, // 搜索函数
  wxSearchClear: wxSearchClear,  // 清空函数
}
- wxs必须设modules属性,起个名;
- wxs内的代码默认私有,必须modules.exports导出,外部才能使用;
- wxs文件导入
- 可以单标签,也可以双标签;
标签形式将wxs导入wxml文件见:
https://developers.weixin.qq.com/miniprogram/dev/reference/wxs/01wxs-module.html#.wxs%20%E6%96%87%E4%BB%B6
2 小程序登录流程
发送code主要作用是为了跟微信服务器请求openId。
- 调用wx.login向微信服务器请求获取code(wx.login()只有5min的有效期)
- 调用wx.request发送code到自己的服务器(后端服务器返回一个登陆态的标识,比如token,存入redis备用)
- 将登录态的标识token进行存储本地缓存LocalStorage,以便下次使用。
- 携带token来请求需要登录态标识的接口时。
3 组件
3.1 组件共同属性
3.2 内置组件
-
view是块级元素,块级元素独占一行;
-
image组件默认尺寸320*240px(固定大小);
-
image属性lazy-load,默认不懒加载,可设置为true,在即将进入一定范围(上下三屏)时才开始加载。
-
scroll-view:局部滚动,可以实现滚动加载内容。scroll-view也是块级元素,横向滑块时需将scroll-item设置为inline-block(行内块)使得元素在同一行;
-
组件行内也可设置样式,优先级:行内>页内>全局样式。例如,我在开发中,将外部view的class名设置为container,与行内样式重名,因而外部样式不生效。

-
rpx尺寸单位(responsive pixel):可以根据屏幕宽度进行自适应。规定屏幕宽为750rpx。如在iPhone6上,屏幕宽为375px,共有750个物理像素,则750rpx=350px=750物理像素,1rpx=0.5px=1物理像素。
3.3 组件化开发
处理复杂问题时,可以将问题拆分成多个处理的小问题。同理,我们也可以将一个完整的页面拆分成很多组件,而每个组件又可以进行细分。

⚠️自定义组件在页面的注册命名规范:小写字母、中划线、下划线的组合,不能“wx-”开头,最好不要使用驼峰命名,数字勉强可以;
"usingComponents": {

    "x-scroll":"/components/scroll/scroll"
    }
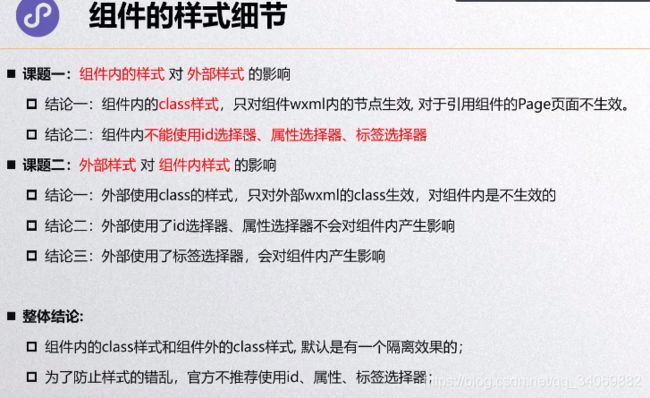
⚠️组件样式细节与组件隔离性有关,具体见"微信小程序|开发FAQ篇"
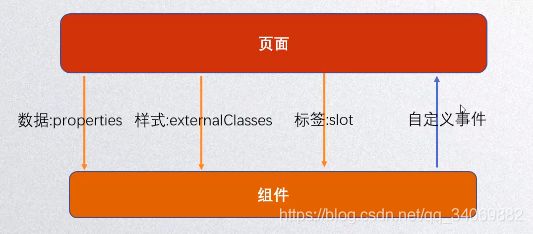
⚠️3.4 组件和页面通信
3.4.1 页面=>组件之properties
// components/my-prop/my-prop.js
Component({

  /**
   * 组件的属性列表
   */
  properties: {

    title1: String,   //定义属性的方法1: 缺点是不可以设置默认值
    title2: {
      //定义属性的方法2
      type: String,   //name属性的类型
      value: 'default', //name属性的默认值,可以为空''
      observer: function(newVal,oldVal) {

      	console.log(newVal,oldVal);
      }// observer是监听数据title2有无改变的,可以不写。
    }
  })
组件页面中调用properties属性:
<text>这里是自定义组件my-prop</text>
<view>
标题1是:{
     {
     title1}}
标题2是:{
     {
     title2}}
</view>
index展示页面使用组件,给组件传入数据:
// index.wxml
<my-prop title1="alibaba" title2="huawei"/>

// index.json
"usingComponents": {

    "my-prop": "/components/my-prop/my-prop"
  }
3.4.2 页面=>组件之传递样式
externalClasses外部样式。
//1、 components/my-prop/my-prop.js
Component({

  /**
   * 组件的属性列表
   */
  properties: {

    title1: String
  },
  externalClasses: ['titleclass']

})

//2、 components/my-prop/my-prop.wxml
<view class='title titleclass'>{
     {
     title}}</view>

//3、 components/my-prop/my-prop.wxss
.title {

	font-size: 40rpx;
	font-weight: 700;
}

//4、 home.wxml 使用组件的页面
<my-prop title="黑色星期五" titleclass="red"/>
<my-prop title="黑色星期五" titleclass="color: red"/> //这样写不行!!!
//由home.wxml外部页面,来控制组件标题的颜色。

//home.wxss 必须在使用组件的页面---编写样式文件
.red {

	color: red;
}
3.4.3 组件=>页面-传递自定义事件
1、定义自定义事件方法
在组件的js文件中的methods中定义触发事件的方法,使用this.triggerEvent(…),此方法传递事件给home。【理解为踢皮球。。。】
this.triggerEvent(“事件名”, {参数1: 值1, 参数2: 值2 }, {options})
// components/my-event/my-event.js
/**
   * 组件的方法列表
   */
  methods: {

  // 组件里按钮触发handleIncrement方法
    handleIncrement: function(){

    // 定义事件
      this.triggerEvent("increment", {
     address:"南京"}, {
     })
    }
  }
2、在组件内设置触发方法
传递的数据在event.detail中。
// components/my-event/my-event.wxml
<button size='mini' bind:tap='handleIncrement'>+1</button>
3、home中监听传递的increment事件
// home.js 和 home.wxml
data: {

	counter: 0
},
handleIncrement: function(event){

	//console.log(event.detail.address);
	const cnt = this.data.counter;
	this.setData({

		counter: cnt + 1
	});
}

<my-event bind:increment="handleIncrement">{
     {
     counter}}</my-event>
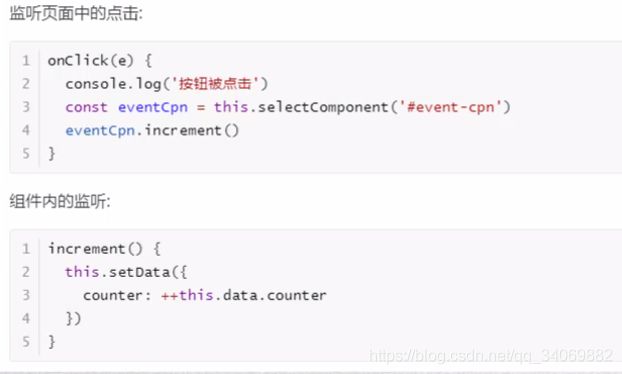
3.4.4 页面=>组件-修改数据/调用组件方法
1、在页面内定义按钮,修改组件内数据。给组件绑定class或者id(一般使用id不会重复)。
//home.wxml
<button size='mini' bind:tap="handleIncrementCpn">修改组件内的数据</button>
<my-sel class="sel-class" id="sel-id"/>
2、在页面内实现监听事件。获取组件对象。
//home.js
handleIncrementCpn() {

	//最终目的:修改my-sel中的counter
	// 1、获取组件对象
	const my_sel = this.selectComponent('.sel-class');

	// 2、通过setData修改数据(不建议使用,强耦合)
	//my_sel.setData({

	//	counter: my_sel.data.counter + 20;
	//});

	// 2、通过调用组件内方法修改数据
	my_sel.incrementCounter(20);
}
3、定义组件内数据。
// my-sel.js
data: {
      counter: 0 },
method: {

	incrementCounter(nums){

		this.setData({

			counter: this.data.counter + nums
		});
	}
}
3.5 template模板
template模版,可以定义代码片段,然后在不同的地方调用,复用机制的一种。
- 模版内的代码没有调用之前不会渲染;
- 必须要设置 name属性;
//定义模版
<template name='item'>
		<view>{
     {
     currentText}}</view>
		<button>{
     {
     btn}}</button>
	</template>
//使用
<template is='item' data="{
     {currentText:'我是模板',btn:'按钮'}}"/>
3.6 block标签
3.6.1 元素
block不用渲染,性能好,不是组件,仅仅是包装元素。
3.6.2 优点
- 包裹需要遍历或者判断的内容;
- 提高代码可读性;
- 不会渲染,提高性能;
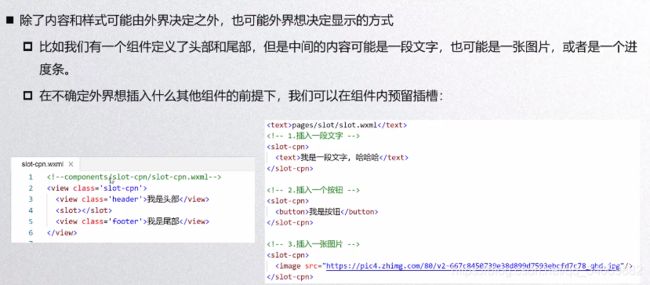
3.7 slot插槽
- 插槽的目的是让我们原来的设备(封装的组件)更加具有扩展性。
- 让使用者可以决定组件内部的一些内容到底展示什么。
3.7.1 单插槽
// 组件my-slot.wxml
<view>head</view>
<slot/>
<view>foot</view>
<my-slot>
<button>点击事件</button>
</my-slot>
3.7.2 多插槽
1、预留插槽并命名
// 组件my-slot.wxml
<view>head</view>
<slot name="slot1"/>
<slot name="slot2"/>
<view>foot</view>
2、组件中开启多插槽功能
// my-slot.js
Component({

  options:{

    multipleSlots: true
  }
})
3、在home插入插槽
// 插槽的位置是受定义时候的影响,不受这里先后顺序的影响
<my-mulslot>

  <view slot="slot2">我是插入的slot2</view>
  <view slot="slot1">我是插入的slot1</view>
</my-mulslot>
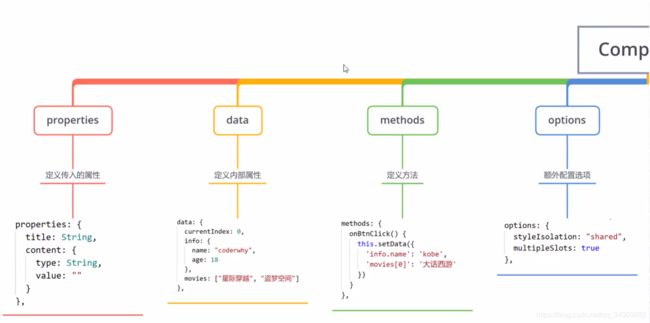
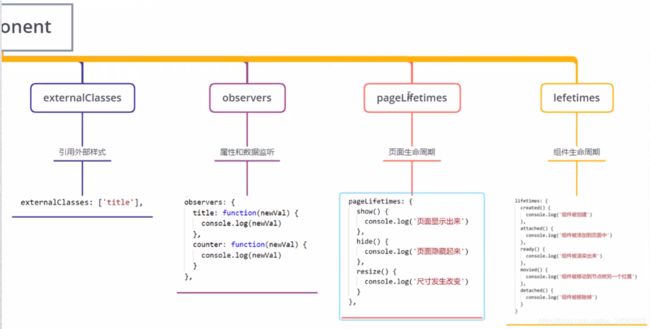
3.8 Component总览
4 事件
4.1 常见事件类型
- input组件有bindinput/bindblur(输入框失去焦点时触发)/bindfocus事件等;
- scroll-view有bindscrolltowpper/bindscrolltolower
- 常用组件共有事件:
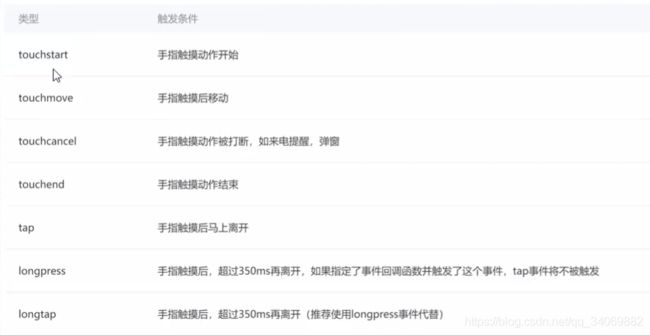
事件对象的解析:
event的type、target、currentTarget等。
event详解!
target和currentTarget的辨析: - List item
4.2 事件的冒泡与捕获
当界面产生一个事件时,事件分为捕获阶段和冒泡阶段。
capture:监听事件的捕获;
bind:进行事件的冒泡;——会一层层的传递
catch:阻止事件的进一步传递。

//事件监听必须使用:,即capture-bind:tap
<view capture-bind:tap='captureView'
	  bind:tap='bindView'
	  catch:tap='catchView'>
</view>
⚠️4.3 监听事件
bind监听事件的点击、长按、移动等。
<button bindtap='handleclick'>按钮</button>
//或者
<button bind:tap='handleclick'>按钮</button>

//.js
//只有在setData方法中设置属性数据,页面才会发生改变;
  handleclick() {

    this.setData({

      // 属性名:属性值
    })
  }
4.3.1 监听事件之data-params传参
- data-自定义参数名=“{ {index}}”,传事件的参数;
- 获取事件传的参数event.currentTarget.dataset ;
// 传递参数index
	<block wx:for="abc" wx:key="*this">
	  <view bind:tap="handleBtn"
			data-param="{
     {index}}"> // 这里{
     {index}}是当前项的下标值,字符串"abc"的索引值。将该值赋给自定义的param
			{
     {
     item}}
	  </view>
	</block>

//获取参数index,可以打印一下event
  handleBtn(event){

    const data = event.currentTarget.dataset;
    console.log(data.param)
  }
4.3.2 自定义数据data-params
注意定义的参数名大小写问题:
<view bind:tap="onTap" data-current-index="1" data-currentIndex="2"> Data Bind Test</view>
Page({

  onTap:function(event){

    event.currentTarget.dataset.currentIndex === 1 // - 会转为驼峰写法
    event.currentTarget.dataset.currentindex === 2 // 大写会转为小写
  }
})
组件中的属性也可以使用 - 来绑定数据:
likes组件中定义readOnly属性。
properties: {

    readOnly:{

      type: Boolean
    }
  }
直接在page页面中使用read-only方式绑定数据。
 <v-like class="like" read-only="{
     {true}}"/>
⚠️4.4 异步处理方案
- 纯粹的callback回调函数;
- Promise保存异步结果;
- async await ES2017 小程序 不支持。
微信小程序官网已经对系统异步API都支持Promise调用。
异步 API 返回 Promise
基础库 2.10.2 版本起,异步 API 支持 callback & promise 两种调用方式。当接口参数 Object 对象中不包含 success/fail/complete 时将默认返回 promise,否则仍按回调方式执行,无返回值。
注意事项
1、部分接口如downloadFile, request, uploadFile, connectSocket, createCamera(小游戏)本身就有返回值, 它们的promisify需要开发者自行封装。
2、当没有回调参数时,异步接口返回 promise。此时若函数调用失败进入 fail 逻辑, 会报错提示Uncaught (in promise),开发者可通过 catch 来进行捕获。
3、wx.onUnhandledRejection可以监听未处理的 Promise 拒绝事件。
代码示例
// callback 形式调用
wx.chooseImage({

  success(res) {

    console.log('res:', res)
  }
})

// promise 形式调用
wx.chooseImage().then(res => console.log('res: ', res))
4.4.1 ⚠️2021/3/15—尝试Promise返回同步结果:败北!
(1)尝试将promise结果在model处理后,直接使用return形式返回结果。
// 1、get获得自己所有的收货地址, 需要传入参数userId
  getAddress(userId){

    let me = this;
    // 向服务端发送request请求
    let promise = this.request('/address/all', {
     userId: userId});
    promise.then((res)=>{


      // 返回JSONResult,包含addrList
      // console.log('get address data:'+res);

      let addrList = res.data;
      if(addrList.length == 0){

        return addrList;
      }
      for(let i=0;i<addrList.length;i++){

        addrList[i].totalDetail = me.setAddressView(addrList[i]);
      }
      console.log(addrList);

      return addrList;

    });
  }
然后在前端以同步方法形式获取返回结果,但是失败了。
// 1、向后端请求收货地址信息
    let addrList = address.getAddress('210307K0NA6X5YW0');
    console.log('从后端获取addrList:'+addrList);
![]()
(2)修改:在model处理之后,以类变量形式返回。在前端仍然以then方式异步获取返回对象。
⚠️注意model中需要返回的是Promise对象!
// 1、get获得自己所有的收货地址, 需要传入参数userId
  getAddress(userId){

    let me = this;
    // 向服务端发送request请求
    let promise = this.request('/address/all', {
     userId: userId});
    return promise.then((res)=>{


      // 返回JSONResult,包含addrList
      // console.log('get address data:'+res);

      let addrList = res.data;
      if(addrList.length == 0){

        return this.addrList;
      }
      for(let i=0;i<addrList.length;i++){

        addrList[i].totalDetail = me.setAddressView(addrList[i]);
      }
      // console.log(addrList);
      this.addrList = addrList;

      return this.addrList;

    });
  }
前端异步获取返回结果:
// 1、向后端请求收货地址信息
    address.getAddress('210307K0NA6X5YW0')
    .then(result=>{

      let list = JSON.stringify(result);
      console.log('从后端获取addrList:'+list);
    });
截图结果如下:
![]()
4.4.1 Promise本质与用法
- Promise是一个对象—保存状态;
- 简单函数是将状态保存在函数内部,返回或不返回一个结果;
- 使用Promise形式调用异步函数,必须需要对异步函数进行Promise的改写。
例如,项目中需要对网络请求函数进行封装wx.request(),可以使用回调函数和Promise方式进行封装。
4.4.1.1 回调函数进行封装的http.js
class HTTP{

    request(params){

      // url, data, method

      if(!params.method){
      //
        params.method = 'GET';
      }
      wx.request({

        url: config.api_base_url + params.url,
        method: params.method,
        data: params.data,
        header: {

          'content-type': 'application/json',
          'appkey': config.appkey
        },
        success:(res) => {


          // 来判断请求是否成功 以2开头就是成功 这个是在Number类型的
          // 需要装换成string类型
          let code = res.statusCode.toString()
          // ES6中 startsWith 和 endsWith
          if(code.startsWith('2')){


            // 回调函数式返回结果
            params.success(res.data);
          }else{

            // 错误信息的提示
            var error_code = res.data.error_code;
            this._show_error(error_code);
          }

        },
        fail:(err) => {
      //api调用失败
          this._show_error(1);
        }
      })
    }

  // 错误信息的提示方法
  _show_error(error_code){

    if(!error_code){

      error_code = 1;
    }
    wx.showToast({

      title: tips[error_code],
      icon: 'none',
      duration: 2000
    })
  }
bookModel.js中,回调函数式调用http.js中的request方法:
// 新建BookModel类来从服务器获取数据
class BookModel extends HTTP {


  // 获取最热门的所有数据
  getHotList(sCallBack) {

    this.request({

      url: 'book/hot_list',
      success: (res) => {

        // 调用回调函数 来传递数据!!!
        sCallBack(res);
      }
    })
  }

}
callback形式调用getHotList()方法:
// callback 形式调用
bookModel.getHotList((res) => {


  // 获取res 做数据绑定
  this.setData({

    //classic: res,
    //likeCount: res.fav_nums,
    //likeStatus: res.like_status
  })
})
4.4.1.2 Promise改写之后的http-p.js
//http-p.js
class HTTP{

    request(url,data={
     },method='GET'){

      return new Promise((resolve, reject)=>{

        this._request(url, resolve,reject, data, method)
      })
    }

    _request(url,resolve, reject, data={
     },method='GET'){

      // url, data, method

      // if(!params.method){ //
      //   params.method = 'GET';
      // }
      wx.request({

        url: config.api_base_url + url,
        method: method,
        data: data,
        header: {

          'content-type': 'application/json',
          'appkey': config.appkey
        },
        success:(res) => {


          // 来判断请求是否成功 以2开头就是成功 这个是在Number类型的,          // 需要装换成string类型
          let code = res.statusCode.toString()
          // ES6中 startsWith 和 endsWith
          if(code.startsWith('2')){

            resolve(res.data);
          }else{

            reject();
            // 错误信息的提示
            const error_code = res.data.error_code;
            this._show_error(error_code);
          }

        },
        fail:(err) => {
      //api调用失败
          reject();
          this._show_error(1);
        }
      })
    }
使用基于Promise封装的http-p.js获取book数据的bookModel.js:
// 基于promise封装的http请求

class BookModel extends HTTP{

  getHotList(){

    return this.request('book/hot_list')
  }

  // 查询历史记录
  search(start, history){

    return this.request({

      url: 'book/search?summary=1',
      data: {

        history:history,
        start:start
      }
    })
  }

}
在页面中使用bookModel中的获取热门书籍方法:
//book页面的book.js
import {

	BookModel
} from '../../models/book.js'
...

const hostList = bookModel.getHotList();
    hostList.then((res)=>{

      console.log(res);
    },(error)=>{

      console.log(error);
    })
Promise重要解释
Promise重要解释:下面的models中的book.js是调用request函数,因为是一个异步函数没法直接返回结果,所以在上面book.js代码中,使用
Promise方式接收回调结果res(一般的回调函数方式,就是声明一个callback方法来接收success或是fail的异步结果),hostList.then((res)=>{...})或者使用callback形式调用success(res){...}。
可参考微信开发者文档关于callback和promise的描述。相关描述
// models中的book.js
import {

  HTTP
}
from '../util/http-p.js'

class BookModel extends HTTP{


  getHotList(){

    return this.request('book/hot_list')
  }

}

export {
     BookModel}
还可以对BookModel改进,可以在类内部定义一个结构,存储异步返回的值。然后就可以在外部调用BookModel的函数,直接返回分页的所有的结果hotList[]。
// models中的book.js
import {

  HTTP
}
from '../util/http-p.js'

class BookModel extends HTTP{


  constructor(){

    this.hotList = {

     list: [],
     total: 0
   }
  }
  getHotList(){

  	return request('book/hot_list')
      .then((res) => {

        const concatList = [...this.userList.list, ...res.data.list]
        this.hotList = {

          list: concatList,
          total: res.data.total
        }
        return this.hotList //直接返回存储的hotList
      })
  }// getHotList()

}

export {
     BookModel}
// 返回的是所有的书籍数据,不只是分页的数据
// promise获取行程list和total
 _getHotList(){


   bookModel.getHotList()
   .then(result => {

     this.setData({

       bookList: result.list,
       bookTotal: result.total
     })
   })
 },
5 其他补充
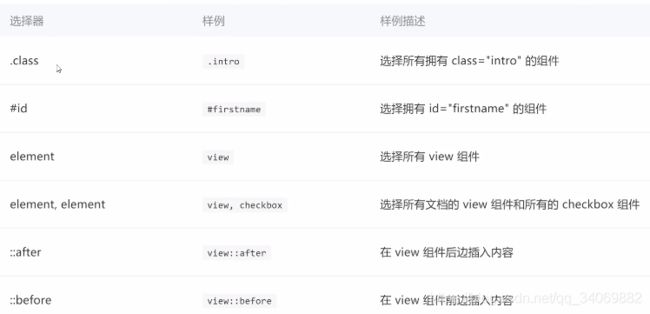
5.1 微信小程序支持的选择器:
5.2 选择器之间的权重:
- ! important,强行增加权重到无穷。
- style页内选择器,权重1000
- id选择器,权重100
- class类选择器,权重10
- element元素选择器、组件选择器,权重1
5.3 Mustache语法
5.3.1 Mustache语法绑定value
// test.wxml
<view>{
     {
     message}}</view>
<view>{
     {
     firstname}} {
     {
     lastname}}</view> //Mustache表达式外部拼接
<view>{
     {
     first+ '' + lastname}}</view> // 内部拼接
<view>{
     {
     age >=18 ? '成年人':'未成年人'}}</view> // 支持三目运算

// Mustache语法实现时钟
<view>{
     {
     nowTime}}</view>

// test.js
Page({

	data: {

	message: 'HW NB!',
	firstname: 'Jerry',
	lastname: 'Xu',
	age: 12,
	nowTime: new Date().toLocalString()
	},
	onLoad() {

		setInterval(() => {

			this.setData({

				nowTime: new Date().toLocalString()
			});
		},1000)
	}// onLoad
})
5.3.2 Mustache语法绑定style属性
// test.wxml
<button size='mini' bindtap="handleSwitchColor">切换颜色</button> //小程序无法进行DOM操作
<view class='box {
     {isActive}}?"active":""'>hw NB</view>

// test.wxss
.box {

	font-size: 14rpx;
}

.active {

	color: red;
}

// test.js
Page({

	data: {

		isActive: false
	},
	handleSwitchColor(){

		this.setData({

			isActive: !this.data.isActive;
		})
	}
})
5.4 列表渲染 - wx:for遍历
- wx:for遍历可以遍历数组、字符串、数字;
- 遍历时,默认下标名为index,遍历当前项为item;
- 可以自定义命名index和item;
data: {

	company: ['alibaba','tencent','huawei']
}

// wx:for遍历数组
<view wx:for="{
     {company}}">{
     {
     item}}</view>
// wx:for遍历字符串
<view wx:for="hello">{
     {
     item}}</view>
// wx:for遍历数字 0-8
<view wx:for="{
     {9}}">{
     {
     item}]</view>
// 不加{
     {}},就是遍历字符串
<view wx:for="9">{
     {
     item}}</view>
- 自定义的index和item:
//遍历二维数组list
list : [
[1,2,3,4],
[5,6,7,8],
[9,10,11,12],
]
// wx:for-item = "新的item名"
// wx:for-index = "新的index名"
// 二维数组,外层参数item一般要重命名,为newItem
<block wx:for = "{
     {list}} wx:for-item="inner_item">
	<view wx:for="{
     {inner_item}}">
	{
     {
     item}}
	</view>
</block>
- block标签(block不需要进行渲染,性能更高,不是组件)
(1)某些情况下,我们需要使用wx:if或wx:for时,可能需要包裹一组组件标签。—可以使用block标签。
(2)将遍历和判断属性放在block便签中,不影响属性的阅读。
<block wx:if="{
     {isShow}}">
	<button></button>
	<view class='style1'>123</view>
	<text class='style2'>456</text>

</block>
- 使用wx:for时,会报一个警告:可以使用key给每个节点添加唯一标识来提升性能。
wx:key 的值以两种形式提供
1、字符串,代表在 for 循环的 array 中 item 的某个 property,该 property 的值需要是列表中唯一的字符串或数字,且不能动态改变。
2、保留关键字 *this 代表在 for 循环中的 item 本身,这种表示需要 item 本身是一个唯一的字符串或者数字。
// test.wxml
1、<view wx:for='{
     {array}}' wx:key='unique'>{
     {
     item.id}}</view>
2、<view wx:for='{
     {company}}' wx:key='*this'>{
     {
     item}}</view>

//test.js
Page({

  data: {

  	array: [
  	{
     id: 5, unique: "unique_5"},
  	{
     id: 4, unique: "unique_4"},
  	{
     id: 3, unique: "unique_3"},
  	{
     id: 2, unique: "unique_2"},
  	{
     id: 1, unique: "unique_1"},
  	{
     id: 0, unique: "unique_0"}
  	],
  	company: ["alibaba","tencent","huawei"]
  }
})

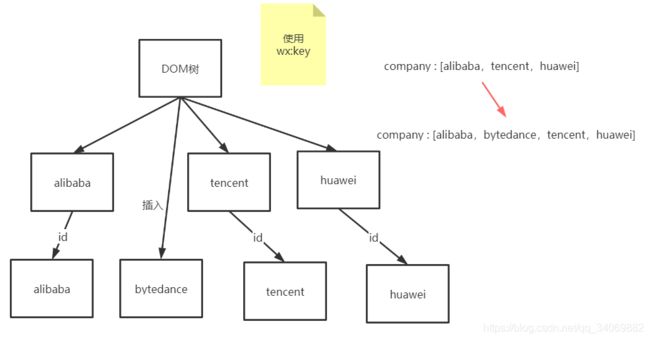
Diff算法在插入节点时,如果有key就可以找到正确的位置插入,避免频繁更新节点。
key的主要作用是为了高效的更新虚拟DOM。
5.4 全局变量
//app.js
globalData:{

	name:'Jerry',
	age:18
}
//使用方法
const app = getApp();
console.log(app.globalData.name);
5.5 组件的隐藏/显示
//wx:if隐藏时,没有渲染组件
wx:if = "{
     {false}}"

//hidden 隐藏时,组件存在
hidden = "{
     {true}}"
5.6 wx.页面跳转
参考:https://developers.weixin.qq.com/miniprogram/dev/api/route/wx.reLaunch.html

5.7 文件导入
- WXML提供两种文件导入方式import和include;
- JS文件导入,使用require
- WXSS导入,@import
5.7.1 WXML导入
5.7.1.1 import
import可以在该文件中使用目标文件定义的template,如:在 item.wxml 中定义了一个叫item的template:
<!-- item.wxml -->
<template name="item">
  <text>{
     {
     text}}</text>
</template>
在 index.wxml 中引用了 item.wxml,就可以使用item模板:
<import src="item.wxml"/>

<template is="item" data="{
     {text: 'forbar'}}"/>
import的作用域:
import 有作用域的概念,即只会 import 目标文件中定义的 template,而不会 import 目标文件 import 的 template。
如:C import B,B import A,在C中可以使用B定义的template,在B中可以使用A定义的template,但是C不能使用A定义的template。
5.7.1.2 include
include 可以将目标文件除了 外的整个代码引入,相当于是拷贝到 include 位置,如:
<include src="../../wxSearchView/wxSearchView.wxml" />
5.7.2 JS文件导入
require函数
在.wxs模块中引用其他 wxs 文件模块,可以使用 require 函数。
引用的时候,要注意如下几点:
- 只能引用 .wxs 文件模块,且必须使用相对路径。
- wxs 模块均为单例,wxs模块在第一次被引用时,会自动初始化为单例对象。多个页面,多个地方,多次引用,使用的都是同一个 wxs 模块对象。
- 如果一个 wxs模块在定义之后,一直没有被引用,则该模块不会被解析与运行。
// searchPage.js
var WxSearch = require('../../wxSearchView/wxSearchView.js');
5.7.3 WXSS文件导入
导入地址为相对路径!@import
@import "../../wxSearchView/wxSearchView.wxss";

