K8s(11)——kubernetes之存储管理-PV和PVC以及StorageClass动态分配详解加StatefulSet的应用
文章目录
- 1、认识PV/PVC/StorageClass
-
- 1.1 介绍
- 1.2 生命周期
- 1.3 PV类型
- 1.4 PV卷阶段状态
- 2、创建 NFS的PV和PVC
-
- 2.1 清理环境
- 2.2 创建所需资源
- 2.3 写pv,pvc,pod的清单并运行
- 2.4 测试
- 2.5 补充个删除命令
- 3、StorageClass
-
- 3.1 StorageClass介绍
- 3.2 部署StorageClass
- 3.3 默认的 StorageClass
-
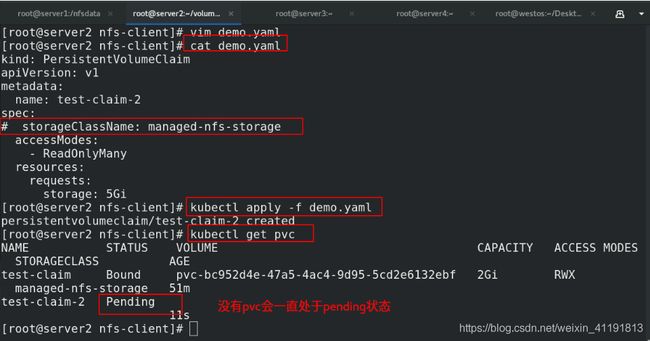
- 3.3.1 没有StorageClass的情况
- 3.3.2 设置默认的StorageClass
- 4、StatefulSet应用
-
- 4.1 简介
- 4.2 示例
- 4.4 小补充
- 4.5 statefulset部署mysql主从集群(重点)
1、认识PV/PVC/StorageClass
1.1 介绍
管理存储是管理计算的一个明显问题。该PersistentVolume子系统为用户和管理员提供了一个API,用于抽象如何根据消费方式提供存储的详细信息。为此,我们引入了两个新的API资源:PersistentVolume和PersistentVolumeClaim
PersistentVolume(PV)是集群中由管理员配置的一段网络存储。 它是集群中的资源,就像节点是集群资源一样。 PV是容量插件,如Volumes,但其生命周期独立于使用PV的任何单个pod。 此API对象捕获存储实现的详细信息,包括NFS,iSCSI或特定于云提供程序的存储系统。
PersistentVolumeClaim(PVC)是由用户进行存储的请求。 它类似于pod。 Pod消耗节点资源,PVC消耗PV资源。Pod可以请求特定级别的资源(CPU和内存)。声明可以请求特定的大小和访问模式(例如,可以一次读/写或多次只读)。
虽然PersistentVolumeClaims允许用户使用抽象存储资源,但是PersistentVolumes对于不同的问题,用户通常需要具有不同属性(例如性能)。群集管理员需要能够提供各种PersistentVolumes不同的方式,而不仅仅是大小和访问模式,而不会让用户了解这些卷的实现方式。对于这些需求,有StorageClass 资源。
StorageClass为管理员提供了一种描述他们提供的存储的“类”的方法。 不同的类可能映射到服务质量级别,或备份策略,或者由群集管理员确定的任意策略。 Kubernetes本身对于什么类别代表是不言而喻的。 这个概念有时在其他存储系统中称为“配置文件”。
PVC和PV是一一对应的。
1.2 生命周期
PV是群集中的资源。PVC是对这些资源的请求,并且还充当对资源的检查。PV和PVC之间的相互作用遵循以下生命周期:
Provisioning ——-> Binding ——–>Using——>Releasing——>Recycling
- 供应准备Provisioning—通过集群外的存储系统或者云平台来提供存储持久化支持。
- 静态提供Static:集群管理员创建多个PV。 它们携带可供集群用户使用的真实存储的详细信息。 它们存在于Kubernetes API中,可用于消费
- 动态提供Dynamic:当管理员创建的静态PV都不匹配用户的PersistentVolumeClaim时,集群可能会尝试为PVC动态配置卷。 此配置基于StorageClasses:PVC必须请求一个类,并且管理员必须已创建并配置该类才能进行动态配置。 要求该类的声明有效地为自己禁用动态配置。
- 绑定Binding—用户创建pvc并指定需要的资源和访问模式。在找到可用pv之前,pvc会保持未绑定状态。
- 使用Using—用户可在pod中像volume一样使用pvc。
释放Releasing—用户删除pvc来回收存储资源,pv将变成“released”状态。由于还保留着之前的数据,这些数据需要根据不同的策略来处理,否则这些存储资源无法被其他pvc使用。 - 回收Recycling—pv可以设置三种回收策略:保留(Retain),回收(Recycle)和删除(Delete)。
- 保留策略:允许人工处理保留的数据。
- 删除策略:将删除pv和外部关联的存储资源,需要插件支持。
- 回收策略:将执行清除操作,之后可以被新的pvc使用,需要插件支持。
注:目前只有NFS和HostPath类型卷支持回收策略,AWS EBS,GCE PD,Azure Disk和Cinder支持删除(Delete)策略。
1.3 PV类型
 1. GCEPersistentDisk
 2.AWSElasticBlockStore
 3. AzureFile
 4. AzureDisk
 5. FC (Fibre Channel)
 6.Flexvolume
 7. Flocker
 8. NFS
 9. iSCSI
 10. RBD (Ceph Block Device)
 11. CephFS
 12. Cinder (OpenStack block storage)
 13. Glusterfs
 14. VsphereVolume
 15. Quobyte Volumes
 16. HostPath (Single node testing only – local storage is not supported in any way and WILL NOT WORK in a multi-node cluster)
 17. Portworx Volumes
 18. ScaleIO Volumes
 19. StorageOS
1.4 PV卷阶段状态
- Available – 资源尚未被claim使用
- Bound – 卷已经被绑定到claim了
- Released – claim被删除,卷处于释放状态,但未被集群回收。
- Failed – 卷自动回收失败
2、创建 NFS的PV和PVC
2.1 清理环境
[root@server2 volumes]# kubectl get pod
NAME     READY   STATUS    RESTARTS   AGE
nfs-pd   1/1     Running   0          12m
[root@server2 volumes]# kubectl delete -f nfs.yaml    ##先清理环境
[root@server2 volumes]# kubectl get pv
No resources found
[root@server2 volumes]# kubectl get pvc
No resources found in default namespace.
[root@server2 volumes]# kubectl get pod
No resources found in default namespace.
2.2 创建所需资源
1. 安装配置NFS服务:(前面已经做过了)
 yum install -y nfs-utils
 mkdir -m 777 /nfsdata
 vim /etc/exports
   /nfsdata	*(rw,sync,no_root_squash)
 systemctl enable --now rpcbind
 systemctl enbale --now nfs

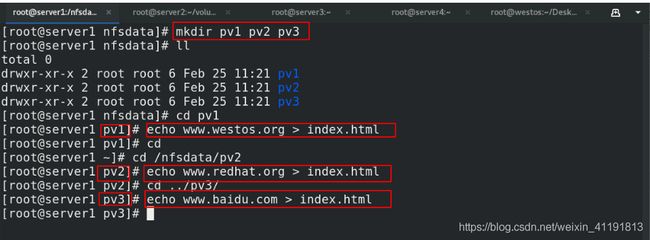
2. 在server1:/nfsdata创建每个节点的环境
[root@server1 nfsdata]# mkdir pv1 pv2 pv3   ##创建相应的目录
[root@server1 nfsdata]# ll
total 0
drwxr-xr-x 2 root root 6 Feb 25 11:21 pv1
drwxr-xr-x 2 root root 6 Feb 25 11:21 pv2
drwxr-xr-x 2 root root 6 Feb 25 11:21 pv3
[root@server1 pv1]# echo www.westos.org > index.html   ##分别书写测试文件
[root@server1 pv2]# echo www.redhat.org > index.html
[root@server1 pv3]# echo www.baidu.com > index.html

3. 给其他节点安装nfs服务
[root@server3 ~]# yum install nfs-utils -y   ##都需要安装nfs服务
[root@server4 ~]# yum install nfs-utils -y
2.3 写pv,pvc,pod的清单并运行
1. 创建pv
创建pv
[root@server2 volumes]# cat pv1.yaml
apiVersion: v1
kind: PersistentVolume
metadata:
  name: pv1
spec:
  capacity:
    storage: 5Gi
  volumeMode: Filesystem
  accessModes:
    - ReadWriteOnce
  persistentVolumeReclaimPolicy: Recycle
  storageClassName: nfs
  nfs:
    path: /nfsdata/pv1
    server: 172.25.200.1       # nfs IP 仓库的IP

---
apiVersion: v1
kind: PersistentVolume
metadata:
  name: pv2
spec:
  capacity:
    storage: 10Gi
  volumeMode: Filesystem
  accessModes:
    - ReadWriteMany
  persistentVolumeReclaimPolicy: Recycle
  storageClassName: nfs
  nfs:
    path: /nfsdata/pv2
    server: 172.25.200.1    # nfs IP 仓库的IP

---
apiVersion: v1
kind: PersistentVolume
metadata:
  name: pv3
spec:
  capacity:
    storage: 20Gi
  volumeMode: Filesystem
  accessModes:
    - ReadOnlyMany
  persistentVolumeReclaimPolicy: Recycle
  storageClassName: nfs
  nfs:
    path: /nfsdata/pv3
    server: 172.25.200.1

[root@server2 volumes]# kubectl apply -f pv1.yaml    ##应用
persistentvolume/pv1 created
persistentvolume/pv2 created
persistentvolume/pv3 created
[root@server2 volumes]# kubectl get pv      ##查看pv
NAME   CAPACITY   ACCESS MODES   RECLAIM POLICY   STATUS      CLAIM   STORAGECLASS   REASON   AGE
pv1    5Gi        RWO            Recycle          Available           nfs                     6s
pv2    10Gi       RWX            Recycle          Available           nfs                     6s
pv3    20Gi       ROX            Recycle          Available           nfs                     6s
2. 创建pvc和pod
创建pvc和pod
[root@server2 volumes]# cat pvc.yaml
apiVersion: v1
kind: PersistentVolumeClaim       ##pvc模式
metadata:
  name: pvc1
spec:
  storageClassName: nfs
  accessModes:
    - ReadWriteOnce               ##单点读写
  resources:
    requests:
      storage: 5Gi
---
apiVersion: v1
kind: PersistentVolumeClaim
metadata:
  name: pvc2
spec:
  storageClassName: nfs
  accessModes:
    - ReadWriteMany               ##多点读写
  resources:
    requests:
      storage: 10Gi
---
apiVersion: v1                    ## 创建pod
kind: Pod
metadata:
  name: test-pd
spec:
  containers:
  - image: myapp:v1
    name: nginx
    volumeMounts:
    - mountPath: /usr/share/nginx/html
      name: nfs-pv
  volumes:
  - name: nfs-pv
    persistentVolumeClaim:
      claimName: pvc1
---
apiVersion: v1
kind: Pod
metadata:
  name: test-pd-2
spec:
  containers:
  - image: myapp:v1
    name: nginx
    volumeMounts:
    - mountPath: /usr/share/nginx/html
      name: nfs-pv-2
  volumes:
  - name: nfs-pv-2
    persistentVolumeClaim:      ##指定pvc
      claimName: pvc2


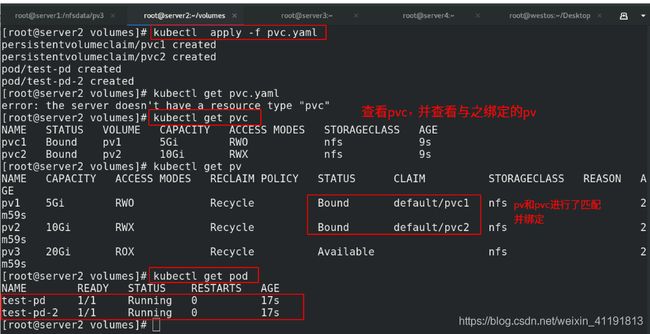
[root@server2 volumes]# kubectl  apply -f pvc.yaml
[root@server2 volumes]# kubectl get pvc
NAME   STATUS   VOLUME   CAPACITY   ACCESS MODES   STORAGECLASS   AGE
pvc1   Bound    pv1      5Gi        RWO            nfs            9s
pvc2   Bound    pv2      10Gi       RWX            nfs            9s
[root@server2 volumes]# kubectl get pv
NAME   CAPACITY   ACCESS MODES   RECLAIM POLICY   STATUS      CLAIM          STORAGECLASS   REASON   AGE
pv1    5Gi        RWO            Recycle          Bound       default/pvc1   nfs                     2m59s
pv2    10Gi       RWX            Recycle          Bound       default/pvc2   nfs                     2m59s
pv3    20Gi       ROX            Recycle          Available                  nfs                     2m59s
[root@server2 volumes]# kubectl get pod
2.4 测试
[root@server2 volumes]# kubectl get pod -o wide
NAME        READY   STATUS    RESTARTS   AGE    IP               NODE      NOMINATED NODE   READINESS GATES
test-pd     1/1     Running   0          112s   10.244.141.208   server3   <none>           <none>
test-pd-2   1/1     Running   0          112s   10.244.22.8      server4   <none>           <none>
[root@server2 volumes]# curl 10.244.141.208    ##访问ip,观察是否是自己书写的对应文件
www.westos.org
[root@server2 volumes]# curl 10.244.22.8
www.redhat.org
2.5 补充个删除命令
##删除
[root@server2 volumes]# kubectl delete pod 加pod名
[root@server2 volumes]# kubectl delete pv 加pv名
[root@server2 volumes]# kubectl delete pvc 加pvc名
3、StorageClass
清单连接:https://github.com/kubernetes-sigs/nfs-subdir-external-provisioner/tree/master/deploy
3.1 StorageClass介绍
-
StorageClass提供了一种描述存储类(class)的方法,不同的class可能会映射到不同的服务质量等级和备份策略或其他策略等。
-
每个 StorageClass 都包含 provisioner、parameters 和 reclaimPolicy 字段, 这些字段会在StorageClass需要动态分配 PersistentVolume 时会使用到。
StorageClass的属性
- Provisioner(存储分配器):用来决定使用哪个卷插件分配 PV,该字段必须指定。可以指定内部分配器,也可以指定外部分配器。外部分配器的代码地址为: kubernetes-incubator/external-storage,其中包括NFS和Ceph等。
- Reclaim Policy(回收策略):通过reclaimPolicy字段指定创建的Persistent Volume的回收策略,回收策略包括:Delete 或者 Retain,没有指定默认为Delete。
更多属性查看:https://kubernetes.io/zh/docs/concepts/storage/storage-classes/
-
NFS Client Provisioner是一个automatic provisioner,使用NFS作为存储,自动创建PV和对应的PVC,本身不提供NFS存储,需要外部先有一套NFS存储服务。
-
PV以 $ {namespace}-$ {pvcName}-$ {pvName}的命名格式提供(在NFS服务器上)
PV回收的时候以 archieved- n a m e s p a c e − {namespace}- namespace−{pvcName}-${pvName} 的命名格式(在NFS服务器上)
nfs-client-provisioner源码地址
nfs-client-provisioner源码地址(新)
3.2 部署StorageClass
1.清理环境
[root@server2 volumes]# kubectl delete -f pvc.yaml ##清理环境
[root@server2 volumes]# kubectl delete -f pv1.yaml
[root@server1 ~]# cd /nfsdata/ ##删除nfs端的数据
[root@server1 nfsdata]# ls
pv1 pv2 pv3
[root@server1 nfsdata]# rm -fr *
2.下载镜像,并上传到harbor仓库
[root@server1 nfsdata]# docker search k8s-staging-sig-storage
NAME DESCRIPTION STARS OFFICIAL AUTOMATED
yuufnn/nfs-external-provisioner gcr.io/k8s-staging-sig-storage/nfs-subdir-ex… 0
heegor/nfs-subdir-external-provisioner Image backup for gcr.io/k8s-staging-sig-stor… 0
zelaxyz/nfs-subdir-external-provisioner #Dockerfile FROM gcr.io/k8s-staging-sig-stor… 0
yuufnn/nfs-subdir-external-provisioner gcr.io/k8s-staging-sig-storage/nfs-subdir-ex… 0
[root@server1 nfsdata]# docker pull heegor/nfs-subdir-external-provisioner:v4.0.0
[root@server1 nfsdata]# docker tag heegor/nfs-subdir-external-provisioner:v4.0.0 reg.westos.org/library/nfs-subdir-external-provisioner:v4.0.0
[root@server1 nfsdata]# docker push reg.westos.org/library/nfs-subdir-external-provisioner:v4.0.0
3.配置
[root@server2 volumes]# mkdir nfs-client
[root@server2 volumes]# cd nfs-client/
[root@server2 nfs-client]# pwd
/root/volumes/nfs-client
[root@server2 nfs-client]# vim nfs-client-provisioner.yaml
[root@server2 nfs-client]# pwd
/root/volumes/nfs-client
[root@server2 nfs-client]# ls
nfs-client-provisioner.yaml pvc.yaml
[root@server2 nfs-client]# cat nfs-client-provisioner.yaml
apiVersion: v1
kind: ServiceAccount
metadata:
name: nfs-client-provisioner
# replace with namespace where provisioner is deployed
namespace: nfs-client-provisioner
---
kind: ClusterRole
apiVersion: rbac.authorization.k8s.io/v1
metadata:
name: nfs-client-provisioner-runner
rules:
- apiGroups: [""]
resources: ["persistentvolumes"]
verbs: ["get", "list", "watch", "create", "delete"]
- apiGroups: [""]
resources: ["persistentvolumeclaims"]
verbs: ["get", "list", "watch", "update"]
- apiGroups: ["storage.k8s.io"]
resources: ["storageclasses"]
verbs: ["get", "list", "watch"]
- apiGroups: [""]
resources: ["events"]
verbs: ["create", "update", "patch"]
---
kind: ClusterRoleBinding
apiVersion: rbac.authorization.k8s.io/v1
metadata:
name: run-nfs-client-provisioner
subjects:
- kind: ServiceAccount
name: nfs-client-provisioner
# replace with namespace where provisioner is deployed
namespace: nfs-client-provisioner
roleRef:
kind: ClusterRole
name: nfs-client-provisioner-runner
apiGroup: rbac.authorization.k8s.io
---
kind: Role
apiVersion: rbac.authorization.k8s.io/v1
metadata:
name: leader-locking-nfs-client-provisioner
# replace with namespace where provisioner is deployed
namespace: nfs-client-provisioner
rules:
- apiGroups: [""]
resources: ["endpoints"]
verbs: ["get", "list", "watch", "create", "update", "patch"]
---
kind: RoleBinding
apiVersion: rbac.authorization.k8s.io/v1
metadata:
name: leader-locking-nfs-client-provisioner
# replace with namespace where provisioner is deployed
namespace: nfs-client-provisioner
subjects:
- kind: ServiceAccount
name: nfs-client-provisioner
# replace with namespace where provisioner is deployed
namespace: nfs-client-provisioner
roleRef:
kind: Role
name: leader-locking-nfs-client-provisioner
apiGroup: rbac.authorization.k8s.io
---
apiVersion: apps/v1
kind: Deployment
metadata:
name: nfs-client-provisioner
labels:
app: nfs-client-provisioner
# replace with namespace where provisioner is deployed
namespace: nfs-client-provisioner
spec:
replicas: 1
strategy:
type: Recreate
selector:
matchLabels:
app: nfs-client-provisioner
template:
metadata:
labels:
app: nfs-client-provisioner
spec:
serviceAccountName: nfs-client-provisioner
containers:
- name: nfs-client-provisioner
image: nfs-subdir-external-provisioner:v4.0.0
volumeMounts:
- name: nfs-client-root
mountPath: /persistentvolumes
env:
- name: PROVISIONER_NAME
value: k8s-sigs.io/nfs-subdir-external-provisioner
- name: NFS_SERVER
value: 172.25.200.1
- name: NFS_PATH
value: /nfsdata
volumes:
- name: nfs-client-root
nfs:
server: 172.25.200.1
path: /nfsdata
---
apiVersion: storage.k8s.io/v1
kind: StorageClass
metadata:
name: managed-nfs-storage
provisioner: k8s-sigs.io/nfs-subdir-external-provisioner
parameters:
archiveOnDelete: "true"
[root@server2 nfs-client]# cat pvc.yaml
kind: PersistentVolumeClaim
apiVersion: v1
metadata:
name: test-claim
spec:
storageClassName: managed-nfs-storage
accessModes:
- ReadWriteMany
resources:
requests:
storage: 2Gi
---
kind: Pod
apiVersion: v1
metadata:
name: test-pod
spec:
containers:
- name: test-pod
image: myapp:v1
volumeMounts:
- name: nfs-pvc
mountPath: "/usr/share/nginx/html"
volumes:
- name: nfs-pvc
persistentVolumeClaim:
claimName: test-claim
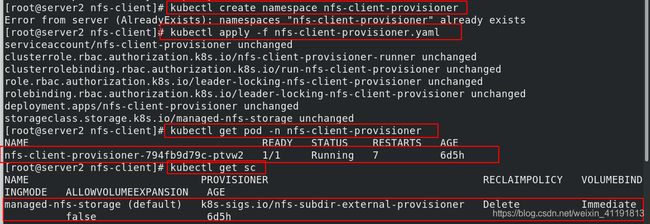
[root@server2 nfs-client]# kubectl create namespace nfs-client-provisioner ##创建相应的namespace,方便管理
[root@server2 nfs-client]# kubectl apply -f nfs-client-provisioner.yaml ##应用动态分配
[root@server2 nfs-client]# kubectl get pod -n nfs-client-provisioner ##查看生成的分配器pod
[root@server2 nfs-client]# kubectl get sc ##StorageClass
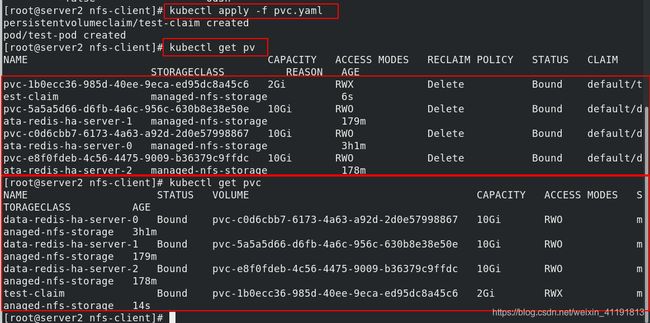
[root@server2 nfs-client]# kubectl apply -f pvc.yaml ##应用测试文件
[root@server2 nfs-client]# kubectl get pv ##
[root@server2 nfs-client]# kubectl get pvc ##
4. 测试
[root@server1 nfsdata]# ls ##按照命名规则生成数据卷
default-test-claim-pvc-bc952d4e-47a5-4ac4-9d95-5cd2e6132ebf
[root@server1 nfsdata]# cd default-test-claim-pvc-bc952d4e-47a5-4ac4-9d95-5cd2e6132ebf/
[root@server1 default-test-claim-pvc-bc952d4e-47a5-4ac4-9d95-5cd2e6132ebf]# echo www.westos.org > index.html
[root@server2 nfs-client]# kubectl get pod -o wide
NAME READY STATUS RESTARTS AGE IP NODE NOMINATED NODE READINESS GATES
test-pod 1/1 Running 0 5m5s 10.244.141.231 server3 <none> <none>
[root@server2 nfs-client]# curl 10.244.141.231
www.westos.org
2.下载镜像,并上传到harbor仓库(已经上传过了,所以显示已经存在)

4.测试
3.3 默认的 StorageClass
- 默认的 StorageClass 将被用于动态的为没有特定 storage class 需求的 PersistentVolumeClaims 配置存储:(只能有一个默认StorageClass)
- 如果没有默认StorageClass,PVC 也没有指定storageClassName 的值,那么意味着它只能够跟 storageClassName 也是“”的 PV 进行绑定。
3.3.1 没有StorageClass的情况
[root@server2 nfs-client]# vim demo.yaml
[root@server2 nfs-client]# cat demo.yaml     ##测试没有StorageClass
kind: PersistentVolumeClaim
apiVersion: v1
metadata:
  name: test-claim-2
spec:
#  storageClassName: managed-nfs-storage
  accessModes:
    - ReadOnlyMany
  resources:
    requests:
      storage: 5Gi

[root@server2 nfs-client]# kubectl apply -f demo.yaml
[root@server2 nfs-client]# kubectl get pvc    ##没有指定一直处于pending状态
3.3.2 设置默认的StorageClass
kubectl patch storageclass <your-class-name> -p '{"metadata": {"annotations":{"storageclass.kubernetes.io/is-default-class":"true"}}}'   ##模板
[root@server2 nfs-client]# kubectl patch storageclass managed-nfs-storage -p '{"metadata": {"annotations":{"storageclass.kubernetes.io/is-default-class":"true"}}}'
  ##指定sc
[root@server2 nfs-client]# kubectl get sc   ##查看是否设置成功
NAME                            PROVISIONER                                   RECLAIMPOLICY   VOLUMEBINDINGMODE   ALLOWVOLUMEEXPANSION   AGE
managed-nfs-storage (default)   k8s-sigs.io/nfs-subdir-external-provisioner   Delete          Immediate           false                  58m


##查看效果
[root@server2 nfs-client]# kubectl delete -f demo.yaml
[root@server2 nfs-client]# kubectl apply -f demo.yaml
[root@server2 nfs-client]# kubectl get pvc
NAME           STATUS   VOLUME                                     CAPACITY   ACCESS MODES   STORAGECLASS          AGE
test-claim     Bound    pvc-bc952d4e-47a5-4ac4-9d95-5cd2e6132ebf   2Gi        RWX            managed-nfs-storage   55m
test-claim-2   Bound    pvc-2262d8b4-c660-4301-aad5-2ec59516f14e   5Gi        ROX            managed-nfs-storage   2s
4、StatefulSet应用
4.1 简介
-
StatefulSet将应用状态抽象成了两种情况:
- 拓扑状态:应用实例必须按照某种顺序启动。新创建的Pod必须和原来Pod的网络标识一样
- 存储状态:应用的多个实例分别绑定了不同存储数据。
-
StatefulSet给所有的Pod进行了编号,编号规则是:$(statefulset名称)- $(序号),从0开始。
-
StatefulSet还会为每一个Pod分配并创建一个同样编号的PVC。这样,kubernetes就可以通过Persistent Volume机制为这个PVC绑定对应的PV,从而保证每一个Pod都拥有一个独立的Volume。
-
Pod被删除后重建,重建Pod的网络标识也不会改变,Pod的拓扑状态按照Pod的“名字+编号”的方式固定下来,并且为每个Pod提供了一个固定且唯一的访问入口,即Pod对应的DNS记录。
4.2 示例
## 1. 清理环境
[root@server2 nfs-client]# kubectl delete -f demo.yaml
[root@server2 nfs-client]# kubectl delete -f pvc.yaml

## 2. 配置
[root@server2 volumes]# pwd
/root/volumes
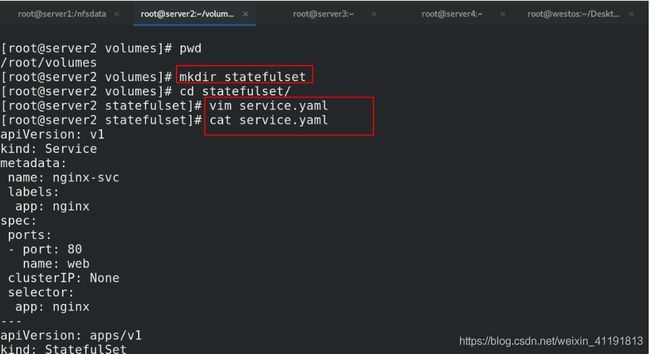
[root@server2 volumes]# mkdir statefulset
[root@server2 volumes]# cd statefulset/
[root@server2 statefulset]# vim service.yaml
[root@server2 statefulset]# cat service.yaml     ##实验文件
apiVersion: v1          ##StatefulSet如何通过Headless Service维持Pod的拓扑状态
kind: Service
metadata:
 name: nginx-svc
 labels:
  app: nginx
spec:
 ports:
 - port: 80
   name: web
 clusterIP: None     ##无头服务
 selector:
  app: nginx
---
apiVersion: apps/v1
kind: StatefulSet
metadata:
 name: web
spec:
 serviceName: "nginx-svc"
 replicas: 2               ##副本数,如果只删除pod可以改为0。全部删除需要删除控制器
 selector:
  matchLabels:
   app: nginx
 template:
  metadata:
   labels:
    app: nginx
  spec:
   containers:
   - name: nginx
     image: myapp:v1           ##myapp其实就是nginx
     ports:
     - containerPort: 80
       name: web
     volumeMounts:          #PV和PVC的设计,使得StatefulSet对存储状态的管理成为了可能:
       - name: www
         mountPath: /usr/share/nginx/html
 volumeClaimTemplates:
  - metadata:
     name: www
    spec:
     storageClassName: managed-nfs-storage    ##sc
     accessModes:
     - ReadWriteOnce
     resources:
      requests:
       storage: 1Gi

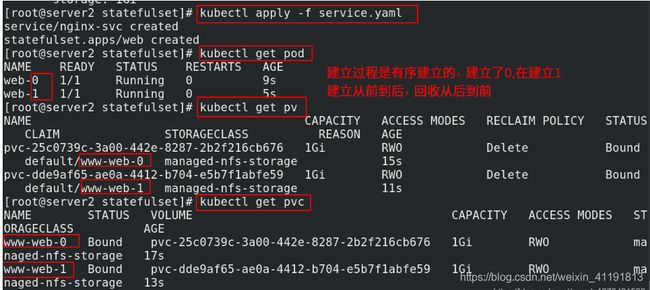
[root@server2 statefulset]# kubectl apply -f service.yaml
service/nginx-svc created
statefulset.apps/web created
[root@server2 statefulset]# kubectl get pod
NAME    READY   STATUS    RESTARTS   AGE
web-0   1/1     Running   0          9s
web-1   1/1     Running   0          5s
[root@server2 statefulset]# kubectl get pv
NAME                                       CAPACITY   ACCESS MODES   RECLAIM POLICY   STATUS   CLAIM               STORAGECLASS          REASON   AGE
pvc-25c0739c-3a00-442e-8287-2b2f216cb676   1Gi        RWO            Delete           Bound    default/www-web-0   managed-nfs-storage            15s
pvc-dde9af65-ae0a-4412-b704-e5b7f1abfe59   1Gi        RWO            Delete           Bound    default/www-web-1   managed-nfs-storage            11s
[root@server2 statefulset]# kubectl get pvc
NAME        STATUS   VOLUME                                     CAPACITY   ACCESS MODES   STORAGECLASS          AGE
www-web-0   Bound    pvc-25c0739c-3a00-442e-8287-2b2f216cb676   1Gi        RWO            managed-nfs-storage   17s
www-web-1   Bound    pvc-dde9af65-ae0a-4412-b704-e5b7f1abfe59   1Gi        RWO            managed-nfs-storage   13s
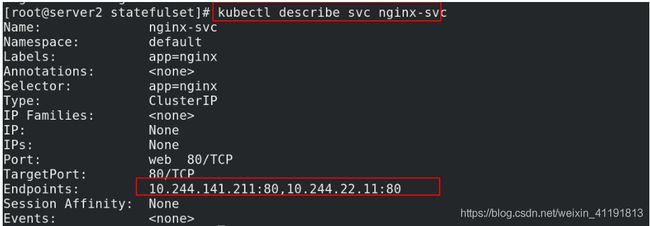
[root@server2 statefulset]# kubectl describe svc nginx-svc    ##查看svc详细信息
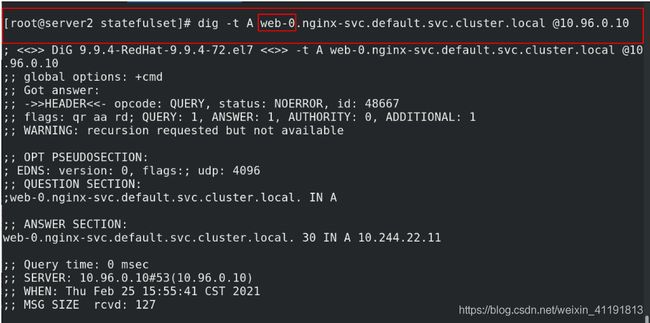
[root@server2 statefulset]# dig -t A web-0.nginx-svc.default.svc.cluster.local @10.96.0.10           ##可以通过dig查看
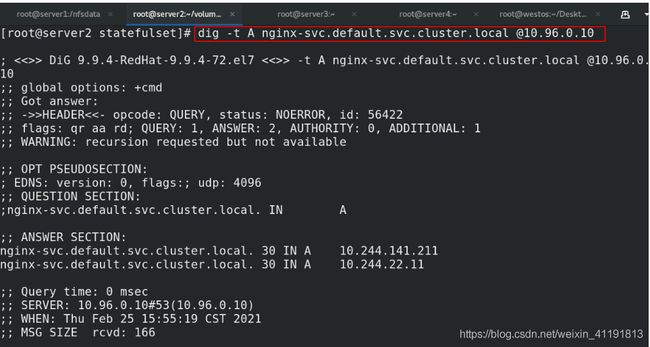
[root@server2 statefulset]# dig -t A nginx-svc.default.svc.cluster.local @10.96.0.10
## 3. 测试
[root@server1 nfsdata]# pwd
/nfsdata
[root@server1 nfsdata]# ls
archived-pvc-2262d8b4-c660-4301-aad5-2ec59516f14e
archived-pvc-bc952d4e-47a5-4ac4-9d95-5cd2e6132ebf
default-www-web-0-pvc-25c0739c-3a00-442e-8287-2b2f216cb676
default-www-web-1-pvc-dde9af65-ae0a-4412-b704-e5b7f1abfe59

[root@server1 nfsdata]# echo web-0 > default-www-web-0-pvc-25c0739c-3a00-442e-8287-2b2f216cb676/index.html
[root@server1 nfsdata]# echo web-1 > default-www-web-1-pvc-dde9af65-ae0a-4412-b704-e5b7f1abfe59/index.html

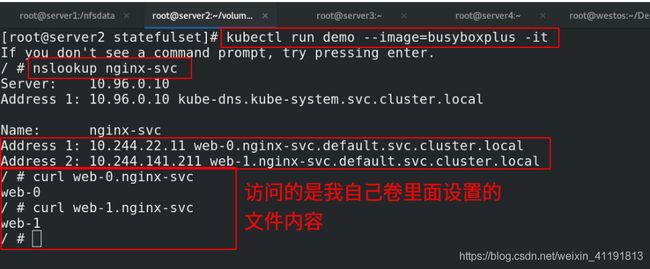
[root@server2 statefulset]# kubectl run demo --image=busyboxplus -it   ##测试
/ # nslookup nginx-svc
Server:    10.96.0.10
Address 1: 10.96.0.10 kube-dns.kube-system.svc.cluster.local
Name:      nginx-svc
Address 1: 10.244.22.11 web-0.nginx-svc.default.svc.cluster.local
Address 2: 10.244.141.211 web-1.nginx-svc.default.svc.cluster.local
/ # curl web-0.nginx-svc
web-0
/ # curl web-1.nginx-svc
web-1
4.4 小补充
kubectl 弹缩
首先,想要弹缩的StatefulSet. 需先清楚是否能弹缩该应用.
$ kubectl get statefulsets <stateful-set-name>
改变StatefulSet副本数量:
$ kubectl scale statefulsets <stateful-set-name> --replicas=<new-replicas>

如果StatefulSet开始由 kubectl apply 或 kubectl create --save-config 创建,更新StatefulSet manifests中的 .spec.replicas, 然后执行命令 kubectl apply:
$ kubectl apply -f <stateful-set-file-updated>

也可以通过命令 kubectl edit 编辑该字段:
$ kubectl edit statefulsets <stateful-set-name>

使用 kubectl patch:
$ kubectl patch statefulsets -p ‘{
     “spec”:{
     “replicas”:<new-replicas>}}’
4.5 statefulset部署mysql主从集群(重点)
官网教程
[root@server2 mysql]# cat configmap.yaml
apiVersion: v1
kind: ConfigMap
metadata:
  name: mysql
  labels:
    app: mysql
data:
  master.cnf: |
    # Apply this config only on the master.
    [mysqld]
    log-bin
  slave.cnf: |
    # Apply this config only on slaves.
    [mysqld]
    super-read-only
[root@server2 mysql]# cat services.yaml
apiVersion: v1
kind: Service
metadata:
  name: mysql
  labels:
    app: mysql
spec:
  ports:
  - name: mysql
    port: 3306
  clusterIP: None
  selector:
    app: mysql
---
apiVersion: v1
kind: Service
metadata:
  name: mysql-read
  labels:
    app: mysql
spec:
  ports:
  - name: mysql
    port: 3306
  selector:
    app: mysql
[root@server2 mysql]# cat statefulset.yaml
apiVersion: apps/v1
kind: StatefulSet
metadata:
  name: mysql
spec:
  selector:
    matchLabels:
      app: mysql
  serviceName: mysql
  replicas: 3
  template:
    metadata:
      labels:
        app: mysql
    spec:
      initContainers:
      - name: init-mysql
        image: mysql:5.7
        command:
        - bash
        - "-c"
        - |
          set -ex
          # Generate mysql server-id from pod ordinal index.
          [[ `hostname` =~ -([0-9]+)$ ]] || exit 1
          ordinal=${BASH_REMATCH[1]}
          echo [mysqld] > /mnt/conf.d/server-id.cnf
          # Add an offset to avoid reserved server-id=0 value.
          echo server-id=$((100 + $ordinal)) >> /mnt/conf.d/server-id.cnf
          # Copy appropriate conf.d files from config-map to emptyDir.
          if [[ $ordinal -eq 0 ]]; then
            cp /mnt/config-map/master.cnf /mnt/conf.d/
          else
            cp /mnt/config-map/slave.cnf /mnt/conf.d/
          fi
        volumeMounts:
        - name: conf
          mountPath: /mnt/conf.d
        - name: config-map
          mountPath: /mnt/config-map
      - name: clone-mysql
        image: xtrabackup:1.0
        command:
        - bash
        - "-c"
        - |
          set -ex
          # Skip the clone if data already exists.
          [[ -d /var/lib/mysql/mysql ]] && exit 0
          # Skip the clone on master (ordinal index 0).
          [[ `hostname` =~ -([0-9]+)$ ]] || exit 1
          ordinal=${BASH_REMATCH[1]}
          [[ $ordinal -eq 0 ]] && exit 0
          # Clone data from previous peer.
          ncat --recv-only mysql-$(($ordinal-1)).mysql 3307 | xbstream -x -C /var/lib/mysql
          # Prepare the backup.
          xtrabackup --prepare --target-dir=/var/lib/mysql
        volumeMounts:
        - name: data
          mountPath: /var/lib/mysql
          subPath: mysql
        - name: conf
          mountPath: /etc/mysql/conf.d
      containers:
      - name: mysql
        image: mysql:5.7
        env:
        - name: MYSQL_ALLOW_EMPTY_PASSWORD
          value: "1"
        ports:
        - name: mysql
          containerPort: 3306
        volumeMounts:
        - name: data
          mountPath: /var/lib/mysql
          subPath: mysql
        - name: conf
          mountPath: /etc/mysql/conf.d
        resources:
          requests:
            cpu: 500m
            memory: 512Mi
        livenessProbe:
          exec:
            command: ["mysqladmin", "ping"]
          initialDelaySeconds: 30
          periodSeconds: 10
          timeoutSeconds: 5
        readinessProbe:
          exec:
            # Check we can execute queries over TCP (skip-networking is off).
            command: ["mysql", "-h", "127.0.0.1", "-e", "SELECT 1"]
          initialDelaySeconds: 5
          periodSeconds: 2
          timeoutSeconds: 1
      - name: xtrabackup
        image: xtrabackup:1.0
        ports:
        - name: xtrabackup
          containerPort: 3307
        command:
        - bash
        - "-c"
        - |
          set -ex
          cd /var/lib/mysql

          # Determine binlog position of cloned data, if any.
          if [[ -f xtrabackup_slave_info && "x$(<xtrabackup_slave_info)" != "x" ]]; then
            # XtraBackup already generated a partial "CHANGE MASTER TO" query
            # because we're cloning from an existing slave. (Need to remove the tailing semicolon!)
            cat xtrabackup_slave_info | sed -E 's/;$//g' > change_master_to.sql.in
            # Ignore xtrabackup_binlog_info in this case (it's useless).
            rm -f xtrabackup_slave_info xtrabackup_binlog_info
          elif [[ -f xtrabackup_binlog_info ]]; then
            # We're cloning directly from master. Parse binlog position.
            [[ `cat xtrabackup_binlog_info` =~ ^(.*?)[[:space:]]+(.*?)$ ]] || exit 1
            rm -f xtrabackup_binlog_info xtrabackup_slave_info
            echo "CHANGE MASTER TO MASTER_LOG_FILE='${BASH_REMATCH[1]}',\
                  MASTER_LOG_POS=${BASH_REMATCH[2]}" > change_master_to.sql.in
          fi

          # Check if we need to complete a clone by starting replication.
          if [[ -f change_master_to.sql.in ]]; then
            echo "Waiting for mysqld to be ready (accepting connections)"
            until mysql -h 127.0.0.1 -e "SELECT 1"; do sleep 1; done

            echo "Initializing replication from clone position"
            mysql -h 127.0.0.1 \
                  -e "$(<change_master_to.sql.in), \
                          MASTER_HOST='mysql-0.mysql', \
                          MASTER_USER='root', \
                          MASTER_PASSWORD='', \
                          MASTER_CONNECT_RETRY=10; \
                        START SLAVE;" || exit 1
            # In case of container restart, attempt this at-most-once.
            mv change_master_to.sql.in change_master_to.sql.orig
          fi

          # Start a server to send backups when requested by peers.
          exec ncat --listen --keep-open --send-only --max-conns=1 3307 -c \
            "xtrabackup --backup --slave-info --stream=xbstream --host=127.0.0.1 --user=root"
        volumeMounts:
        - name: data
          mountPath: /var/lib/mysql
          subPath: mysql
        - name: conf
          mountPath: /etc/mysql/conf.d
        resources:
          requests:
            cpu: 100m
            memory: 100Mi
      volumes:
      - name: conf
        emptyDir: {
     }
      - name: config-map
        configMap:
          name: mysql
  volumeClaimTemplates:
  - metadata:
      name: data
    spec:
      accessModes: ["ReadWriteOnce"]
      resources:
        requests:
          storage: 5Gi
##镜像拉取
[root@server1 nfsdata]# docker pull mysql:5.7
[root@server1 nfsdata]# docker tag mysql:5.7 reg.westos.org/library/mysql:5.7
[root@server1 nfsdata]# docker push reg.westos.org/library/mysql:5.7


[root@server1 nfsdata]# docker pull yizhiyong/xtrabackup
[root@server1 nfsdata]# docker tag yizhiyong/xtrabackup:latest reg.westos.org/library/xtrabackup:1.0
[root@server1 nfsdata]# docker push reg.westos.org/library/xtrabackup:1.0
[root@server2 mysql]# kubectl apply -f configmap.yaml
configmap/mysql created
[root@server2 mysql]# kubectl describe cm mysql
Name:         mysql
Namespace:    default
Labels:       app=mysql
Annotations:  <none>

Data
====
master.cnf:
----
# Apply this config only on the master.
[mysqld]
log-bin

slave.cnf:
----
# Apply this config only on slaves.
[mysqld]
super-read-only

Events:  <none>


[root@server2 mysql]# kubectl apply -f services.yaml
service/mysql created
service/mysql-read created
[root@server2 mysql]# kubectl get svc
NAME         TYPE        CLUSTER-IP       EXTERNAL-IP   PORT(S)    AGE
kubernetes   ClusterIP   10.96.0.1        <none>        443/TCP    6d5h
mysql        ClusterIP   None             <none>        3306/TCP   6s
mysql-read   ClusterIP   10.109.234.245   <none>        3306/TCP   6s


[root@server2 mysql]# yum install mariadb -y   ##需要安装数据库
[root@server2 mysql]# kubectl apply -f statefulset.yaml  ##
[root@server2 mysql]# kubectl get pod
[root@server2 mysql]# kubectl get pvc
[root@server2 mysql]# kubectl get pv
